

Fingerprint Biometric Capture

This guide will address the following:

Fingerprint Capturing Pre-requisites.
To register a Persons fingerprints onto OneSpace Central. You will need the following:
Your admin workstation (Laptop or Desktop)
Your biometric fingerprint reader next to you.
The user that needs to have their fingerprints added.
The OneSpace Biometric Enroller Application installed onto your workstation. It can be downloaded from the Central Portal. Under the Access Control Menu.
NOTE: In the event you are capturing Biometrics for a user that can’t use the Connect App. You will need to create a Local Profile (Local ID) for that user. If that user has already been enrolled onto your estate in the past. You can find their Local Profile (Local ID) under the Peoples Page as well.
It is recommend that Fingerprint Capturing be done on a dedicated PC that will be used for capturing Fingerprints for your site going forward. For first time set up, please contact our Support Desk to assist you with setting up your Biometric Enroller App.
In the event you change Fingerprint Capturing PC, the Biometric Enroller App will need to be re-installed.
Fingerprint Capturing for People
Note: You will need to be in the People’s page, on the left hand menu select People and Properties, then select people.
Filter for the the Person you wish to capture Biometrics for on the people table then select them. Before proceeding to the next step.
When capturing their Fingerprints for Access Control. The Person with a 1iD Account must give consent via their Connect App to the Manager to allow the capturing of their Biometric Template. People with Local Profile (Local iD) that don’t have a 1iD account link, will not require to provide consent to capture their Fingerprints.

1. Select the Green Add New Method button. Then Select Biometrics.
2. You can view the current status of the Persons Biometric Enrollment here.
3. Select the Enroll Fingerprints Button.

The Person will need to consent to their Fingerprint Template being Enrolled into the OneSpace Cloud. DO NOT close this window.
You will have 15 min for the Person to consent to the enrollment of their Fingerprints. The person can consent to this enrollment either via their Connect App or via the Central web portal using a browser.
!!DO NOT CLOSE THE CONSENT REQUEST WINDOW!!
You can preview the Person Consent process below.
Resident Enrollment Consent Approval Process. (Web)
Note: Residents can approve the Enrollment of their Fingerprints via the Connect App as well.
This will come through as a push notification on their cell phone. If the resident knows their Connect App Username and Password. They can approve the enrollment of their Fingerprint via a Web Browser on a computer as well.
The below instructions can be done via https://id.1s.co.za

Once there, Select the Consent Requests Button on the left.
Select the corresponding consent request by clicking on the Pending Button.

Your web browser will change asking you to accept the request from your Estate Manager to enroll your fingerprints onto Central. Selecting Accept will allow the Manager to capture your Fingerprints into Central.

If your Person (Resident) Accepts the enrollment request. The Consent window will change and prompt you to Launch the Enroller App on your Workstation.
Note: Local Profile (Local iD) users will not require to give consent as their Biometric information will only be stored on the current site. It can’t be used on other OneSpace Sites.
Select Launch Enroller.
Domestic / Ground Staff Enrollment Process
This section assumes that you already have created a Local Profile (Local iD) for your Domestic / Ground Staff. If you are unsure about this. Please check that the person exists under the People & Properties page, before proceeding to capture their fingerprints.
If you do not know how to create a Local ID for your Domestic / Ground Staff. Please see the Add a Person Guide here
The Fingerprint Enrollment process is the same for Local Profile (Local iD) Users as it is for 1iD Users.
Local Profile (Local iD) Users are not required to Accept the Managers request to enroll their fingerprints. Therefore the Manager can proceed straight to capturing the persons fingerprint via the OneSpace Enroller Application.
How to use the Fingerprint Bio-metric Enroller App.
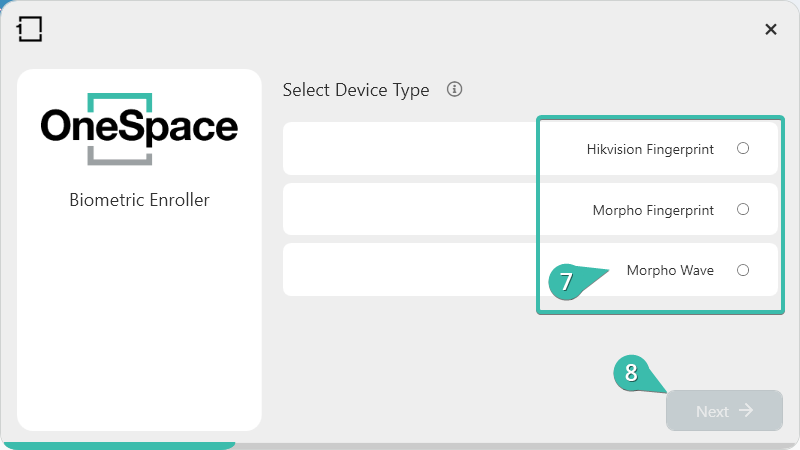
7. The OneSpace Enroller App will now open. Select the type of device you are using for your site. In this guide we are using Morpho Wave Biometric Terminals.
8. Select Next.

9. Ensure that IP Address is for your enrolment reader.
10. Select Connect. This button will become grey upon successful connection.
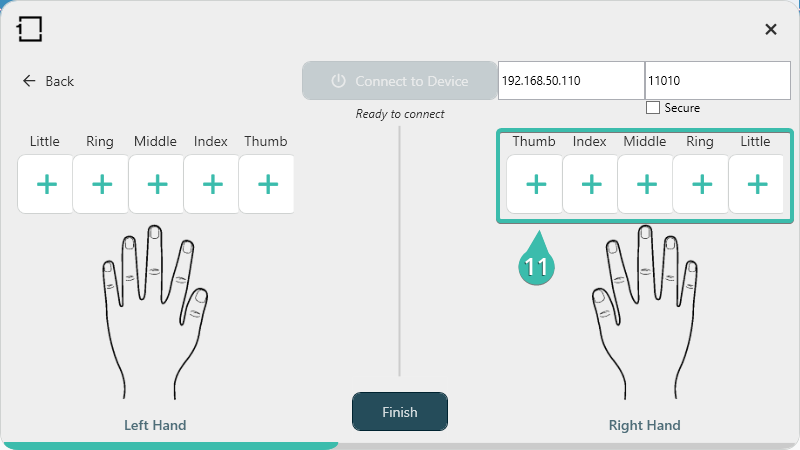
11. If you are using Morpho wave units, select a finger on either hand to begin registration for that hand. Follow your Morpho Wave readers prompts. It will continue to ask you to wave your hand until it captures all your fingers.

12. On your admin station, the OneSpace Enroller App will give you confirmation window each time a finger is successfully scanned. Hit OK each time you see this.

13. These will highlight green on successful capture, if all fingers are a go. For Morpho Wave units, the thumb print is never collected.
14. Select Finish.

Close the Consent Request window.
Test the user’s hand on your reader. If the reader responds; that concludes their enrollment process.