

Patrol App Admin Guide

To foster collaboration between communities SNIPR have begun improving on the tools you will use to better collaborate with other SNIPR users within the SNIPR Community. Here at SNIPR we embrace transparency, to that end we have introduced the concept of SNIPR Companies.
SNIPR Companies is what will represent your presence on the SNIPR Ecosystem. All of your LPR Cameras will be ultimately assigned under one company. From this Company, you as the SNIPR Area Manager will have more control of who has access to my camera alerts via OneSpace Patrol.
Managing Your Users
You can manage all the Users that have access to your SNIPR Information by navigating to the Manage Company Section on your SNIPR Portal.
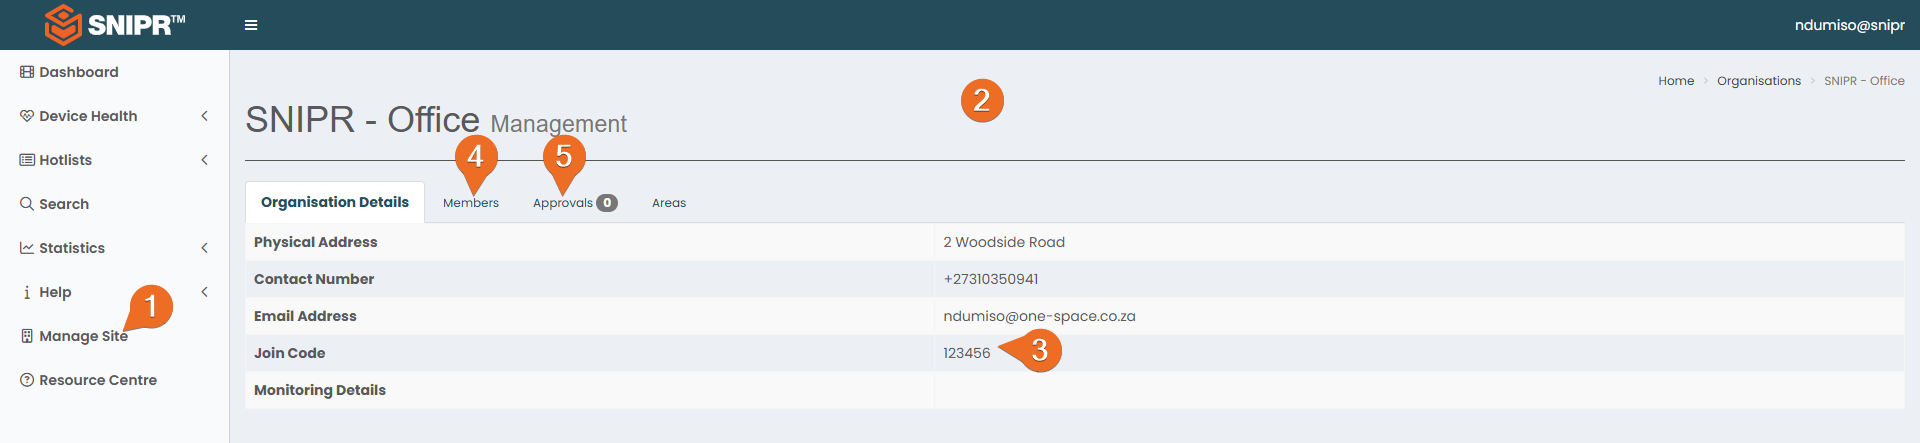
To Manage Users linked to your site click here.
If you are listed as a Manager for your Company, you will be able to view this page. If you are a manager of multiple SNIPR Companies, they will appear here as a list. In this example this user is a manager of 1 company. SNIPR - Office.
Join Code is what you will provide to your colleagues or other SNIPR Users that wish to access your SNIPR Site.
Members are where you will see all the SNIPR Users that you have approved, as well as what cameras they have access to. You can revoke their access from here. You will also be able to INVITE new SNIPR Members to your SNIPR Site.
Approvals are where you can process pending applications.
Inviting Members to Access your SNIPR Site
You must have upgraded your SNIPR Profile to a 1iD before you attempt to Invite a new member to your site. Select the Upgrade to 1iD button to the left of your username at the top right corner of your SNIPR Online window.
If you are wanting to add a member that has not created an account yet. Please have them sign up for an account through the OneSpace Patrol App. Click Me!
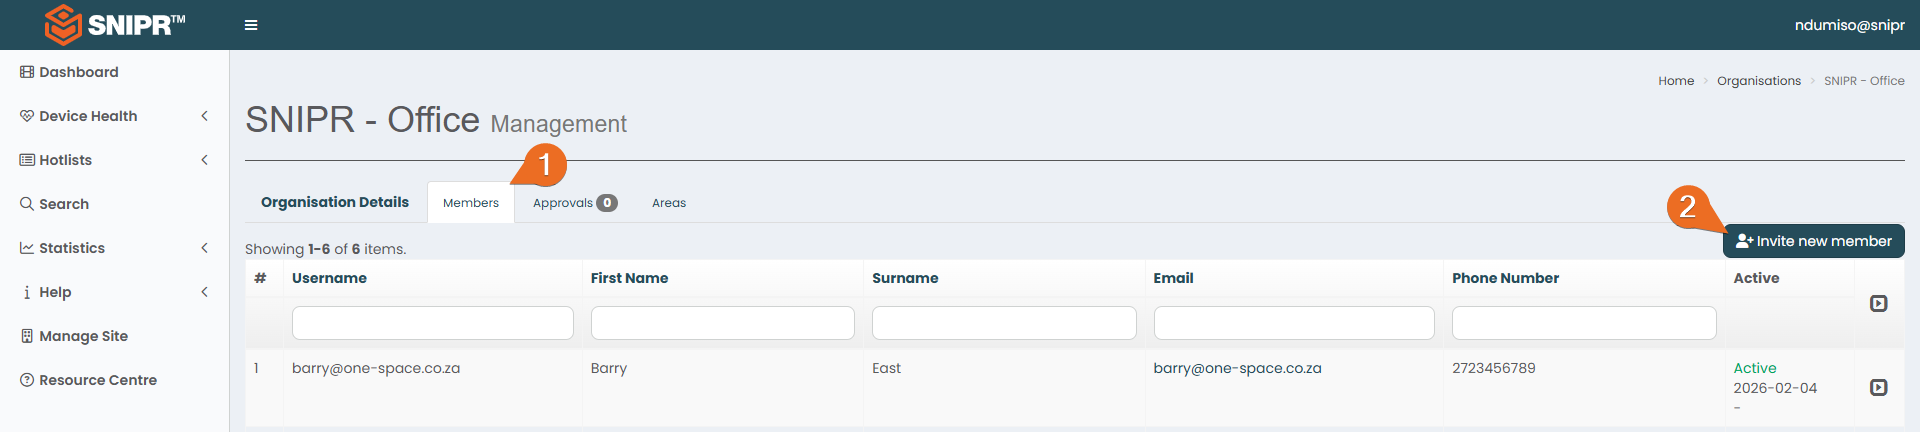
When inviting a new SNIPR User to be a Member of your site. You need to:
Ensure you are on the Members Tab.
Select Invite New Member.
SNIPR Platforms
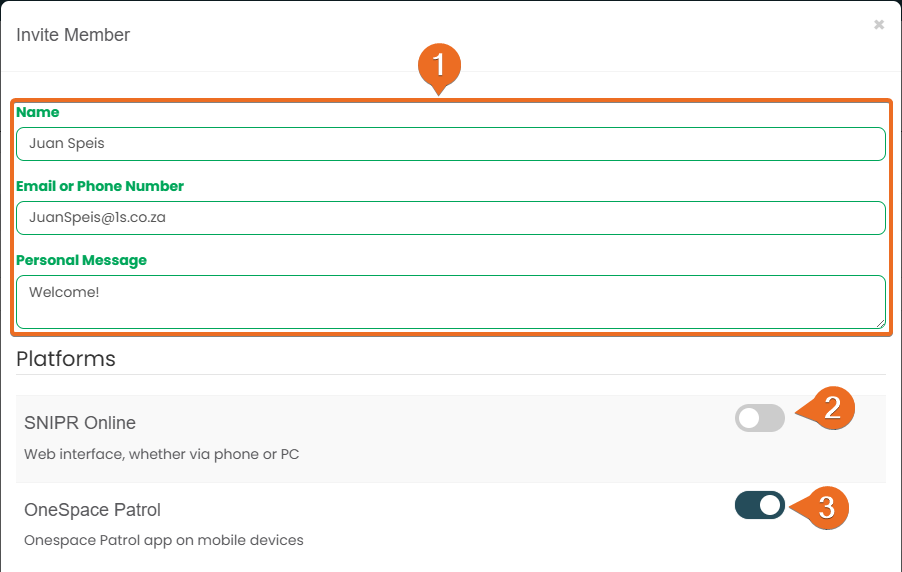
You must provide the details of the SNIPR User you wish to add as a member of your Site. Ensure you use the Users email they use when logging into SNIPR Online or OneSpace Patrol.
SNIPR Online: If this is enabled (blue). That means this new Member will be able to access your cameras through the SNIPR Online Platform.
OneSpace Patrol: If this is enabled (blue). That means this new Member will be able to access your cameras through the OneSpace Patrol Platform.
The platform access you enable for a member determines how much detail they see on Patrol App alerts.
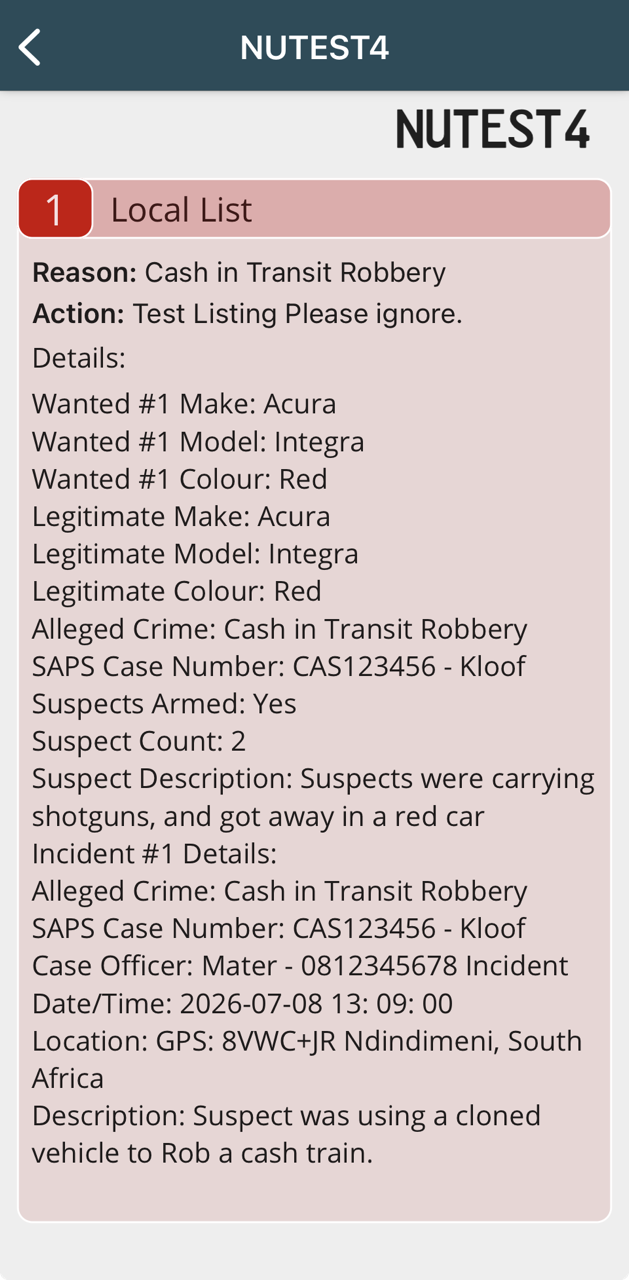
Both SNIPR Online + OneSpace Patrol Platform enabled:
The member sees full alert details, including all linked Incident Details information, directly on their Patrol App.
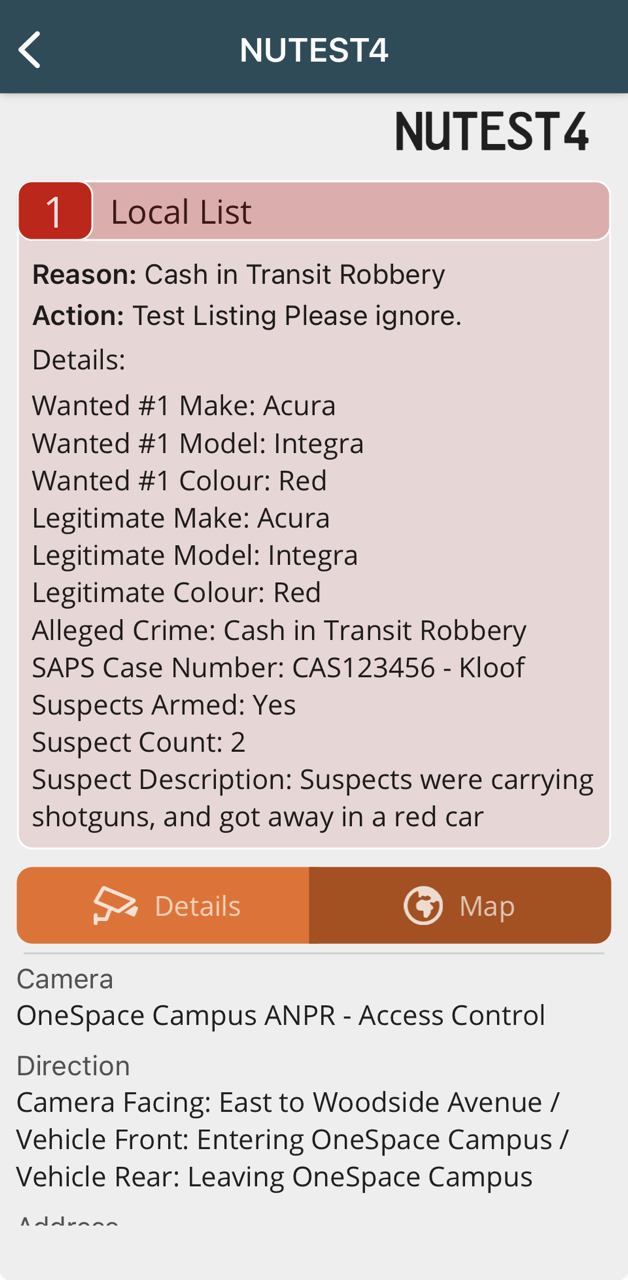
OneSpace Patrol Platform only:
The member sees only the essential alert information on their Patrol App — no additional Incident information details.
Both SNIPR Online + OneSpace Patrol Platform enabled
OneSpace Patrol Platform only
Member Permissions
Permissions are where you define what your member is able to do on your Site. This is not where you define what cameras new members have access to.
Members have different areas of influence or control within your site, these are:
User - They can view, add, change, or approve new members to your site.
Devices - A member can view, add, change or approve Camera Access of other members within your site.
Sharing - This is the permission that controls the overall access to this Member invite process.
Hotlisiting - This will effect the members ability to interact with the Hotlisting functions within your Site.
App Permissions - This will effect the members ability to control access of your members that use the retired SNIPR Patrol App
Area Permissions - This will effect the members ability to control access of your members that use the retired SNIPR Patrol App
Deactivation Messages - This will control if this new member will be able to see the Deactivation message of your site.
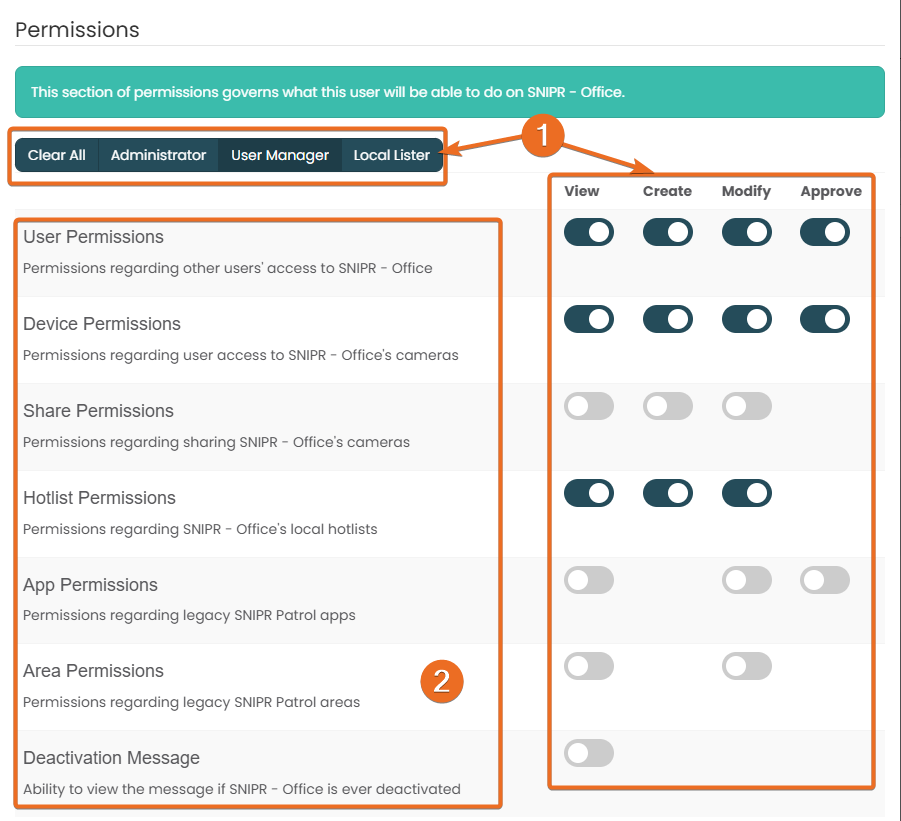
As a manager you control if members have the ability to View, Create, Modify or Approve certain aspects in the different Permission areas of your site.
Using these categories: Administrator, User Manager, Local Lister. You can quickly enable the types of permissions that fall under members of a specific category. You can however ignore these categories and manually select what is appropriate for you.
These are the Permission Areas that a member could have control over in your site.
Setting Up a Users Camera Access
Camera Access is where you will ultimately decide which cameras you are granting the applicant access to.
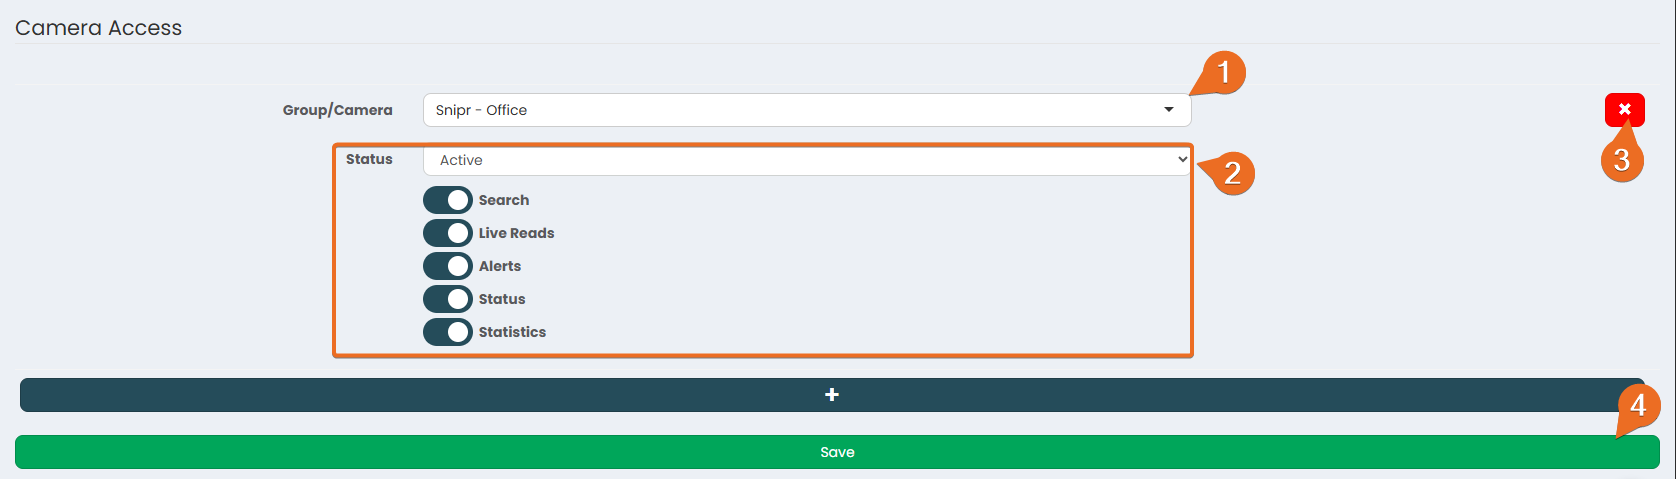
1. Group – All cameras on SNIPR are bundled together in groups. Simply type the name of your SNIPR Camera Group or Individual Camera name that you are looking for and the system will offer you suggestions for you to select.
2. Status – If set to active and all the below permissions will take effect.
Search: If ticked, this user will be able to search for vehicles against cameras in the above group. This requires the user to have been granted SNIPR Online Platform Access to your Site.
Ticking Live Reads allows this user to view live incoming LPR Reads from your cameras. This requires the user to have been granted SNIPR Online Platform Access to your Site.
Ticking Alerts will allow this user to receive live Vehicle alerts. This requires the user to have been granted SNIPR Online Platform Access or SNIPR Patrol Access to your Site.
Ticking Status will allow this user to review Camera Statuses. This requires the user to have been granted SNIPR Online Platform Access to your Site.
Ticking Statistics will allow this user to review Camera Statistics. This requires the user to have been granted SNIPR Online Platform Access to your Site.
3. You can remove a group of cameras by selecting this (x) cross symbol.
4. Once the group/camera drop down fields look correct to you, select Approve to grant them access to the above groups with the selected permissions.
Managing Approved Users

This column indicates a user’s current link status. And when they were approved to join your SNIPR Company.
Selecting this arrow will prompt the page to display more information such as what cameras they have access to.
This section governs what cameras this SNIPR User has access to for their SNIPR Patrol App. Here cameras are grouped together, typically by area or by pole. This section governs what cameras this SNIPR User has access to for their SNIPR Patrol App.
Permissions – This will display what types of information this user has access to according to the correlating group. In this example this user has access to:
Receiving search information
Receiving live reads
Receiving Alerts
Receiving camera health information
This section governs your ability to grant a SNIPR User the ability to manipulate SNIPR Portal (Web) Login profiles, for your company. This feature is currently unavailable.
This user has a pending SNIPR Patrol approval, lets go and process it.
Conducting Approvals
Here is where you will process SNIPR Patrol Users, that have applied to have access to your SNIPR Cameras.

To begin an approval of a user, select this play button.
This is the SNIPR Company that the SNIPR User is applying for.
This is the User that is applying for access to your Cameras.
This is the Application message that the user left for you when they were submitting their application.
You can set an end date, if you want the SNIPR System to revoke their Patrol Access on a certain date.
You will still need to define your new members’ permissions and Camera Access. Please see the below sections guides on how to do this.
Manage Member Permissions
Manage Member Camera Access