

Central
Site Manager Guide

Thank you for selecting OneSpace Central to empower your community. We at OneSpace are more than happy to assist you in case you have any troubles with your Site Management system.
This guide was made to provide a quick reference for common actions, functions, and workings that you will be using to help manage your site and all residents on the system. If this guide fails in assisting you with the website’s functionality, please do not hesitate to email us on support@one-space.co.za.
Note: If you need the Legacy User Guide that covers all of the above but for the old version of Central. You can access this guide here: Old Guide
This guide will address the following:

Central Login Page
Getting Registered and Signed In
When you first navigate to OneSpace Central you will be able to Sign up for an account or login with the credentials provided to you by OneSpace.
Site Homepage

Welcome to the New OneSpace Central!
We’ve reimagined your OneSpace Central experience with a fresh new look, a sleek, intuitive interface, and powerful new dashboards!
What’s New?
A streamlined left-hand menu.
All-new Visitor, People, and Property dashboards.

Reports, Reimagined!
Your Reports now have a dedicated home in the Reporting Menu—but that’s not all! We’ve also introduced an all-new Dashboards section, featuring the Visitor Insights Dashboard for a clearer, more powerful view of your site’s activity. 📊
🔄 Where Did My Features Go?
Don’t worry! Certain features and functions have now moved to new, more intuitive locations, making it easier than ever to find what you need.

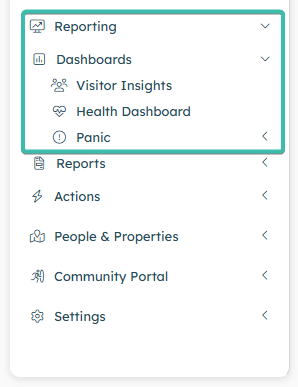
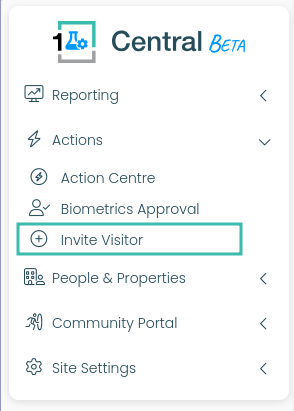
Introducing The Action Centre
Onboarding users and Access Control Approvals can be done via the Action Centre.
You can also generate an invite on behalf of a resident by selecting Invite Visitor option.

Join Requests
Residents (OneSpace Connect App Users) must register on the OneSpace Connect App to be able to generate and share PINs for PreAuth entries into the site.
As Site Management you are in full control. You can:
Decide how long a resident's Connect App is linked to your site.
Have final say as to what unit their app is linked to.
Define their Access Control Rights at the point of approving their join request.
To process Join Request, you will need to select the corresponding View Action Item button next to the Action you want to process.
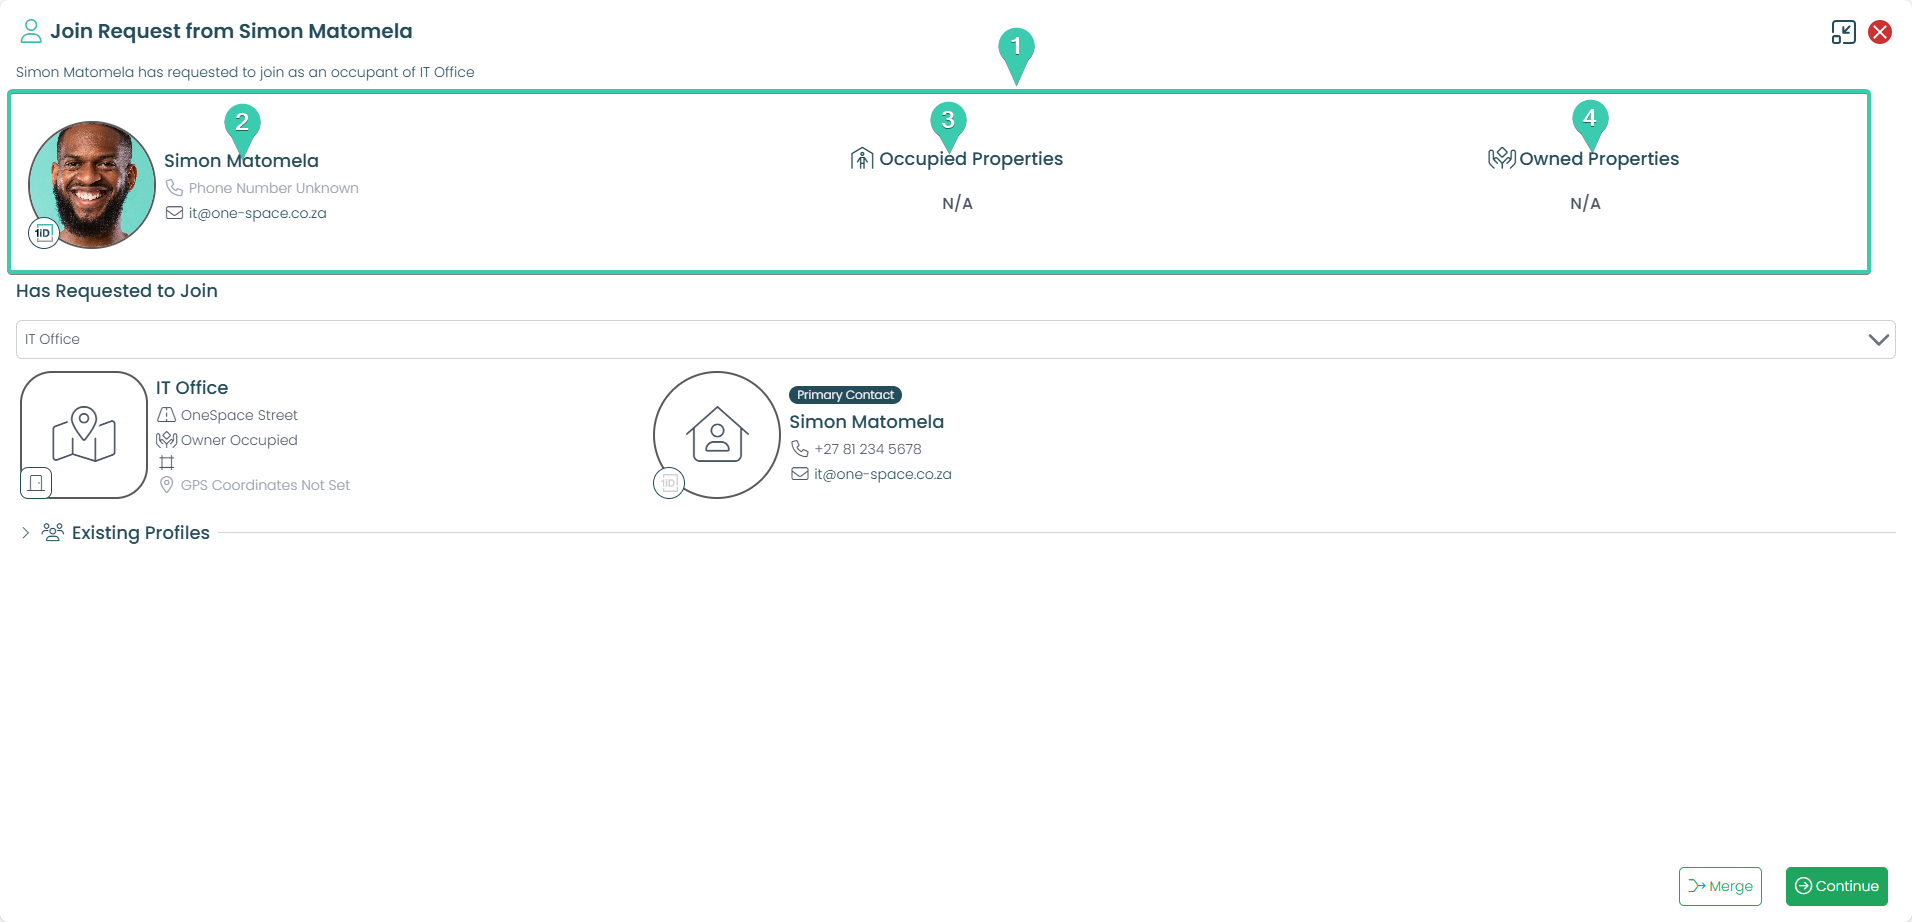
1. This is the person section. Within this section will be the relevant details of the person that is applying to join your site, in this case it is Simon.
2. Here are the contact details of Simon, as well as a selfie picture of himself. This is to be used within Central Access Control System.
3. Here you will view any properties that Simon has a connection with on your site. For example, he may occupy a different unit as a tenant. This property will be displayed here.
4. If Simon owns any Properties on your site, they will be listed here.
In the instance that the person linked to the Join Request is already joined to your site, central will Highlight this under the Existing Profiles Section of the Join Request.
You can Merge the Persons information from the Join Request to the Person Profile that already exists on your site.

This section displays all Local Profiles that have similar information to that of the Person in your Join Request.
Selecting this small “X” icon will remove irrelevant Profiles from this screen.
Select the relevant Similar Profile (Local Profile) that you would like to merge with.
Select Merge to begin this merge process between the Person in your Join Request and the existing Local Profile.
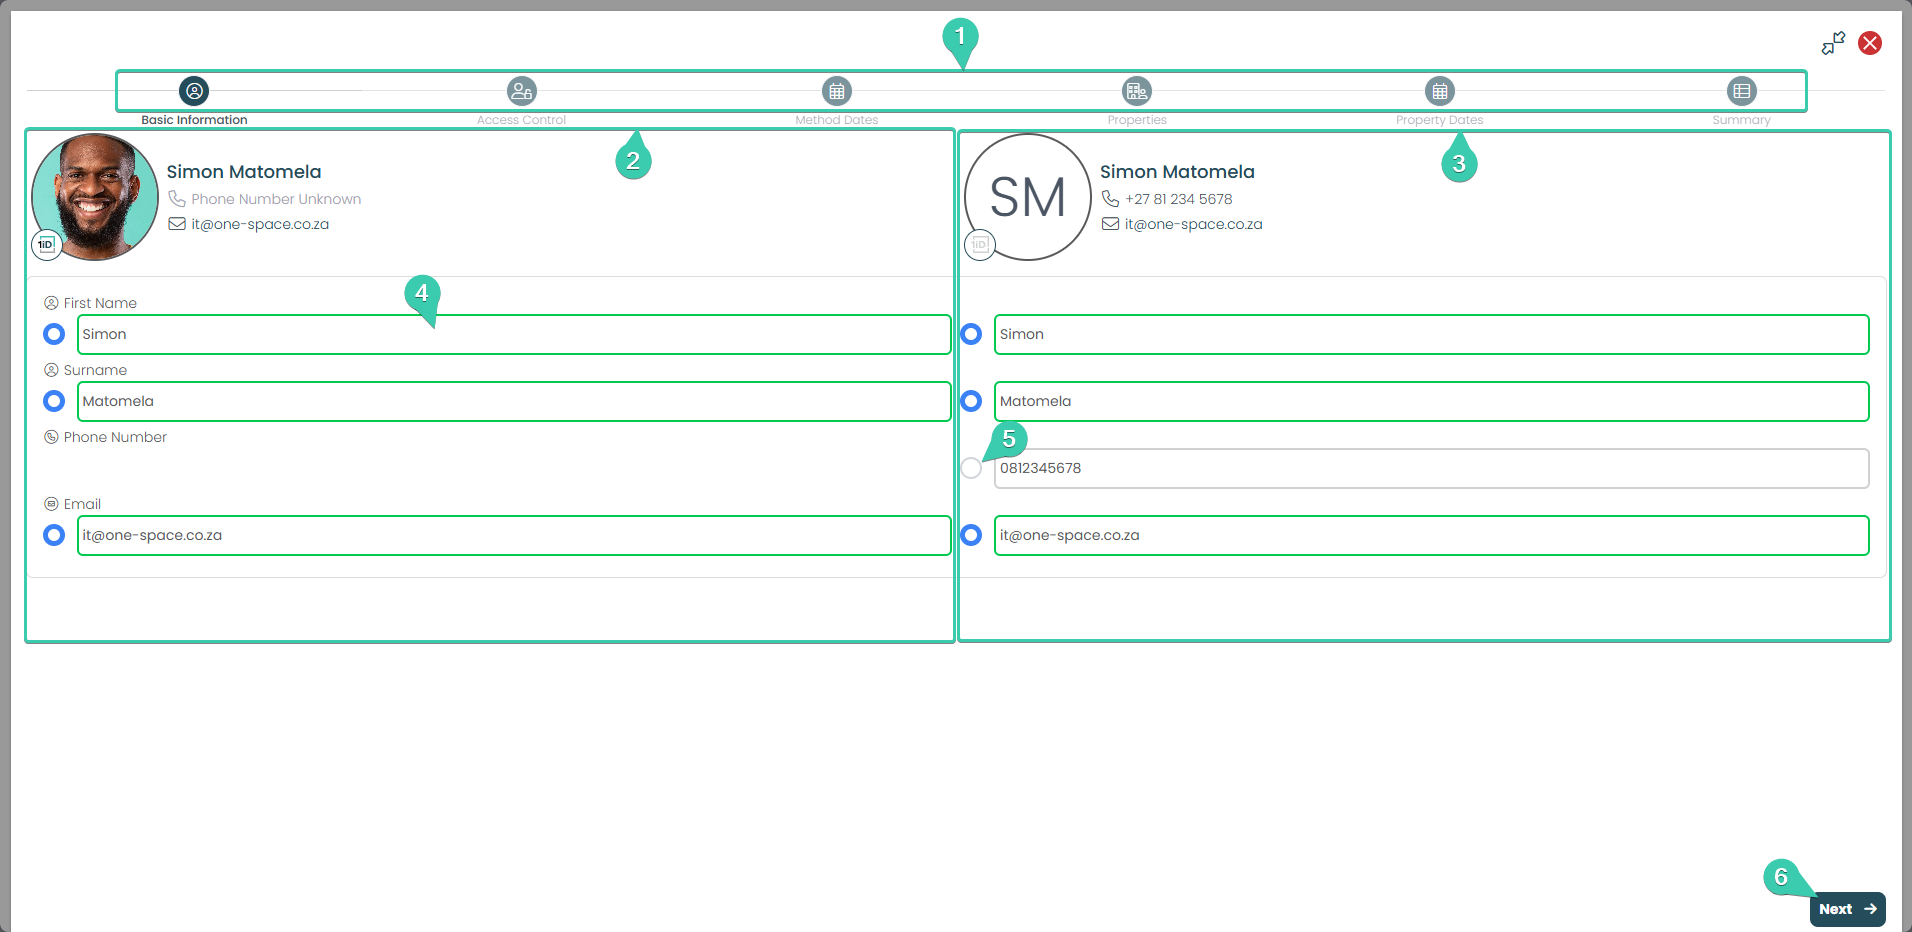
During the merge process. You will have to confirm what information will remain bound to the merged Person Profile.
Each step of the Merging process is split into stages. Once you have confirmed what information you want to keep at each stage. Only then can you proceed to the next stage.
The profile tied to the Join Request will always be displayed here.
Similar Profiles will always be on the right side of the Join Request Profile.
The Merge tool will highlight information that is common between all profiles automatically. In this example Simons First Name, Surname and email are common. Therefore they have automatically been selected for merging.
Where information is not common. You must decide what information you want to keep by selecting it. In this example, Simons Phone Numbers are different.
Once you have confirmed what information you want to keep select Next.
Continue through the merge wizard, choosing what information you wish to merge into one profile. At the end you will reach the Summary Stage where you must confirm that this is the profile you want to ultimately end up with.

This icon will be solid blue when you arrive at the Summary Stage in the Profile Merge process.
The basic information you kept in the Basic Information Stage is presented here.
All information tied to the persons Access Control that you have decided to keep is visible here.
The kept Access Methods Dates are located here.
The kept Property Links are displayed here. Note, if there are no property links. This Person will not have access to generate PINs for your site.
Property Dates that have been kept will appear here. In the event a property date with no end date was selected, this will mean that Person has indefinite access to generate PINs for your site.
If everything looks correct to you on this page. Select Merge to finalize the unification of People Profiles.

1. This person wants to join the site in connection to the property on 2 Woodside Avenue, named Product Development.
2. This is the Action Section, this is where you will be processing Simon’s request.
3. Choose this person’s role on the property they are requesting to join (Ie: Primary means overview rights)
4. This Validity period will set how long Simon will be allowed to be linked to this property. By default, the start date is always the current date. If Simon is expected to occupy the property at a later date. You can amend the start date here.
5. The Validity End Period will terminate Simon’s relationship to this property, if he is a permanent resident. You may leave this blank.
6. If you would like to relay a message to Simon when you approve or deny his request. Be sure you have a message in this section prior to approving or denying his request.
7. You can approve or deny his request by selecting either one of these buttons.
Heres a video Showcasing a Join Request Approval.
User Removal

Go to the People Page on the left hand menu.
Find the person you need to manage by entering the persons info in any of the filter fields here.
Select the persons name to start managing them!
While managing a person. You can also block them by unlinking that person from their property! Here's how.

While in the manage person view. Go and find their Properties in the property section. Select the options button next to their property name.
Select the Block Button.
Note: If the person has multiple properties on your site. You will need to block them on all properties if you no longer wish this person to create new invites for your site.
Statuses
In the Central platform, a status is a system rule that determines what a person is allowed to do, whether their access is valid, and how the system should respond at any given time.
A status exists in 3 key areas:
Person Status, can either be Enabled (green), Suspended (yellow) or Archived (grey).
Property Link Status, can be Active (green) and Archived (grey).
Access Method Status, can be Enabled (green), Disabled (orange), Enabled-Suspended (green + yellow ring)
If all three statuses for the person are green (hence enabled with an active property link) and they have been given the appropriate access right, then that person will be able to use access control.
To understand how this works, you need to understand how these three types of statuses work together:
Person Status
A person’s status controls the overall access that the person has within Central.
Example:
If someone is Enabled, their access control and visitor hosting will operate as normal.
If someone is Suspended, their access control and visitor hosting will be restricted (Estate managers can set up whether residents lose one or both functions on suspension).
Common Person Statuses:
Pending – The person is not fully approved yet
Enabled – The person is active and has a valid link to a property on your site
Suspended – Temporarily restricted
Archived – No longer active, person information is kept only for historical records
How do I know a person's status?
The default state of a person is Enabled and they appear as a standard person card.
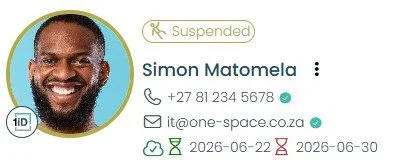
If the person is Suspended and they will have that chip on their person card.
If the person is Archived and they will have that chip on their person card.
If a Person has no active property link. They will also be greyed out. But they will also have a red cloud icon below their email.
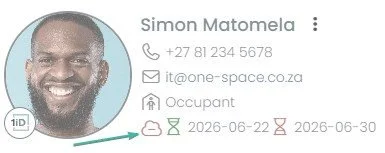
How do I know a person's Property Link Status?
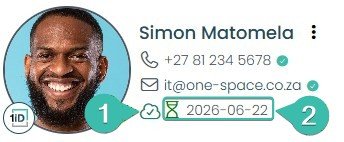
A persons property link status is displayed just below their email. This status is influenced by:
A Person having at least one active property link.
Their Property link validity period.
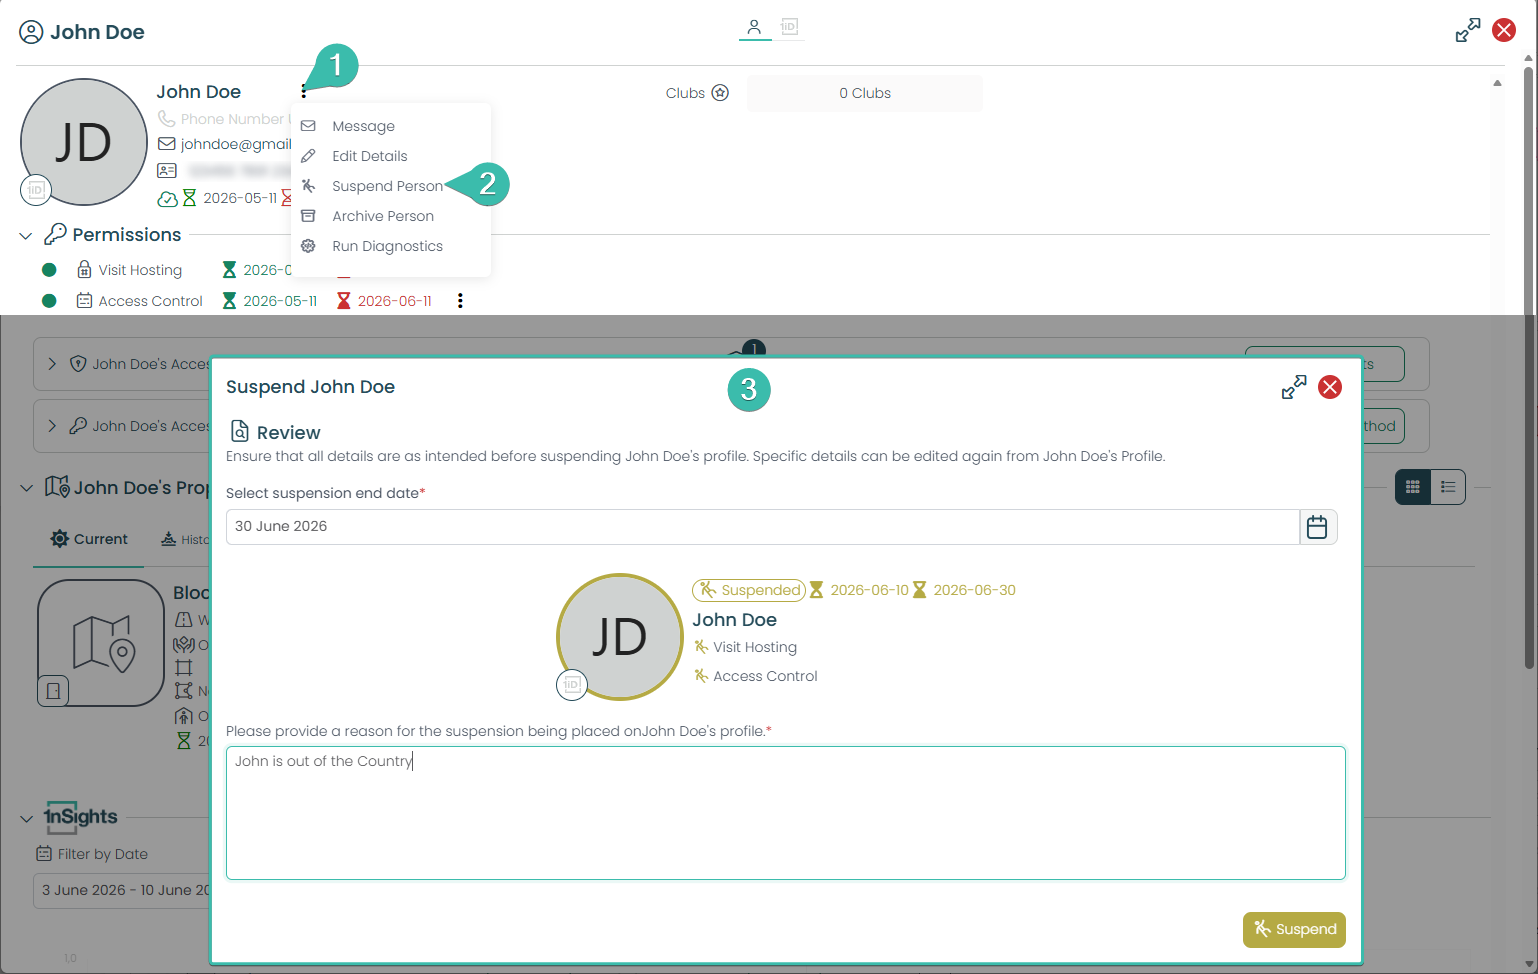
How do I suspend a Person?
Select the options button next to the Persons Name.
Select Suspend Person
In the suspend window you will need to declare when that persons suspension will end and why you are suspending them.
Once their suspended period lapses, this persons access will be reset back to Active.
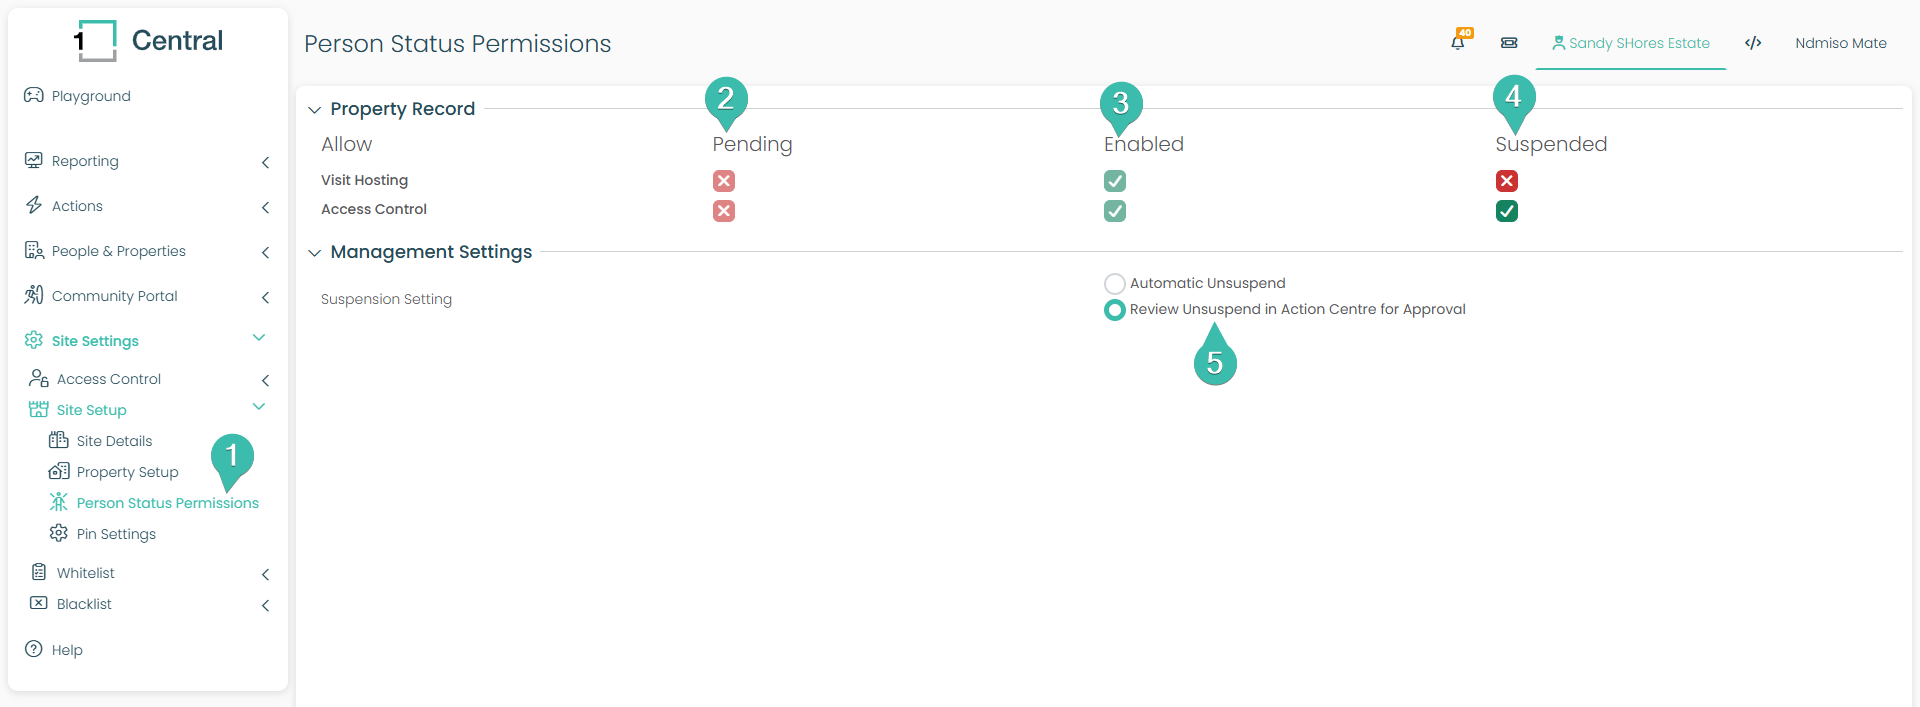
Person Status Permissions
Think of this page as the rulebook for your site. Every person on your site has a status like Pending, Enabled, or Suspended. This page is where you decide, ahead of time, what each of those statuses is actually allowed to do. You set the rules once here, and the system applies them automatically to everyone who falls into that status. You're not changing one person, you're setting the policy for everybody.
Finding the page (left menu): Go to Site Settings → Site Setup → Person Status Permissions. This is your starting point.
The "Pending" column
This is the rulebook for people who are not yet fully set up on your site, someone whose link to a property is still waiting on you. As you can see, both Visit Hosting and Access Control are switched off (red X). In plain terms: until you've approved someone, they can't host visitors or use access control. That's the safe default. No rights until they're properly enrolled.The "Enabled" column
This is the rulebook for your fully active people, your regular residents and tenants going about their day. Here both Visit Hosting and Access Control are switched on (green tick). So an Enabled person can invite visitors and can use access control. This is your "everything working normally" column.The "Suspended" column
This is the rulebook for someone you've temporarily restricted. Notice it's a mix: Visit Hosting is off (red X) but Access Control is on (green tick). That's the power of this page, you decide exactly what a suspended person loses and what they keep. In this example, a suspended person can still get through the gate, but they can no longer invite guests. You tune that to suit your site.Management Settings: Suspension Setting
This is where you choose what happens when a suspension comes to an end. You have two options:Automatic Unsuspend — the system lifts the suspension on its own when the review date arrives.
Review Unsuspend in Action Centre for Approval (selected here) — the suspension doesn't lift automatically; instead it lands in your Action Centre so you can review and approve it first.
Choose Review if you want the final say before someone gets their full rights back; choose Automatic if you'd rather it just handle itself.
The one thing to remember: this page sets the rules per status, not the status of any individual person. Changing a specific person's status (actually suspending someone, for example) happens elsewhere. But when you do, these are the rules that kick in.
Property Status
Much like a person. A property link can also have a Status. However be aware of the following rules:
Property Link statuses are primarily controlled by validity dates, not direct actions.
A person can have multiple property links at once, each link with its own status. A persons access depends on which property is being used.
A property link is the Persons justification for access. Without it, the person will not have access to your site at all.
People with Access Methods will only work within Access Control if they have:
A property link that has an Active Status.
Their Person Status has an Active Status.
Their Access Methods has an Active Status.
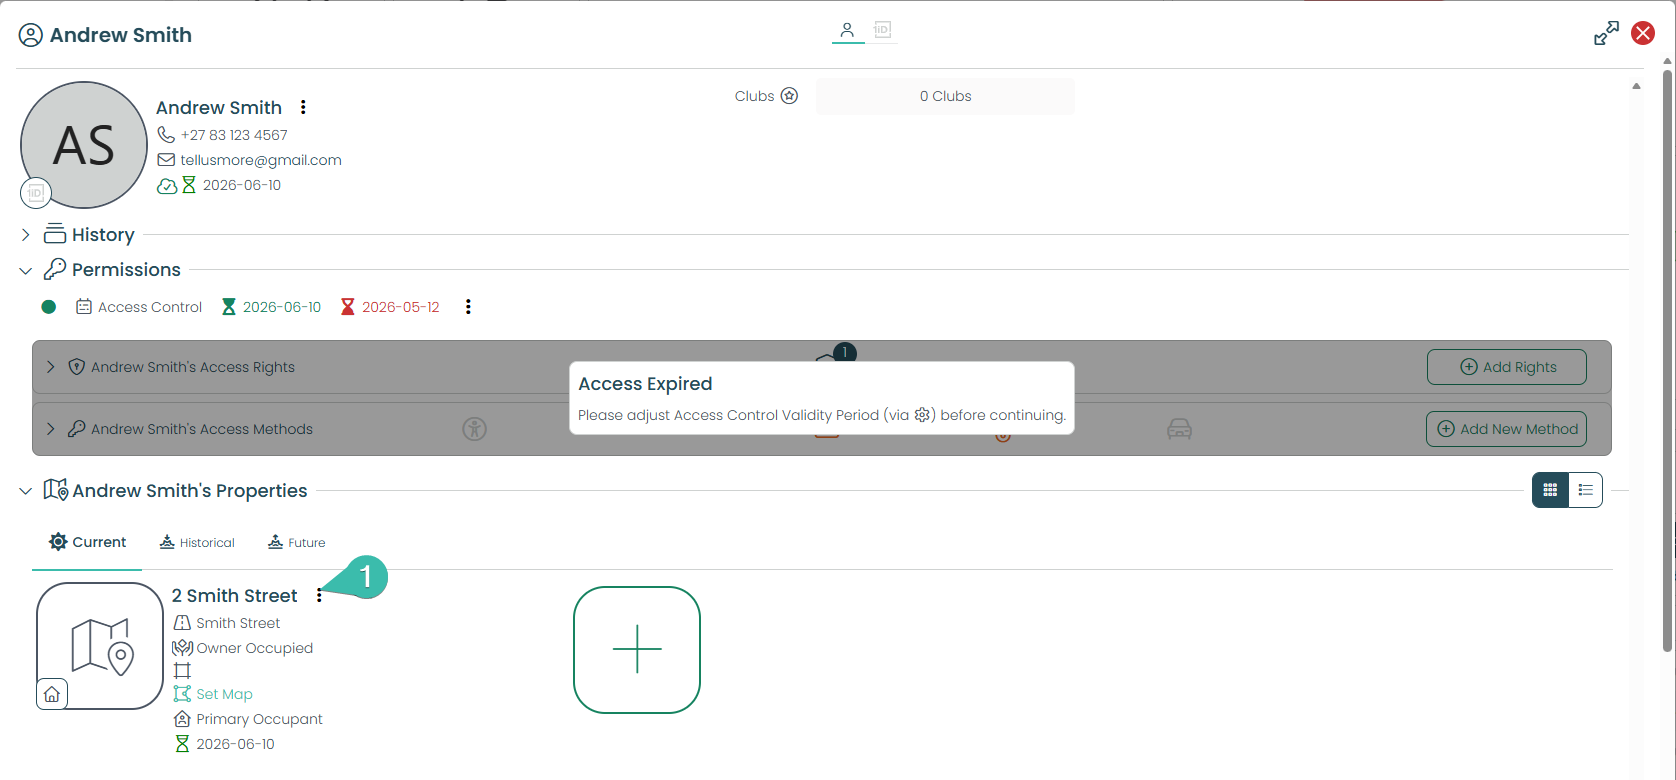
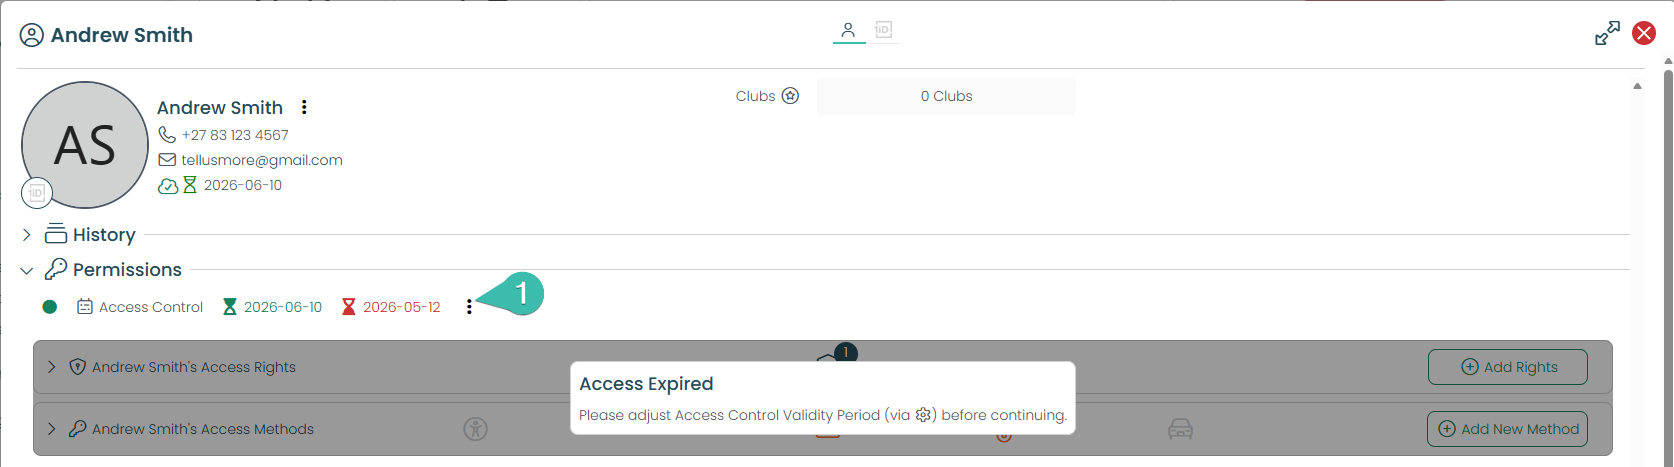
You can control a Persons Property Status by selecting the three dots next to their property name when viewing that Person.
Access Method Status
A persons Access Methods status can be individually set as well. However Access methods can also be effected by:
The persons property link expiring or being removed.
The persons status being changed to blocked or suspended.
You can control a Persons Access Method Status by selecting the three dots next to their Access Control End Date when viewing that Person.


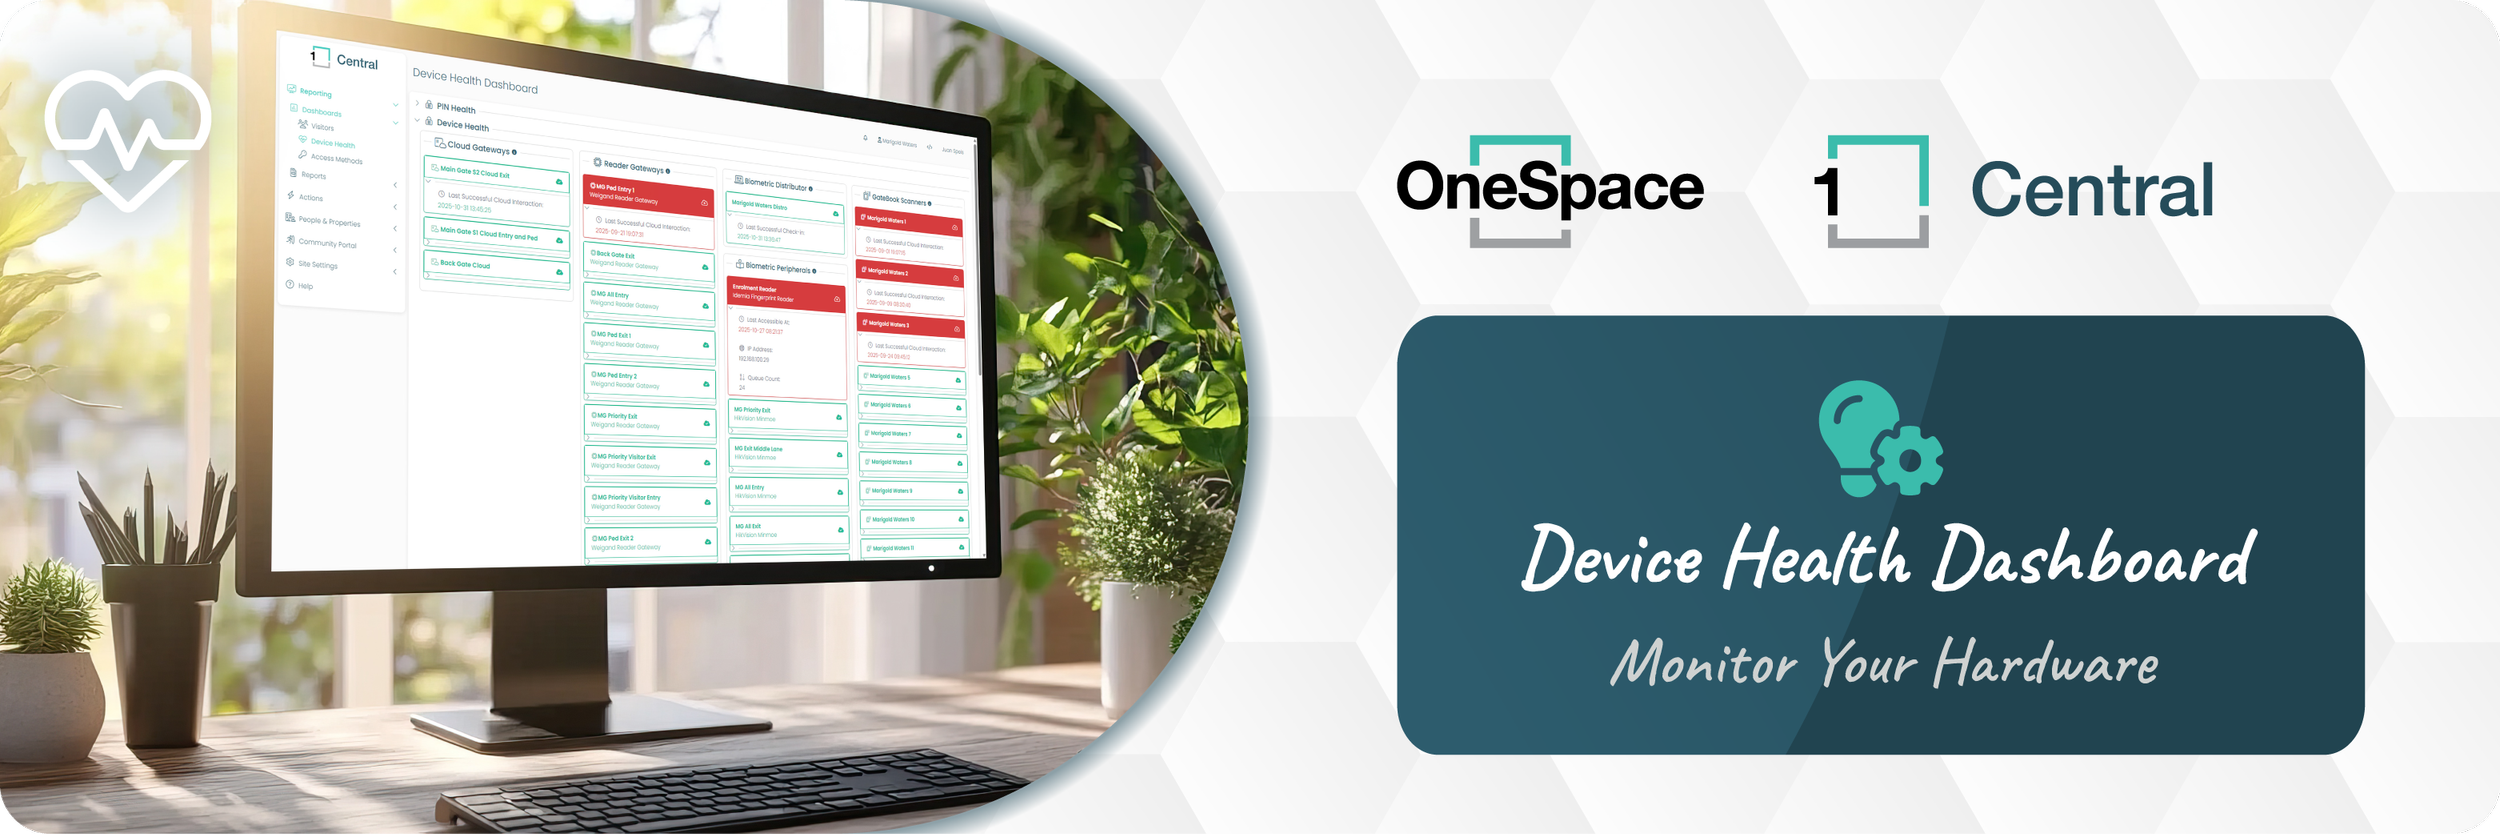
Device Health Dashboard
Should you need insight to the current status of your site. You can access the Health Dashboard Page:
This page will convey how many visits you had for the current day. As well as what your peak times are.
Details pertaining to your Gatebook Devices. Should you find your Gatebook Device is listed as offline. Please don’t hesitate to contact Support.
Details pertaining to your OneSpace Access Control Hardware. Should you find your users are struggling to navigate through OneSpace Access Control, you can confirm if the OneSpace Access Control Hardware is online here.

To Access the Health Dashboard, select the Dashboard Menu Icon here.
Followed by selecting the PIN Health.
Clicking PIN Health will open up Health Dahsboards focused on all Invites on your site.
Clicking Device Health will open up Health Dahsboards focused on all Access Control hardware on your site.
This column graph will display visits based on when your residents generated their Invites.
This section will tell you the details of the latest Invite generated by your residents.
This section will tell you the details of the last processed visitor into your site.
Next we will go over the Device Health Dashboard.
Device Health Dashboard - Cloud Gateways
This section of the Health Dashboard focuses on reporting the health of Access Control Equipment.
It will relay information pertaining to your Gatebook Scanners. You can quickly confirm if your Gatebook Scanners are connected to the OneSpace Cloud.
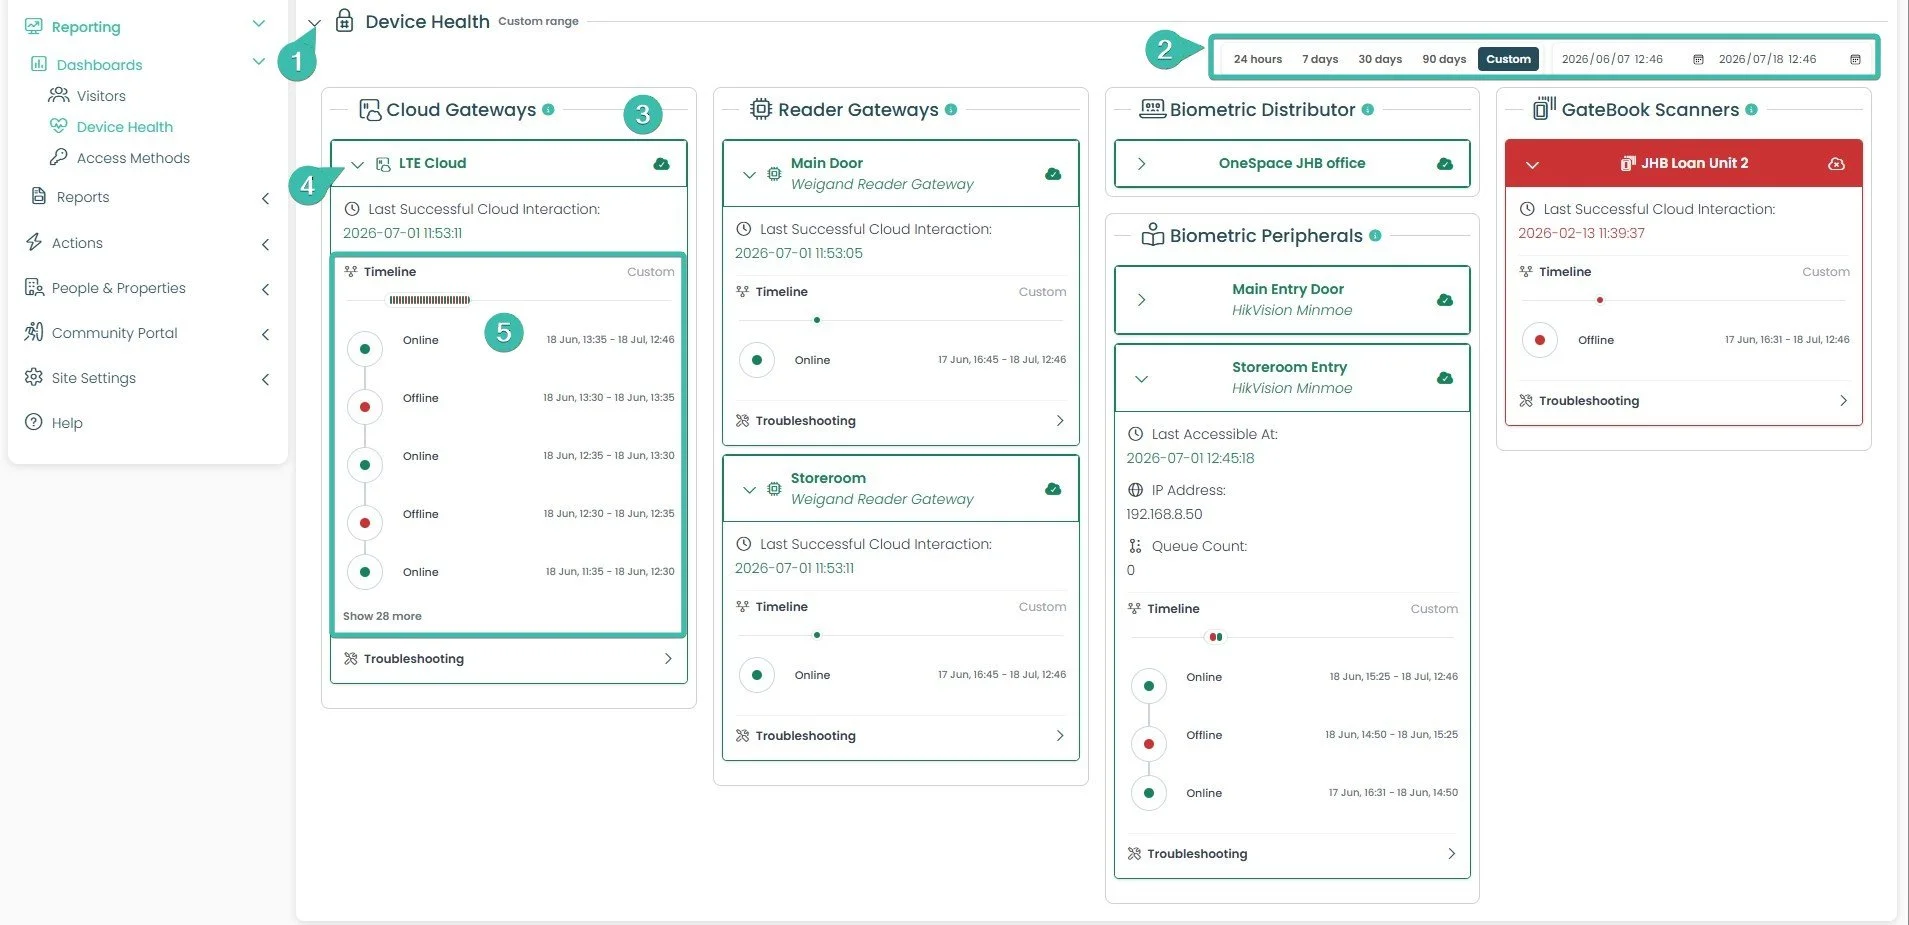
Select the Device Health heading.
At the top right, choose the period you want to review: 24 hours, 7 days, 30 days, 90 days, or Custom.
Selecting Custom lets you pick specific start and end dates using the calendar fields provided.
This date range controls what's shown in every device's Timeline further down the page (see Step 5), so narrowing it down here will filter the online/offline history for all devices on the dashboard at once.This section will display the Health Status all of the Cloud Gateways that are linked to your site.
If this is red, that means your Cloud Gateway is not recieving Access Control changes or uploading Access Control Events to your Central Reports.
New Feature - Device Status Timeline: Once expanded, the Timeline displays a running history of the device's online and offline status, with the most recent status shown at the top.
Each entry shows the status (Online or Offline) alongside the date and time range it applied for.
Select Show [X] more at the bottom of the list to load older entries.
Use the Custom date range option next to Timeline to narrow this history down to a specific period.
Device Health Dashboard - Reader Gateways
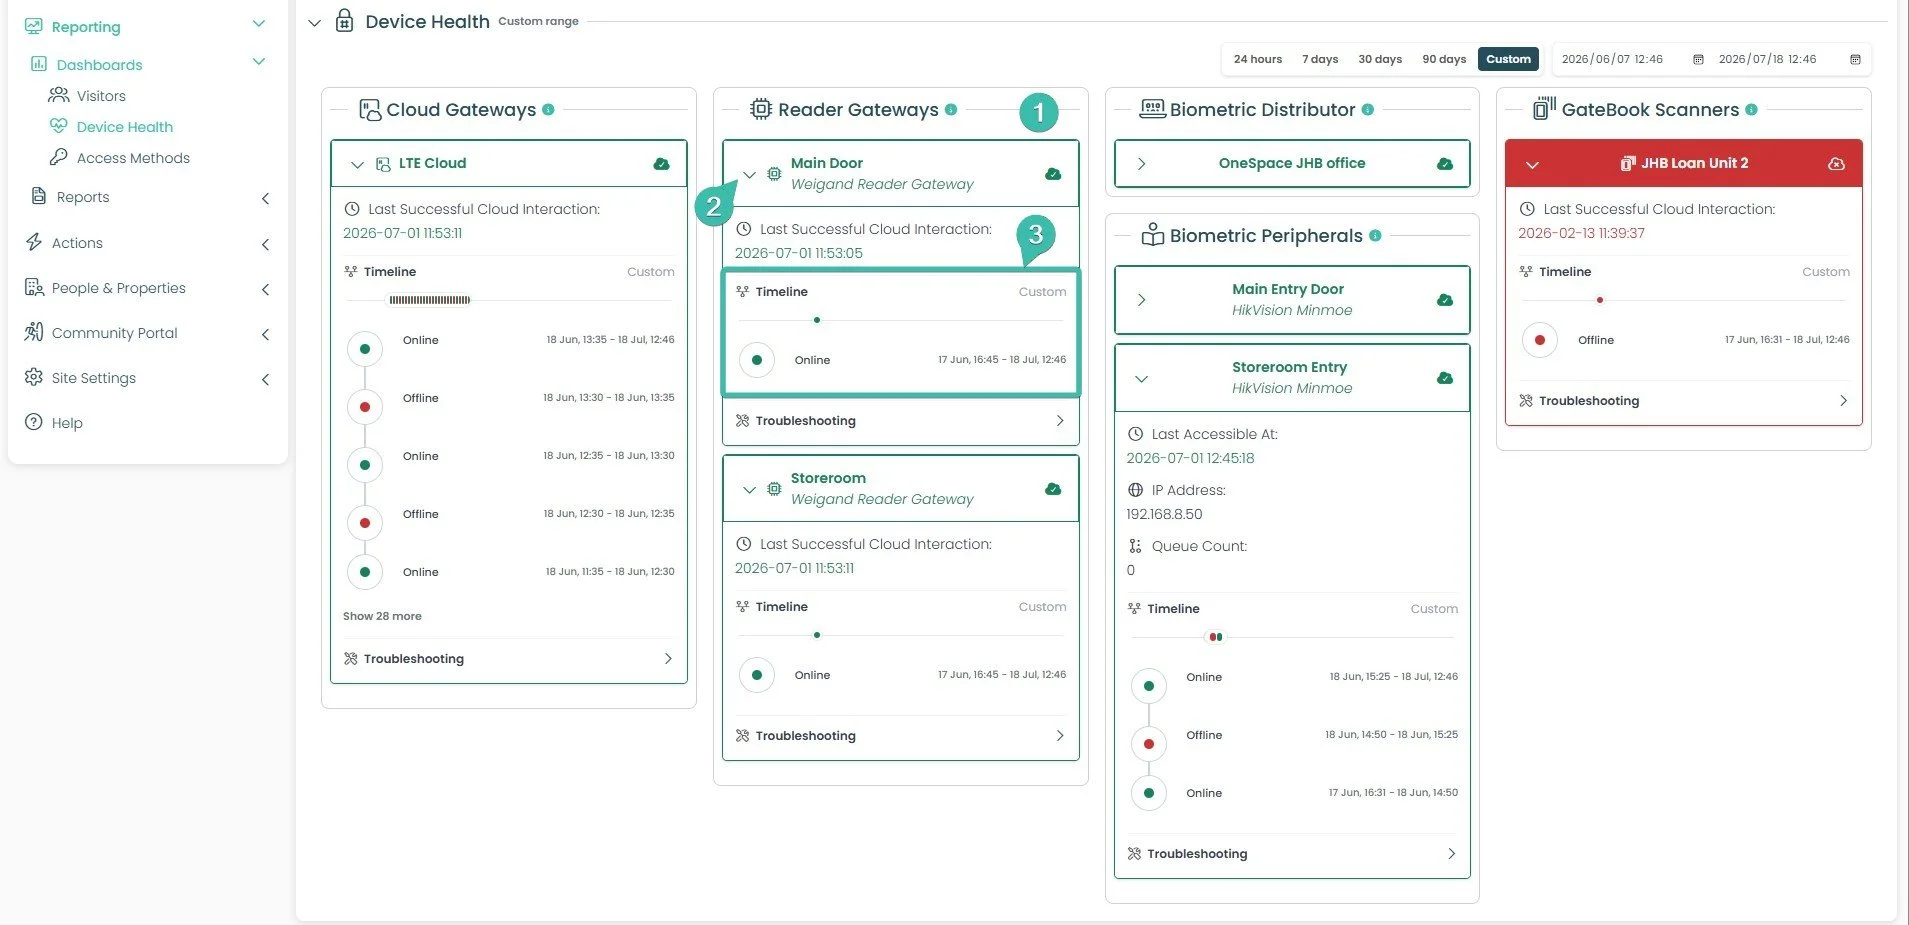
This section will display the Health Status all of the Reader Gateways that are linked to your site.
If this is red, that means your Reader Gateway is not recieving Access Control changes or uploading Access Control Events to your Cloud Gateway.
Clicking on this small arrow underneath your Reader Gateway name, will expand further details pretaining to when your Reader Gateway was last seen by its linked Cloud Gateway.
New Feature - Device Status Timeline: Once expanded, the Timeline displays a running history of the device's online and offline status, with the most recent status shown at the top.
Each entry shows the status (Online or Offline) alongside the date and time range it applied for.
Select Show [X] more at the bottom of the list to load older entries.
Use the Custom date range option next to Timeline to narrow this history down to a specific period.
Device Health Dashboard - Biometric Devices
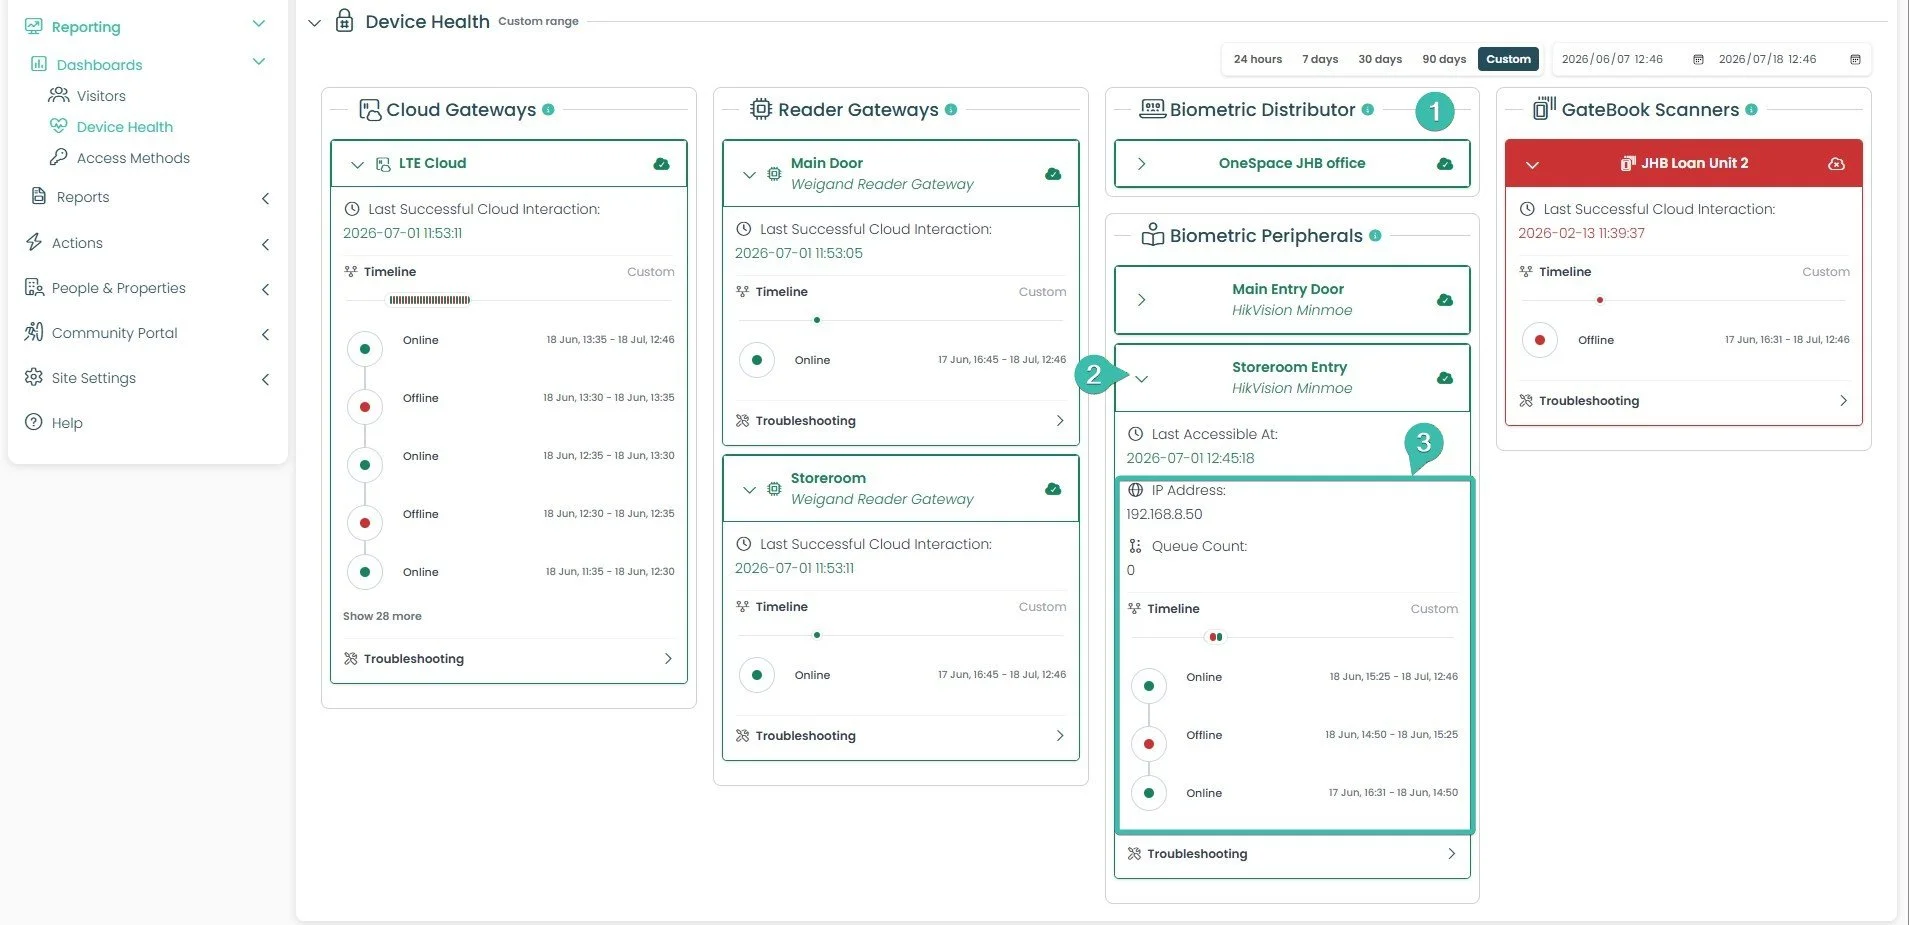
This section will display the Health Status all of the Biometric Distribution Servers that are linked to your site.
Directly beneath the Distribution Server you will see Biometric Peripherals (Readers) that are linked to your Distribution Server. Clicking the small arrow underneath a Readers name will tell you the last time it was seen by its Distribution Server.
Note: if your Reader is red, this will mean no new enrollments or deletion of faces will occur with that reader. You will need to investigate the power or network configuration of your Reader.
New Feature - Device Status Timeline: Once expanded, the Timeline displays a running history of the device's online and offline status, with the most recent status shown at the top.
Each entry shows the status (Online or Offline) alongside the date and time range it applied for.
Select Show [X] more at the bottom of the list to load older entries.
Use the Custom date range option next to Timeline to narrow this history down to a specific period.
Device Health Dashboard - Gatebook Scanners
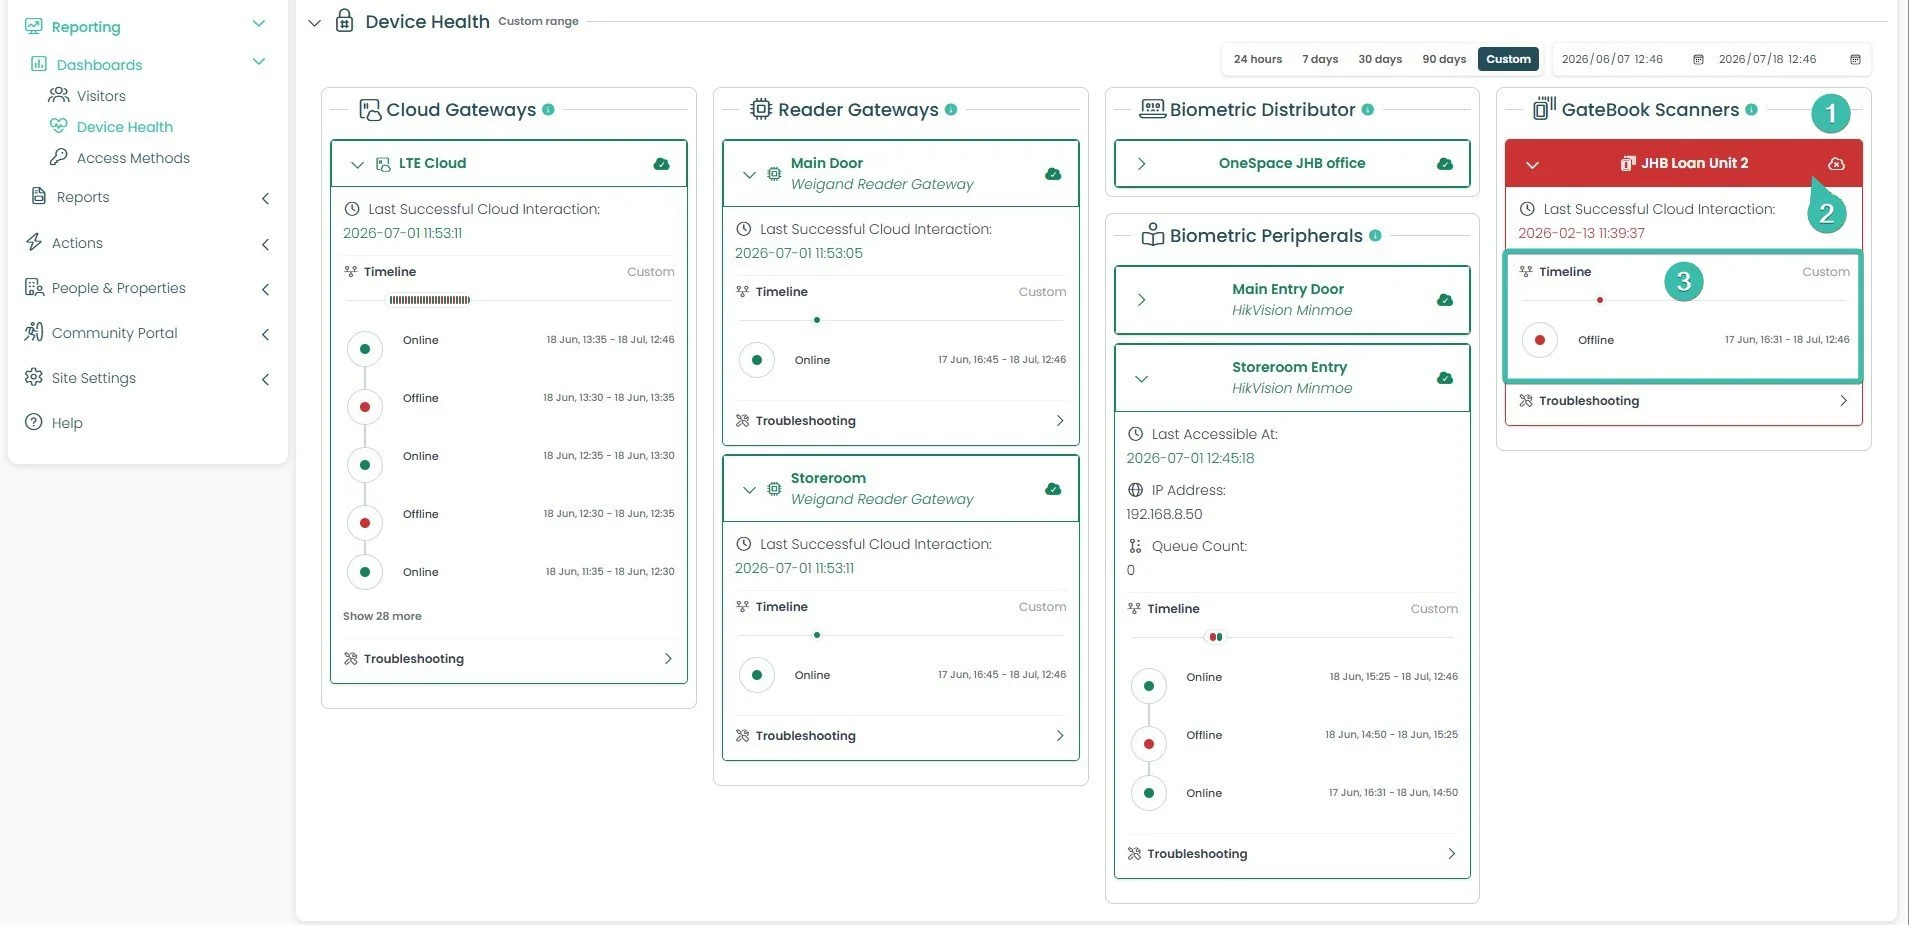
This section will display the Health Status all of the Reader Gateways that are linked to your site.
If this is red, that means your Reader Gateway is not recieving Access Control changes or uploading Access Control Events to your Cloud Gateway.
Clicking on this small arrow underneath your Reader Gateway name, will expand further details pretaining to when your Reader Gateway was last seen by its linked Cloud Gateway.
New Feature - Device Status Timeline: Once expanded, the Timeline displays a running history of the device's online and offline status, with the most recent status shown at the top.
Each entry shows the status (Online or Offline) alongside the date and time range it applied for.
Select Show [X] more at the bottom of the list to load older entries.
Use the Custom date range option next to Timeline to narrow this history down to a specific period.
Device Health Dashboard - Troubleshooting Tips
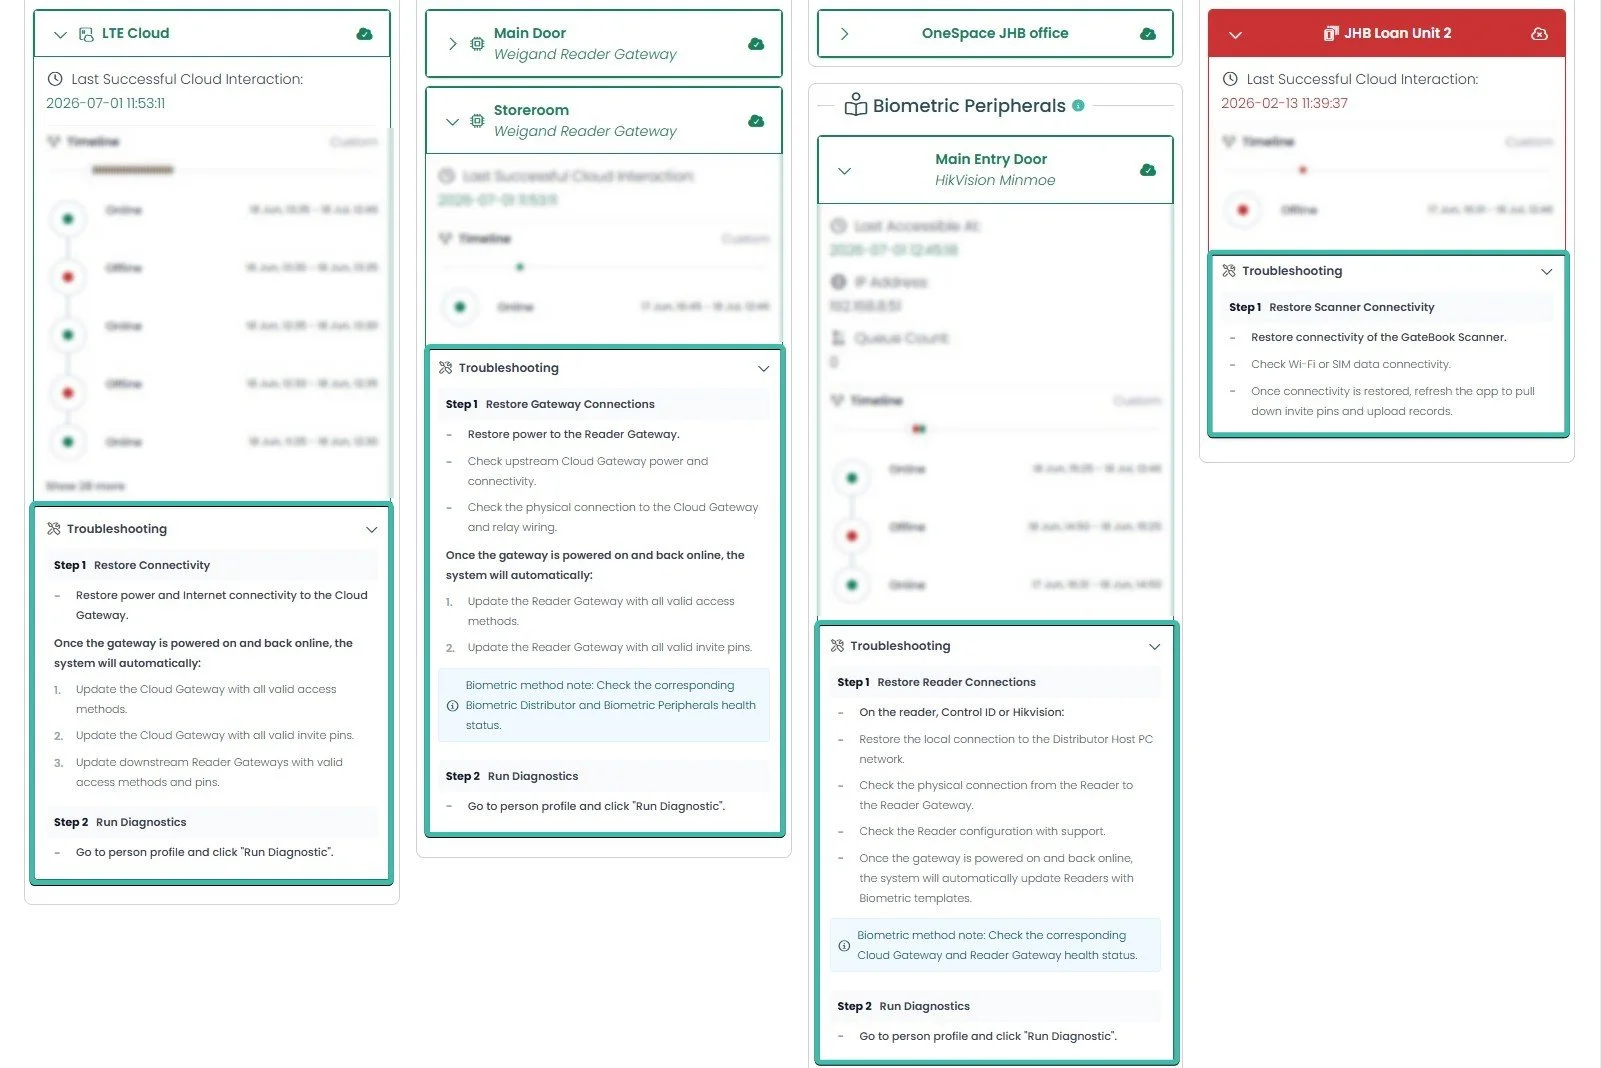
Every device card on the Health Dashboard now includes its own Troubleshooting section, found just below the device's status Timeline. Simply select the Troubleshooting heading to expand step-by-step guidance tailored to that specific device type — whether it's a Cloud Gateway, Reader Gateway, Biometric Distributor, Biometric Peripheral, or GateBook Scanner.
Each section walks you through practical checks (like restoring power or connectivity) and, where relevant, a Run Diagnostic step you can trigger directly from the person's profile. We'd encourage all Site Managers to make this their first stop when a device shows as offline — it's often the fastest way to resolve an issue before needing to log a support ticket.
The Central Cloud will now also alert you via a notifications on when your Gateways go offline:
A message will be delivered within your OneSpace Connect App messages for Offline Gateway Alerts.
A notification will appear within your notifications menu on the Central Web Platform.
How to enable Alerts for your sites Gateways?
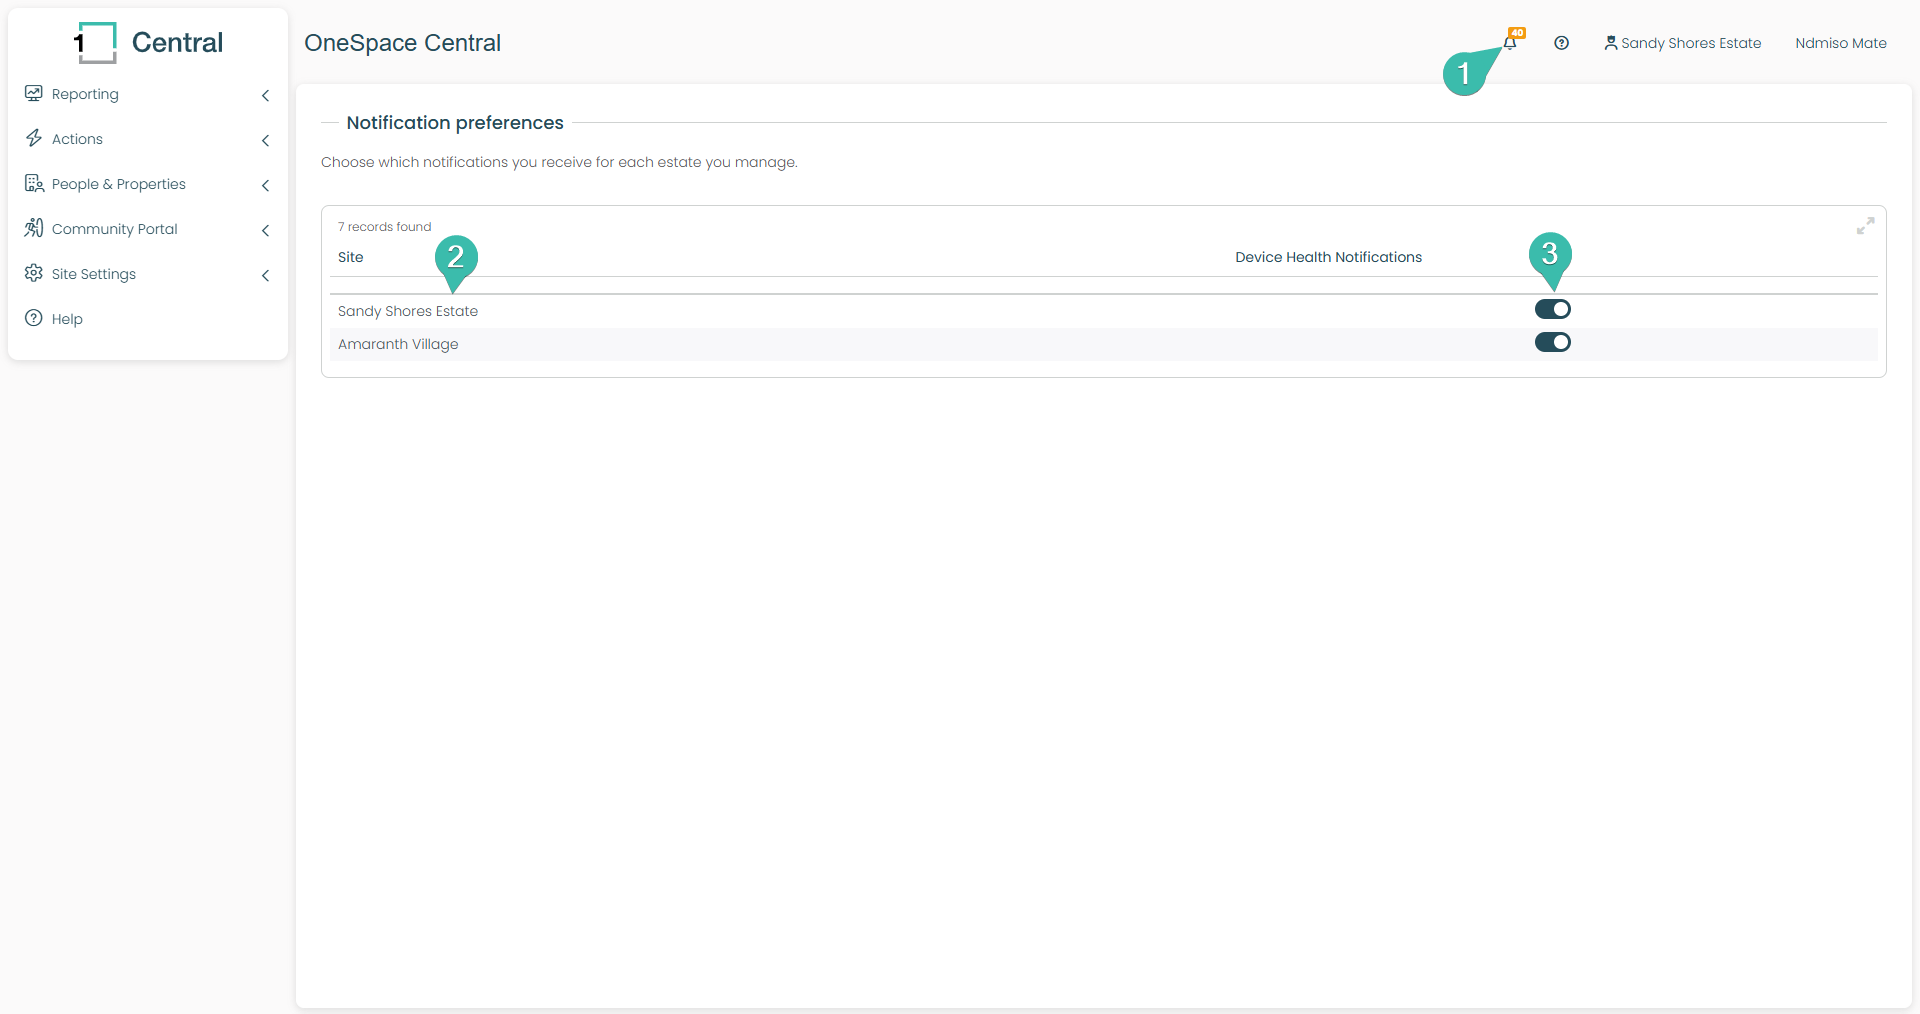
Select the notification bell within Central. A window will appear to your right. Where you will need to select the gear icon to access your Notification Settings.
This section will show you all the sites that you manage.
On the right, you can enable Device Health Notifications. If this is turned on you will receive notifications within Central and your OneSpace Connect App when any of your Gatebook, or OneAccess Devices go offline.
Mobile Alert view
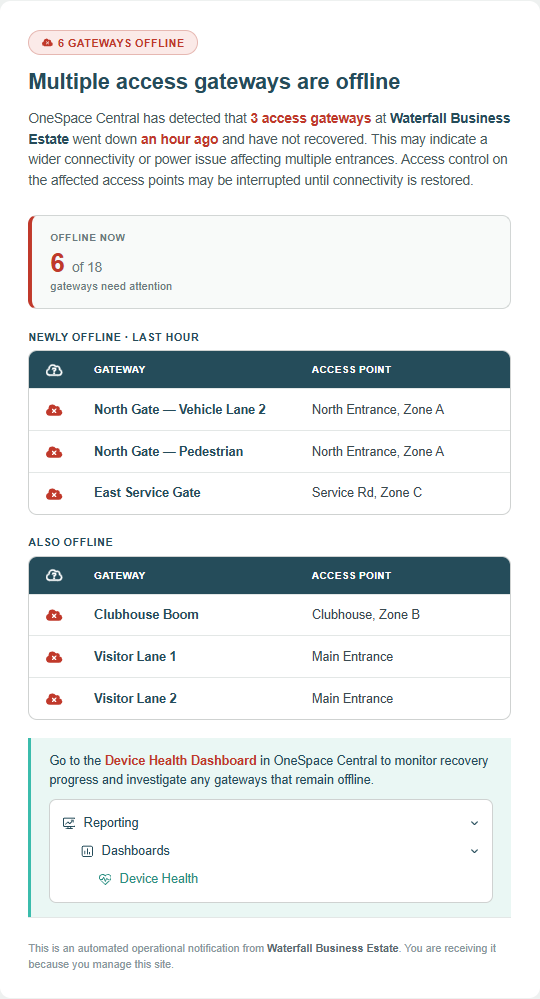
When you have notifications for Device Health turned on. You will get a notification like the image above detailing which devices have gone offline
You can click on the Device Health Dashboard Section at the bottom of the message, to go straight to your Device Health Dashboard
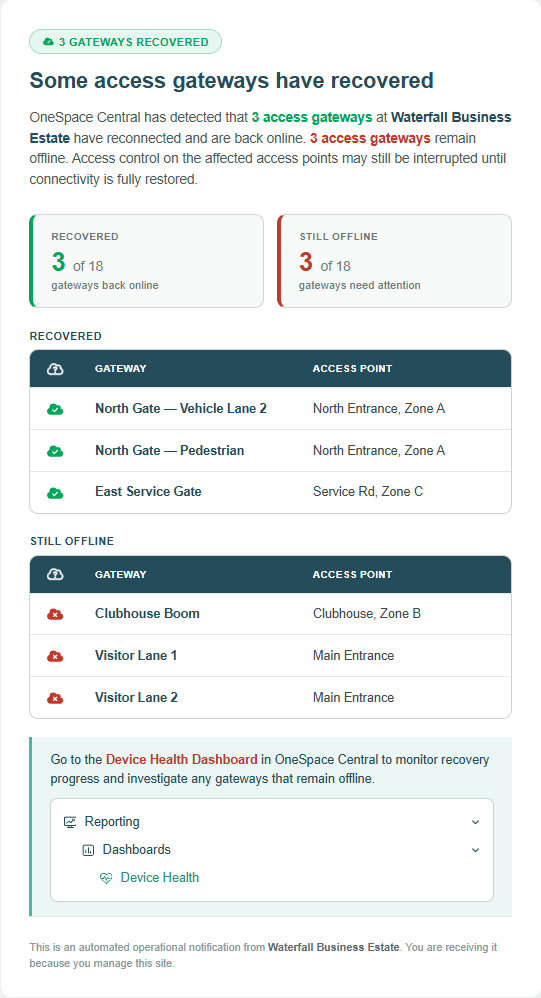
The Mobile Alerts system will also notify you of partial recoveries of your Gateway devices.
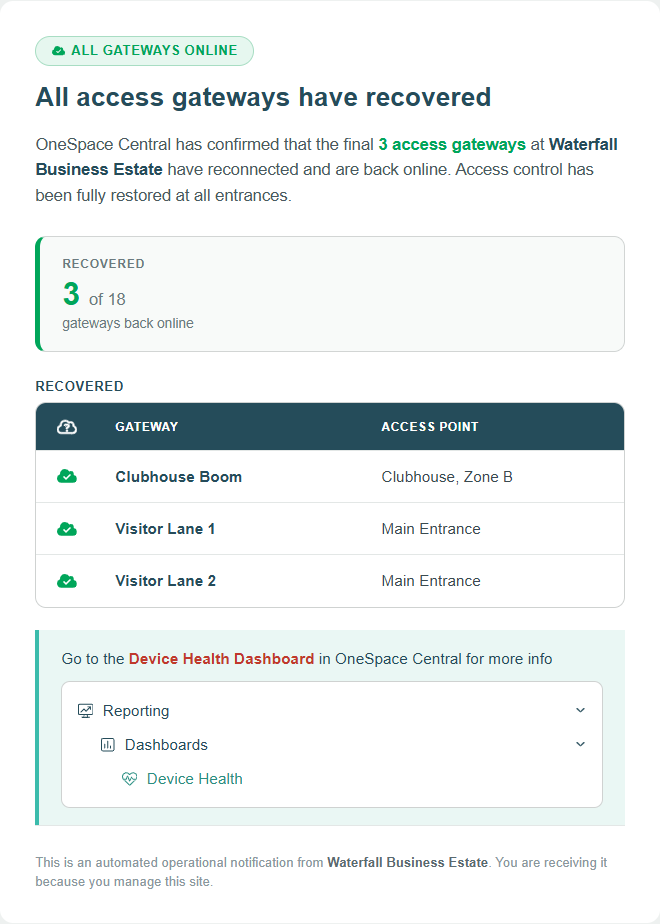
If all of your Devices went offline, and recovered within an hour of each other.
You will get an alert highlighting that your entire system has recovered.
Access Control Management
Requirements
A fixed PC on site, that has internet access. This PC will need to have the OneSpace Distribution software installed.
OneSpace Access Control Hardware installed on site.
OneSpace Access Control Module Enabled on your Site.

The People & Properties section is where you can manage your residents / tenants. Access Control Methods.
Employee and Contractor Management has been moved here for a more seamless experience! 🏢👥
Note: Add and edit Access Methods and access rights of people here by simply clicking on the person's name who's access control you would like to update! You can also block people from generating invites to your site via the People & Properties Page.
See the below video to see how it is done.
Access Method - Code Hop Remotes
Requirements
A Windows PC with the Central Platform Open.
A OneSpace USB Code Hop Receiver.
A Code Hop remote.
Note the following instructions assumes you have a OneSpace USB Code Hop Receiver inserted into your PC, and a Code Hop Remote is next to you. Please ensure that you have both at the ready before proceeding.
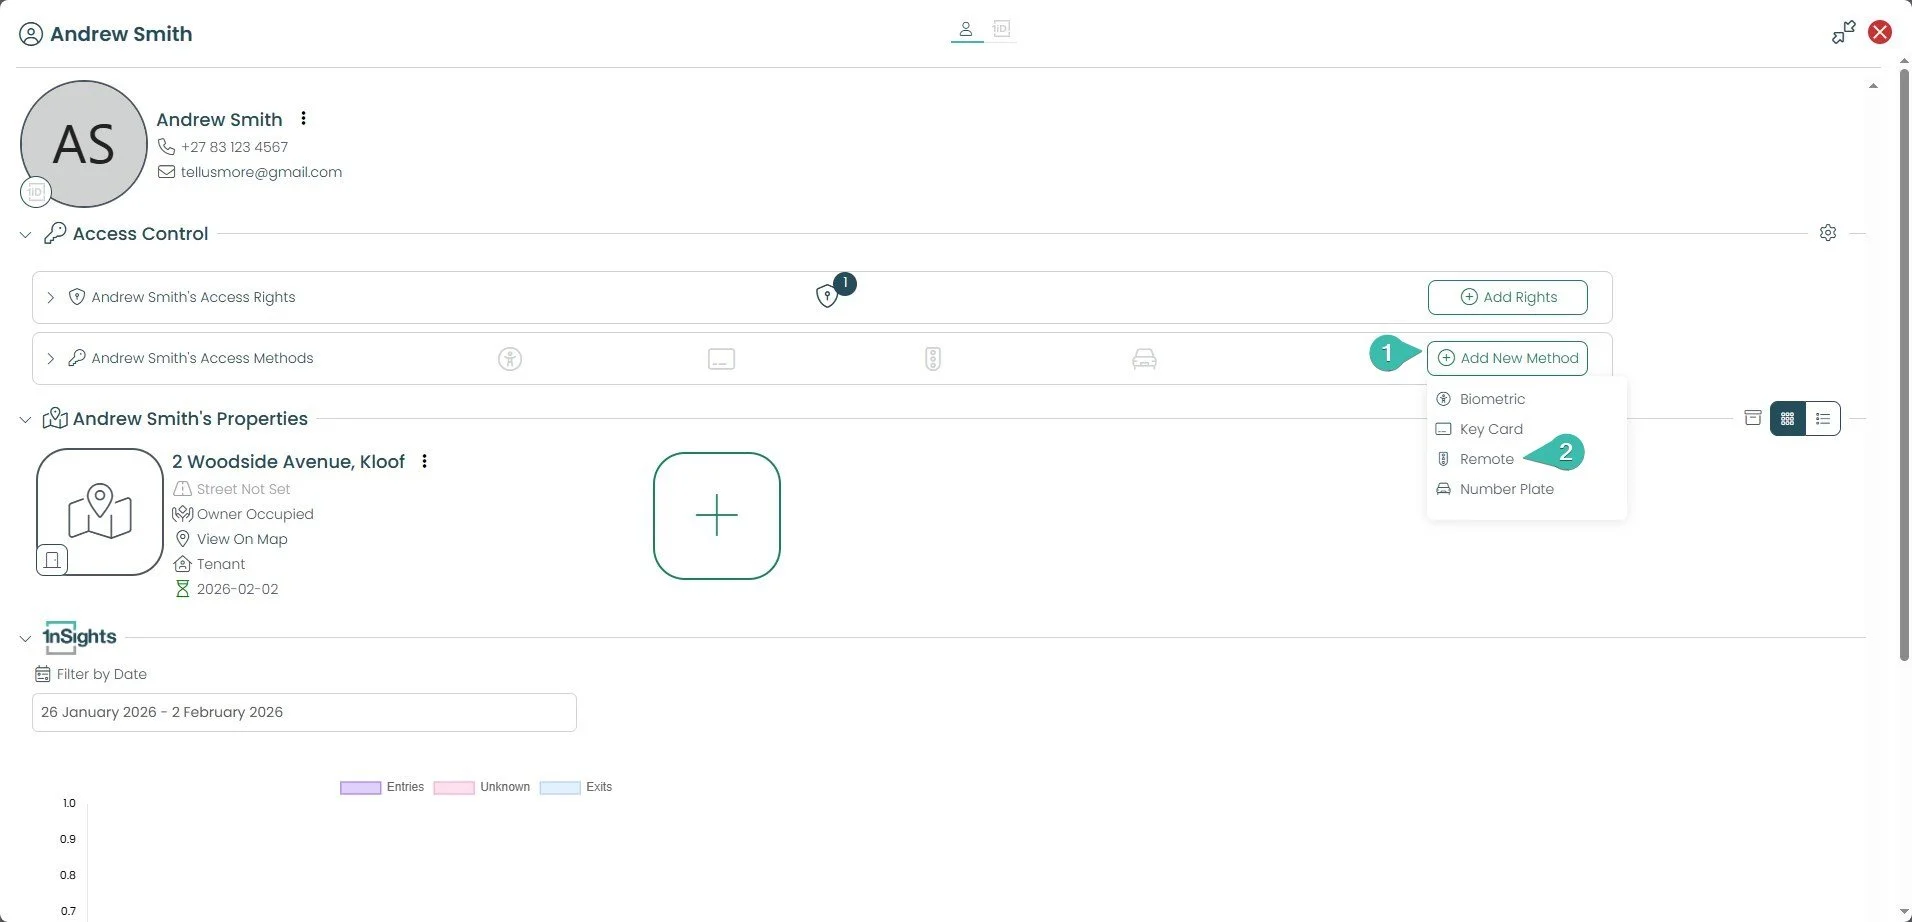
Select the Add new Method button.
Select Remote.
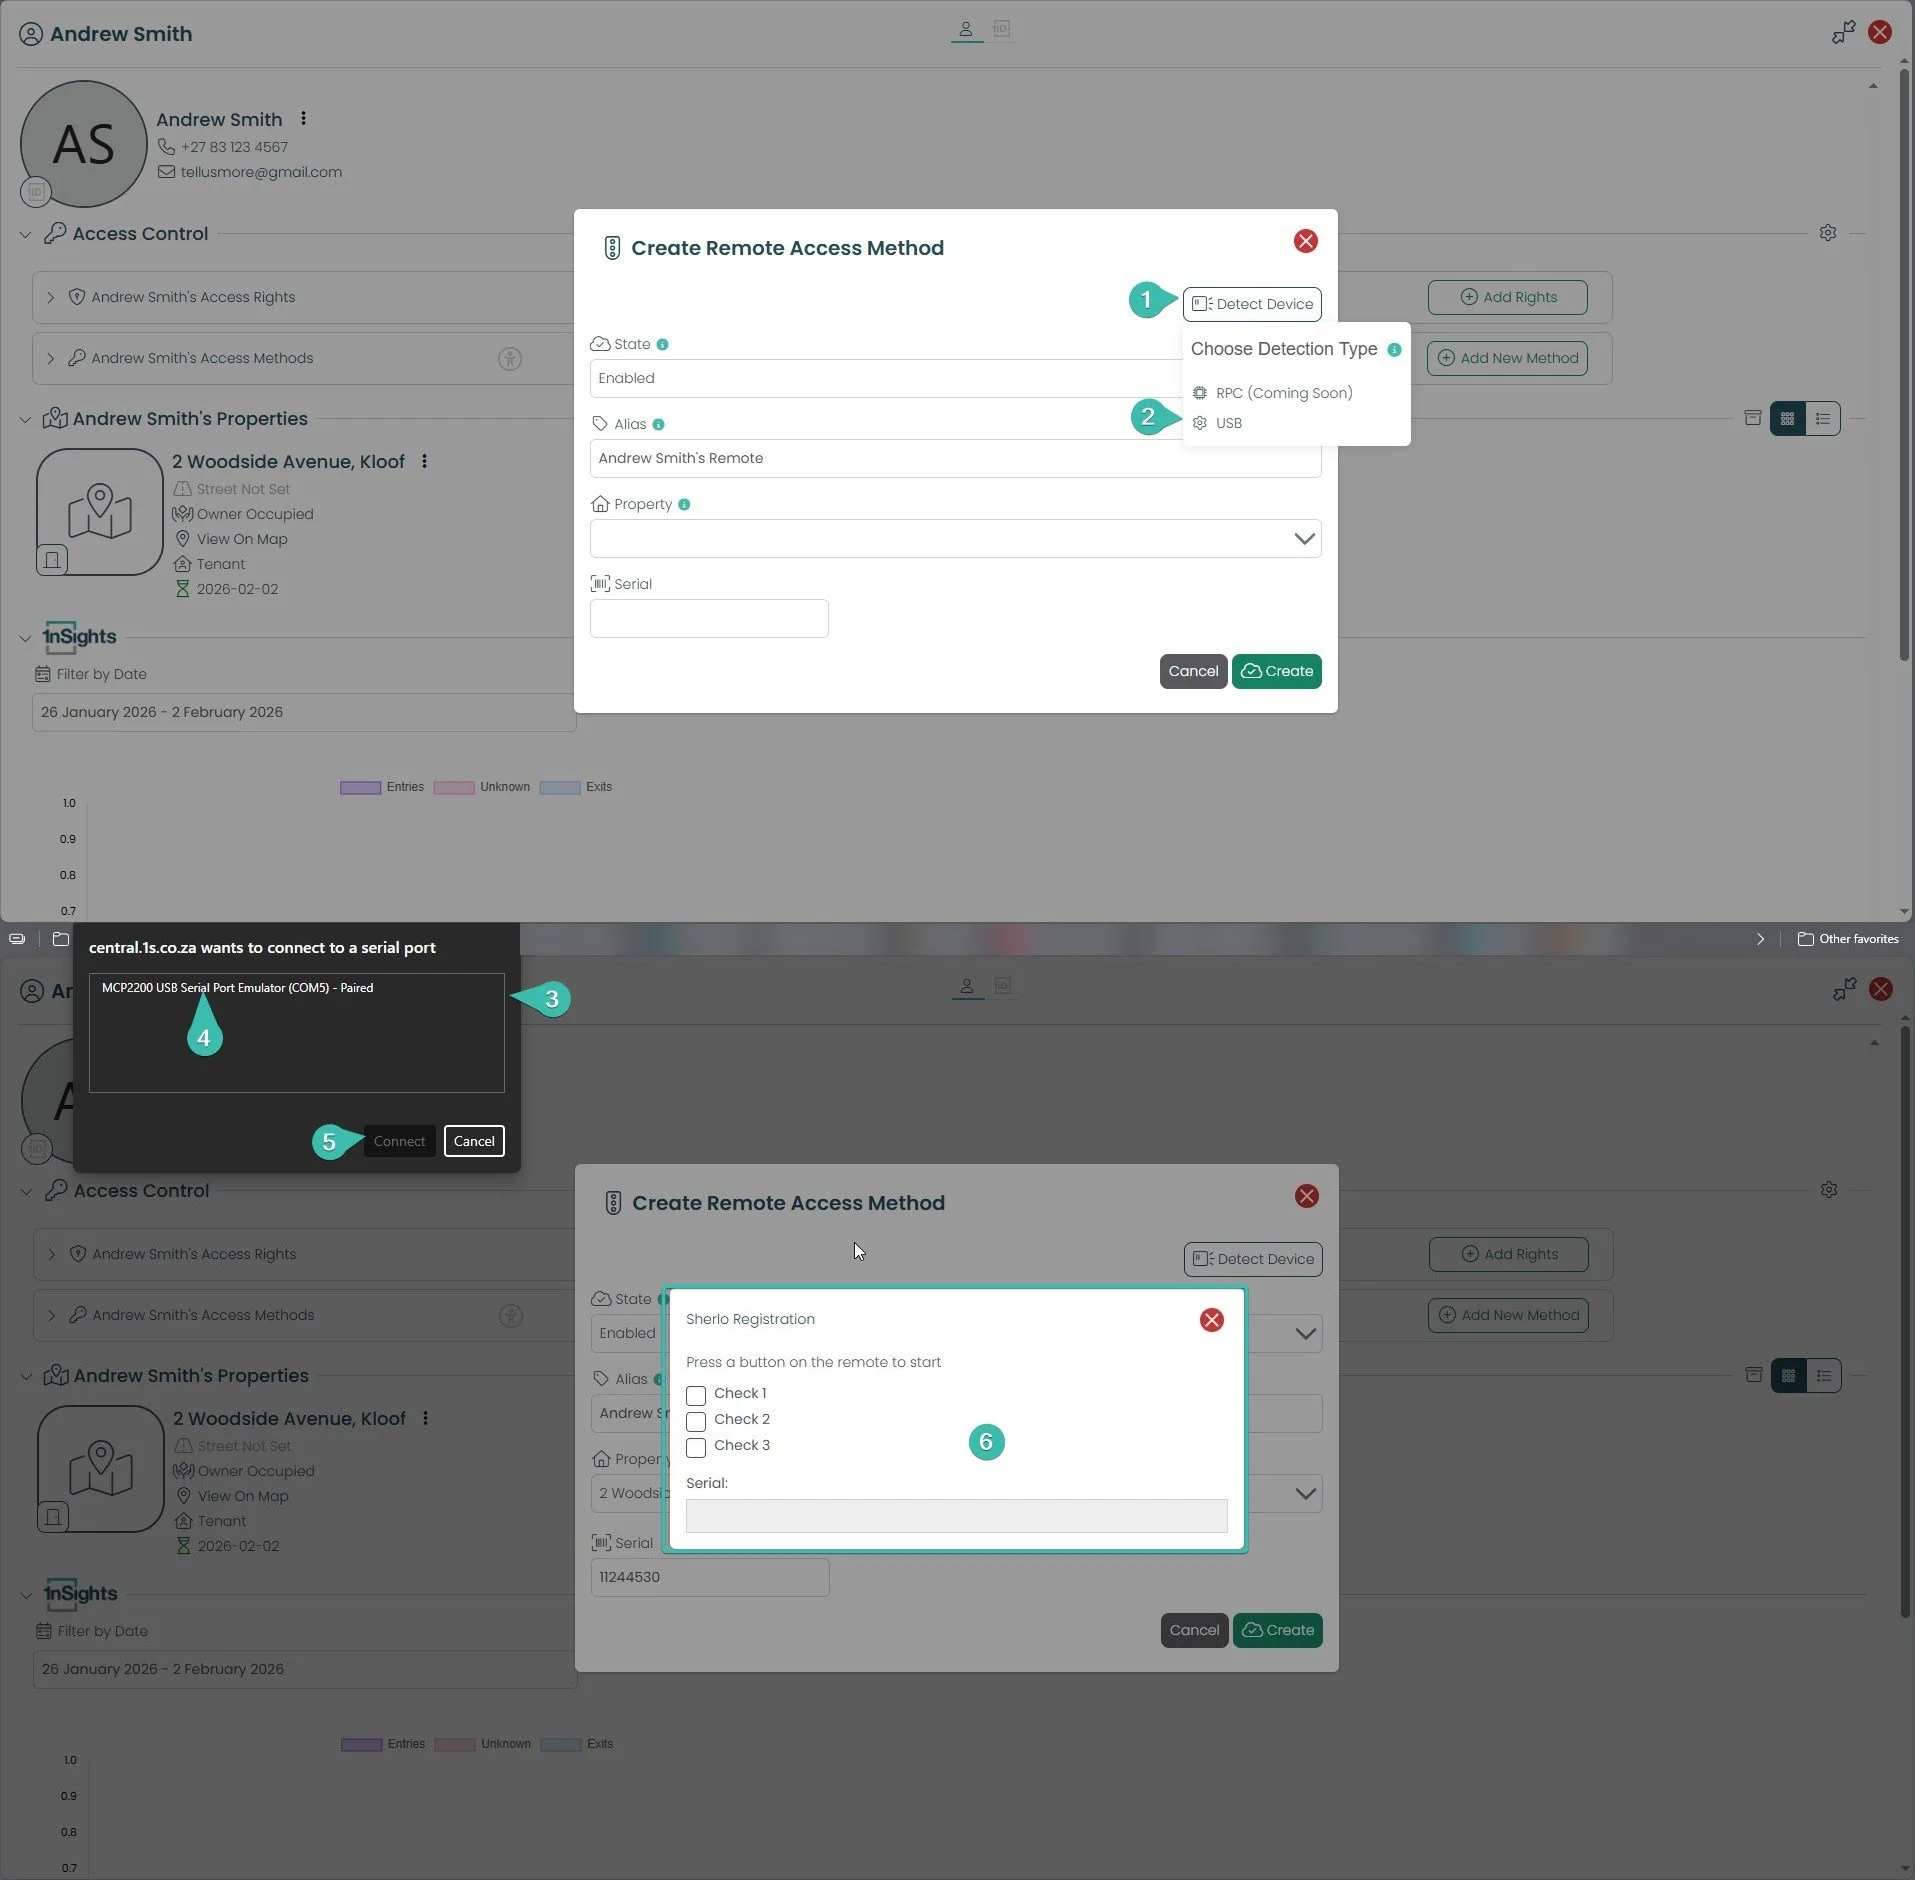
Select the Detect Device Button.
Select USB.
A new window will appear, it will be your browser trying to connect to your OneSpace USB Code Hop Receiver.
Select the one USB Serial Port Reader (usually MCP2200).
Select Connect.
Now with your Code Hop Remote in your hand press the button you want to capture the serial number for.
Please note the 3 Check boxes in the Center of the screen. You will need to press the same button 3 times to ensure an accurate capture of the remotes Serial number. You may need to wait 3 seconds between each press.
Only once all boxes are filled, will the Central window automatically fill the remotes serial number.
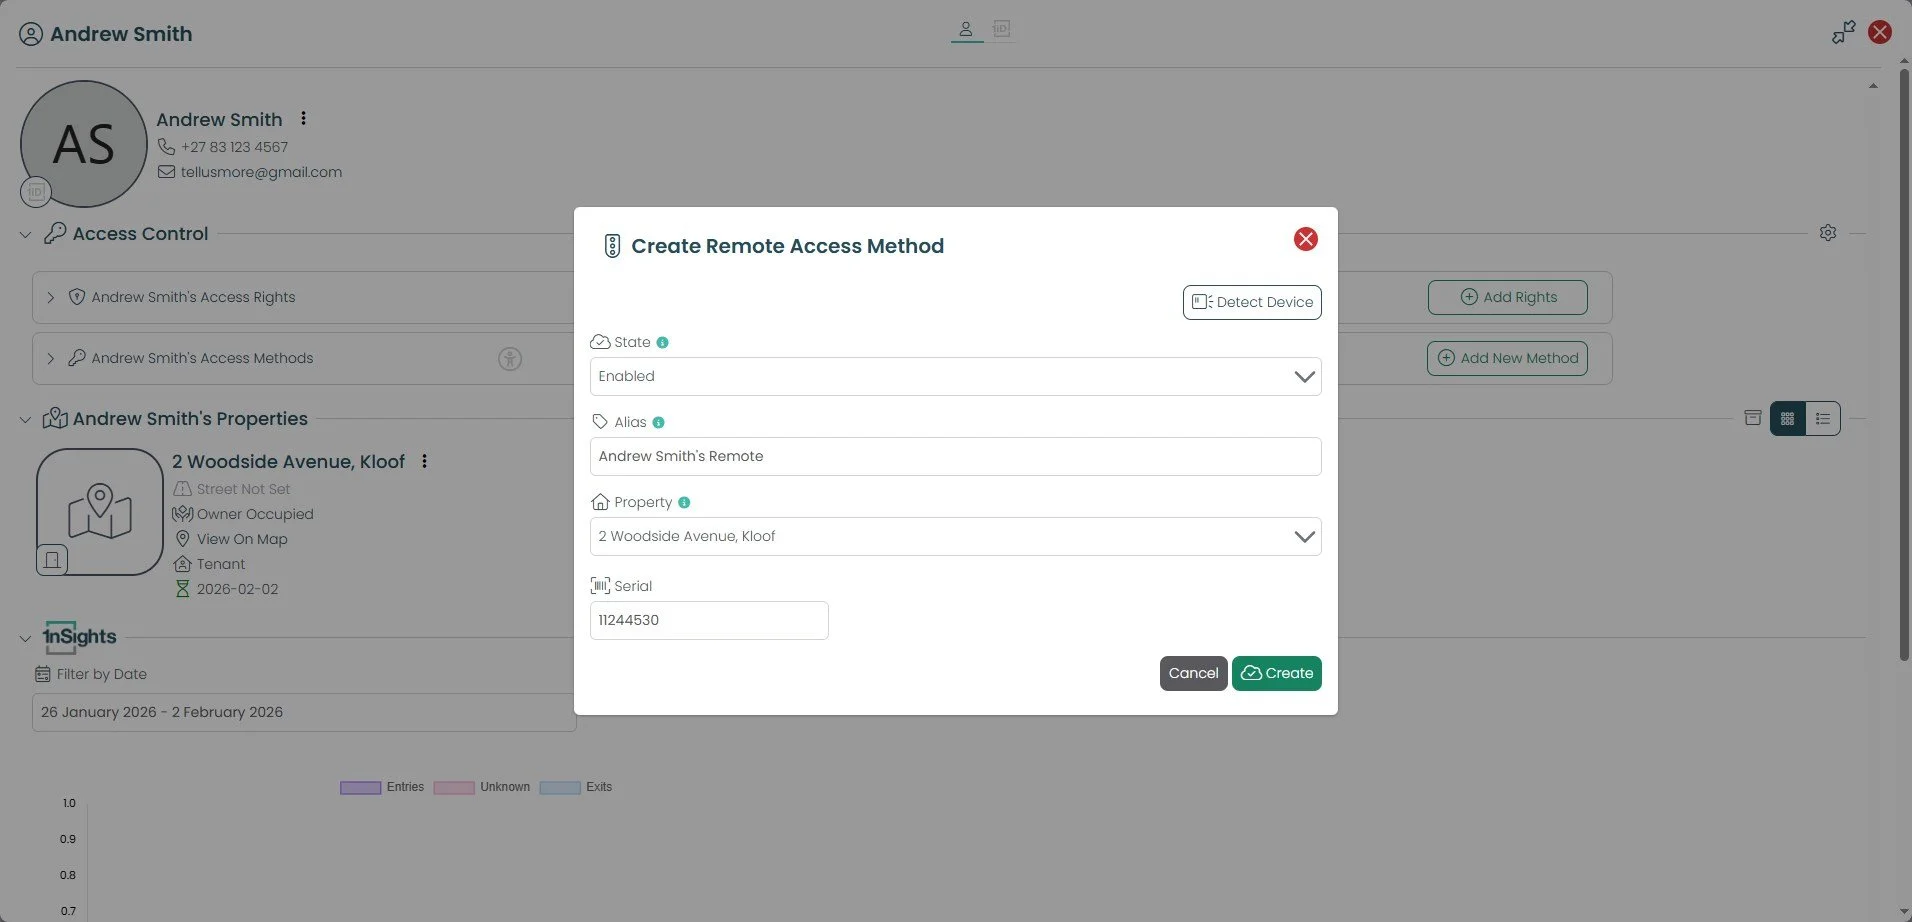
Lastly, just confirm what Property this method is tied to. Then select create. In a minute or two, your Code Hop Access Method will start working.
Access Rights - Creation
Access Rights is a feature that controls When an Access Method can be used and Where an Access Method can be used, within the OneSpace Access Control Eco System.
The below instructions will cover how to create new Access Rights.

Select Site Settings
Select the Access Control Option.
Select Access Rights.
This section is your Access Rights table, where you can view all of the configured Access Rights for your site. There will always be two default rights for a site.
Selecting this button will allow you to view what time window (when) an Access Method is valid for. As well as which Access Points (where) the Access Methods will be valid.
You can edit an Access Right at any time by selecting this pen icon.
You can delete an Access Right by selecting the red bin icon.
Selecting the Create new Access Right button will allow you to create a new Access Right.
Note: When creating Access Rights, you will still need to assign the Access Right to a Person’s Access Method. In order for it to take effect.
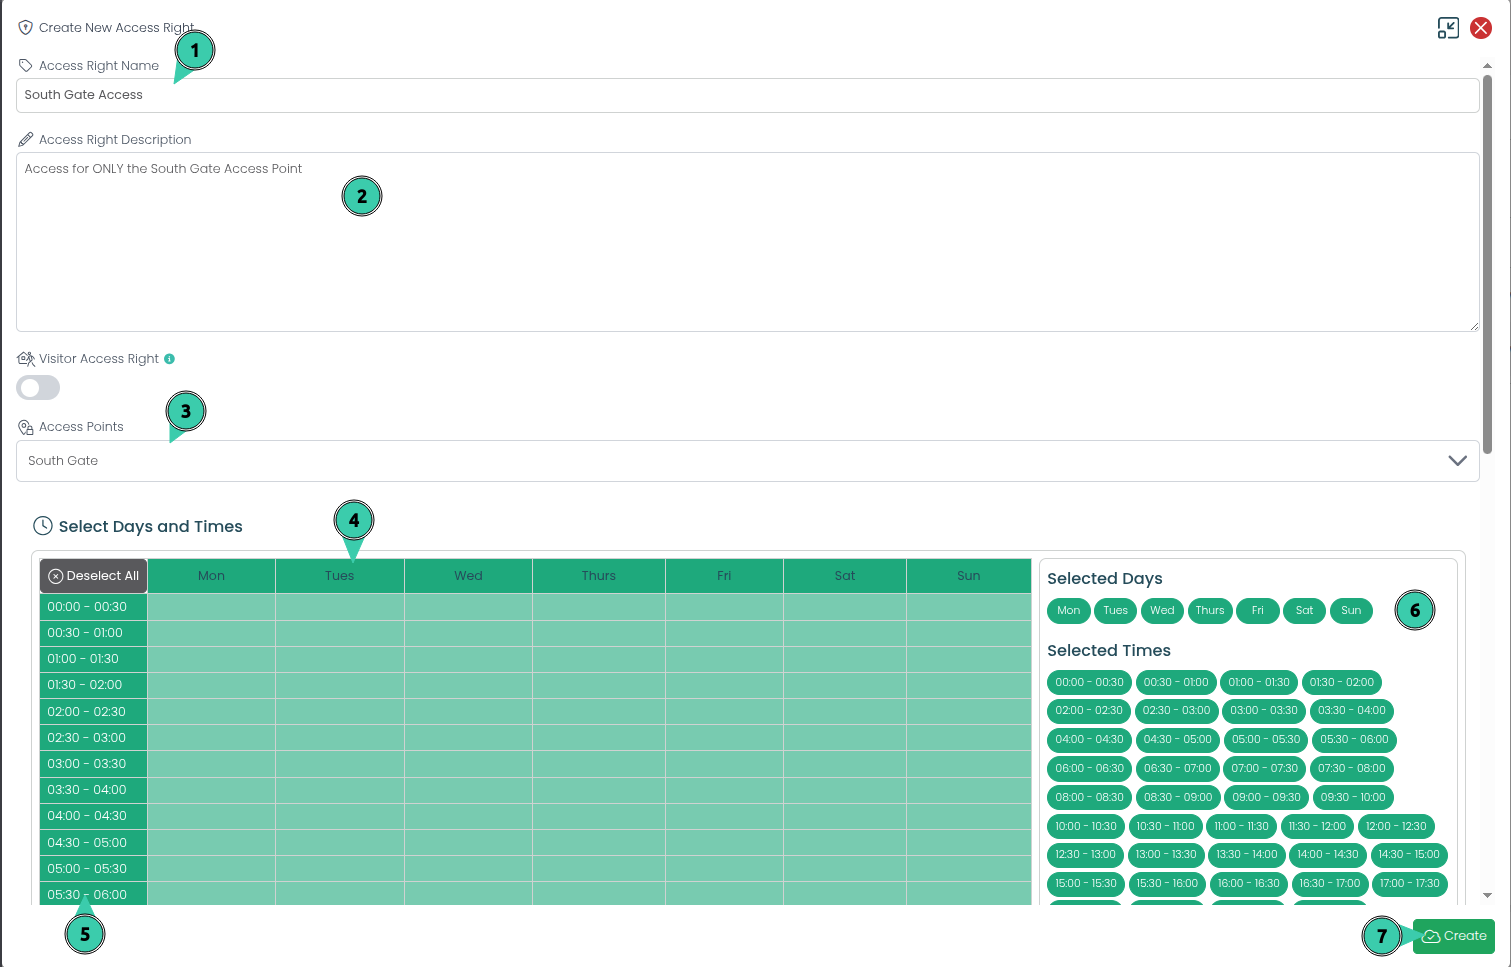
Define the name of your Access Right here.
You can provide a description for the Right, that can assist in documenting what level of Access this Right intends to grant.
Access Points, you must select which Access Points (where) this Access Right will work on. Note your Access Control Readers are tied to Access Points.
Days and Times (when), you can define what days will be enabled for this Access Right, by selecting a Day of the week by clicking the days on this table.
Days and Times (when), you can define what times will be enabled for this Access Right, by selecting the time slots on this table.
New Feature Day Pass / Long Stay Pass (PINs)
PINs are now considered as a Day Pass or Long Stay Pass.
To see a history of Generated Day Pass; whether or not a Day Pass has been used, its valid dates and times, the Unit number(ERF) or Registered App user that created the Day Pass:
Expand the Reports in the Central Menu on the left hand side of the screen.
Select Standard Reports.
Select Visitor Reports Section Heading.
Select the Visitors (Day Pass) Report.

You can filter viewing all Day Passes through their destination, and the dates that they are valid by selecting from the Destinations List and Valid On Date menu. You can also see whether or not specific Day Passes have been Redeemed or not, are Expired, or Still Valid by checking the icon under Status.
If a Day Passes has been used upon Entrance, Exit, both or neither by checking the Entries Used & Exits Used columns.
Expand the Reports in the Central Menu on the left hand side of the screen. Select Standard Reports.
Select the eye icon to view the Access Record linked to that Day Pass.
Select this button to cancel a visit.
Generating a Day Pass (PIN)
As a Manager you can also Generate PIN Day Passes for your site via the Central Platform.
Note: Day Passes by default will have a Single entry and/or Single Exit within 24h period.

Here is how you can generate a PIN Day Pass for your Visitor:
Select the Action Centre menu button to expand this menu.
Select Invite Visitor.
Select the Destination that this PIN Day Pass will be linked to.
Provide a Comment stating what this PIN Day Pass is meant to be used for.
This field will fix (lock) how many uses this PIN Day Pass will have, in and out of your site.
You must define a date that this PIN Day Pass will be valid for. You can provide a date in the future as well.
This option will dictate which Keypads this PIN Day Pass will be valid for. By default you will only have 1 option here.
Select Generate to create the Day Pass.
When a PIN Day Pass is generated this way the Central page will display the PIN to you. However you will need to still send this PIN to your visitor yourself.
New Feature Unlimited use - Day Pass (PINs)
This page is where you decide whether residents on your site are allowed to generate an Unlimited Use Day Pass (PINs).
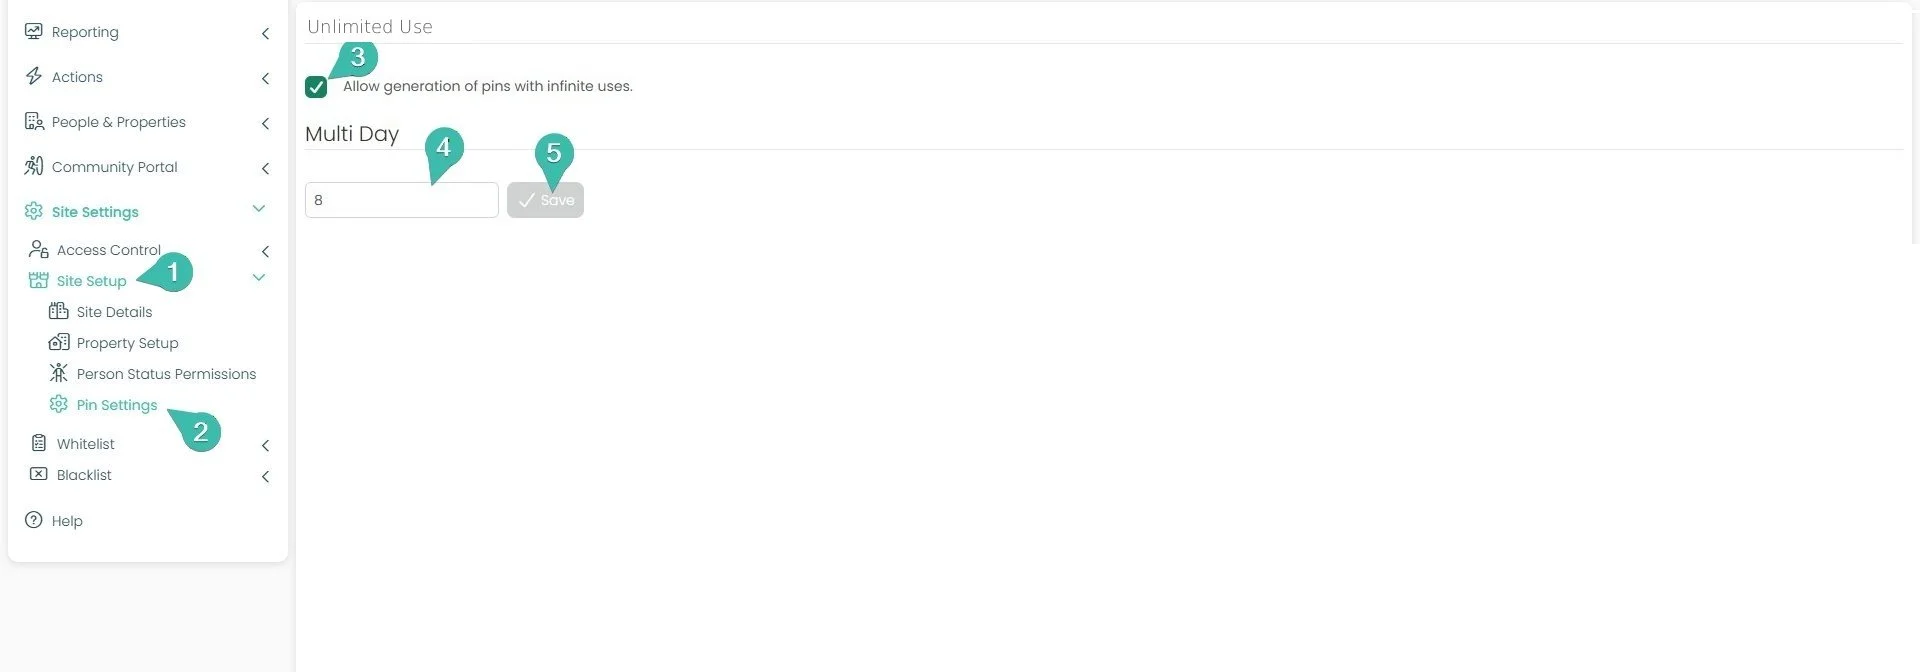
To get here and set it up:
In the Central menu on the left, expand Site Setup.
Select Pin Settings.
Under Unlimited Use, tick Allow generation of Day Passes with unlimited uses. This is the switch that lets residents (and managers) create Infinite Use Day Passes for your site. Leave it unticked if you don't want Infinite Use Day Passes available here.
Under Multi Day, enter a number in the field. This sets the maximum number of days an Infinite Use Day Pass can remain valid on your site. For example, entering 8 means a resident can create a Day Pass that stays active for up to 8 days.
Select Save to apply your changes.
Good to know — Rollover: The Rollover section at the top of this page controls something separate. For each visitor category that's ticked, a PIN's exit use will carry over to the next day rather than expiring at the day's end. You can turn this on or off per category.
Understanding Unlimited Use Day Passes (PINs)
Every visitor Day Pass (PIN) you generate does two jobs: it sets how long the Pass is valid for, and how many times it can be used to enter or exit during that period. Mixing those two choices gives you five pass types:
The two Unlimited use options are what we call Infinite Use Day Passes, there's no usage count to run out. The visitor can come and go freely for as long as the PIN is valid.
When would you use an Unlimited Use Day Pass?
These are built for visitors who need to move in and out repeatedly without you (or the resident) having to issue a fresh PIN each time.
A Day Pass – Unlimited use suits someone who'll be coming and going throughout a single day. For example, a contractor making several trips to a vehicle, or a helper running errands in and out of the site.
A Longstay Pass – Unlimited use is the one designed for overnight and extended visitors. Instead of creating a new PIN every single day, you set a start and end date, and the visitor has free movement in and out for the entire stay. Think of a family member staying for a week, or a houseguest over a long weekend.
How it relates to your Pin Settings
A Longstay (multi-day) Unlimited Use PIN can only be created if both of the below settings meet the below criteria in your Pin Settings:
Allow generation of Day Passes with unlimited uses must be ticked (this enables the "Unlimited use" option), and
The Multi Day value sets how many days that PIN can stretch across.
So the setting you configured earlier is what makes the Longstay – Unlimited use pass possible for your residents.
| Pass type | Valid for | Number of uses |
|---|---|---|
| Day Pass – Single use | Within a 24-hour period | One entry and/or one exit, then it’s done |
| Day Pass – Unlimited use | Within a 24-hour period | As many entries and exits as needed |
| Day Pass – Fixed use | Within a 24-hour period | A set number of uses you choose |
| Longstay Pass – Unlimited use | Across multiple days | As many entries and exits as needed |
| Longstay Pass – Fixed use | Across multiple days | A set number of uses you choose |
How to Generate an Unlimited Use Day Pass (PIN)?
As a manager, you can create an Unlimited Use Day Pass (a PIN with no usage limit) directly from Central. Here's how:
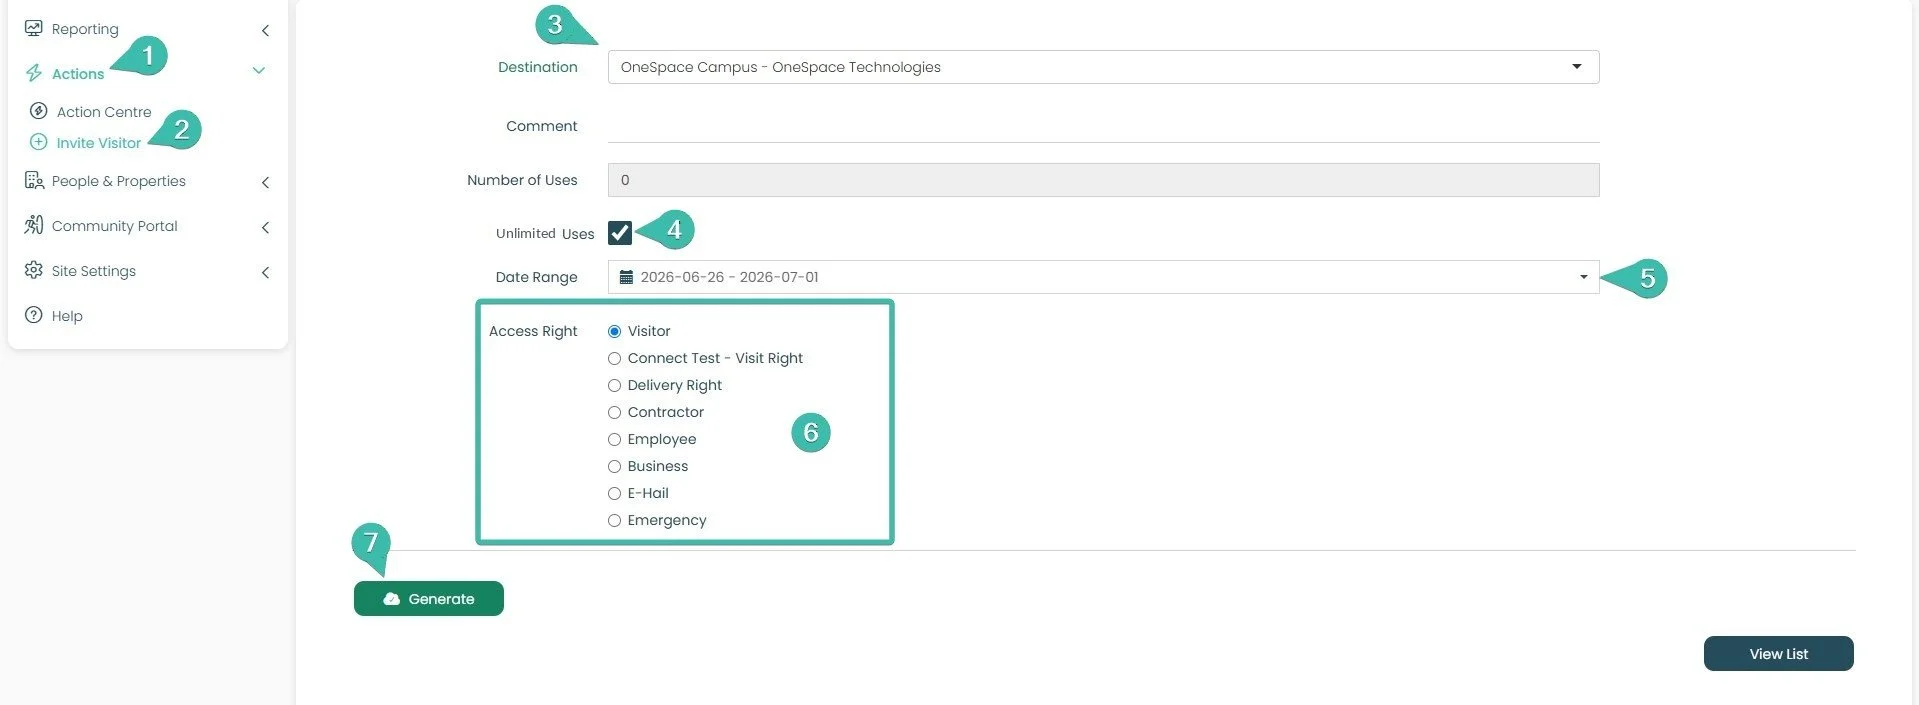
In the Central menu on the left, expand Actions.
Select Invite Visitor.
Choose the Destination this Day Pass will be linked to from the dropdown.
Add a Comment describing what the Day Pass is for (for example, the visitor's name or reason for the visit).
Tick Unlimited Uses. This turns the Day Pass into an Unlimited Use Day Pass, the visitor can enter and exit as many times as they need while it's valid. Once this is ticked. The Number of Uses field is no longer needed and will be unavailable.
Set the Date Range for how long the Day Pass stays valid. Selecting a single day creates a Day Pass; selecting a range across multiple days creates a Longstay Pass.
Choose an Access Right for the visitor. This controls where the Day Pass works on your site, select the option that matches the visitor type (for example, Visitor, Contractor, or Delivery Right).
Select Generate to create the Day Pass.
To see how your residents will generate an Infinite use Day Pass on Connect click here

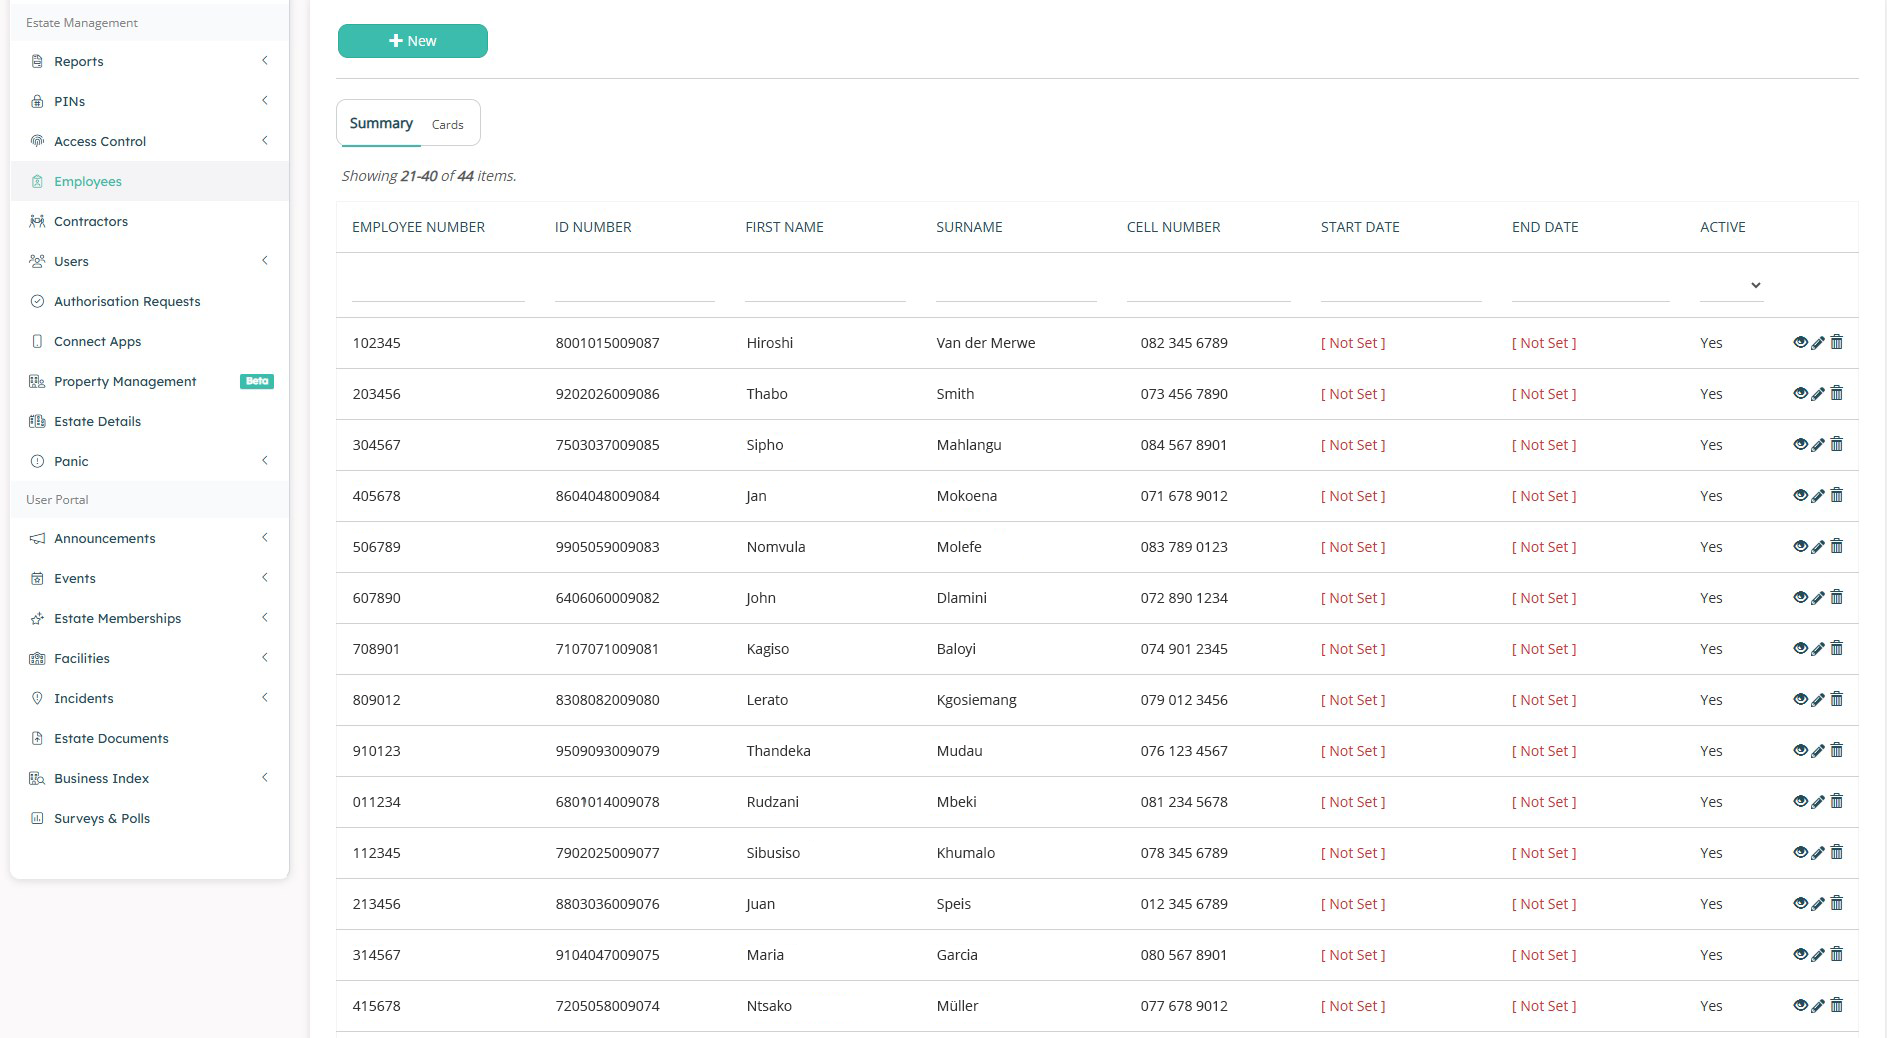
Employees
The Employees section on Central is for enrolling Site Employees. This is reserved for those people who are employed privately or directly by the site. i.e. Clubhouse employees, chefs, cleaners, gardeners, office workers, security etc.
Note: Employee Management has been moved under the People and Properties Menu for a more seamless experience!

An example of the Employee’s page on Central.
Note: that if a Start Date or End Date is not set. Then they will be listed as a valid employee indefinitely.
The site manager can enroll new employees as required by selecting the + New button under the Employees heading. This will open the following page:

From this screen you can enter the Employees details. The employee’s details must be filled out as accurately as possible in the supplied fields.
The Employee Number is unique to each employee and can be provided at your discretion, the rest of the information needs to be supplied by the Employee themselves. This includes their ID Number, First Name, Surname, Cellphone Number, and a photo to upload to their listing.
This photo will appear on their Employee card to be used to gain access to the site. This can be uploaded and changed at any time through the Uploaded Image field.
This can be done either while creating the employee listing, or by editing an existing employee listing by selecting the Pen icon next to their details.
Once filled out and an image has been added, ensure the Status is marked as ‘Active’, then select the button to save the new Employee listing.
Selecting the Eye icon next to each employee’s listing will take you to an overview page.

Here you can view their employee card, these cards are automatically generated by the system upon employee creation.
Employees can also be Archived if you want to disable and remove their listing on the system and block their employee card from being successfully scanned upon entrance. Select the Eye icon to view an employee, and click to Remove their listing.

Contractors
The Contractors section on Central is for enrolling Contractors from external companies that are permitted to enter and work within your site. This feature will be used by regular companies that frequent the site at various units.
Contractors are enrolled in the system under their respective companies. After creating the company, you may enroll the various employees permitted access. This is reserved for people who are employed by contractor companies and not directly by the site. i.e. Pool Cleaners, renovation companies, 3rd party cleaning services, 3rd party gardening services, delivery drivers, au pair services, etc.
Note: Contractor Management has been moved under the People and Properties Menu for a more seamless experience!
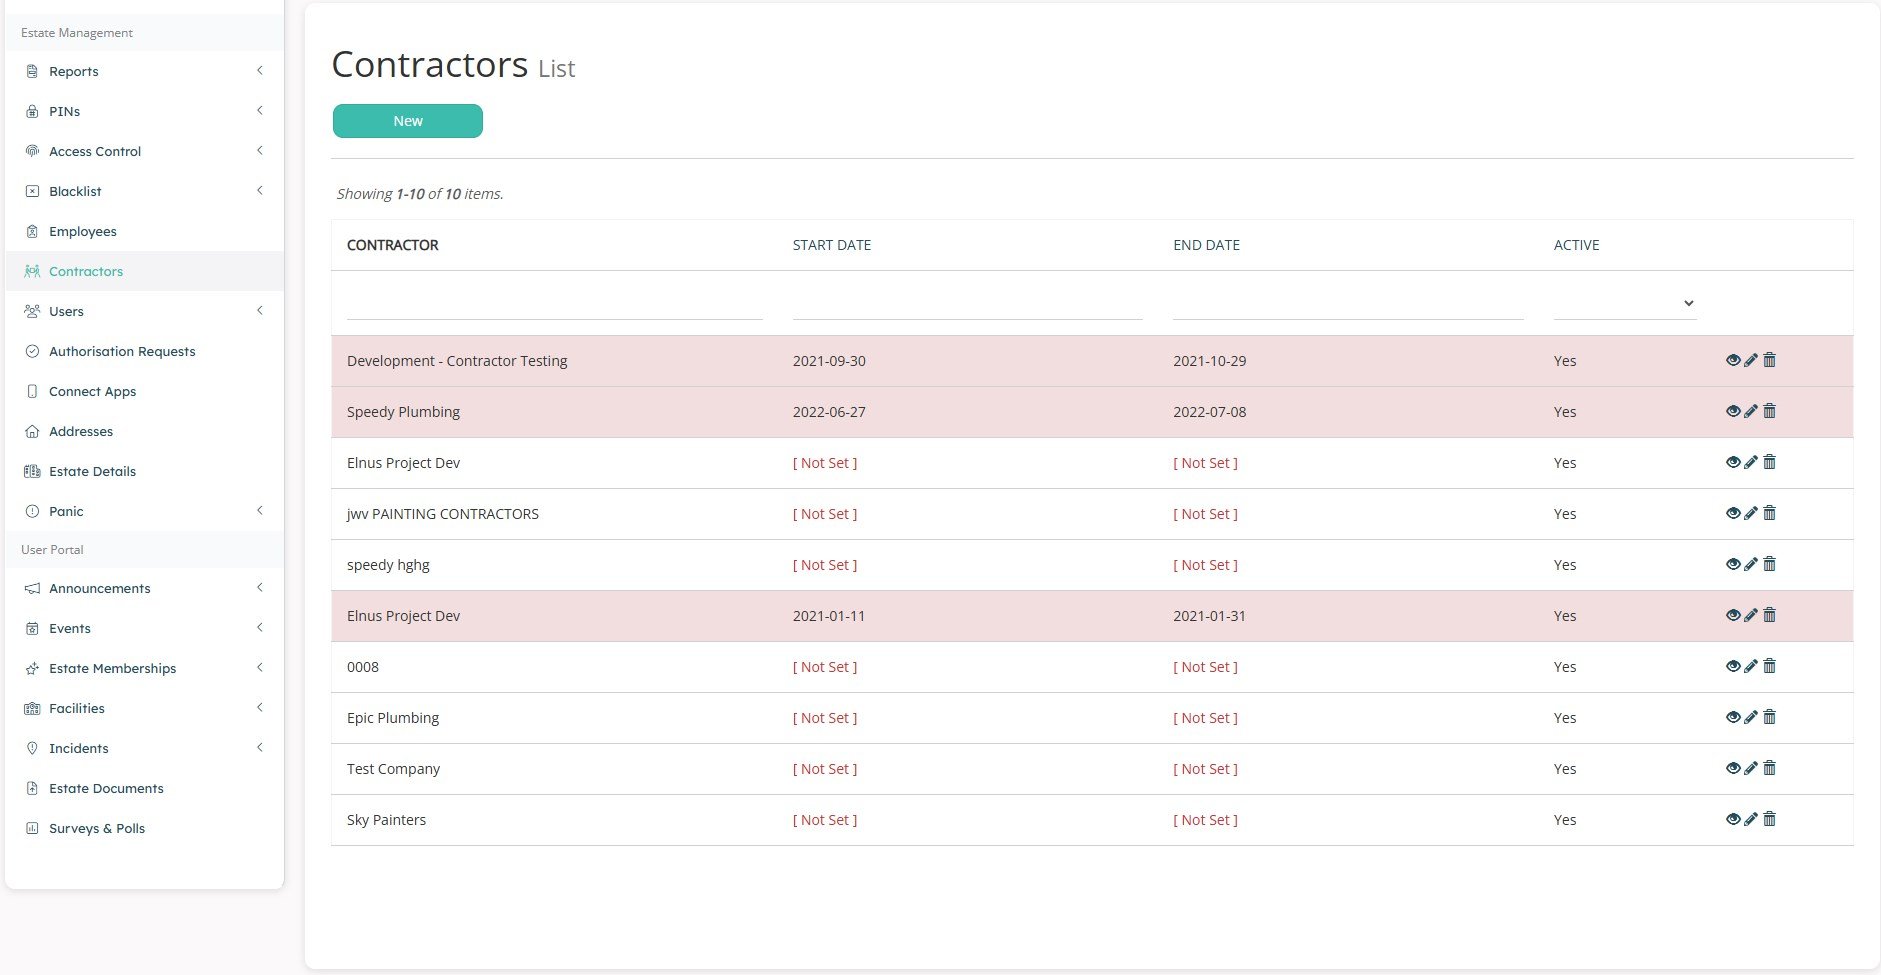
On the Contractors page, click the + New button to create a new Contractor company, or click the Eye icon on any of the entries to see the company and contrator details.
When creating a new Contractor Company, you will be taken to the following page from where you can name the new Contractor Company as well as list the dates you wish the Company and its employees to be valid on the system for. Once done, you can click the Create button to save the new Contractor Company listing.


An example of a Contractor Company listing.
You can also view the Employee Cards available for any Contractor Companies from the Employee Cards tab.

On the Contractor Employees tab, you can view an expanded view of any enrolled contractor employees at anytime by selecting the eye icon on any enrolled employee under the Contractor Employee tab.
Click + New Contractor Employees on the right side of the screen. This will open a page where you can enrol a new Contractor Employee.

As the Site Manager, you can supply the new Employee with an Employee Number of your choosing.
List the basic information for the person to be enrolled, i.e. First name, Surname, ID Number, Email Address, Cell Number and upload an image of the employee to appear on their barcoded ID card.
Once the basic Employee information has been filled out, the new listing will be saved under the Company chosen from the drop-down menu Contractor ID.
Creating Contacts for Gatebook SIP Calling
The Gatebook Scanner will collect the list of who to call based on what Erf (Address) was selected on the scanner, by the Guard.
Note: That any changes to Contacts will require the Gatebook Scanner to be refreshed to pull the changes from the OneSpace Cloud. This is done every morning by the scanner itself, but can be manually done if required.
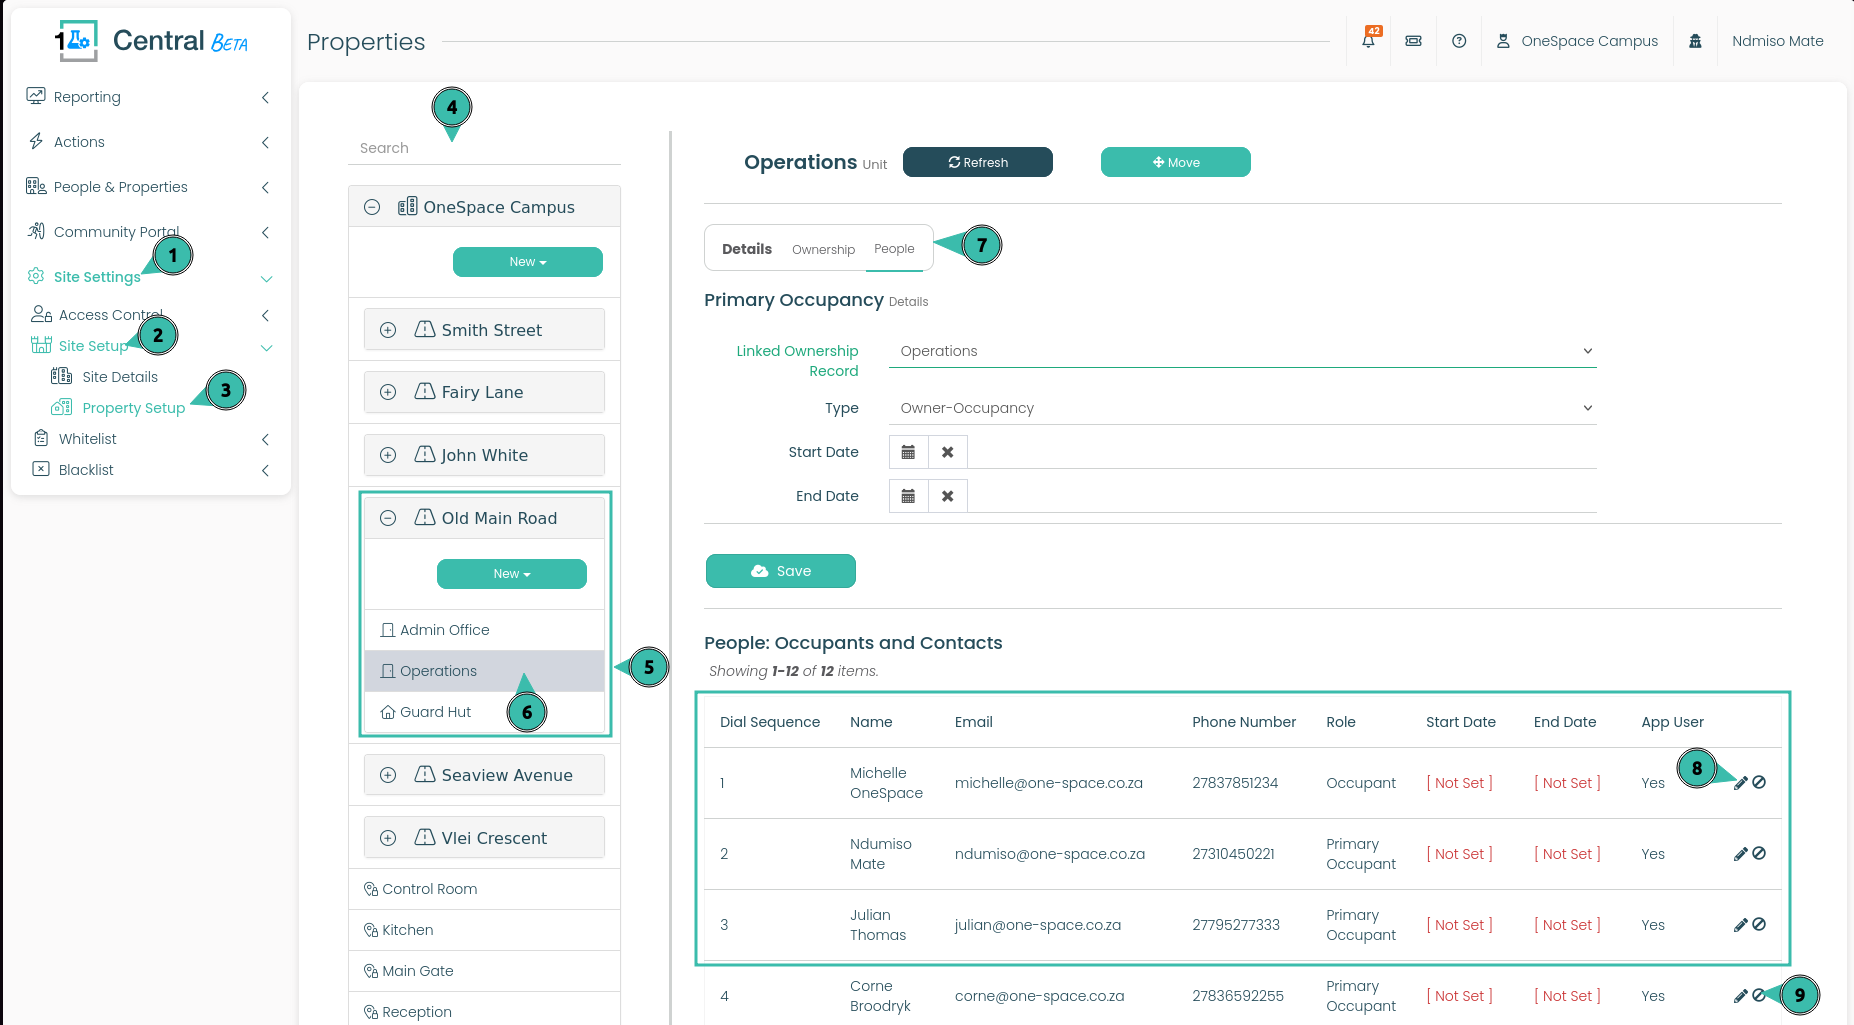
To Create a new Contact, please do the following:
Select Site Settings.
Select Site Setup.
Select Property Setup.
If you know the unit name. You can search for it here, by typing out the name of the unit.
Your units / erf will be listed under a road or street.
Select your unit / erf.
The details of your unit will now be displayed on the right side of the screen. Select the People Tab.
This section will display all the contacts that are created for that erf. Along with the order (Dial Sequence) each contact will be displayed in on the Gatebook Scanner. It is suggested that the primary contact for the erf should be listed with the display order value of 1. Their contact will appear as the first Contact for the Guard to select.
Select this button to remove the contact, preventing their number appearing as a dial-able option for your Guard..