

People Management


The People Management function is being upgraded across Central, where each Person listed on a site has a locally managed profile (Local Profile). The Management of Local iDs and 1iDs have been consolidated into the same People Management process.
This guide will address the following:
What is a Local Profile?
A Local Profile is an upgrade of the Local iD system within Central.
A Local Profile can be updated and edited by the Estate Manager.
A Local Profile can be assigned OneSpace Access Control privillages (Access Methods, Biometric Enrollment etc…).
A Local Profile can have a 1iD Profile linked to it.
A Local Profile can exist without a 1iD Profile linked to it.
Any changes that your Residents (1iD Users) make to their 1iD Account information will not alter the estate managed Local Profile unless the Estate Manager chooses to sync these changes.
The linked 1iD Account information will be visible to the Manager.

Create a Local Profile
To Create a Local Profile for purpose of giving a person Access to OneSpace Access Control. You will need to start by navigating to the Property that will be associated with the person via the Property menu.
When creating a Local Profile make sure you do this on a laptop or a desktop that has a webcam.
The person that you are creating a Local Profile for must be present for their face profile or fingerprint to be captured.
You must provide at least a Name, and ID number.
To begin do the following:

Locate the People and Properties Menu, and Select it.
Select the Properties Menu.
Locate the Add New green button within the People’s Section and click it.
Person Search: Insert your Persons name here. If they don’t already exist on your system, you will not see any results below this field.
In this highlighted section, you will need to fill in the details of your person that you are on-boarding onto your system.
You can define a Start Date or an End Date for the Person Profile.
Create Face Biometrics for a Local Profile
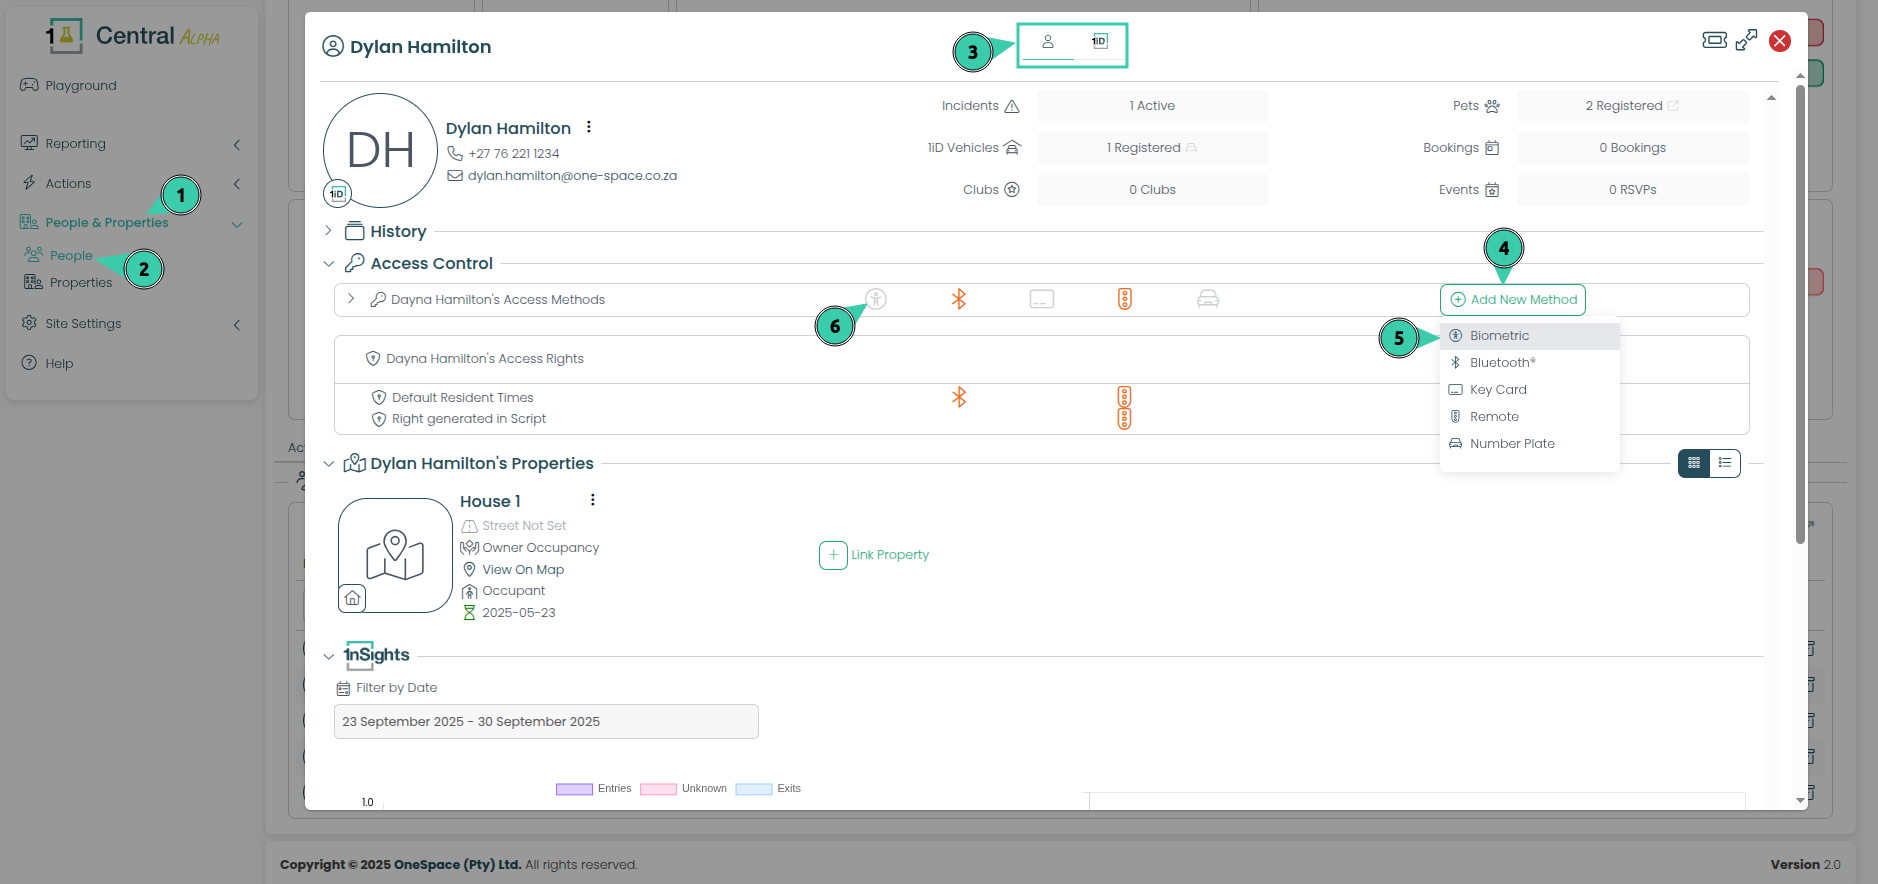
Locate the People and Properties Menu, and Select it.
Select the People Menu.
This Person has a 1iD Account linked to their Local Profile. You can click on the colored 1iD Icon to view the contact information this resident provided to Central via their OneSpace Connect App.
Go to the People Section and Select the green Add New Method button.
Select Biometric
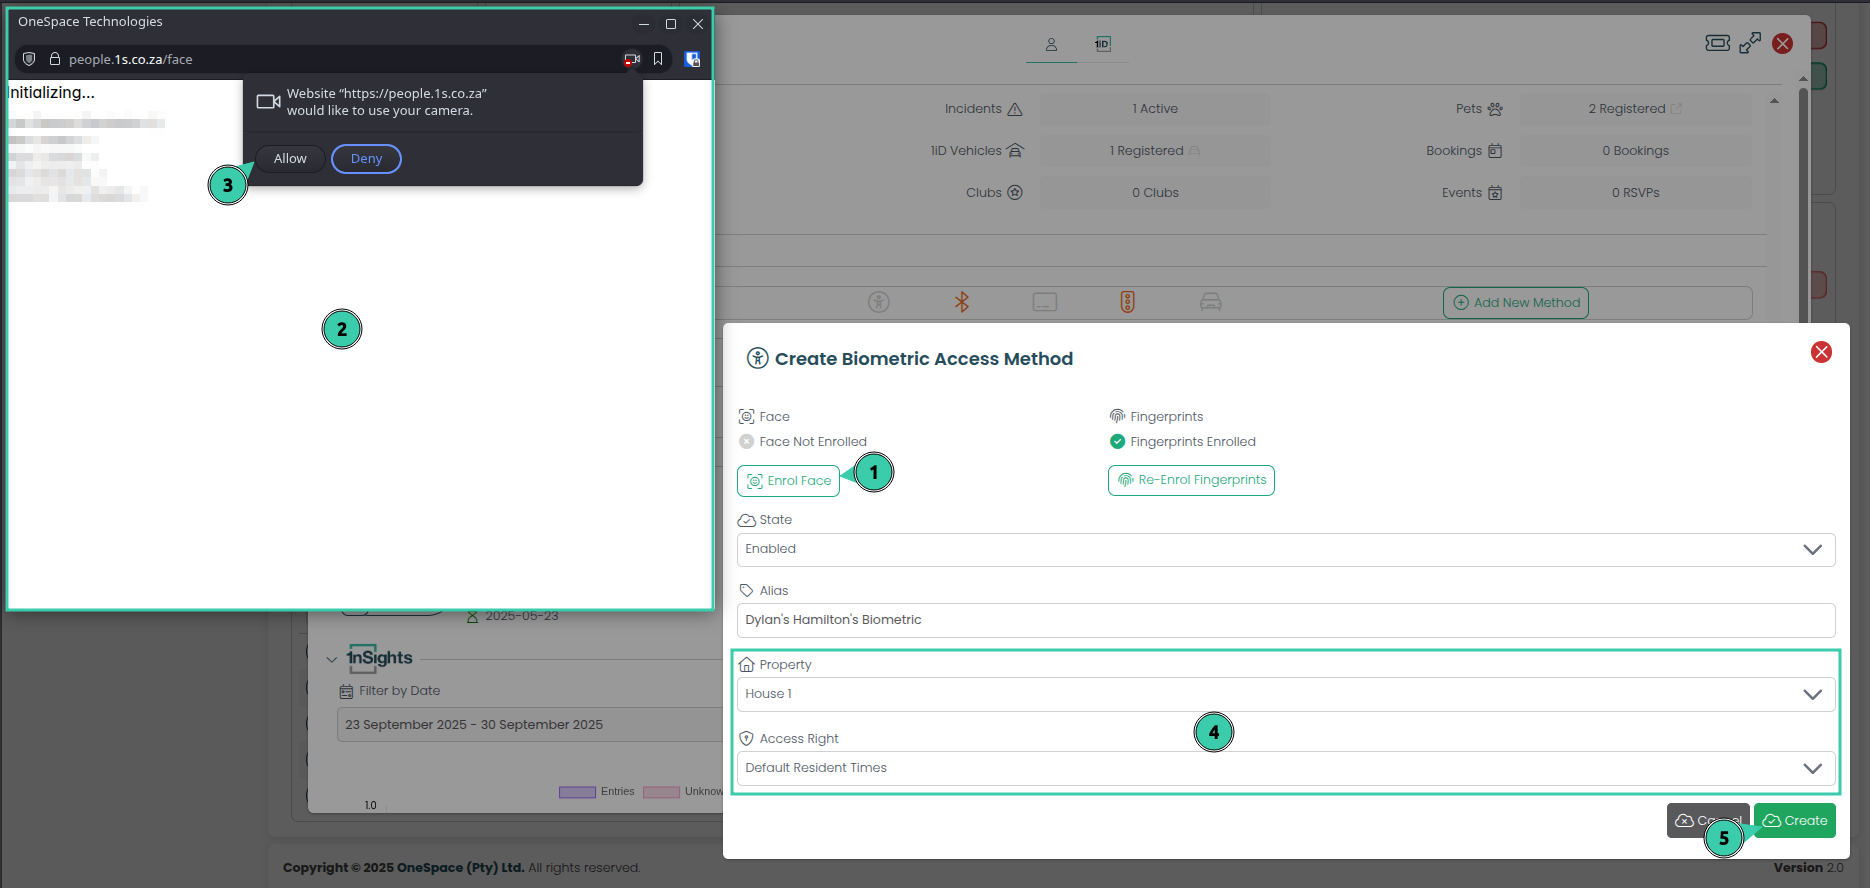
Select the Enrol Face Button to start the Face Capture process. Note that this user does not have a Face Enrolled by the status above this button. That says “Face Not Enrolled.”
Face Capture Window: This window will appear on your screen. A portrait for Face Capturing will load here.
Camera Permission: If this is the first time you are doing this process. You must allow this window to access your computers Web Camera.
You must define which Property and what Access Rights this person will have on their Access Method.
Select Create once you have completed the Face Capturing Process.
Note: In the event you need to Enrol Fingerprints to a Person Profile, please see the guide here.

6. The page will now update to show the face capturing process. Have your Local 1iD applicant now stand Infront of your web camera. Their face should be cantered in this oval.
7. Select I’m Ready to begin capturing their face.
8. Follow the instructions that appear in the window.
Note: For face capturing it is important that your environment is suitable for capturing a face profile. The following must be considered for an accurate face capture:
The subject must have a muted background behind them. Preferably a light grey.
The subject must not be wearing glasses, as the light reflections from the glasses may reduce accuracy.
There must not be any light sources directly behind or in front of the subject.
Should you need to enroll Fingerprints onto a Local Profile, please see the Fingerprint Biometric Enrollment Guide.

What are Access Rights?
Access Rights is what the OneAccess Solution uses to govern:
Where the Person is allowed Access.
When a Person is allowed Access.
The OneAccess System allows you to allocate multiple Access Rights to a person.
Lets go over how to do this now.
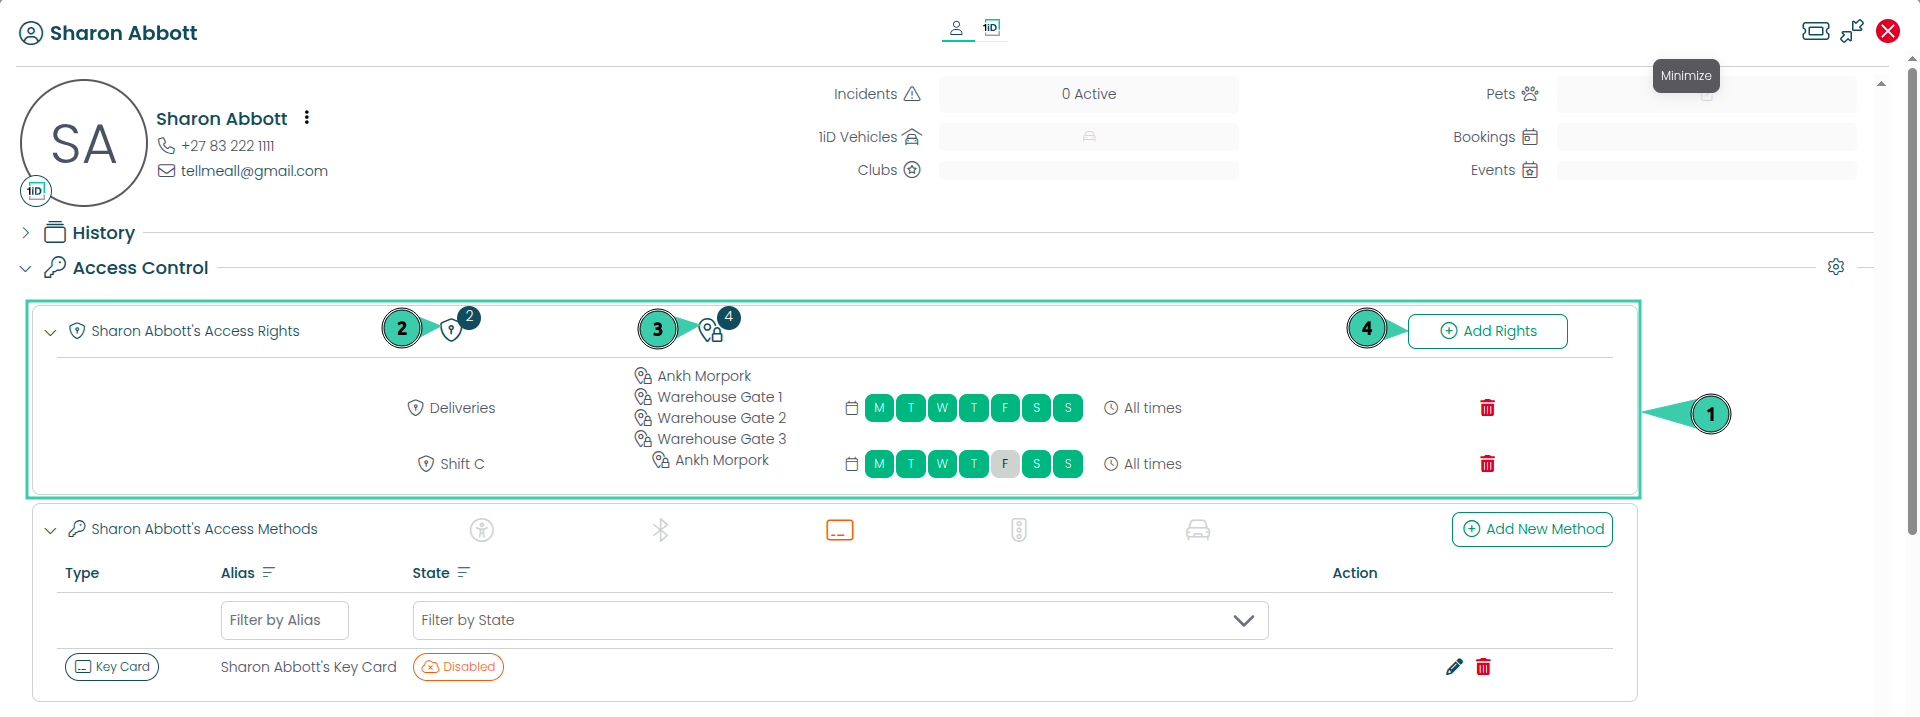
Edit the Person Profile of the individual that you want to give Access Control to.
Expand the Access Rights section.
Displays the total of Access Rights assigned to the person.
Displays total Access Points that are available for Entry or Exit.
Select “+Add Rights” to add a new Access Right.
Note: The OneAccess System by default will create an Access Right for Residents and Visitors.
Should you wish to set up an Access Right of your own please see the Creating Access Rights Guide.
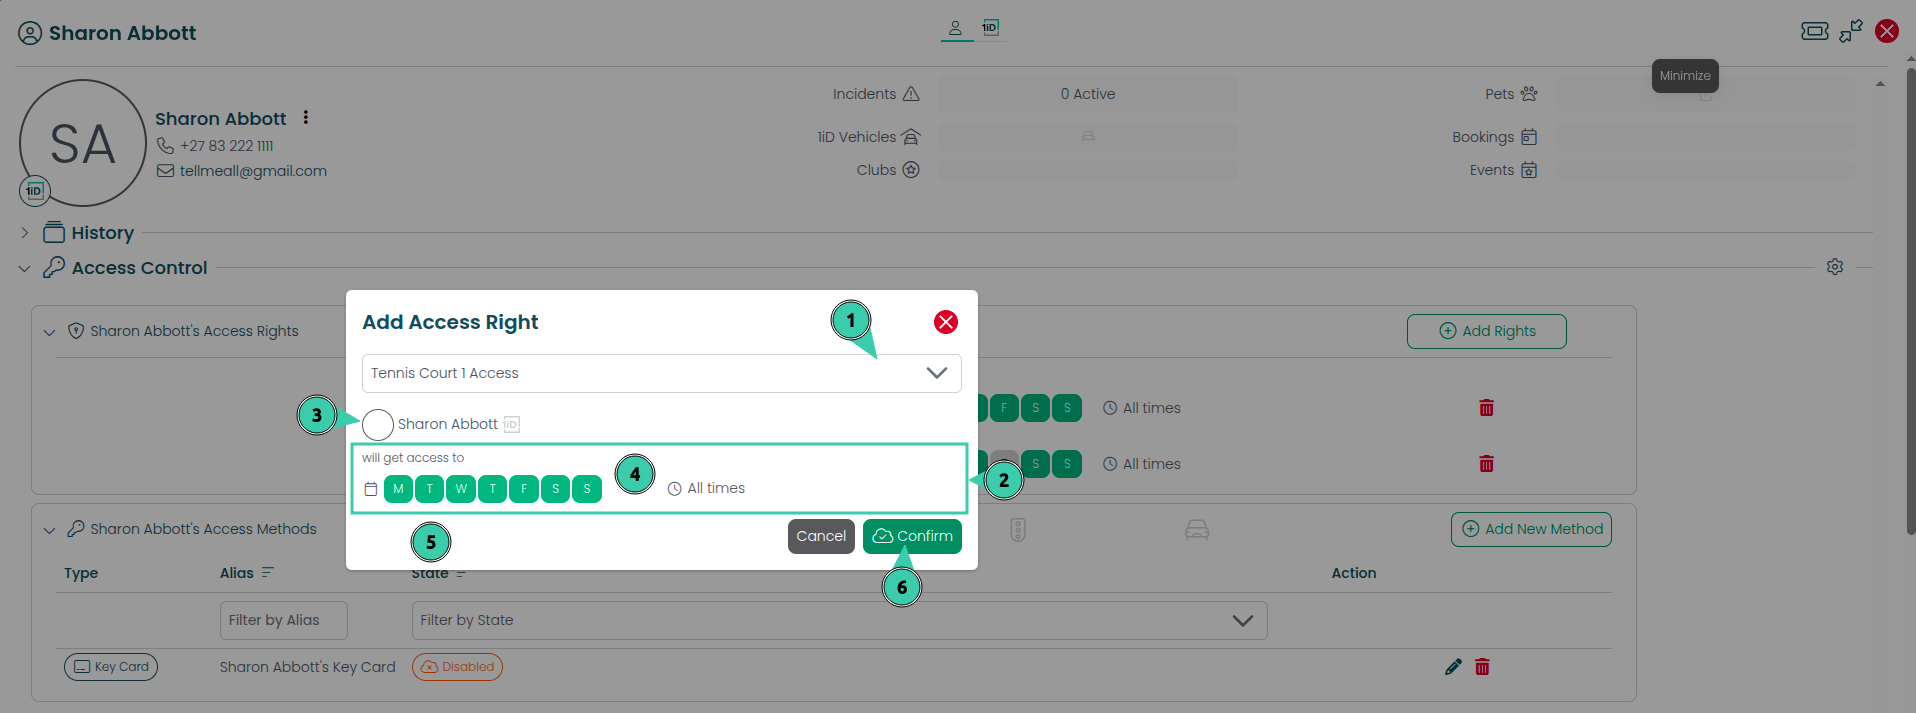
Clicking this drop down will allow you to select the Access Right name.
Displays details of the Access Right you are adding.
The Person that this Right is being added to.
When they are allowed Access with this Right.
Where they are allowed Access with this Right.
Select Confirm when done.
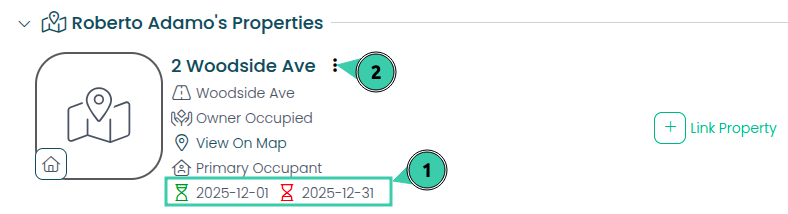
You as the Administrator can control when a Person is treated as Active on your Estate.
This is done by editing the End Date of the persons property link.
The End Date of the Persons Property is displayed under their Property Name. If this area is blank the End Date is not set and thus the person is indefinitely Active.
You can configure the End Date by clicking this button and selecting Edit. A window will appear allowing you to set the End Date for this persons property link. This End Date determines when their Access Control and ability to Generate Invites (PINs) will be terminated.
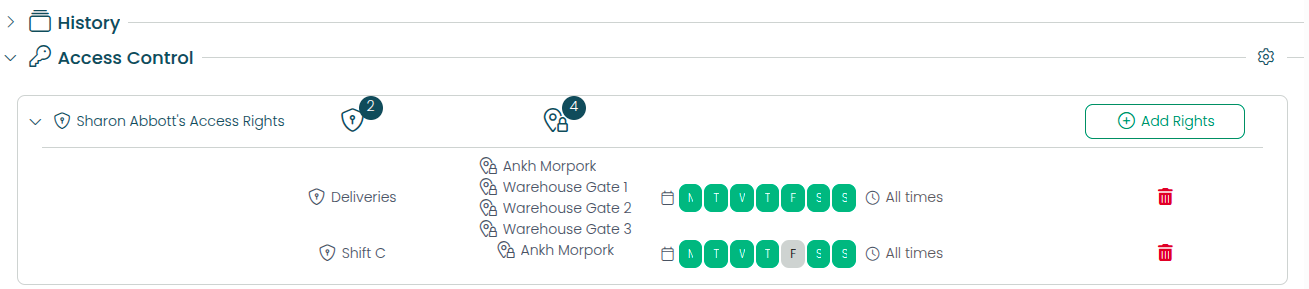
A person can have multiple Access Rights assigned to them.
Each Access Method obeys the rights set for that person.
In this example to the left, the person has 2 Access Rights assigned to them:
Rat Catchers: Restricts access to the Ankh-Morpork access point to Fridays only.
Deliveries: Grants access to Ankh-Morpork on Fridays.
If this person uses their access method on a Friday at Ankh-Morpork, they will still be allowed in because the Deliveries right permits Friday access.
Property Validity End Dates
Note: When a Property Links End Date is not set, the person will be able to generate Pins for your site indefinitely.
Access Method Validity End Dates
The Manager can further restrict the Persons Access Control Validity Period..

Access Right Considerations
To define a Validity Period for a Person’s Access Control, do the following:
Select the cog icon to the far right of the Access Control heading.
Selecting these three dots will allow you to define the Start Date and End Date of that Person’s Access Control.
If no End Date is present on ANY of your Persons Properties or their Access Control this will mean that this person will have indefinite Access Control to your site.
You are restricted to set an Access Control Validity Period that is within the Person’s Property Start and End Dates.
If a person has multiple property links, the Access Control Validity Period End Date must not exceed the latest End Date among all associated property links.
If a person's Property link End Date is brought forward to or set to a date earlier than the Access Control End Date, the Access Control End Date will be brought in line with the Property link End Date.