


NEW Feature
SNIPR 1insights

Thank you for selecting OneSpace Central to empower your community. We at OneSpace are more than happy to assist you in case you have any troubles with your Site Management system.
This guide was made to provide a quick reference for common actions, functions, and workings within the 1insights pages of Central. If this guide fails in assisting you with understanding the 1insights functionality, please do not hesitate to email us on support@one-space.co.za.
This guide will address the following:
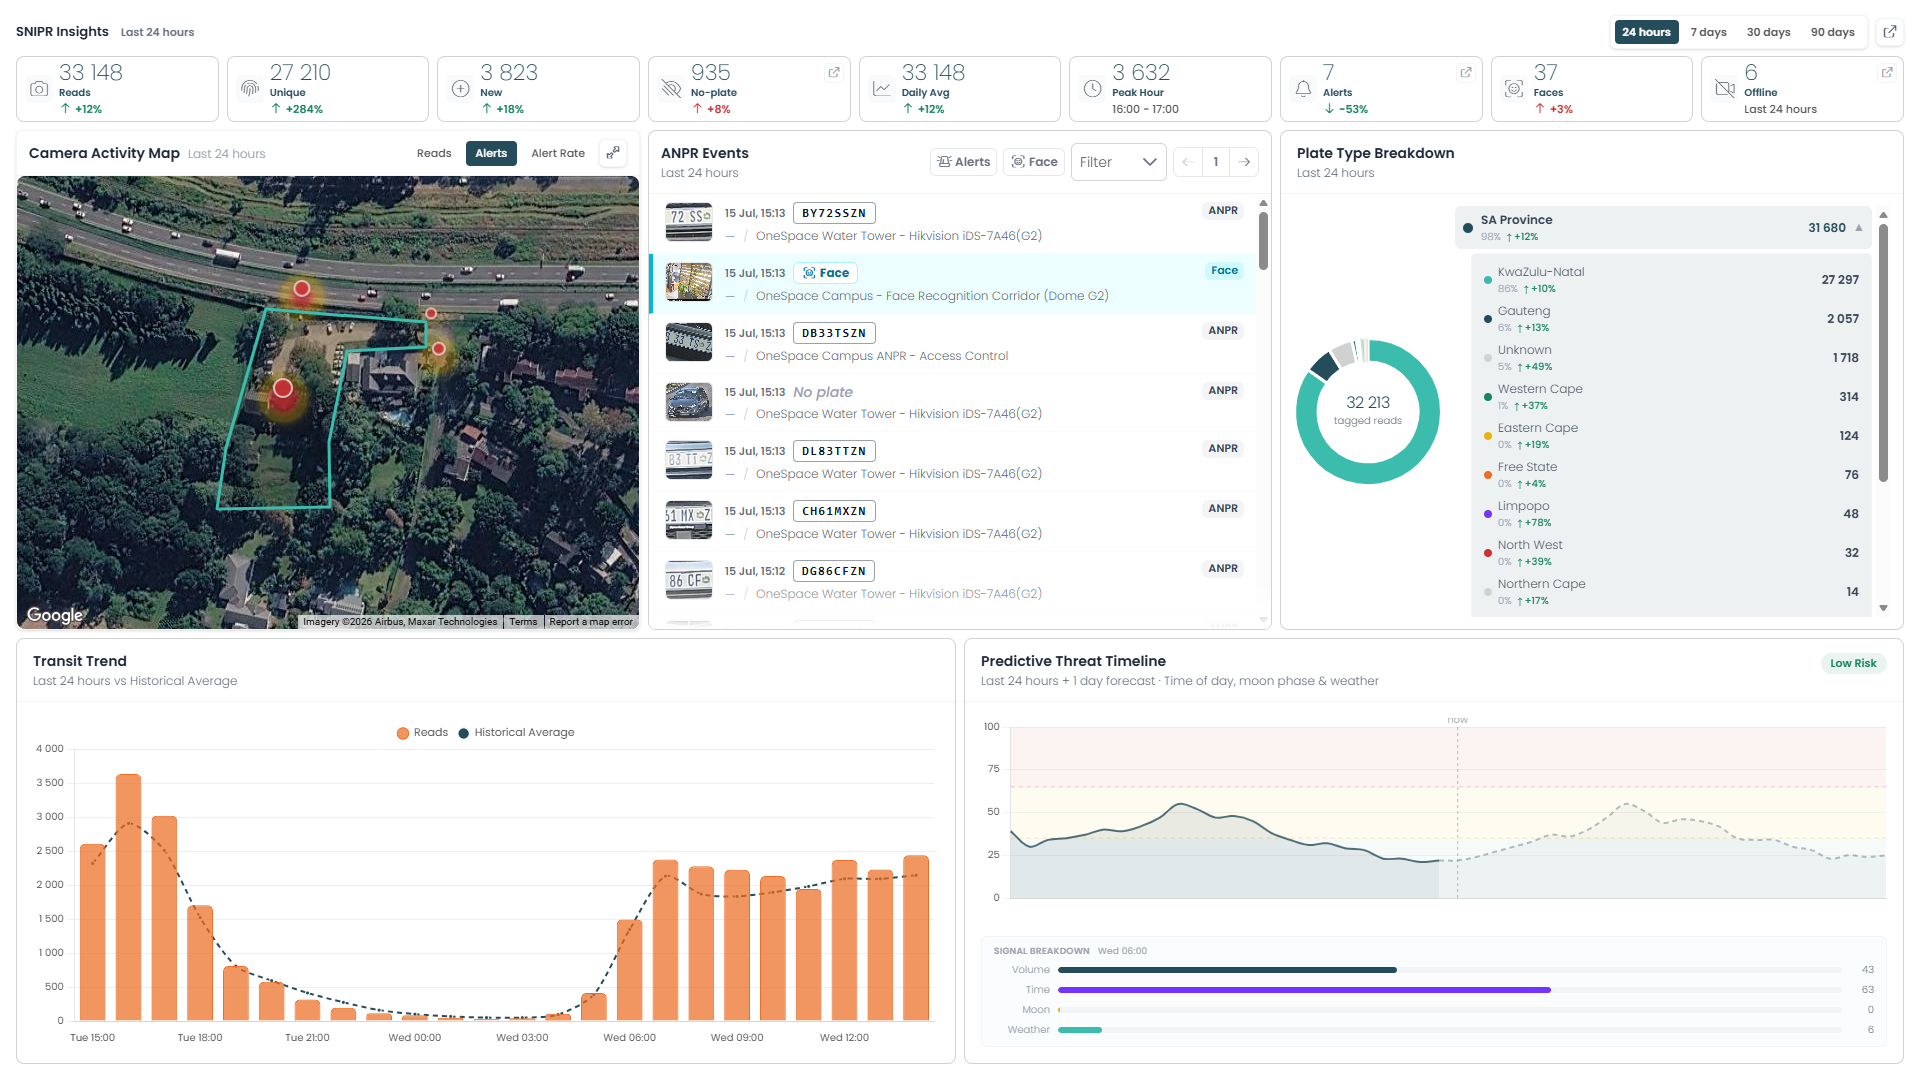
The SNIPR 1insights page gives you a real-time view of every vehicle and face your camera network has picked up — what was read, where, and whether it warrants attention. It combines a live camera activity map, an ANPR/Face event feed, a plate-origin breakdown by province, transit trend charts, and a predictive threat timeline that forecasts risk based on time of day, moon phase, and weather. Use the time range filter at the top to view activity over the last 24 hours, 7 days, 30 days, or 90 days.
Time Range & Key Stats
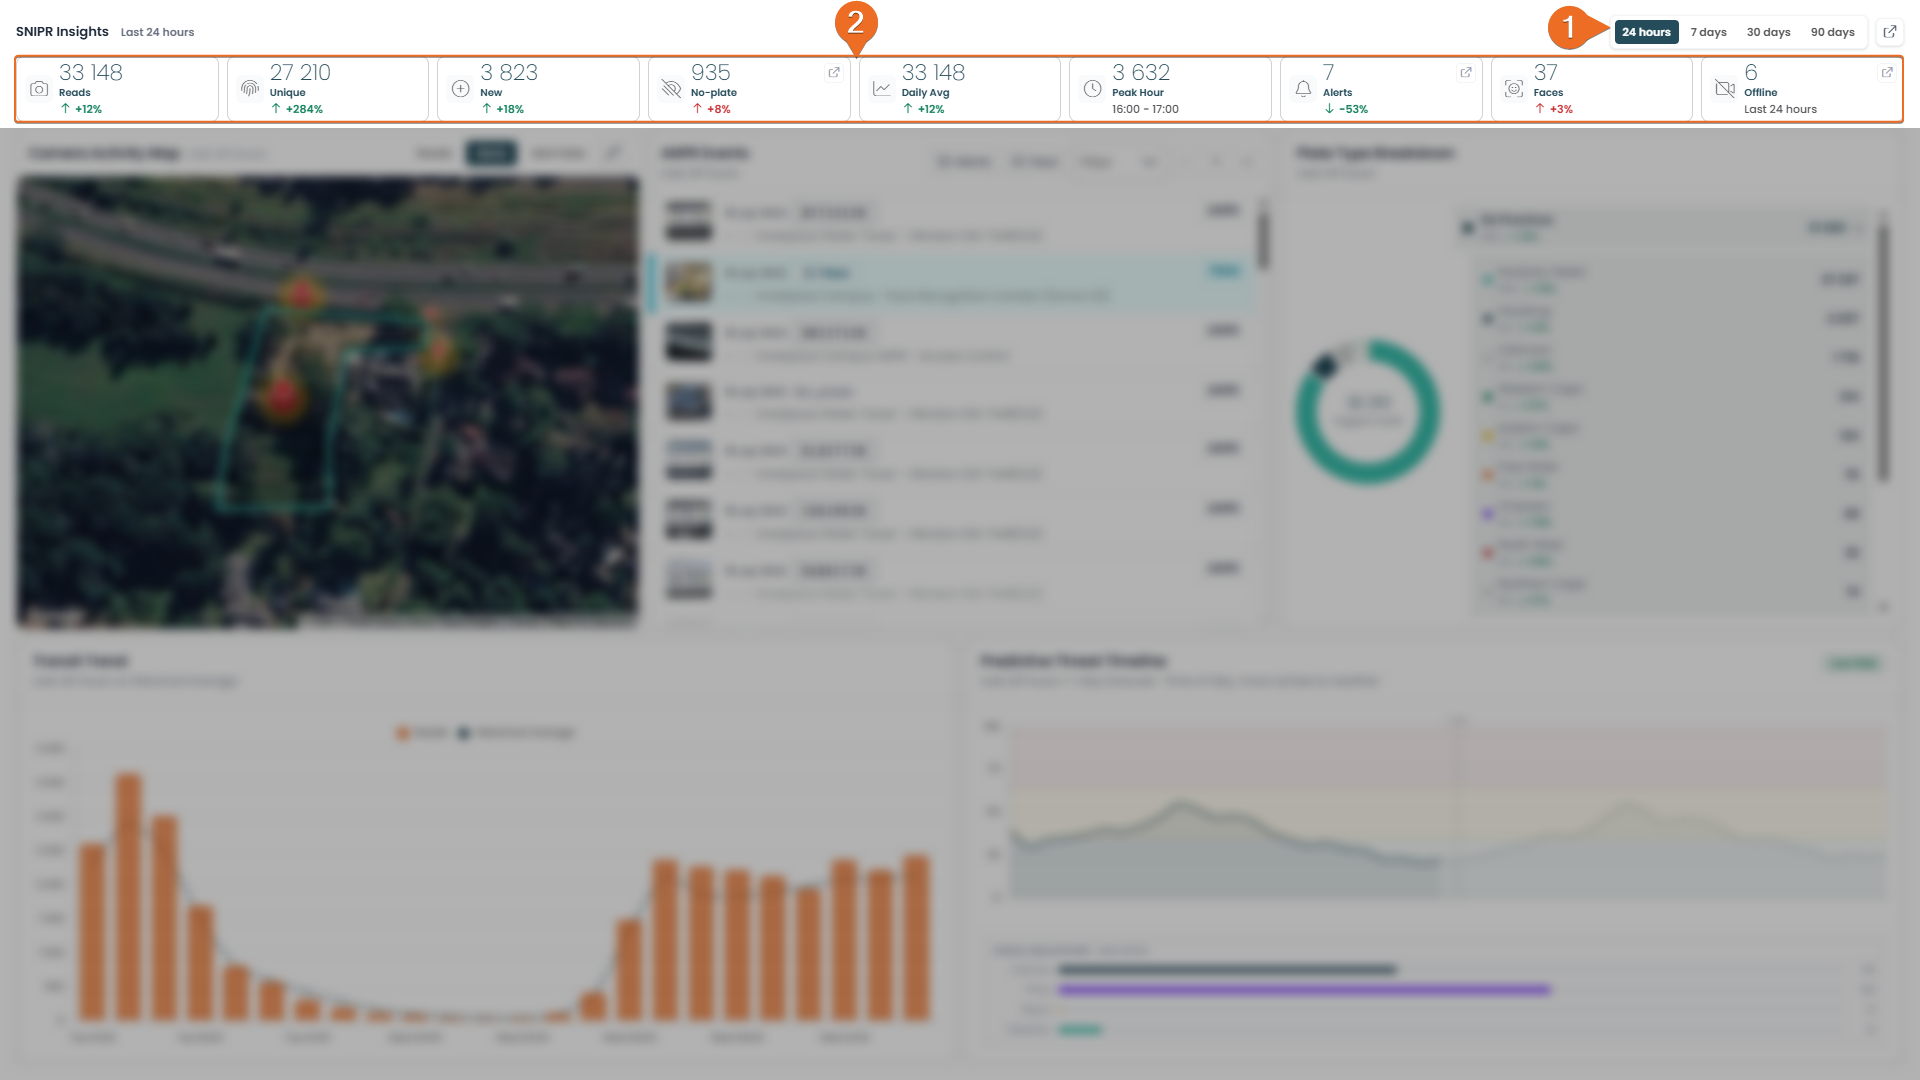
This bar sets the context for everything else on the page.
Time Range Filter: Choose the period you want to analyze: 24 hours, 7 days, 30 days, or 90 days. Every map, chart, and list on the page updates instantly to match your selection.
Key Stats: A quick-glance summary of camera network activity for the selected period: Reads (total plate/face captures), Unique (distinct vehicles seen), New (first-time plates), No-plate (vehicles detected without a readable plate), Daily Avg, Peak Hour, Alerts (watchlist/flag matches), Faces (facial recognition events), and Offline (cameras that dropped out during the period). Most cards show a percentage change against the previous equivalent period.
How to read it: Green ↑ means the number has grown since the last comparable period; red ↓ means it's dropped — note that for Alerts, a red ↓ is good news (fewer alerts), the opposite of how you'd read it for Reads or Unique. Peak Hour and Offline don't carry a comparison arrow, just a value.
What to do with it: Start every review here before drilling into the sections below. If Alerts or Offline is elevated, treat it as a trigger to jump straight to the ANPR Events feed or check camera health before anything else. A high No-plate count relative to Reads is worth a glance too — it can point to a camera angle, lighting, or plate-cover issue rather than genuine unreadable traffic.
Camera Activity Map
A heatmap of where your cameras are picking up activity, overlaid on the property boundary. Each pin marks a camera location; the warm red/orange glow shows where hits are concentrated, while cooler areas represent lighter, baseline activity.
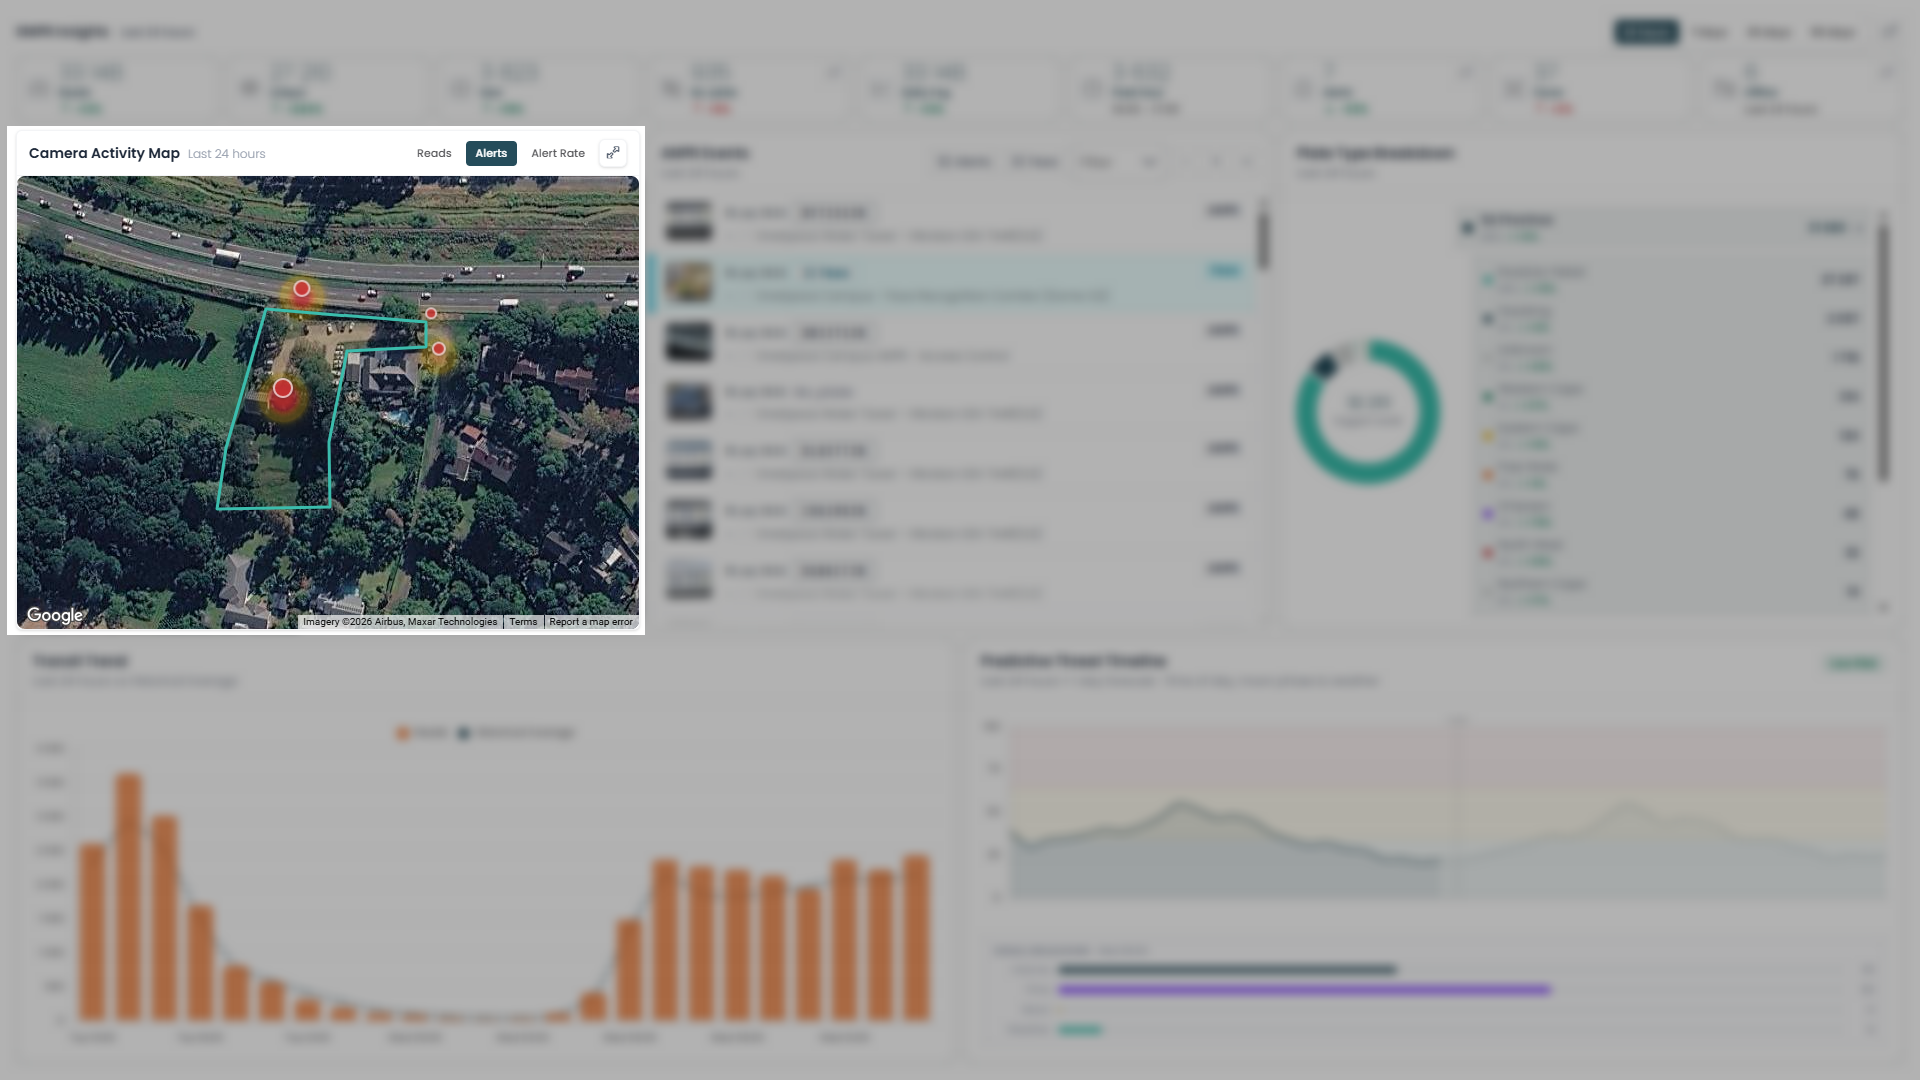
View toggle: Switch the map between Reads (raw plate/face capture volume), Alerts (only flagged/watchlist matches), and Alert Rate (alerts as a proportion of reads, useful for spotting a camera with a disproportionately high hit rate rather than just high traffic).
How to read it: The brighter and redder a cluster, the more activity that camera has logged relative to the rest of the network. Switching to Alerts strips away routine traffic and shows you only where flagged events are actually happening — which isn't always the busiest camera.
What to do with it: Start on Reads to see where traffic is heaviest, then flip to Alerts to check whether that's also where your risk is concentrated — the two don't always line up, and a quiet camera with a spike in Alerts is often more worth investigating than a busy one with none. Use the enlarge icon (top right of the panel) to pull up a bigger view when you need to inspect camera positions or the boundary overlay more closely.
ANPR Events (Part 1: The Feed)
A live, feed of every plate read and face recognition event captured in the selected time range, newest first. Each entry shows the time, plate number (or No plate if unreadable), the camera/device that captured it, and a type tag (ANPR or Face).
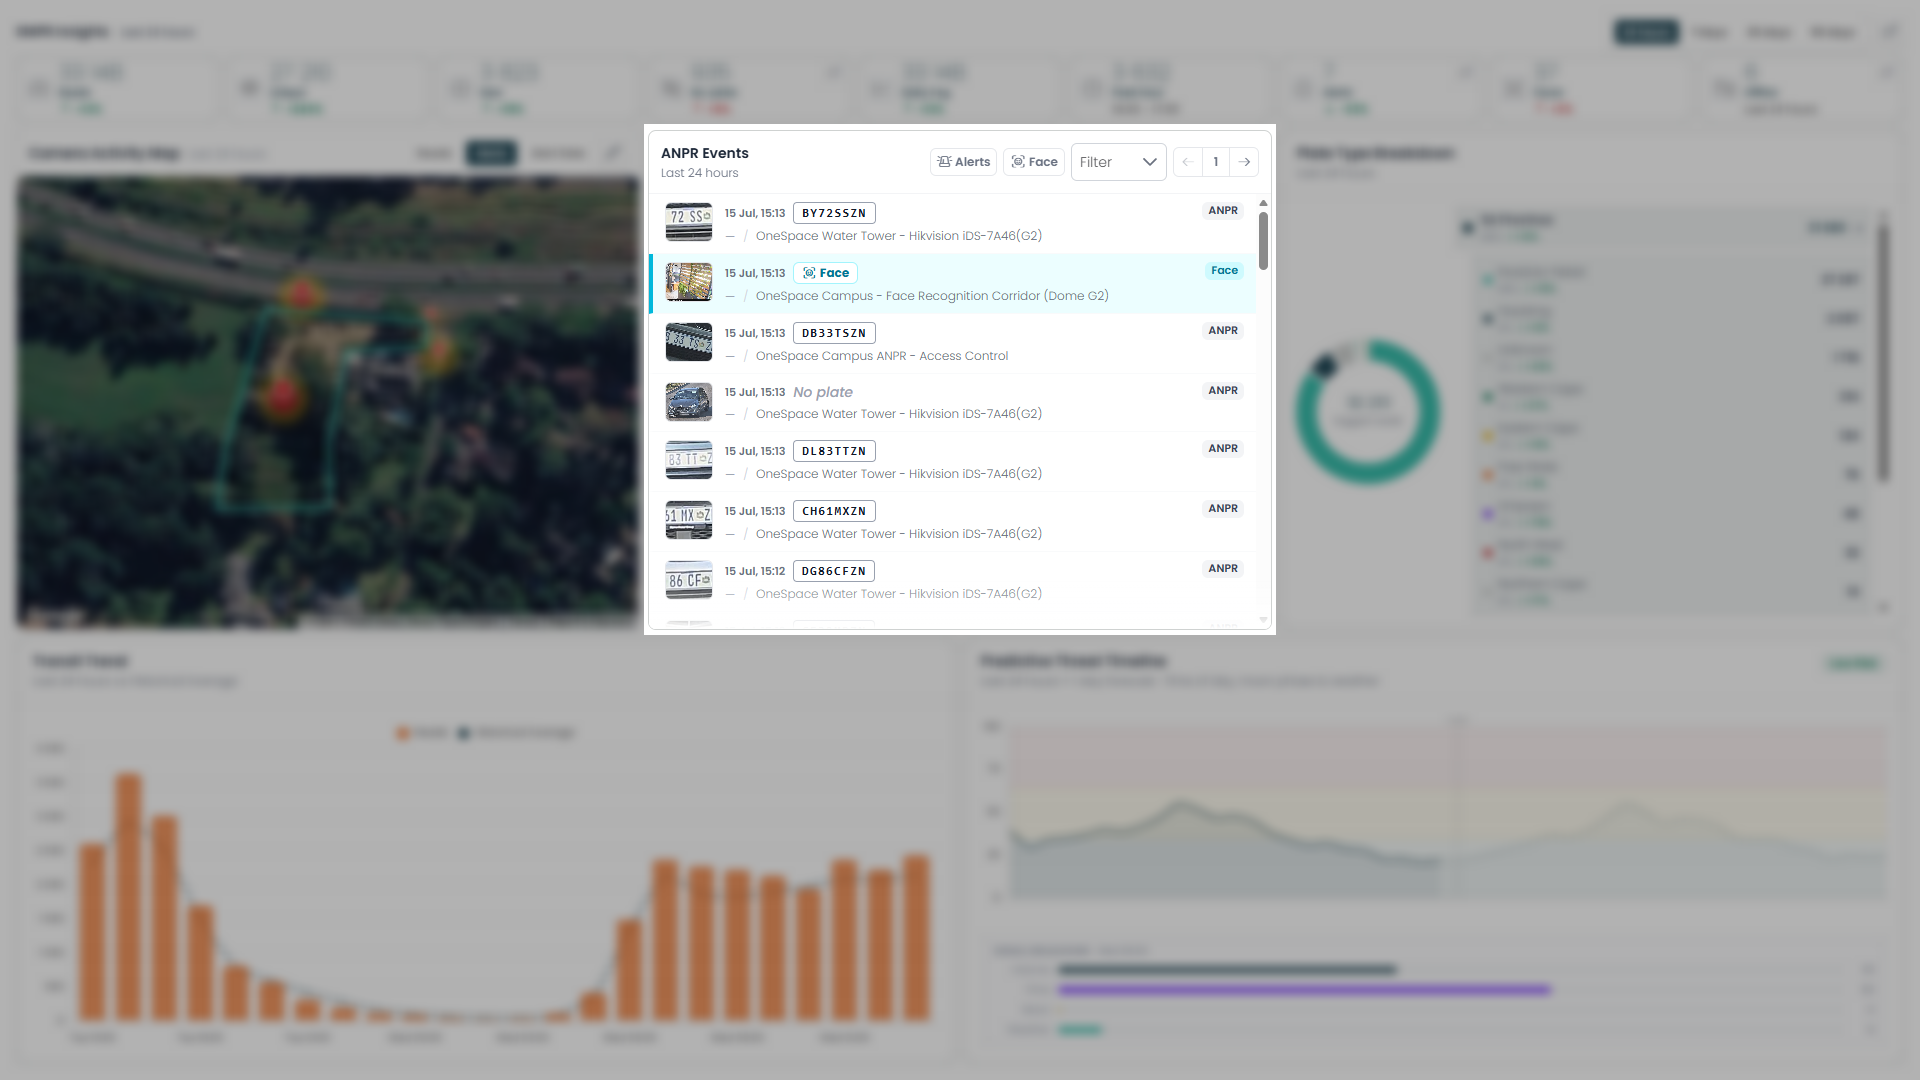
How to read it: Use the Alerts and Face toggle buttons to narrow the feed to just flagged matches or facial recognition events, or use the Filter dropdown for more specific criteria. The thumbnail on the left is the actual captured image for that read.
What to do with it: Scan this feed at the start of a shift to review recent activity, or filter to Alerts to confirm nothing flagged needs immediate follow-up. Click on any row to drill into the full history for that plate — which is exactly what Part 2 below covers.
ANPR Event Details (Part 2: The Drill-Down)
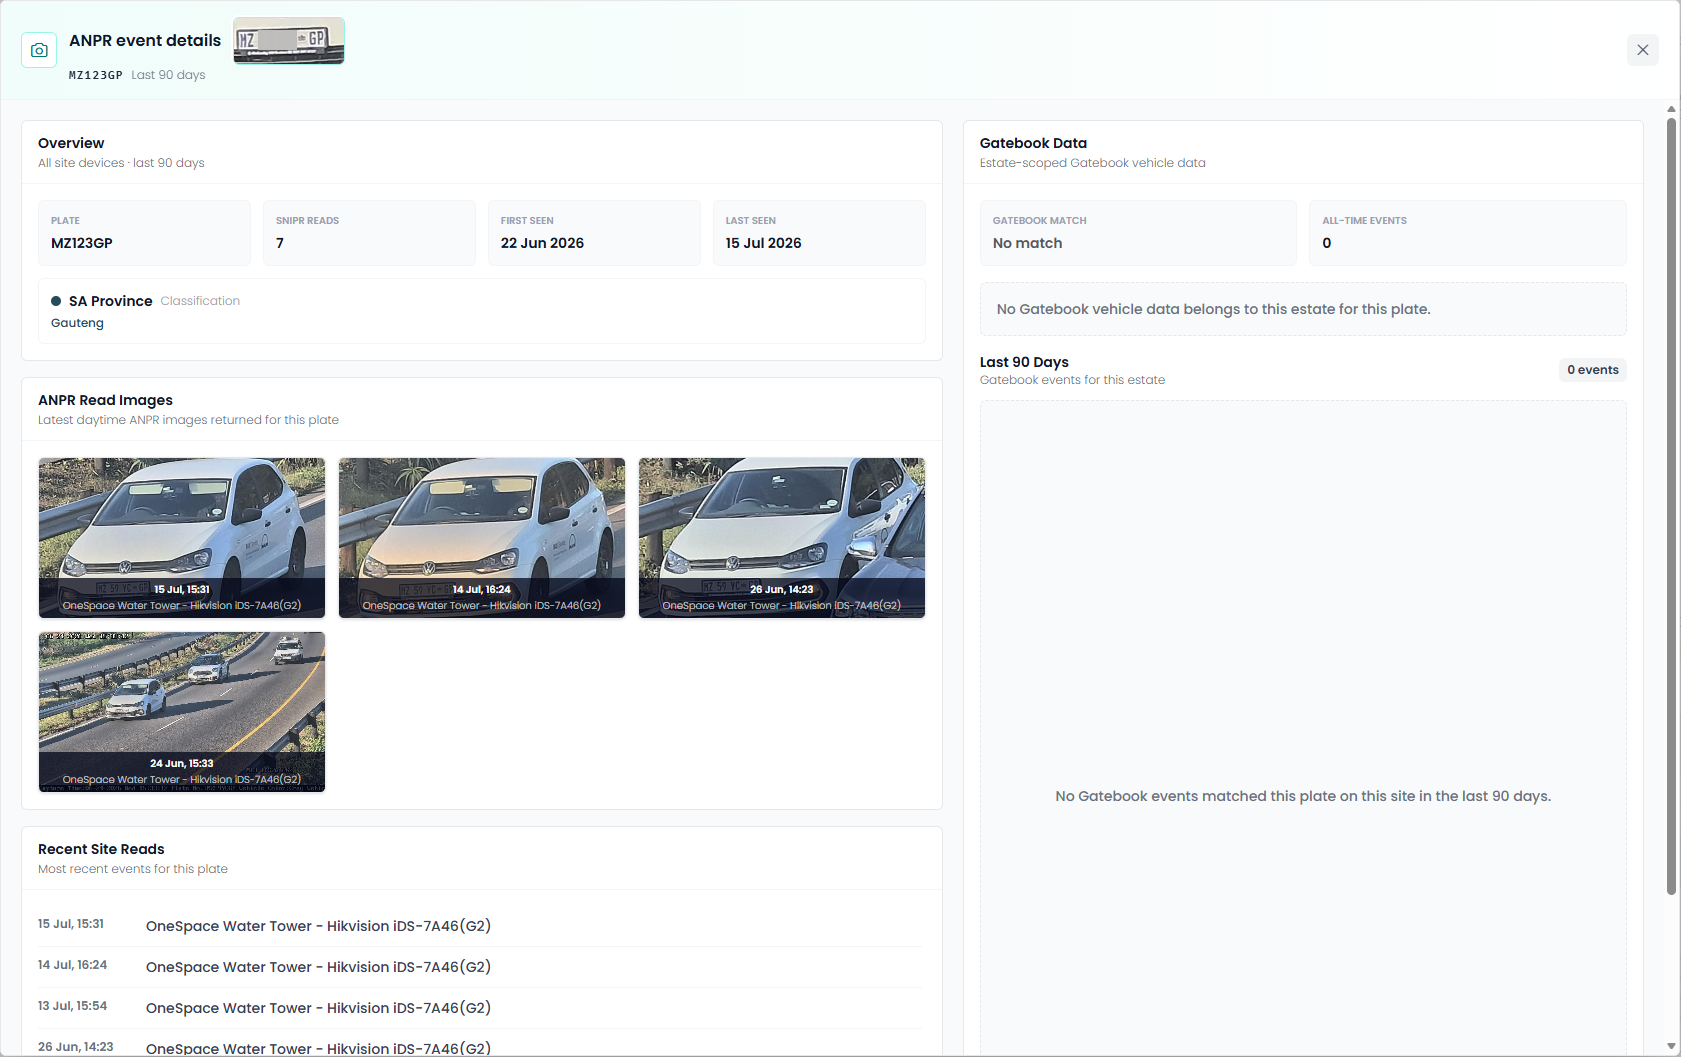
Clicking any row in ANPR Events opens the full profile for that plate: an Overview (classification/province, total SNIPR reads, first seen, last seen), a gallery of ANPR Read Images (recent daytime captures), a Recent Site Reads timeline (every camera/time this plate was seen on site), and Gatebook Data — whether this plate matches a known vehicle registered to the estate, and how many Gatebook events exist for it.
Why this matters: A single row in the feed only tells you one moment. This view tells you the plate's whole story on your SNIPR Site — how often it's really been here, whether it's a known/registered vehicle, and whether it's ever matched a Gatebook entry. That's the difference between "a car drove past" and "this car has been here 7 times over 90 days and isn't registered to anyone."
What to do with it: Whenever a plate in the feed looks unfamiliar, appears repeatedly, or triggers an alert, drill in before deciding it's nothing. Pay particular attention to Gatebook Match: No match paired with a high SNIPR Reads count — a plate with no Gatebook record but frequent, recurring visits is a strong candidate for follow-up with security or the estate office.
Plate Type Breakdown
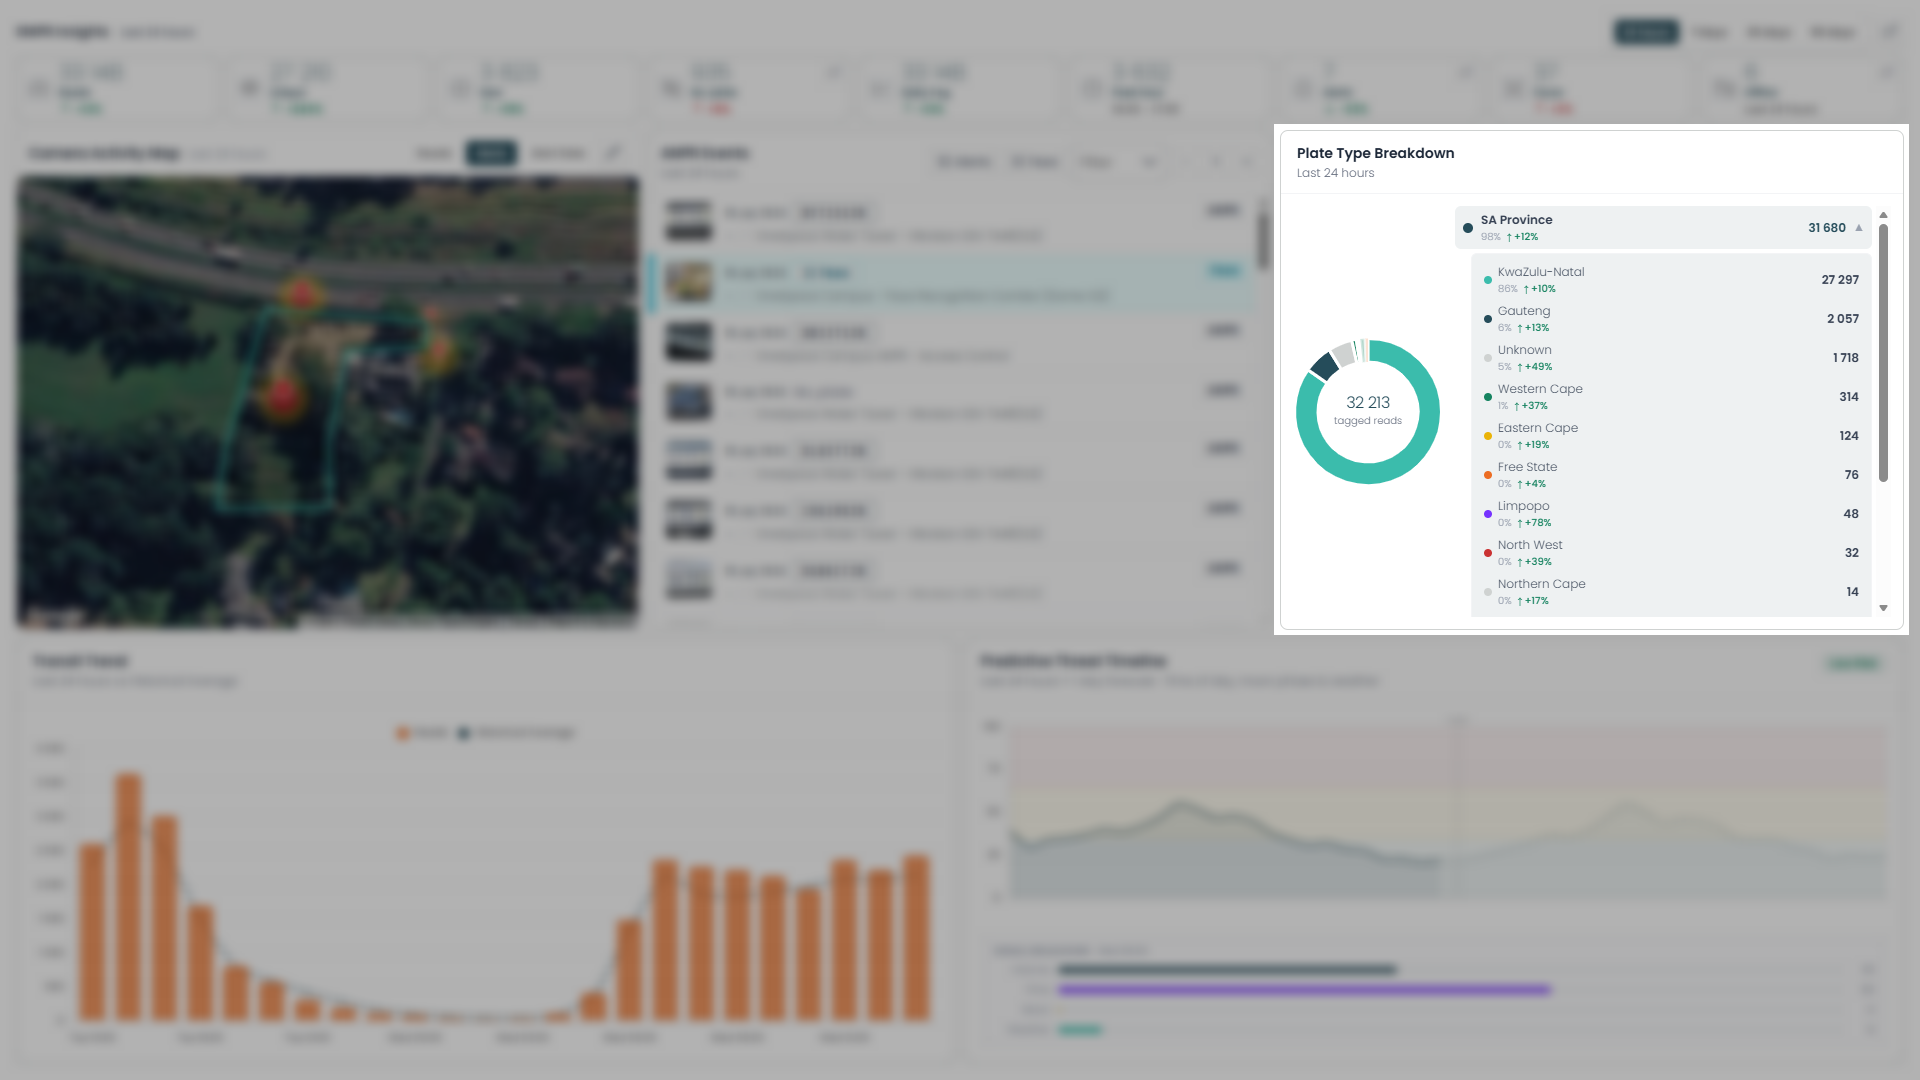
A donut chart showing where the plates your cameras have read are registered, broken down by province (with the total tagged reads shown in the center). Expand SA Province to see the split across all nine provinces, plus an Unknown category for reads that couldn't be classified.
Click to filter: Selecting a province in this list filters the ANPR Events feed to show only plates registered to that province — a quick way to isolate, say, every out-of-province plate seen today without building a filter manually.
How to read it: Each row shows a province's share of total tagged reads, the count, and its change versus the previous equivalent period. Since this is a residential estate, you'd expect the local province (here, KwaZulu-Natal) to dominate — the further down the list you go, the more those plates stand out as coming from further afield.
What to do with it: Use this to sanity-check the makeup of your traffic — a sudden jump in an out-of-province or Unknown share is worth a look, especially alongside a rise in Alerts on the Key Stats bar. It's also a useful long-range view (7/30/90 days): a growing proportion of unfamiliar-province plates over time can flag a broader pattern that a single day's reads wouldn't show.
Transit Trend
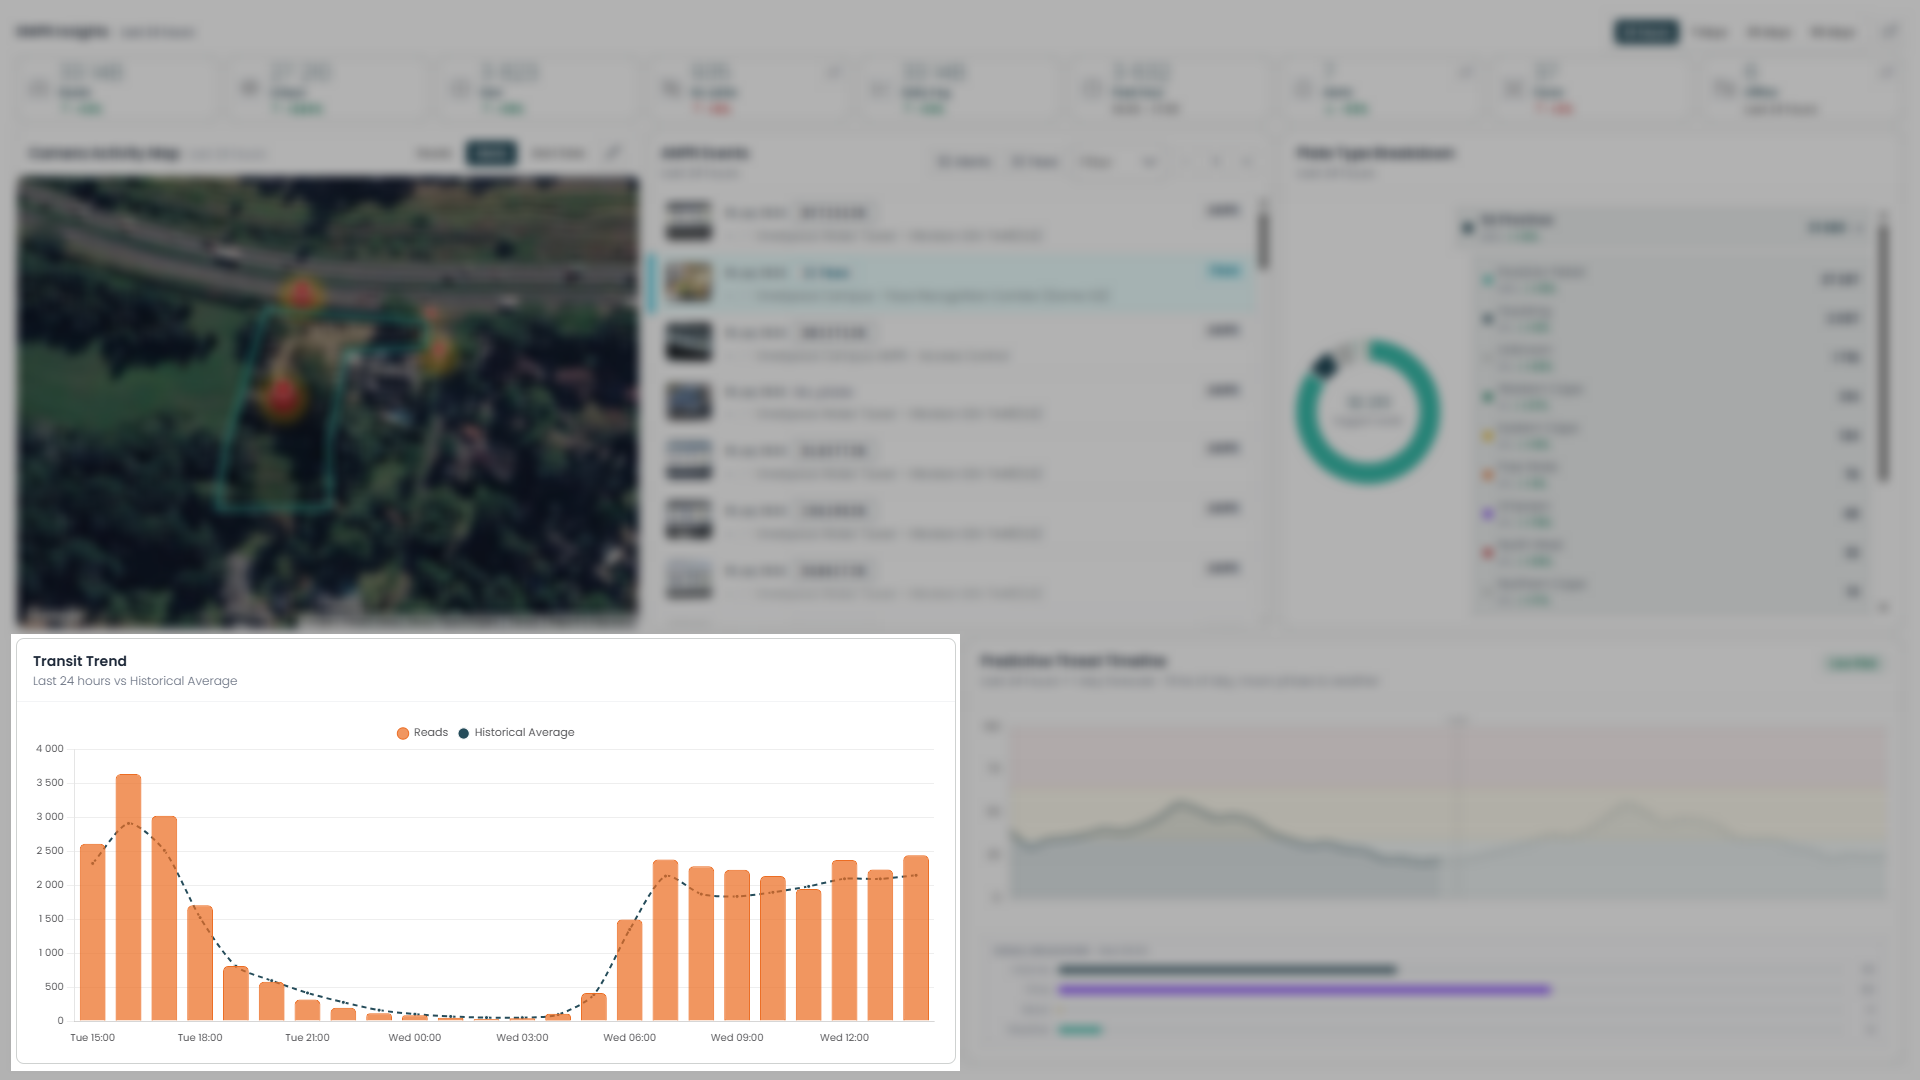
A combo chart plotting reads over time (bars) against the typical pattern for that period (dotted line), so you can see not just volume, but whether it's normal for the time of day.
How to read it: Each bar is the number of reads in that time slot; the dotted Historical Average line is what's typically expected at that same time. Bars rising above the line mean busier than usual; bars sitting below mean quieter than usual. The shape also reflects your site's natural rhythm — a dip overnight, rising again through the day.
What to do with it: Use this to plan camera monitoring and patrols around real peak times rather than guesswork — it's the detailed, hour-by-hour version of the Daily Avg and Peak Hour stats up top. More importantly, watch for bars that break away from the dotted line: a spike at an hour that's normally quiet (like the middle of the night) is exactly the kind of anomaly worth cross-checking against ANPR Events for that specific window.
Predictive Threat Timeline
A forecast chart that scores overall risk (0–100) for your site, combining the last 24 hours (solid line) with a 1-day-ahead forecast (dotted line), split by a now marker. The colored bands in the background — green/blue (low), yellow (elevated), red (high) — show which risk tier the score falls into at any point, and the Low Risk badge (top right) reflects where the score sits right now.
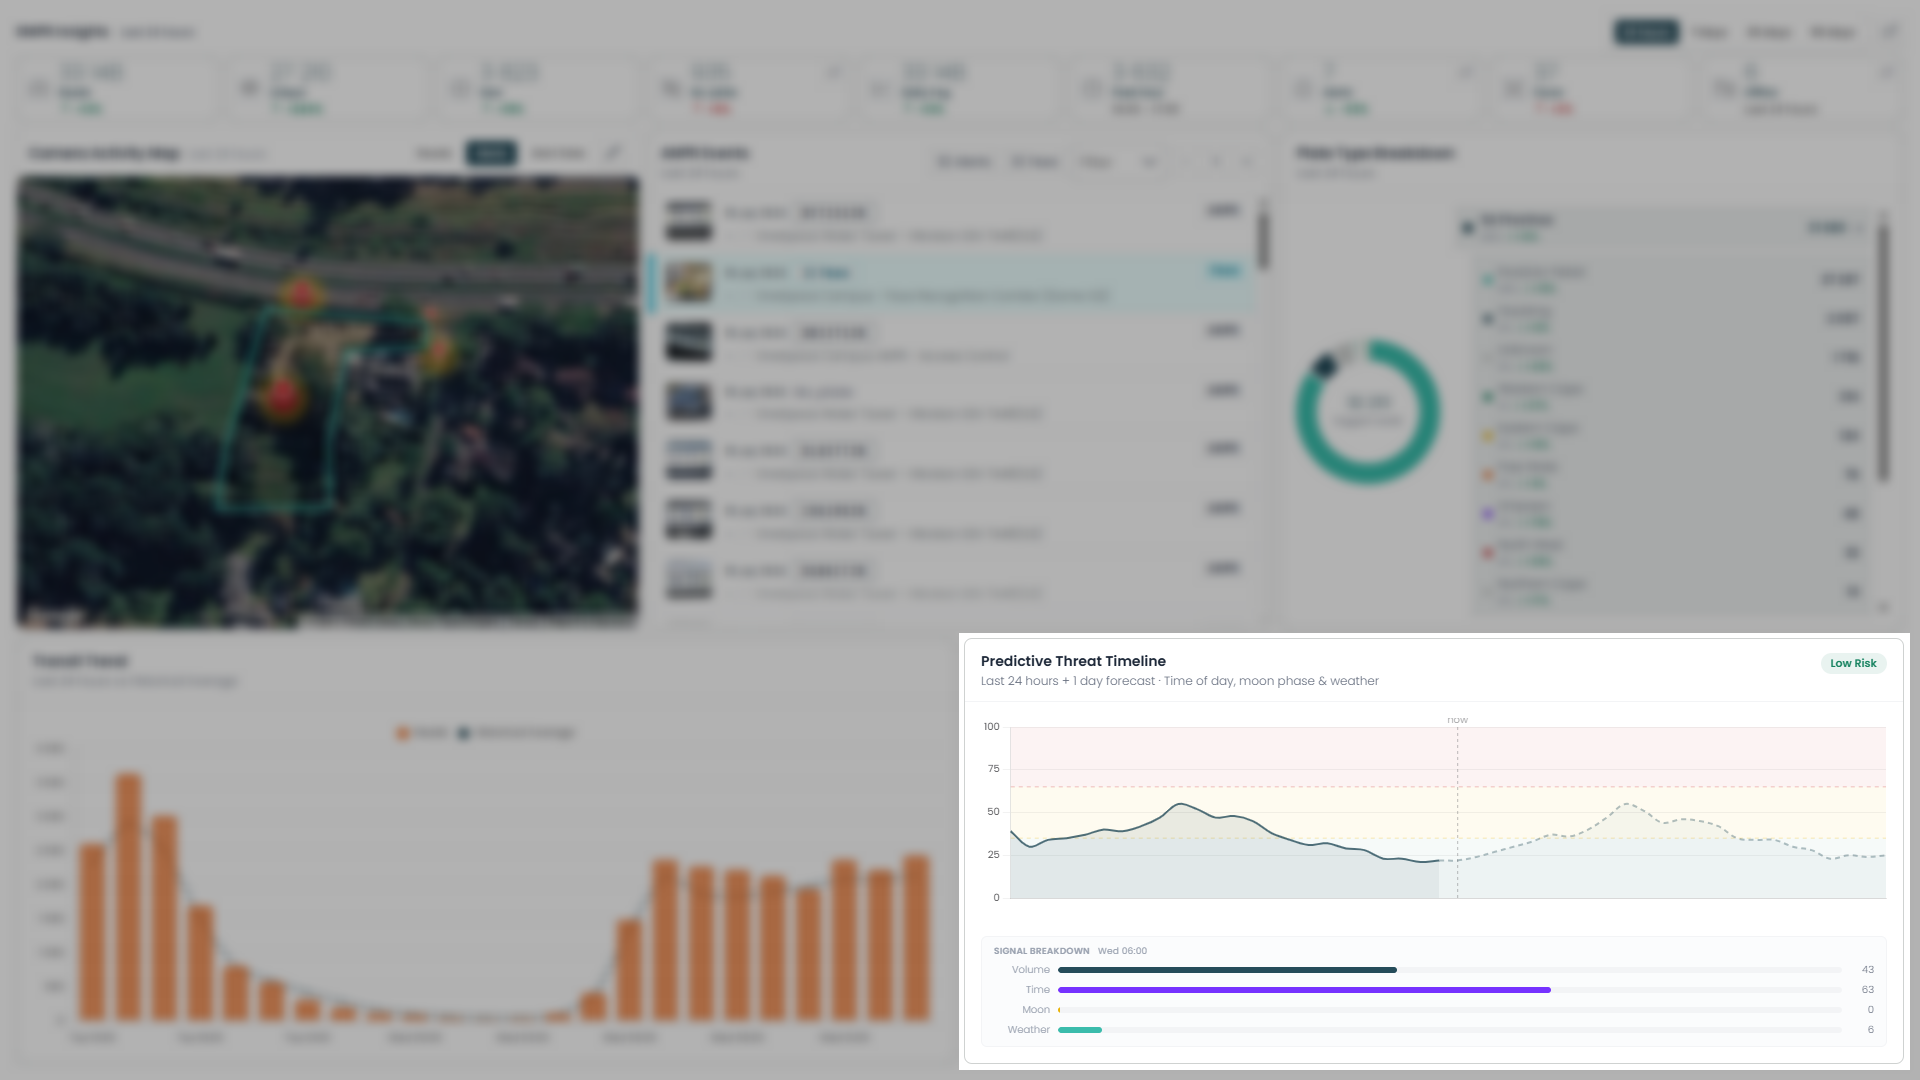
Signal Breakdown — Hover over any point on the timeline to see what's driving the score at that moment: Volume (how much activity), Time (how unusual the hour is), Moon (moon phase), and Weather — each shown as its own contributing value.
How to read it: A rising line moving into the yellow or red band means the model expects elevated risk soon, based on patterns like unusual timing, past incident correlation, or forecast conditions — not a single visible event. The Signal Breakdown tells you why the score is what it is at a given hour, rather than leaving it a black box.
What to do with it: Use the overall badge as your at-a-glance check — if it ever moves out of Low Risk, look at where the line is heading (rising into the forecast half) and check the Signal Breakdown to see which factor is driving it. If Time or Volume is the dominant signal heading into an odd hour, that's your cue to increase monitoring or patrols during that window before it happens, rather than reacting after the fact.
SNIPR MultiSight 1insights
Everything above describes SNIPR 1insights for a single SNIPR Site. Central Multi-Sight gives you the same page for your whole portfolio at once.
Rather than logging into each site separately, the Multi-Sight version consolidates ANPR and Face activity from all the sites you manage into one view. Every section you already know — Time Range & Key Stats, the Camera Activity Map, the ANPR Events feed and drill-down, Plate Type Breakdown, Transit Trend, and the Predictive Threat Timeline — works exactly as described above. The only difference is that each one now reports across multiple sites instead of one.
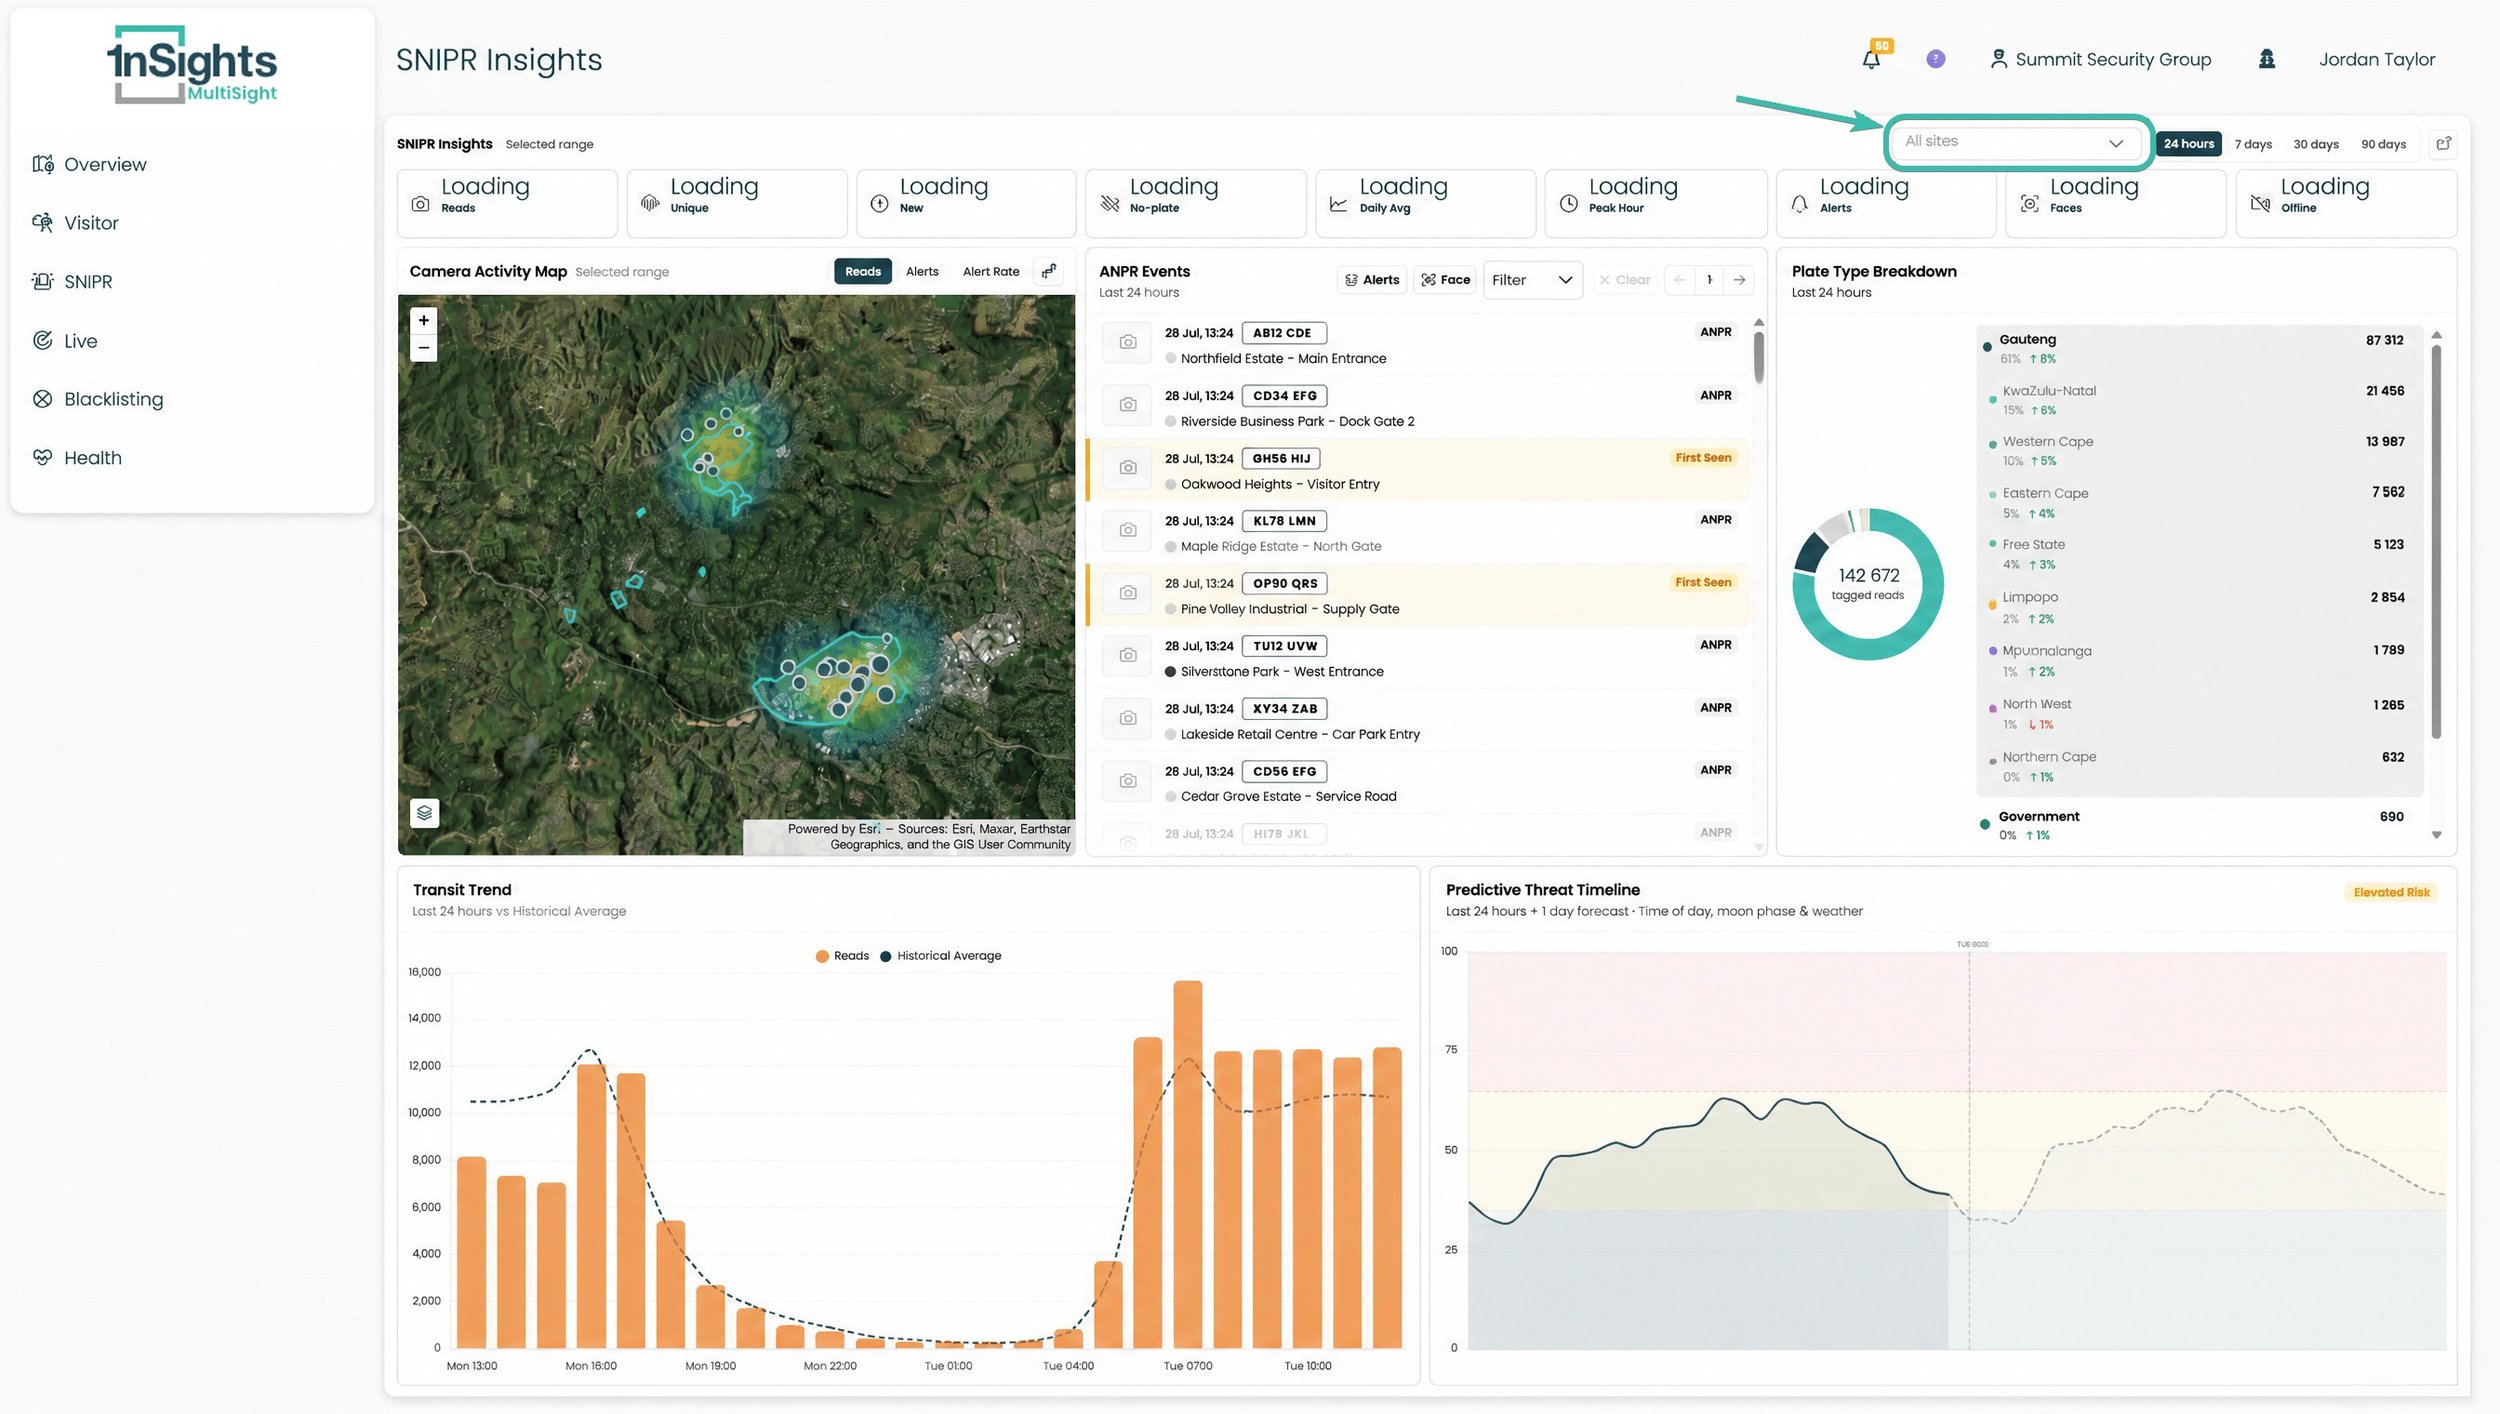
The control that makes this possible is the site selector at the top right, labelled All sites. Leave it on All sites for a full network-wide view, or open it to tick only the sites you want to focus on. Every stat, map, feed, and chart on the page updates instantly to match your selection — the same way the time range filter updates the page for a single site.
If you run more than one SNIPR-enabled site, this is the fastest way to see where reads and alerts are concentrated across your entire network, compare sites against each other, and spot the one site that needs attention — all without switching between them one at a time.
1insights Overview — Site Selection
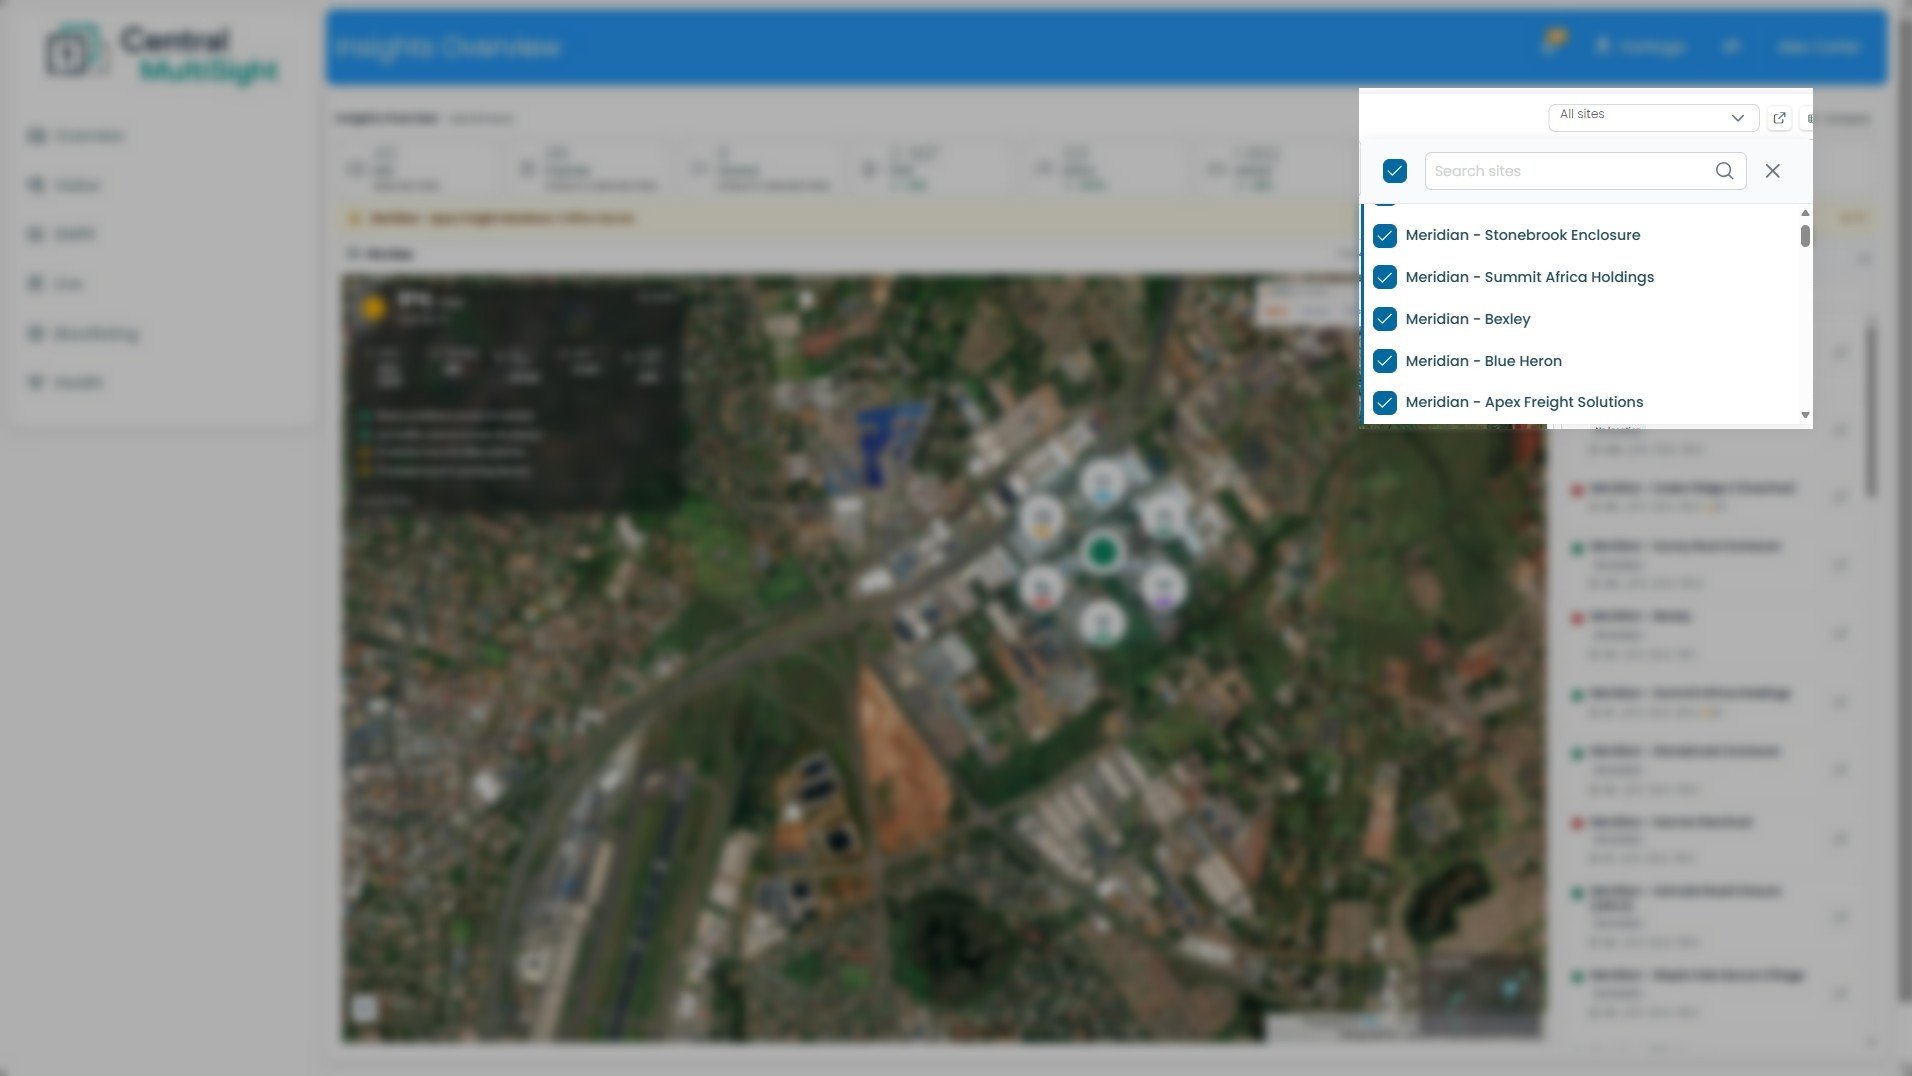
This is the control that decides which of your sites the entire dashboard reports on. Everything else — the Key Stats, the map, and the per-site list — reflects whatever you select here.
Site selector ("All sites") — The dropdown at the top right of the dashboard. Click it to open the site list shown here. The label reflects your current selection: All sites when everything is included, or a count/site name when you've narrowed it down.
Select-all checkbox — The ticked box at the top left of the panel. Use it to select or clear every site at once, rather than ticking them individually.
Search sites — Type here to filter the list by name — useful when you manage a long list of sites and want to jump straight to one.
Site checklist — Each site in your portfolio with a checkbox. Tick the sites you want included and untick the ones you don't; the dashboard updates to match. (In this view all sites are ticked, matching the "All sites" state.)
Close (X) — Closes the selector and returns you to the dashboard with your selection applied.
How to read it: A ticked box means that site's data is included in everything on the dashboard. "All sites" in the selector label confirms your whole portfolio is in view.
What to do with it: Start with All sites for a portfolio-wide view, then narrow down when you need to focus — for example, tick only the sites in one region, or a single site you're investigating, so the stats and map show just that group. Use Search sites to find a specific site quickly instead of scrolling.
1insights Overview — Site Metrics
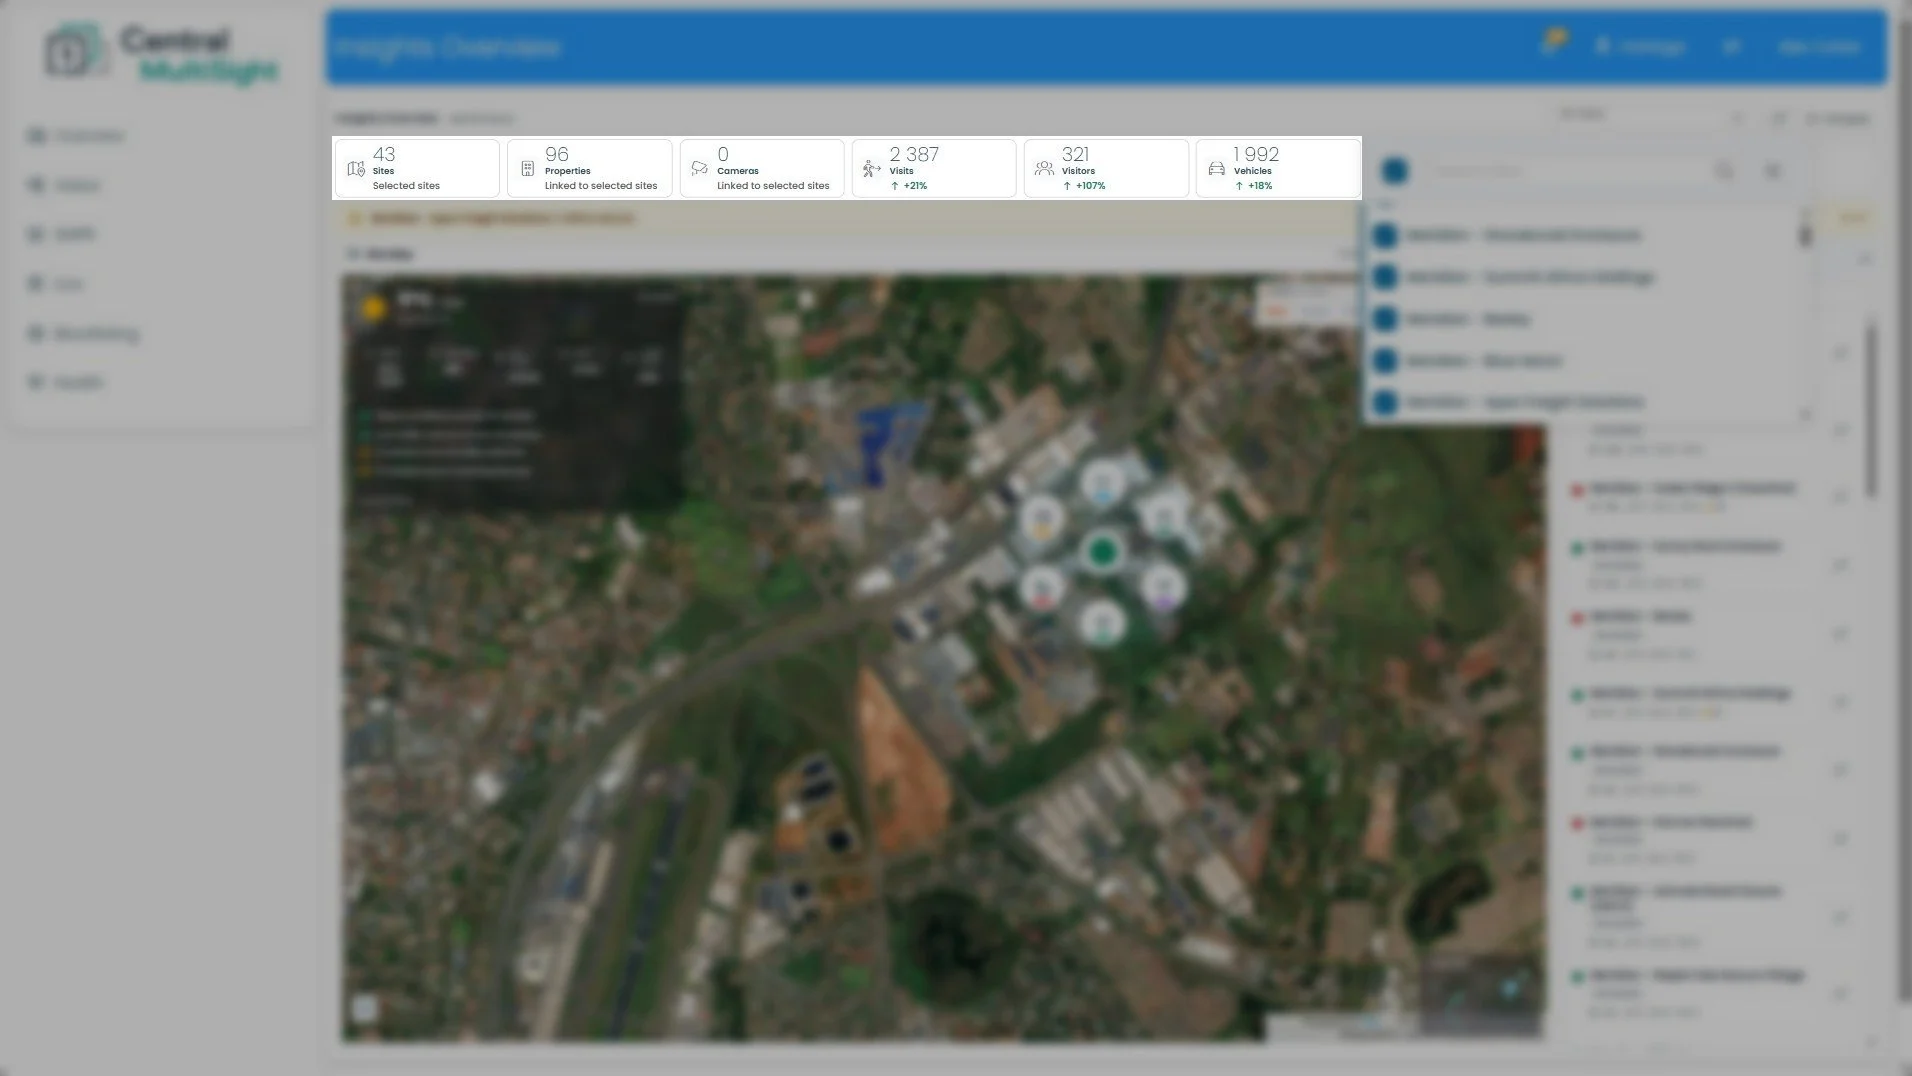
This row sits directly below the header and summarises activity across every site you currently have selected. It's the multi-site equivalent of the single-site Key Stats bar — the difference is that these totals roll up all selected sites into one figure, rather than reporting on a single estate. Change your selection in the site selector (Section 2) and these numbers update to match.
How to read it: The first three cards (Sites, Properties, Cameras) describe the scope of what you're looking at — how many sites, properties, and cameras are included. The last three (Visits, Visitors, Vehicles) describe the activity within that scope for the selected time range. A green ↑ means the figure has grown since the last comparable period; a red ↓ means it's dropped.
What to do with it: Read this row first, before the map or the site list. Check the Sites count matches the selection you intended — if it's lower than expected, you may have sites unticked in the selector. Then use Visits, Visitors, and Vehicles as your portfolio pulse: a large swing in any of them (like Visitors at +107% here) is worth drilling into, either by narrowing the site selection or opening the individual site from the list on the right to see which site is driving the change.
1insights Overview — Compare
Where the Key Stats row rolls all your sites into single totals, Compare does the opposite: it ranks your selected sites against each other on one metric at a time, so you can see which sites are busiest, quietest, or worth a closer look.
Compare button — Found at the top right of the dashboard, next to the site selector. Clicking it opens the Quick Comparison panel shown here.
Quick Comparison panel — The comparison view itself. The subheading confirms what you're comparing and over what scope — here, Last 24 hours · 43 estates — which matches your current time range and site selection.
Metric tabs — Choose what to rank the sites by: Visitors, Vehicles, Properties, ANPR Events, Alerts, Visit Events, or Visitor Pins. The selected tab (here, Visit Events) is highlighted, and the ranked list updates to match.
Ranked site list — Every selected site, ordered from highest to lowest on the chosen metric. Each row shows the site's rank, its name, a bar giving a visual sense of its share relative to the top site, and its exact figure. (In this view, the top site records 817 visit events, down to lower-ranked sites.)
Insights — A plain-language summary of the comparison, calling out the standout differences automatically — for example, how far ahead the top site is, and how many sites recorded no activity on the selected metric.
Close (X) — Closes the panel and returns you to the dashboard.
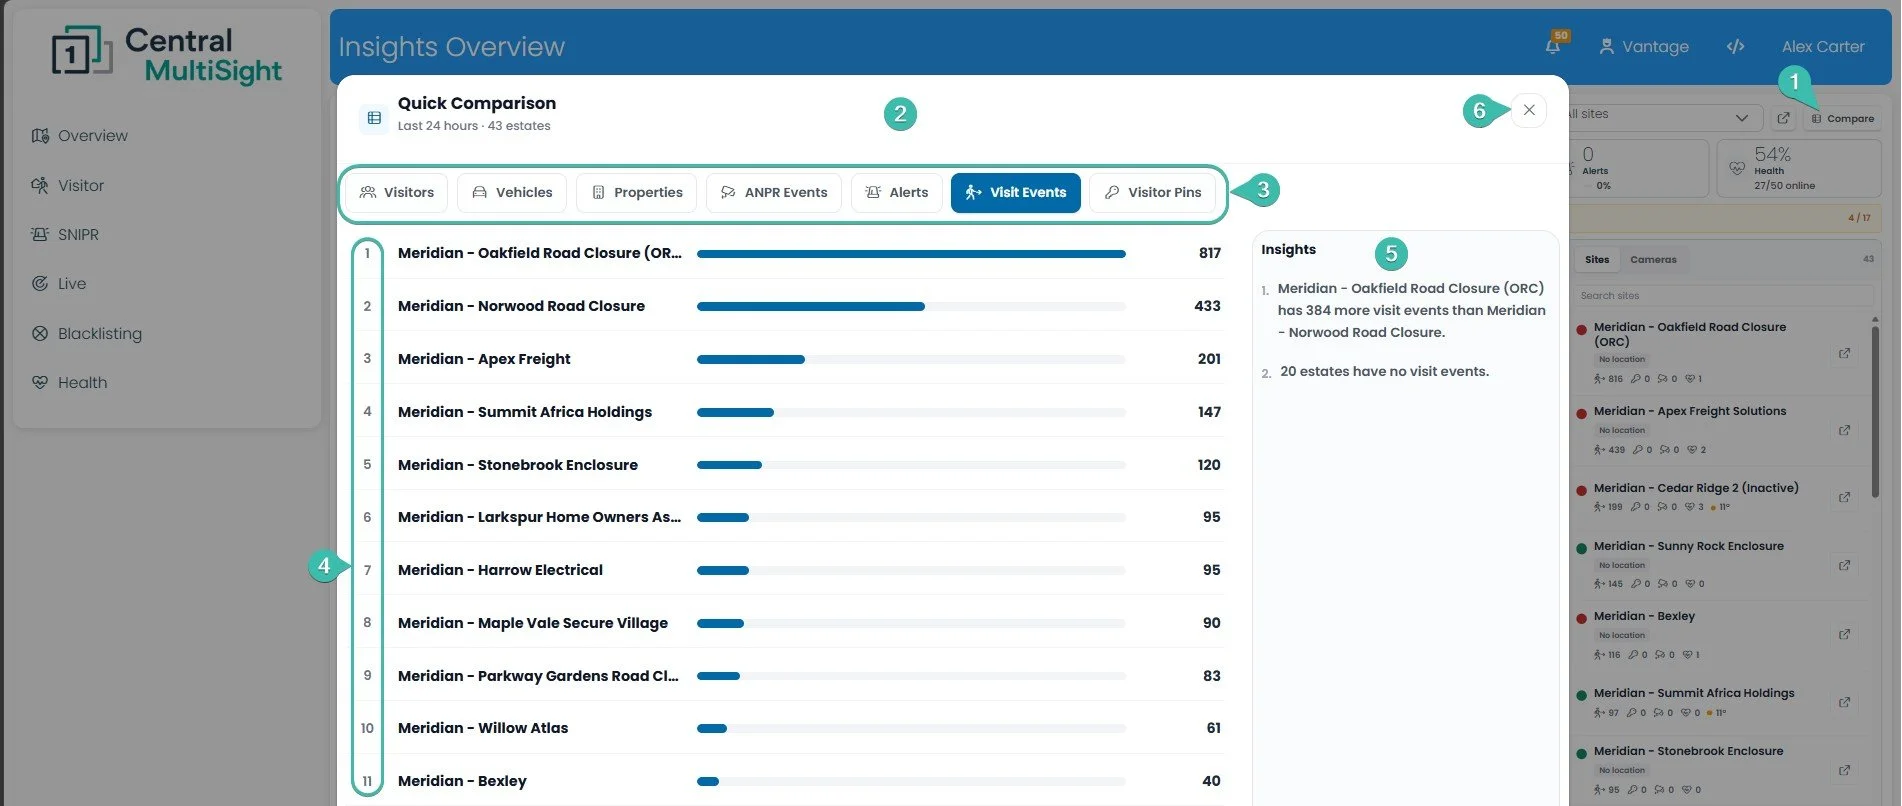
How to read it: Rank #1 is the site leading on whichever tab you've selected; the bar lengths let you gauge at a glance how much busier the top sites are than the rest. Switch tabs to re-rank the same sites by a different metric.
What to do with it: Use this to spot outliers across your portfolio fast. Switch to the Alerts or ANPR Events tab to see which sites are generating the most events needing attention, then open that site from the list to investigate. It's also useful the other way around — sites sitting at the bottom of Visit Events or with no activity at all can be worth a check to confirm that's expected and not a sign a site has gone quiet unexpectedly.