

Communications

Table of Contents:
Feature Introduction
Initiating Communication from Property
Welcome to the Communications Page
This is where you keep your community in the loop.
From here you can see every message that's gone out to residents. From here you can check how those messages are landing, and pick up any drafts you haven't finished.
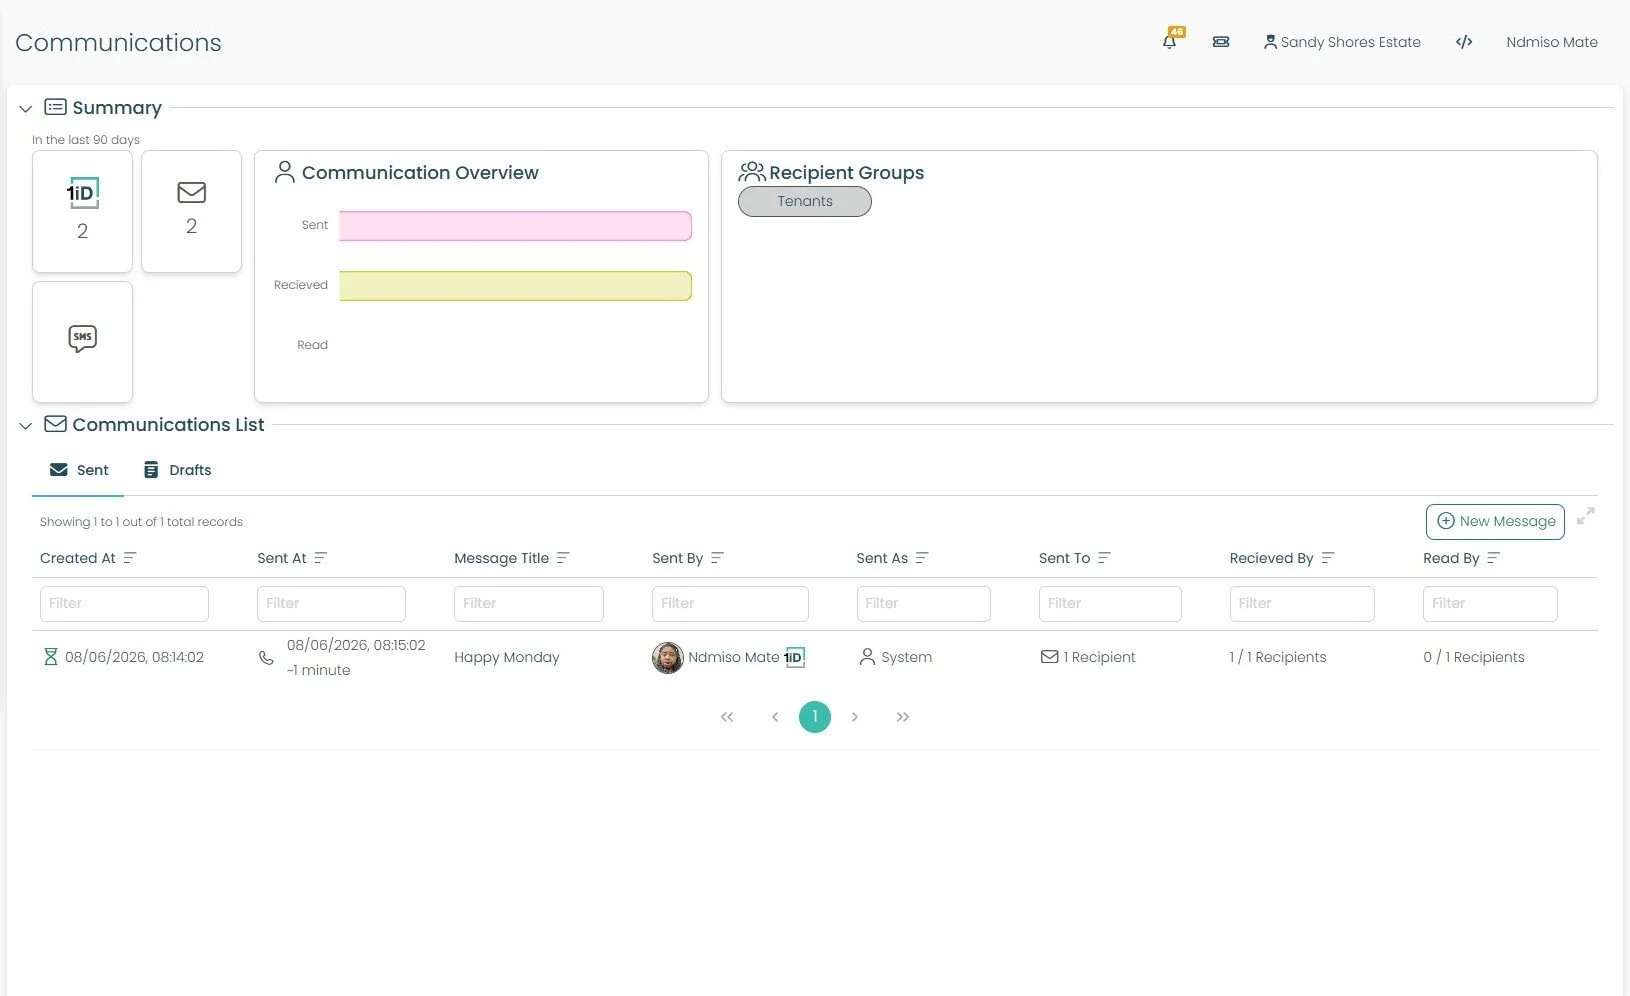
Communications: Summary
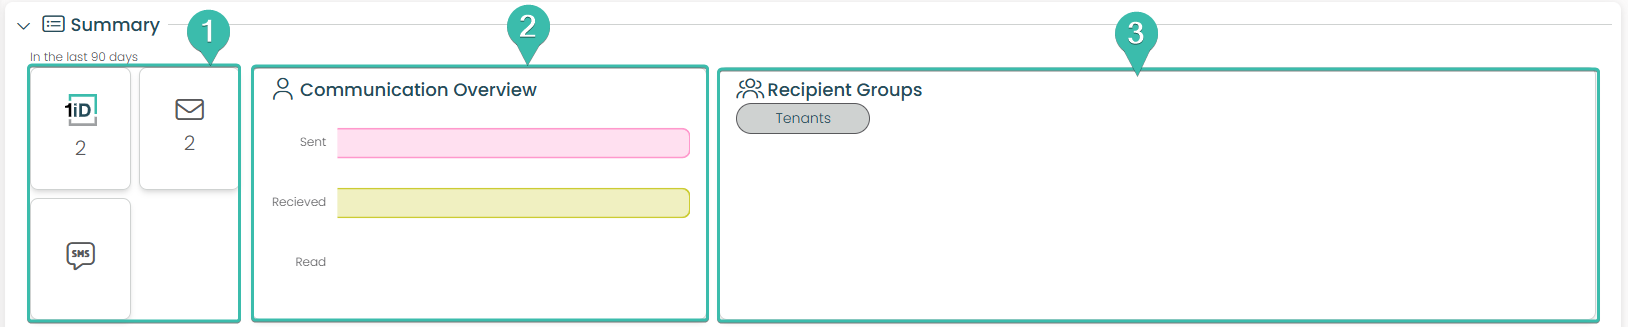
These three cards show how you've been reaching your community, broken down by channel: 1iD, Email, and SMS. The number on each card is the total number of communications sent via that channel in the last 90 days.
Note: The 1iD channel reaches residents through the OneSpace Connect App. So when you send via 1iD, that message lands with them inside Connect.This is your at-a-glance health check.
Sent -Total Count of messages that what went out.
Received - Displays how many messages reached people.
Read -Shows how many people actually opened your messages. This shows you how your messages are performing and is the quickest way to tell whether your messages are landing or getting lost.
Recipient Groups This section displays the groups you've already created. It's your starting point for sending a new communication — select a group here and you'll kick off the process of sending a message to that audience. (Don't worry about how to create these groups just yet — we'll cover that later in the tour.)
Communications: List
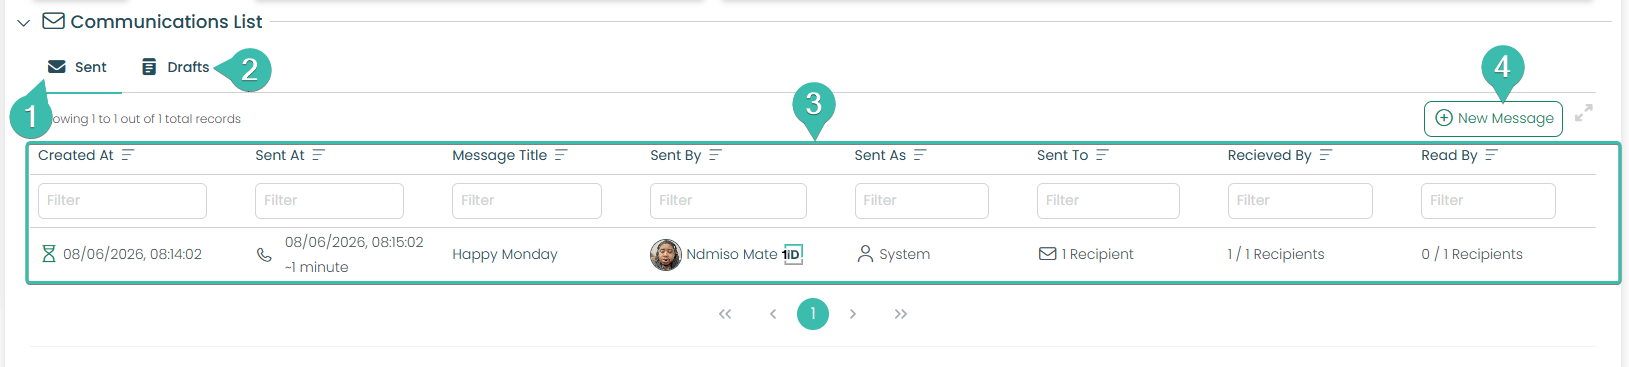
Click here to view every communication that has already gone out, including messages sent by you and by other managers on your site. This is your shared sent-history record.
Started a message but weren't ready to send it? It lives here. Click Drafts to come back and finish anything you've saved.
This is the detailed log of your messages. Each row tells the full story of a single communication:
Created At / Sent At: When it was drafted and when it actually went out
Message Title: The subject of the message
Sent By: Which manager sent it (handy on a site with multiple managers)
Sent As: How it was sent, e.g. System
Sent To / Received By / Read By: Your delivery and engagement counts at a glance
Use the Filter boxes under each column heading to quickly find a specific message — useful once your list grows.
New Message: Begin creating a new message to your residents by selecting this button.
Communications
People: Communications
In Central you can send a communication two ways: by selecting specific people, or by selecting specific properties. Both routes lead into the same message wizard. Each screen below walks through exactly what to do.
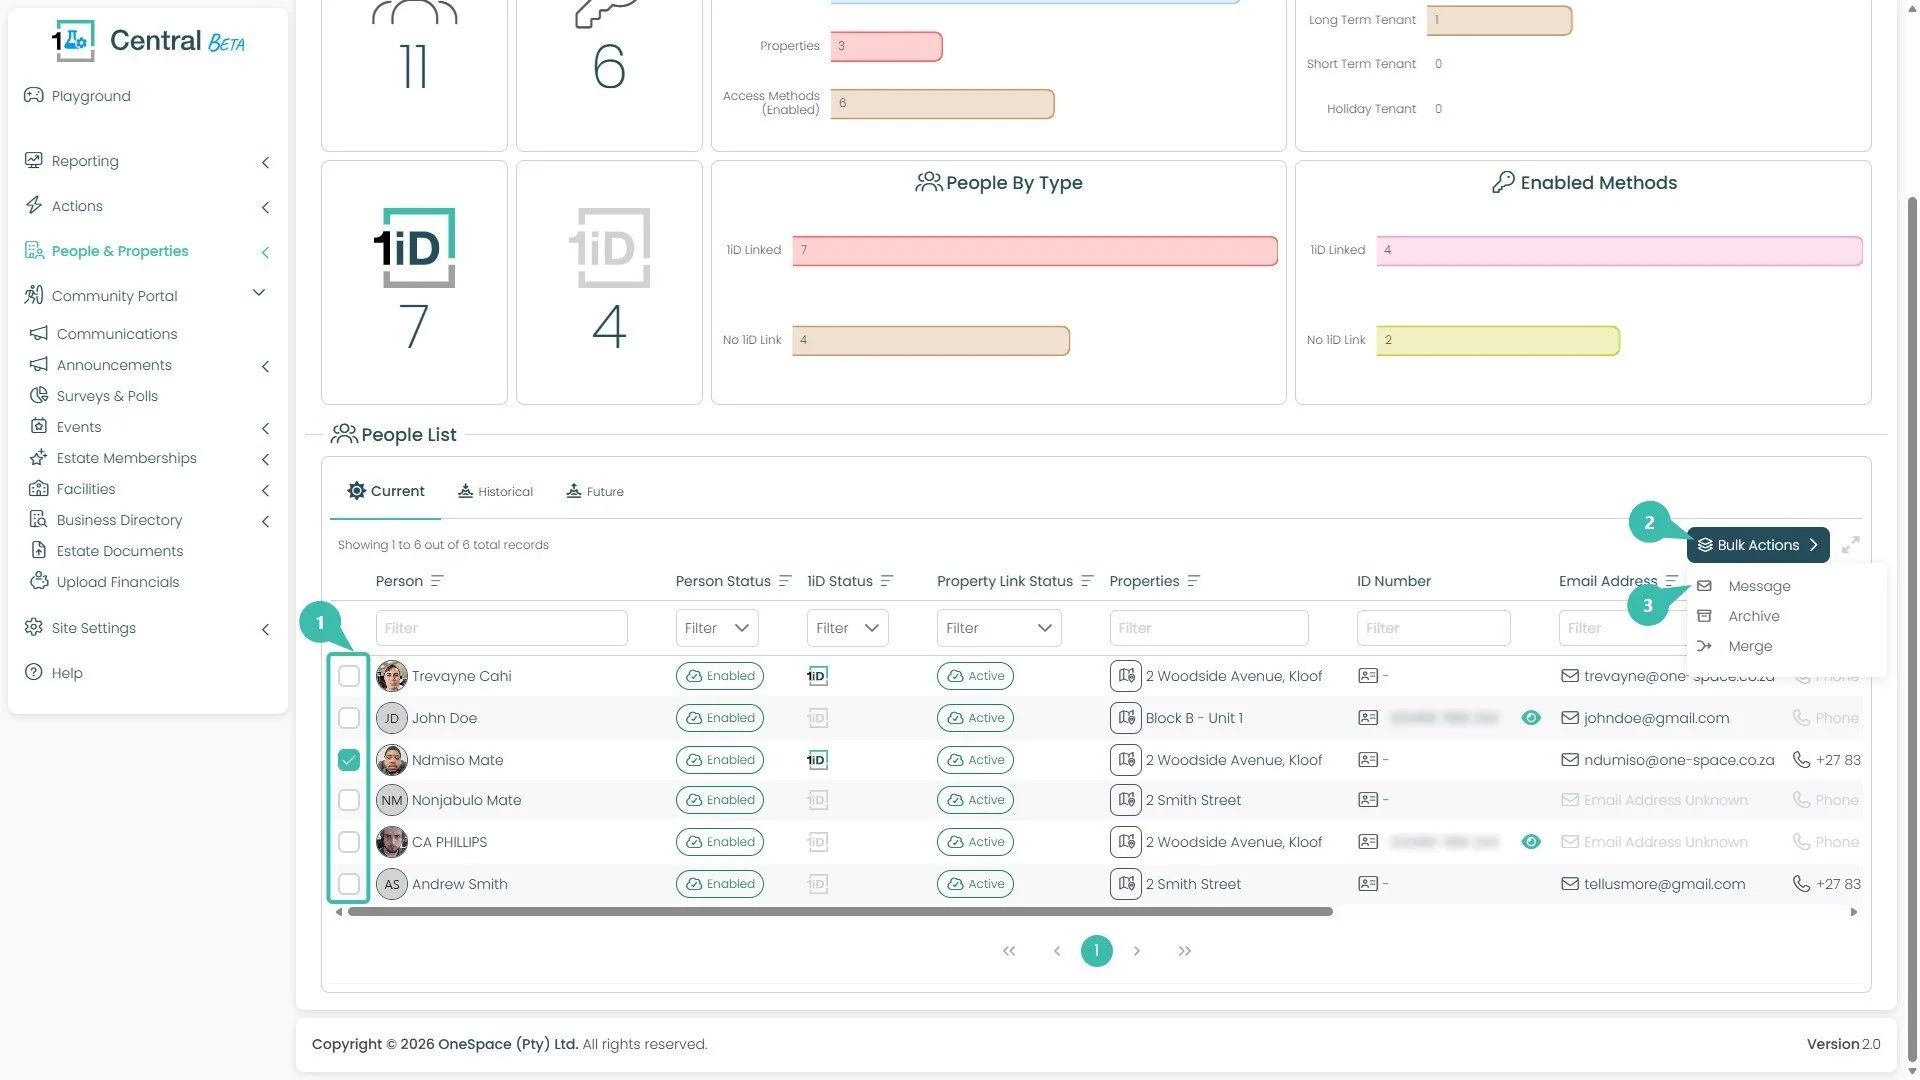
Start a Message from the People List
This is where you begin when you want to message specific people.
Select your people. Tick the checkbox next to each person you want to message. In this example, Ndumiso Mate has been ticked.
Open Bulk Actions. Click the Bulk Actions button on the right-hand side. This reveals a dropdown of actions you can apply to everyone you've selected.
Choose Message. From the dropdown, click Message. This opens the message wizard.
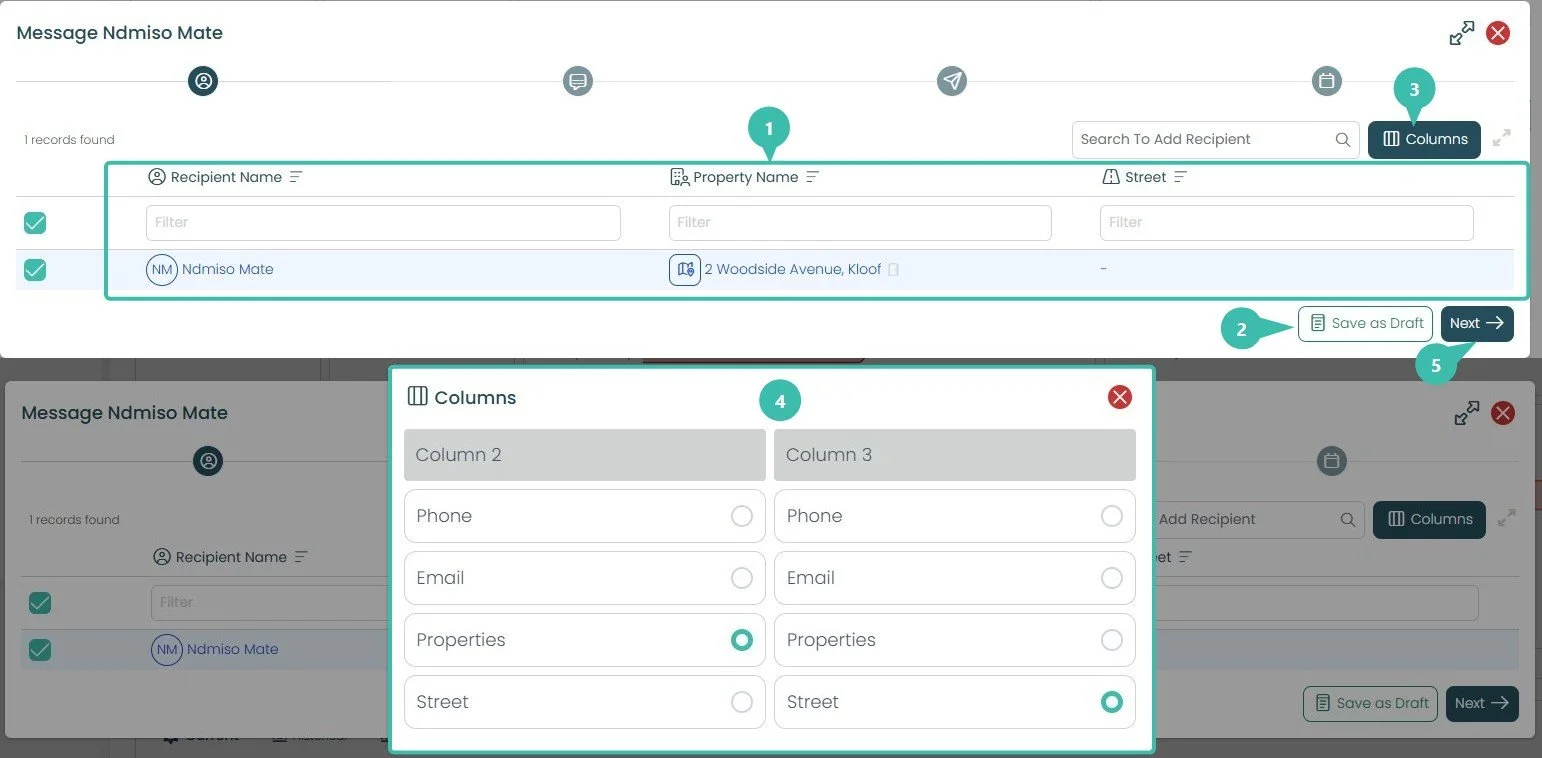
You're now on the first wizard step (the person icon at the top). This is where you confirm exactly who will receive the message.
Review the recipient list. Each recipient is shown with their name and details (Recipient Name, Property Name, Street). Use the Filter boxes under each heading to find someone quickly in a longer list.
Save as Draft (optional). Click Save as Draft if you need to pause and return to this communication later without losing your progress.
Open the Columns picker. Click Columns to change which detail columns appear for each recipient.
Choose your columns. In the picker that opens, select what to show in Column 2 and Column 3. Here, Properties is chosen for Column 2 and Street for Column 3. This only changes what you see while setting up — it doesn't affect the message itself.
Click Next. Once your recipient list looks right, move on to the next step.
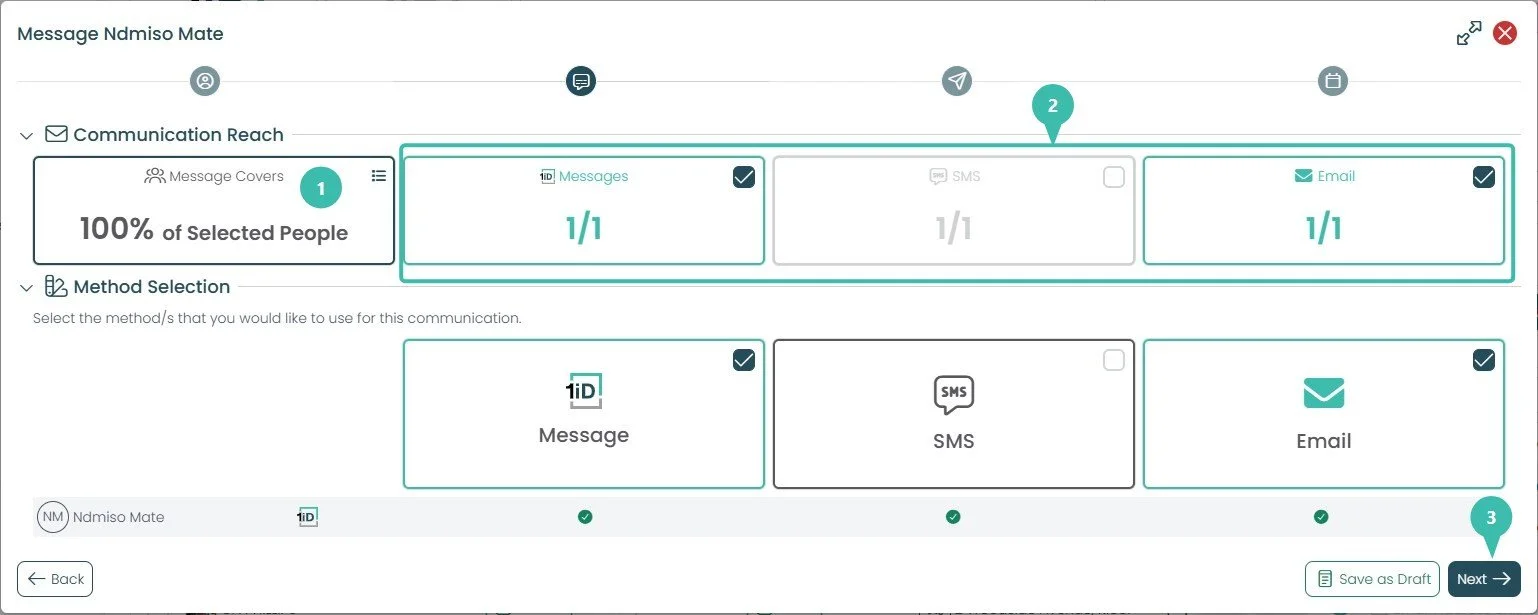
This step (the speech-bubble icon) is where you decide how the message is delivered.
Check your Communication Reach. The "Message Covers" panel shows the percentage of your selected people who can actually be reached by the methods you pick, here it's 100% of Selected People. If this number drops, it means some recipients can't receive the message by your chosen method (for example, someone with no email on file).
Select your method(s). Tick any combination of the three delivery methods: Mail, SMS or Email.
Click Next. Continue to compose your message.
The counters (such as 1/1) show how many of your recipients can receive each method. In this example, Message and Email are ticked and SMS is left off. The green ticks in the row below confirm each recipient is reachable by the selected methods.
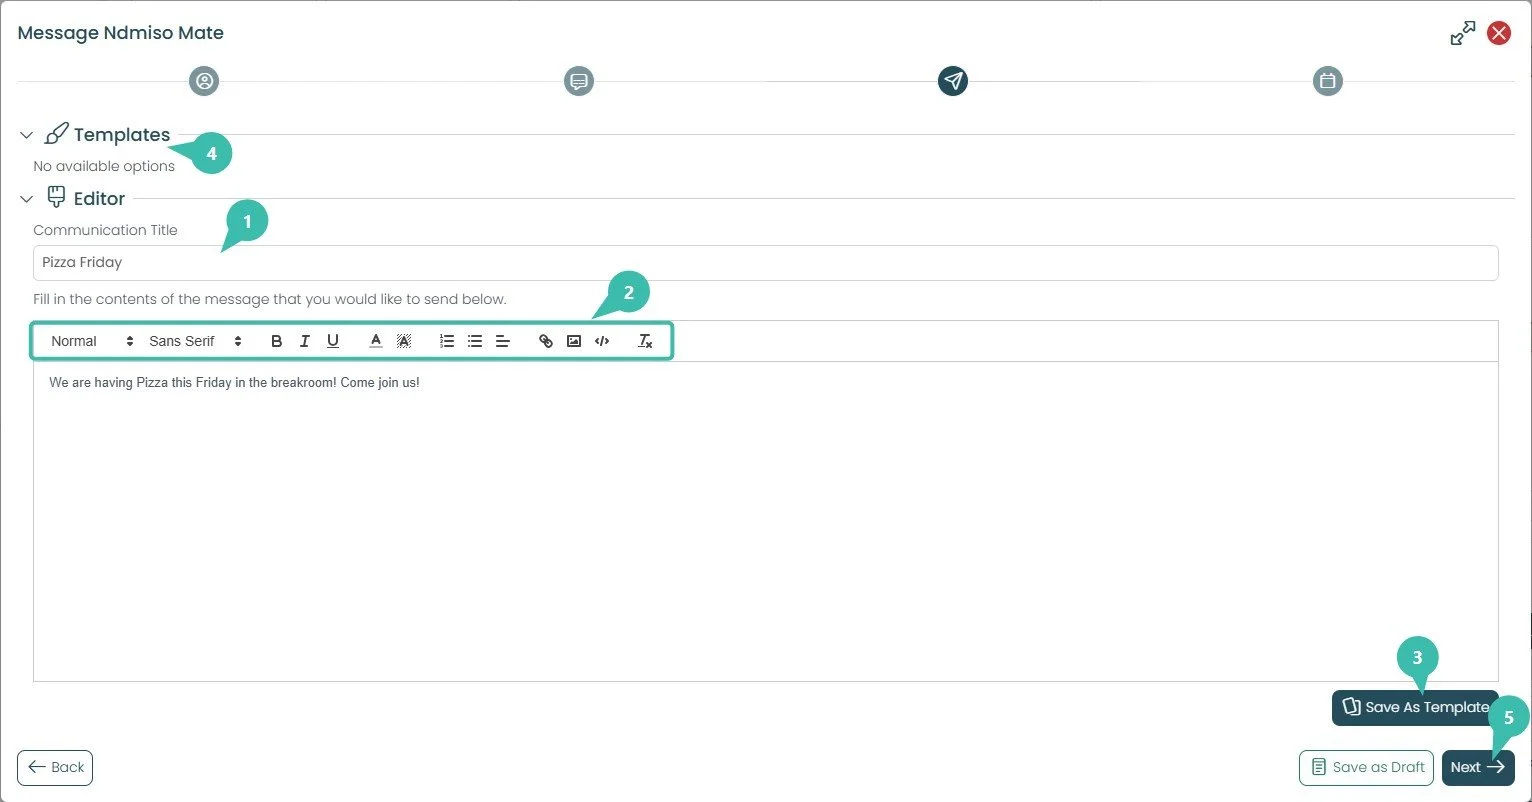
This step (the paper-plane icon) is where you create the actual content.
Enter a Communication Title. Type the heading recipients will see — here, "Pizza Friday."
Compose your message. Write the body in the editor, using the formatting toolbar for bold, italics, underline, font colour, lists, alignment, links, images, and embedded code. In this example: "We are having Pizza this Friday in the breakroom! Come join us!"
Save As Template (optional). Click Save As Template to store this message layout so you can reuse it for future communications.
Templates. This section lets you load a previously saved template. It currently reads "No available options" simply because none have been saved yet.
Click Next. Move on to preview and schedule.
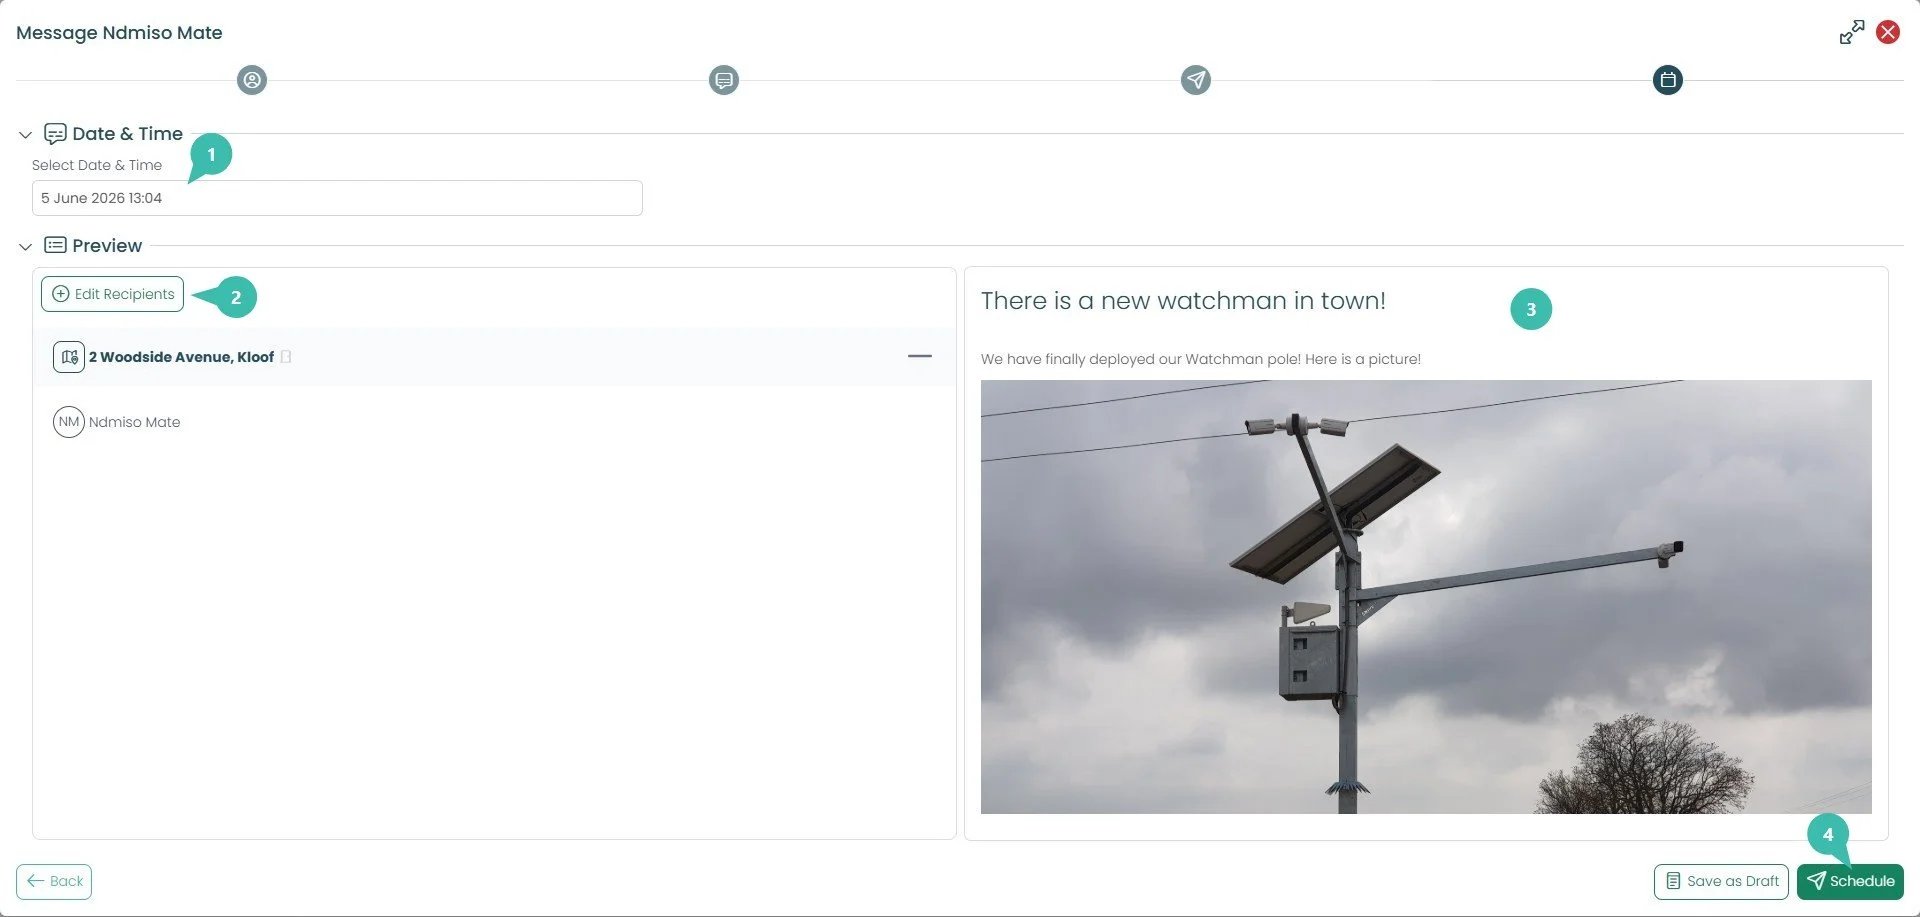
This final step (the calendar icon) is where you review everything and send.
Set the Date & Time. Choose when the message should go out — here it's set to 5 June 2026, 13:04.
Edit Recipients (optional). Click Edit Recipients to jump back and adjust who's receiving the message; recipients are grouped here by property.
Review the Preview. The right-hand panel shows exactly how your message will appear, including the title, body text, and any images you added.
Click Schedule. Confirm by clicking Schedule. Your communication is now queued and will send automatically at the date and time you set.
Start a Message from the Property Page
This is the alternative starting point — use it when you want to reach everyone linked to specific properties.
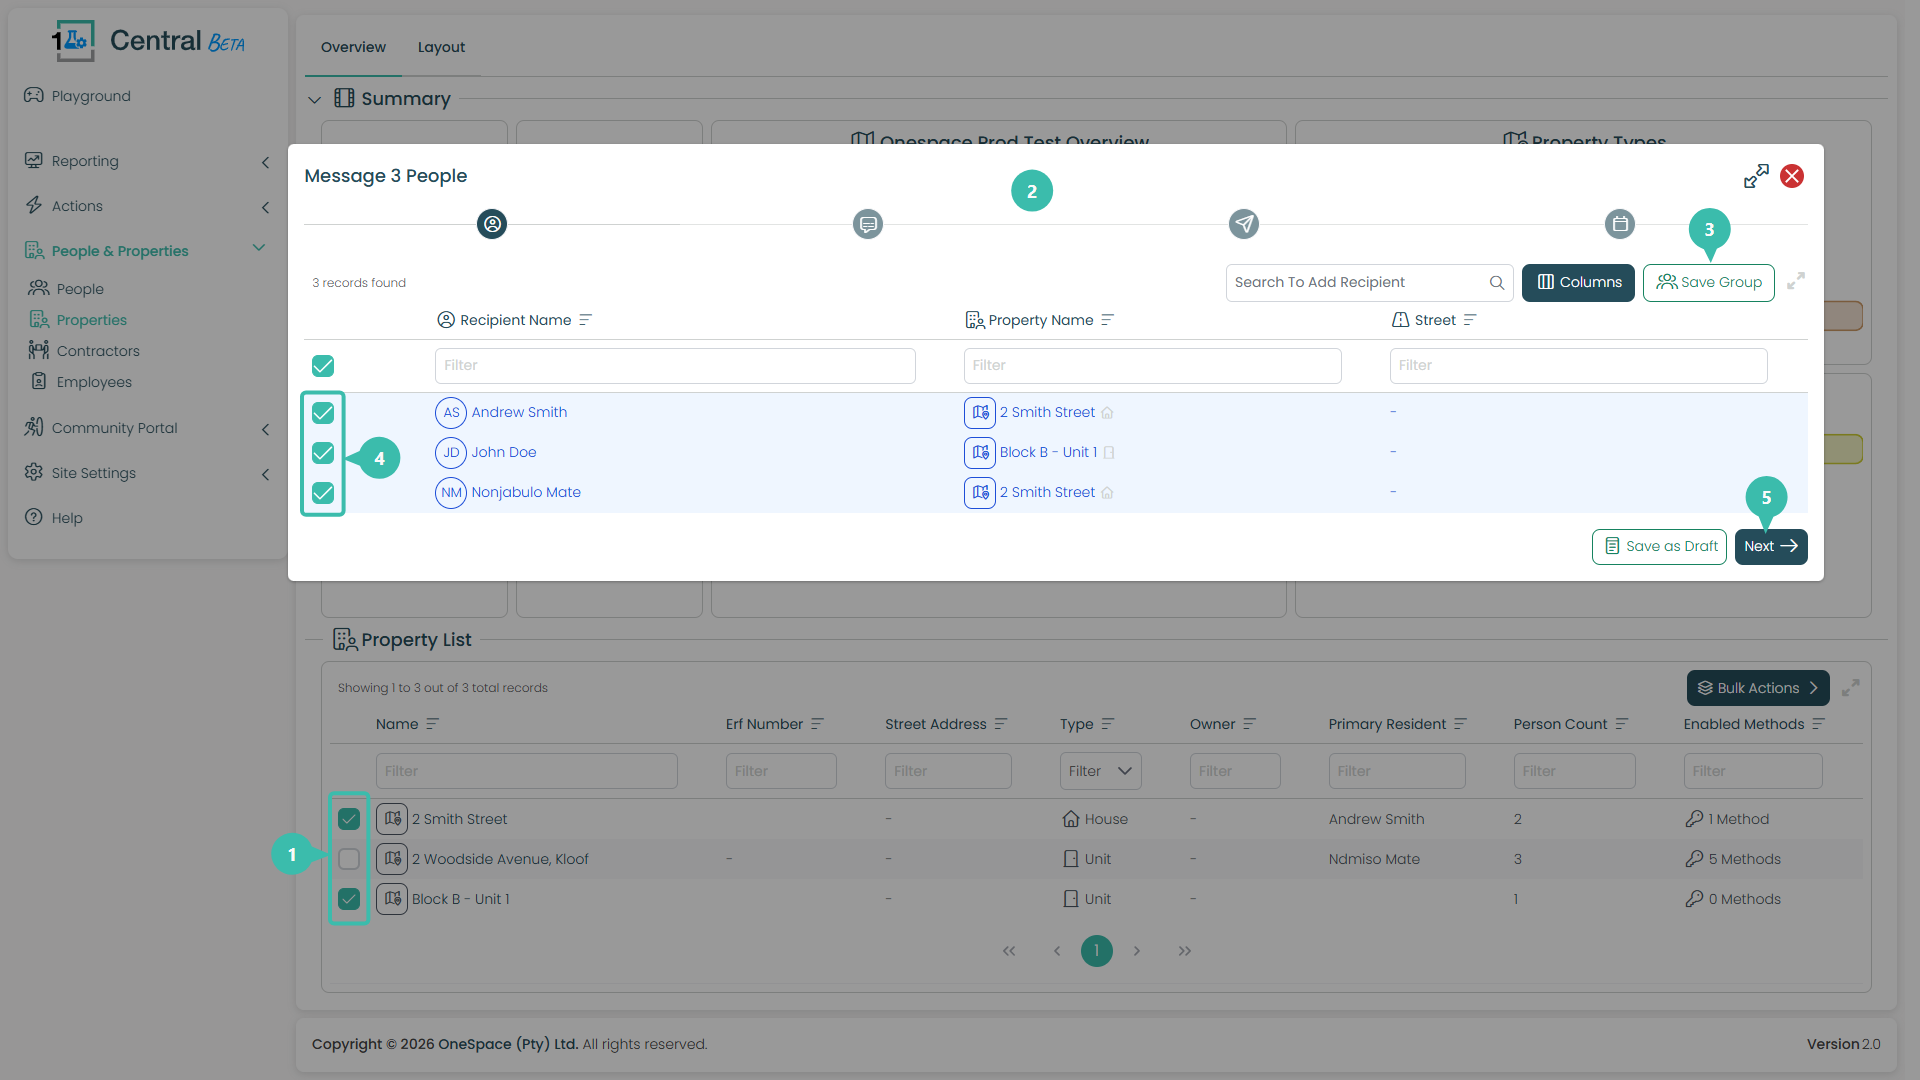
Select your properties. Tick the checkbox next to each property you want to reach. Here, "2 Smith Street" and "Block B – Unit 1" are ticked, while "2 Woodside Avenue" is left unticked.
The wizard opens with everyone gathered. Central automatically pulls in every person linked to those properties. The window title confirms the total — here it reads Message 3 People.
Save Group (optional). If you expect to message this same set of people again, click Save Group to store them for quick reuse later.
Review who's included. All the people gathered from your selected properties are listed and ticked. Untick anyone you'd like to leave out of this message.
Click Next. This moves you forward into the message wizard, which from here is identical no matter which starting point you used.
Sending a Message from Property Layout
This is another way to begin a communication — straight from your site's Property Layout. Instead of picking people or properties off a list, you message everyone tied to a chosen point in your site's structure (an estate, a street, or a building).
Why your Property Layout matters here
This is where a well-built layout really pays off. When you message from the Layout page, Central gathers recipients based on how your site is structured — so the quality of your layout directly determines how powerful this tool is.
If your layout is set up correctly — with streets clearly defined and the right properties (buildings, units, houses) sitting underneath each one — then a single click can do a lot:
Click a street, and you instantly reach everyone living on it.
Click a building, and you reach every unit within it.
Click the estate at the top, and you reach the whole site at once.
In the below example, one click on "Sandy Avenue" reached all five residents across Block B without ticking a single name individually. That only works because those people and units were correctly associated under that street in the layout.
If your layout is incomplete — streets missing, or properties not linked to the street they belong to — those residents simply won't be gathered when you message at that level, and you'd have to fall back to selecting them by hand. So it's well worth getting your Property Layout right first: it turns large, repetitive messaging jobs into a single, reliable click.
Sending a Message from Property Layout - Example
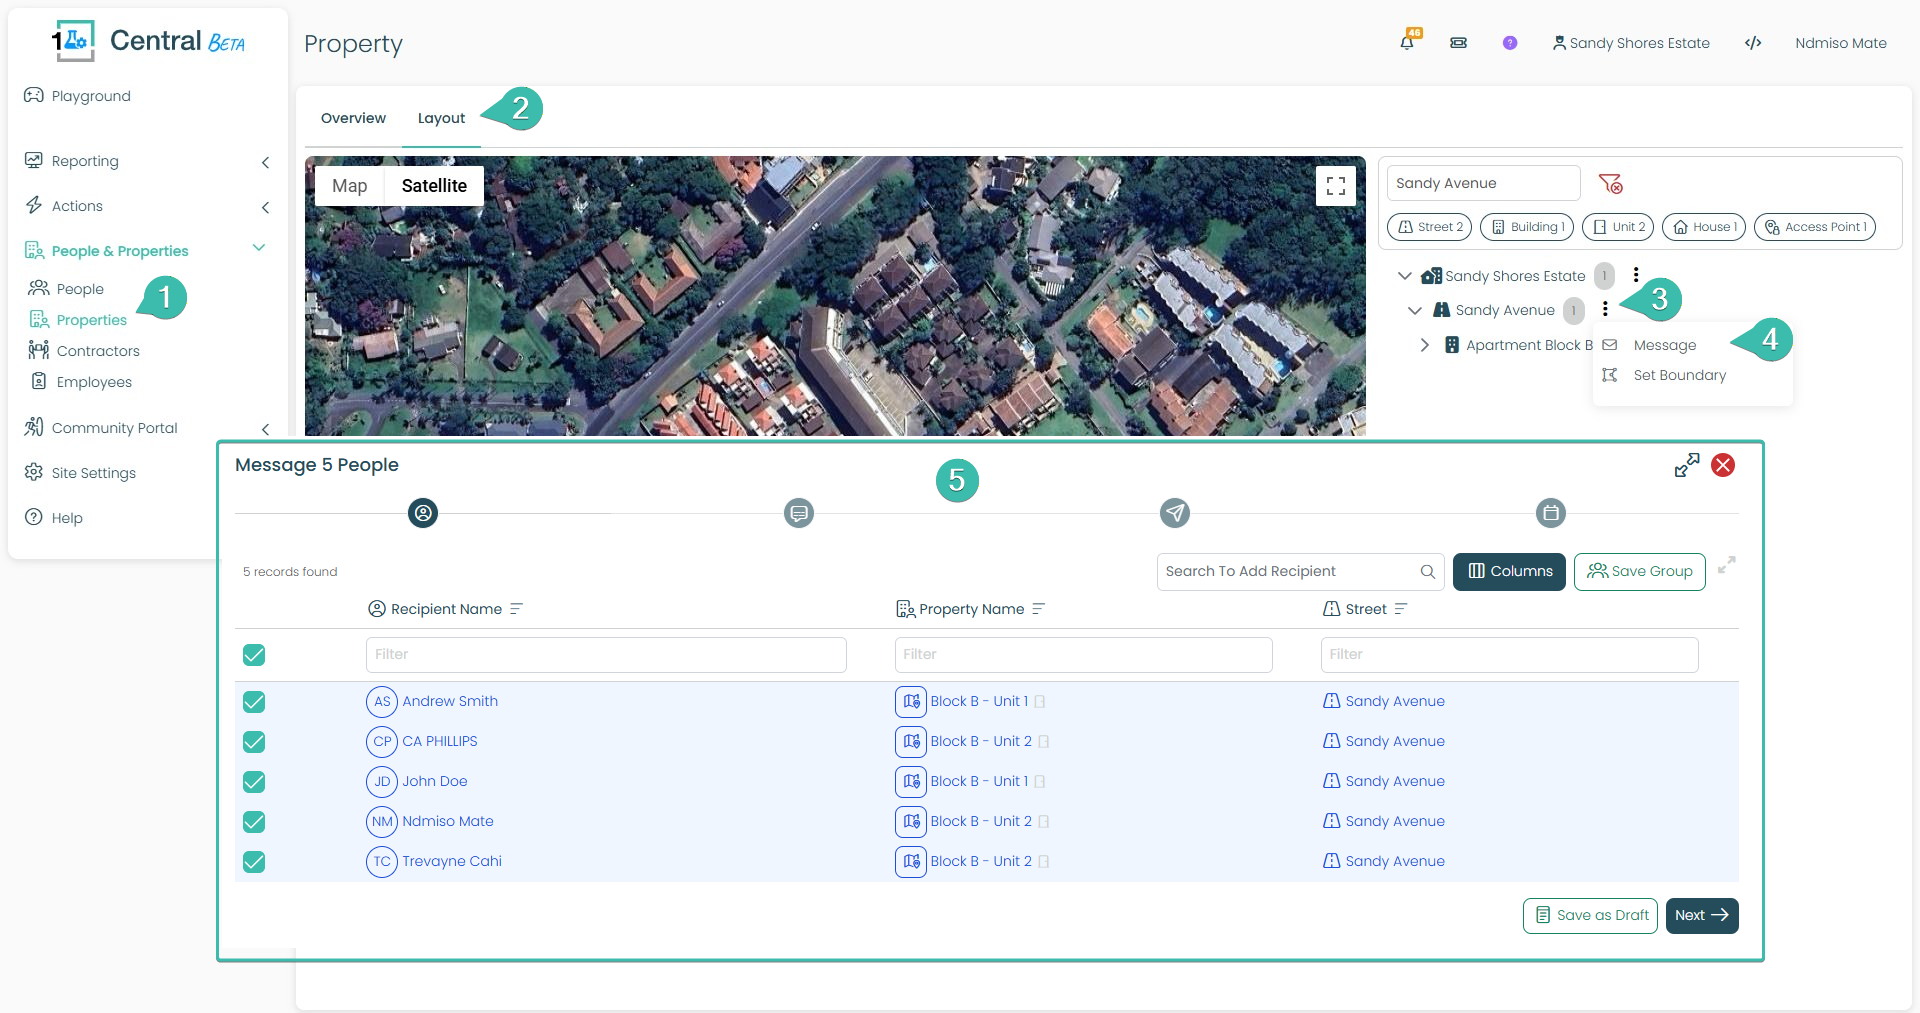
Open Properties. Under People & Properties in the left-hand menu, click Properties.
Switch to the Layout tab. At the top of the Property page, click Layout. This shows your site as a map alongside its structural hierarchy — your estate, the streets within it, and the buildings and units beneath each street.
Open the actions menu. In the hierarchy on the right, find the level you want to message — here it's the street "Sandy Avenue" — and click the three-dot (⋮) menu next to it.
Choose Message. From the menu, click Message. (Set Boundary is a separate layout tool — Message is the one that starts a communication.)
Everyone underneath is gathered automatically. Central pulls in every person linked to that point in the hierarchy. Because you selected the street "Sandy Avenue," all five people across its buildings and units are gathered — the window title confirms Message 5 People, and each is listed and ticked. From here you can Save Group, adjust Columns, Save as Draft, or click Next to continue into the rest of the wizard (which is identical regardless of how you started).