

Snipr Dahua Integration

Please follow instructions below to set your Dahua ANPR Camera to talk to the SNIPR Cloud
Ensure that your Dahua Camera is running the correct firmware for your region / Country. A copy of the firmware can be obtained from SNIPR Support team or Dahua themselves. Failure to do so will harm the read accuracy for your camera.
Phase 1: Upgrading your camera's firmware
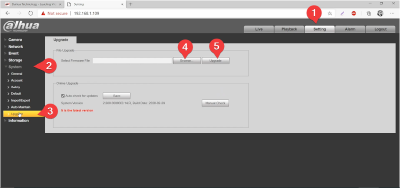
Once you are logged into your camera navigate to the cameras settings.
Select the System Menu.
Select Upgrade.
Select Browse, a window will pop up. Navigate to where you have stored the Firmware file on your computer. Select it then press open.
Select the Upgrade button to initiate the upgrade process. The camera will reboot itself on a successful upgrade.
Once done. You will then need to set the camera to forward ANPR events to SNIPR. To do this, you need to use the cameras ITC Push function. Below are the steps required to do this.
Phase 2: Configuring your ANPR Camera to forward reads to SNIPR
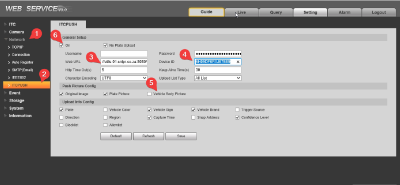
Select Network.
Select ITCPUSH.
Insert the URL, http://utils-01.snipr.co.za:8080/
Insert the SNIPR Auth Key into the Device ID field, a support technician will provide this to you. Once you have applied the Auth key hit the save button. To Save your changes. When the camera reboots. Navigate to this page again, copy the Auth key (Device ID) from the camera and provide it to a SNIPR support technician.
Ensure the vehicle Body Picture option is ticked.
Ensure that ITPUSH is turned on.
Important!
Remember to follow through with Phase 2 Step 4 and submit the Auth key (Device ID) of your Dahua ANPR Camera (captured in Phase 2 Step 4 of this guide) through to Support@one-space.co.za along with your take on form. And our team will conclude the onboarding process for you.