

ANPR Installation Guidelines

Thank you for selecting SNIPR to empower your community in active crime prevention. Included in this guide are some basic instructions on how to install your ANPR camera.
***Please note The SNIPR Team will only be able to assist you once the instructions on this page are adhered to for your installation.***
This guide will address the following:
Introduction
This guide will go over how to install your ANPR camera, for optimal license plate detection.
This guide is applicable to the cameras below:
• DAHUA_ ITC413-PW4D-Z3 | (8-32mm lens)
• DAHUA_ITC431-RW1F-L(IRL8) | (8-32mm lens)
• HIKVISION_iDS_2CD7A46G0_P-IZHS(SA) | (8-32mm lens)
• HIKVISION_iDS-2CD7A46G2_P-IZHS | (8-32mm lens)
• HIKVISION_iDS-2CD7A26G0/P-IZHS(Y) | (8-32mm lens)
• HIKVISION_DS-2CD7A26G0/P-IZ(H)S | (8-32mm lens)
What do you need?
1. ANPR Camera
2. Mounting Pole/Wall Bracket (for 5m height installation)
3. Concrete Foundation Materials (if installing a pole)
4. Drill and Masonry Anchors (if mounting on a wall)
5. Levelling Tool (to ensure correct alignment)
6. Wrench Set & Screwdrivers
7. Weatherproof Junction Box (for cable connections)
8. Network & Power Cables (Cat6 Ethernet, power cable)
9. PoE Injector/Switch (if using PoE power)
10. Surge Protector (to protect from lightning damage)
11. Ladder or Scaffolding (for safe installation)
12. Safety Gear (gloves, helmet, harness for high work)
PRE-INSTALLATION CONSIDERATIONS
Site Selection
Ensure the camera has a clear line of sight to the road.
Position the camera at an optimal angle (typically 15° - 30°) for the best license plate capture.
Avoid direct sunlight or headlight glare by adjusting the tilt.
Ensure that the vehicles are facing the camera directly. If there is too much imagery of the side of the vehicle. The less accurate the camera will be.
Installation Steps
Step 1: Mounting the Camera
Option 1: Pole Installation
1. Prepare the foundation – Applicable for Electrical SNIPR Pole Installations
o Dig a hole 1m deep and 400(mm) x 400(mm) wide.
o Insert the mounting pole and secure it with concrete.
o Allow 24 hours for concrete to cure before mounting the camera.
2. Prepare the foundation – Applicable for Solar SNIPR Pole Installations
o Dig a hole 1m deep and 500(mm) x 500(mm) wide.
o Insert the mounting pole and secure it with concrete.
o Allow 24 hours for concrete to cure before mounting the camera.
3. Attach the camera bracket
o Fix the ANPR camera mounting bracket onto the pole.
o Ensure it is stable and level.
4. Secure the camera
o Attach the ANPR camera to the mounting bracket.
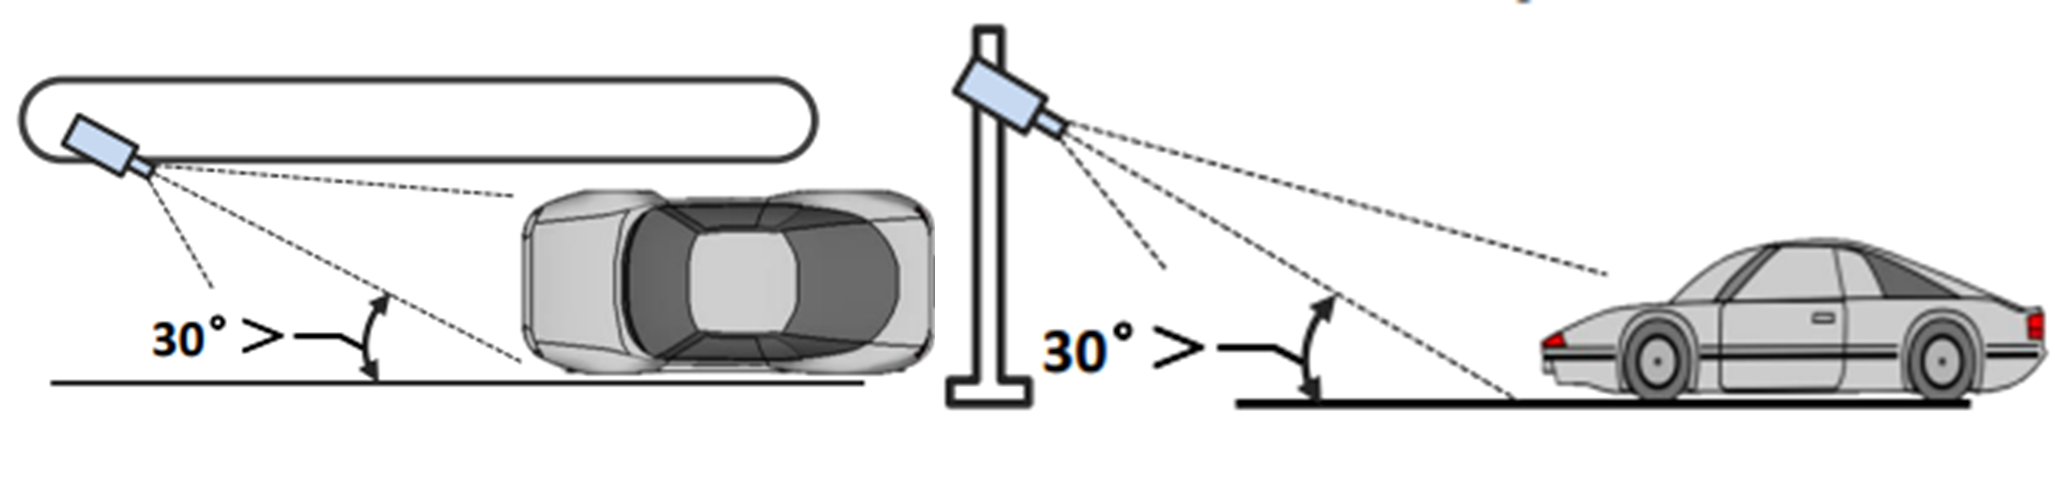
o Adjust the tilt angle to capture vehicles correctly (usually 15° - 30°).
o Horizontal angle the view angle of the camera should be within 30 degrees to the path of movement.
o Horizontal angle Should not exceed 30 degrees.
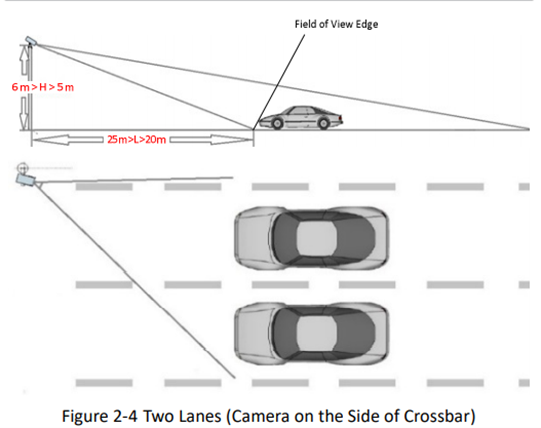
o It is advised that the camera be mounted as close to the edge of the road as possible. A good spot will be 3meters from the road surface.
o Vertical angle between lens direction and horizontal should be less than 30 degrees.
o Vertical angle should not exceed 30 degrees
The camera should not be mounted more than 5.5meters above the ground with the below angles. (Side of the road installation)
Step 2: Connecting Power & Network
Option 1: PoE (Power over Ethernet) – Recommended
Connect a Cat6 Ethernet cable from the camera to a PoE switch or PoE injector.
Ensure the PoE switch is rated for outdoor cameras.
Option 2: Separate Power Supply (Included PSU in SNIPR Kit Boxes)
Connect the camera to a 12V DC power supply.
Use weatherproof conduits to protect cables.
Weatherproofing Connections
Use IP67-rated junction boxes for cable terminations.
Apply waterproof sealing tape around connectors.
FINAL CHECKS: DO’S AND DON’TS
✅ DO Ensure the camera is firmly secured.
✅ DO Check all cables for proper connections and weatherproofing.
✅ DO Perform day and night tests for plate readability.
Plate reads must look like the below examples to ensure accurate capturing of vehicles.
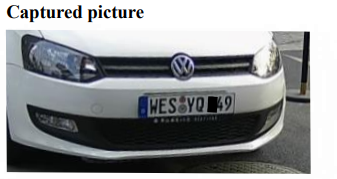
If the angle of the camera is too great, the Number Plate read will be at an offset Angle
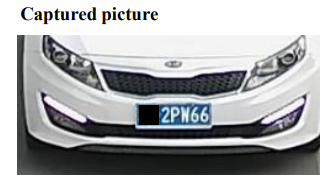
If the angle of the camera is facing traffic directly, the number plate read will be in a much better position & more likely to be accurate.
Don’ts
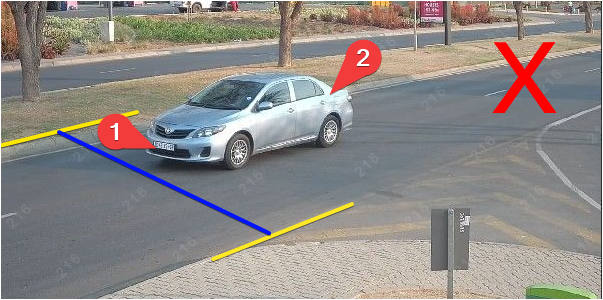
DO NOT leave an installation with your camera set up like the picture above.
Take note of the positon of the plate. In this example the first 2 characters JC will passthrough the blue capture line first. Having the plate pass through in this manor WILL greatly increase the chances of a miss read plate. DO NOT configure your camera this way.
The side of the vehicle is far to prominent in the cameras field of view, it will not read the plate correctly, and it will submit a FALSE NO Plate read instead.
Your real time results should not have the plates displayed at an angle as in this example. You WILL come across read accuracy issues if an installation is left like this.
For onboarding your ANPR Camera to SNIPR, please provide the following to SNIPR Support:
· Camera MAC Address
· Camera HTTP Port Number if it is not set to the default port 80.
· Camera Username and Password
If your ANPR Camera is not capturing the best quality reads. Re-assess how your camera is installed. Make sure the ANPR Camera installation meets the manufacturer’s requirements