


Central Events

Thank you for selecting OneSpace Central to empower your community. We at OneSpace are more than happy to assist you in case you have any troubles with your Site Management system.
This guide was made to provide a quick reference for common actions, functions, and workings that you will be using to help manage your site and all residents on the system. If this guide fails in assisting you with the website’s functionality, please do not hesitate to email us on support@one-space.co.za.
Note: If you need the Legacy User Guide that covers all of the above but for the old version of Central. You can access this guide here: Old Guide
This guide will address the following:
Events
Events in Central helps you invite visitors and control their access. Visitors complete a new visitor form to RSVP. When they finish, the system creates a Visitor PIN that you can use to check their entry to the event. The PIN is sent to them by WhatsApp and email. When you set up the event, you choose an access right, so you control the level of access your visitors get. Visitors can also enrol their face by filling in the form. They can then use face access instead of a PIN.
A walkthrough of the Central Events Module.
Event Main Page
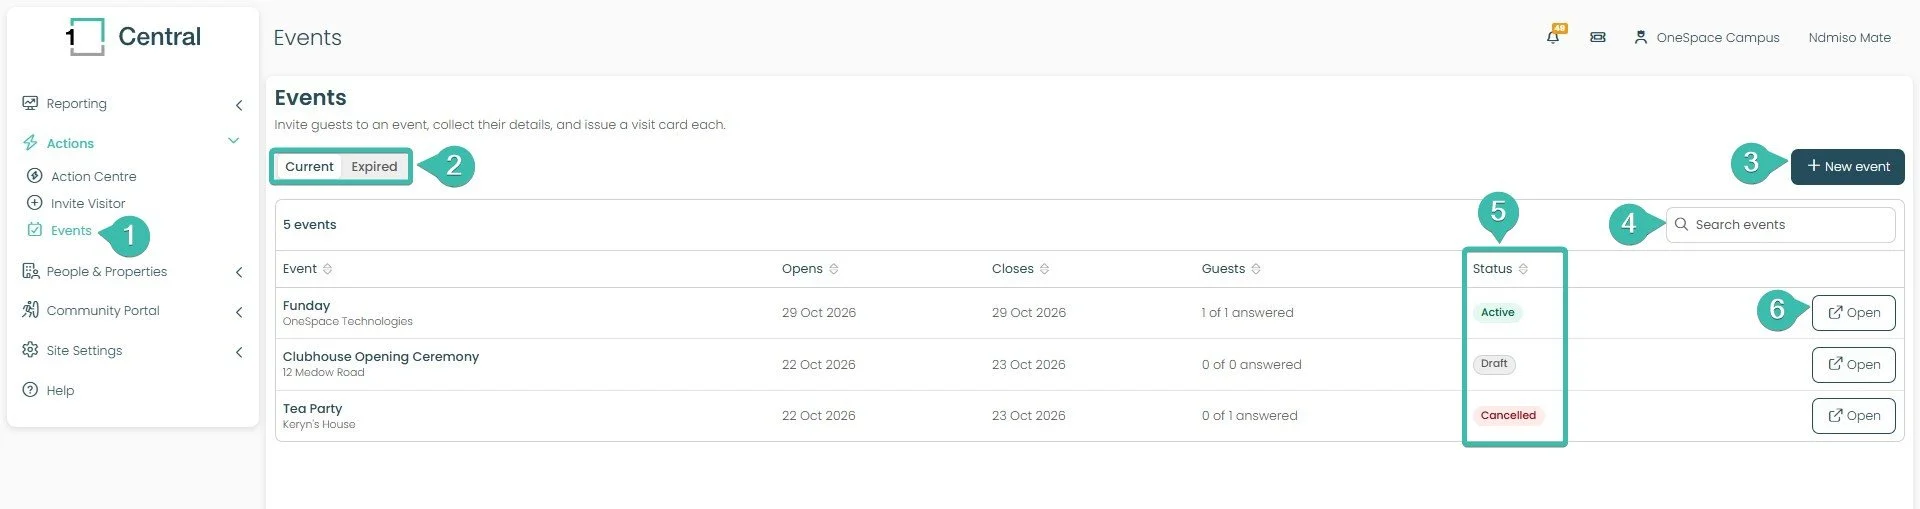
Select Events under Actions in the left menu.
Select Current or Expired to choose which events you see.
Select New event to start a new event.
Type in Search events to find an event by name.
Check the Status column. Draft means the event is not yet sent to visitors. Active means it is live. Cancelled means it will not run.
Select Open to see an event.
Event Creation
When creating the event you will be taken through the Event Visitor Form creation process. Follow the required instructions and start creating your Event Visitor form.
Step 1: The Basics
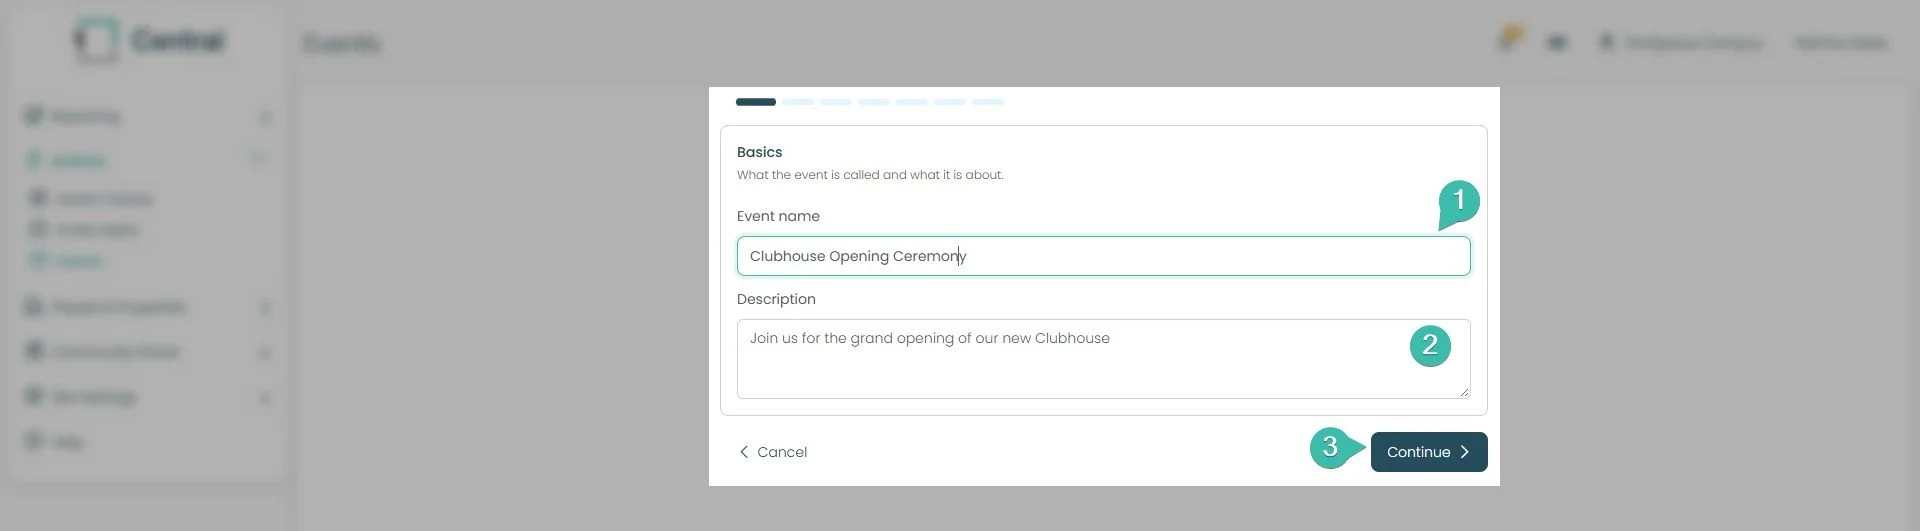
Type the Event name. Example: Clubhouse Opening Ceremony.
Type a Description if you want. It tells visitors what the event is about.
Select Continue.
Step 2: Location
This step controls where your Event Visitors will be allowed to go. With their Event Visitor Pass, they receive after registering for your event.
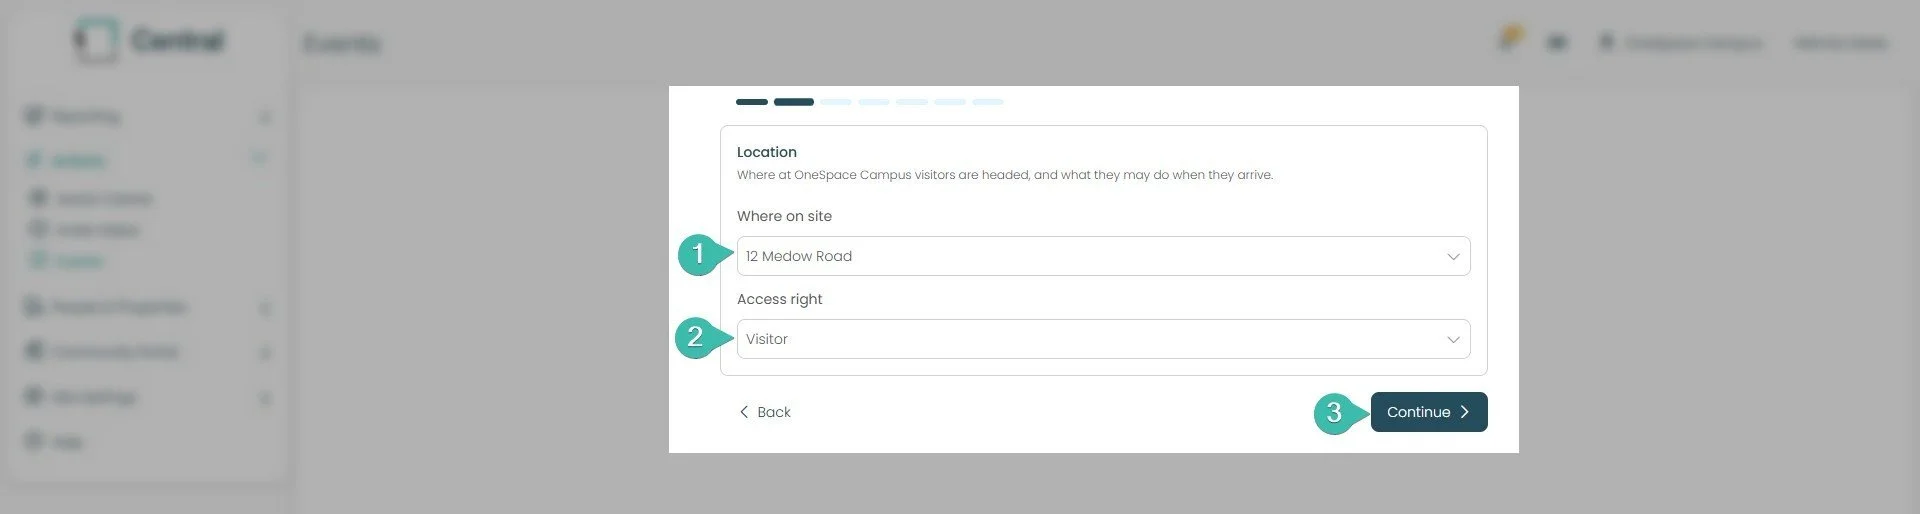
Choose Where on site. This is the place the visitors go to. Example: 12 Medow Road.
Choose Access right. This controls the level of access your visitors have. The access right is assigned to the visitor form, and it is used for the visitor's face and PIN when they are invited. The levels you can choose depend on what is set up for the site. Example: Visitor.
Select Continue. Select Back to change the previous step.
Step 3: Visit settings
It sets the dates of the event and the rules for how visitors get in: whether a face is captured, how many entries each visitor gets, and whether forms are approved automatically.
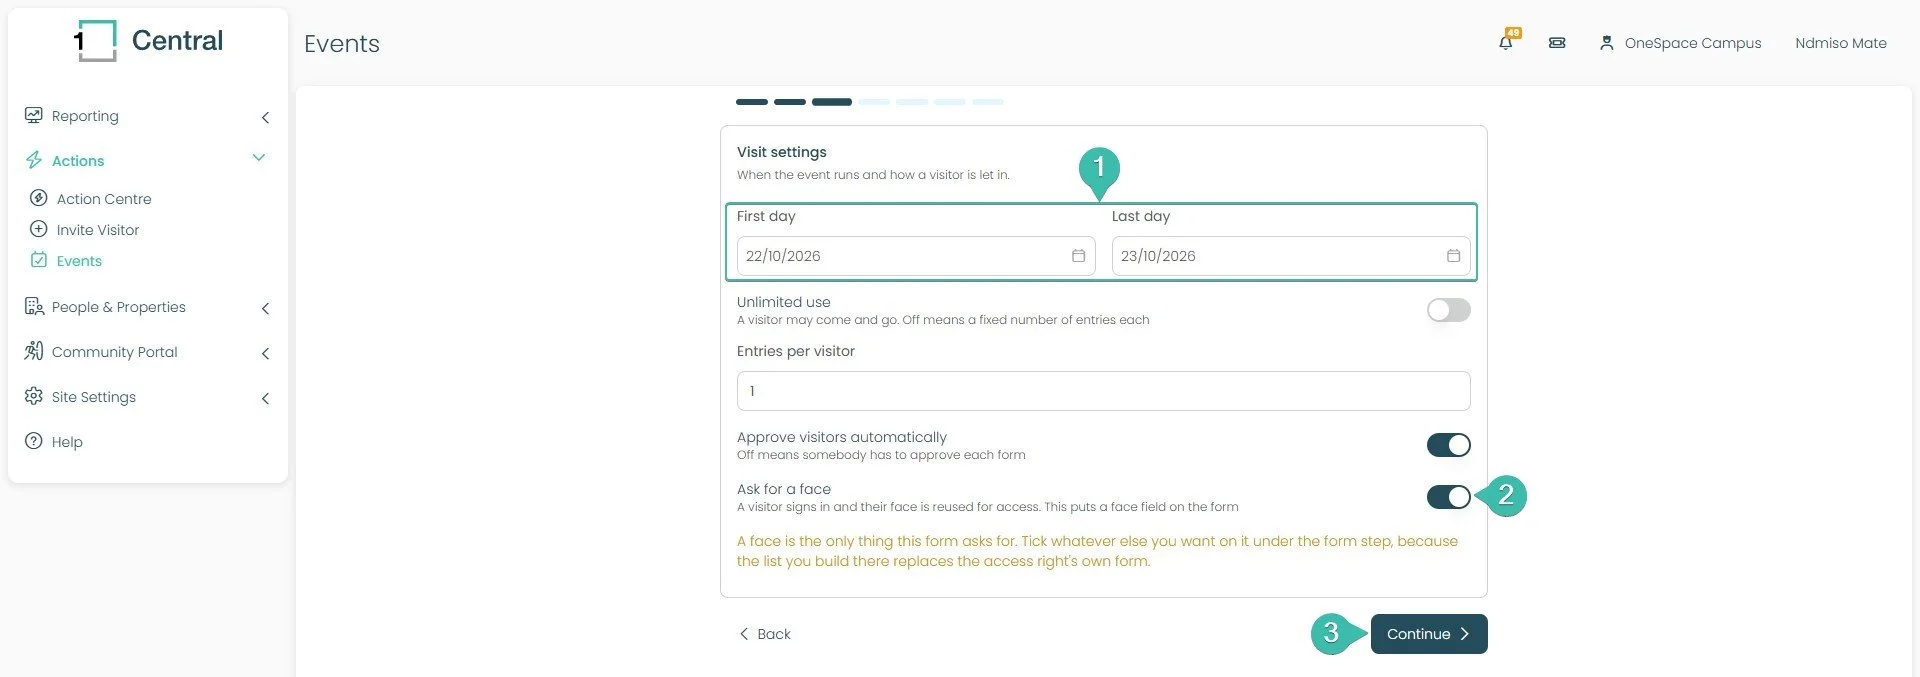
Choose the First day and the Last day of the event.
Turn Ask for a face on or off. When it is on, the visitor's face is captured on the form and added to OneAccess. The visitor can then use their face for access instead of a PIN.
Check the other settings:
Unlimited use: On means a visitor may come and go as often as they need. Off means each visitor gets a fixed number of entries.
Entries per visitor: The number of entries each visitor gets when Unlimited use is off.
Approve visitors automatically: On means forms are accepted without a check. Off means someone must approve each form.
Select Continue.
Step 4: Visitor form
It sets the questions a visitor answers: which fields they see, which fields are required, any custom fields you add, and the wording of the invitation.
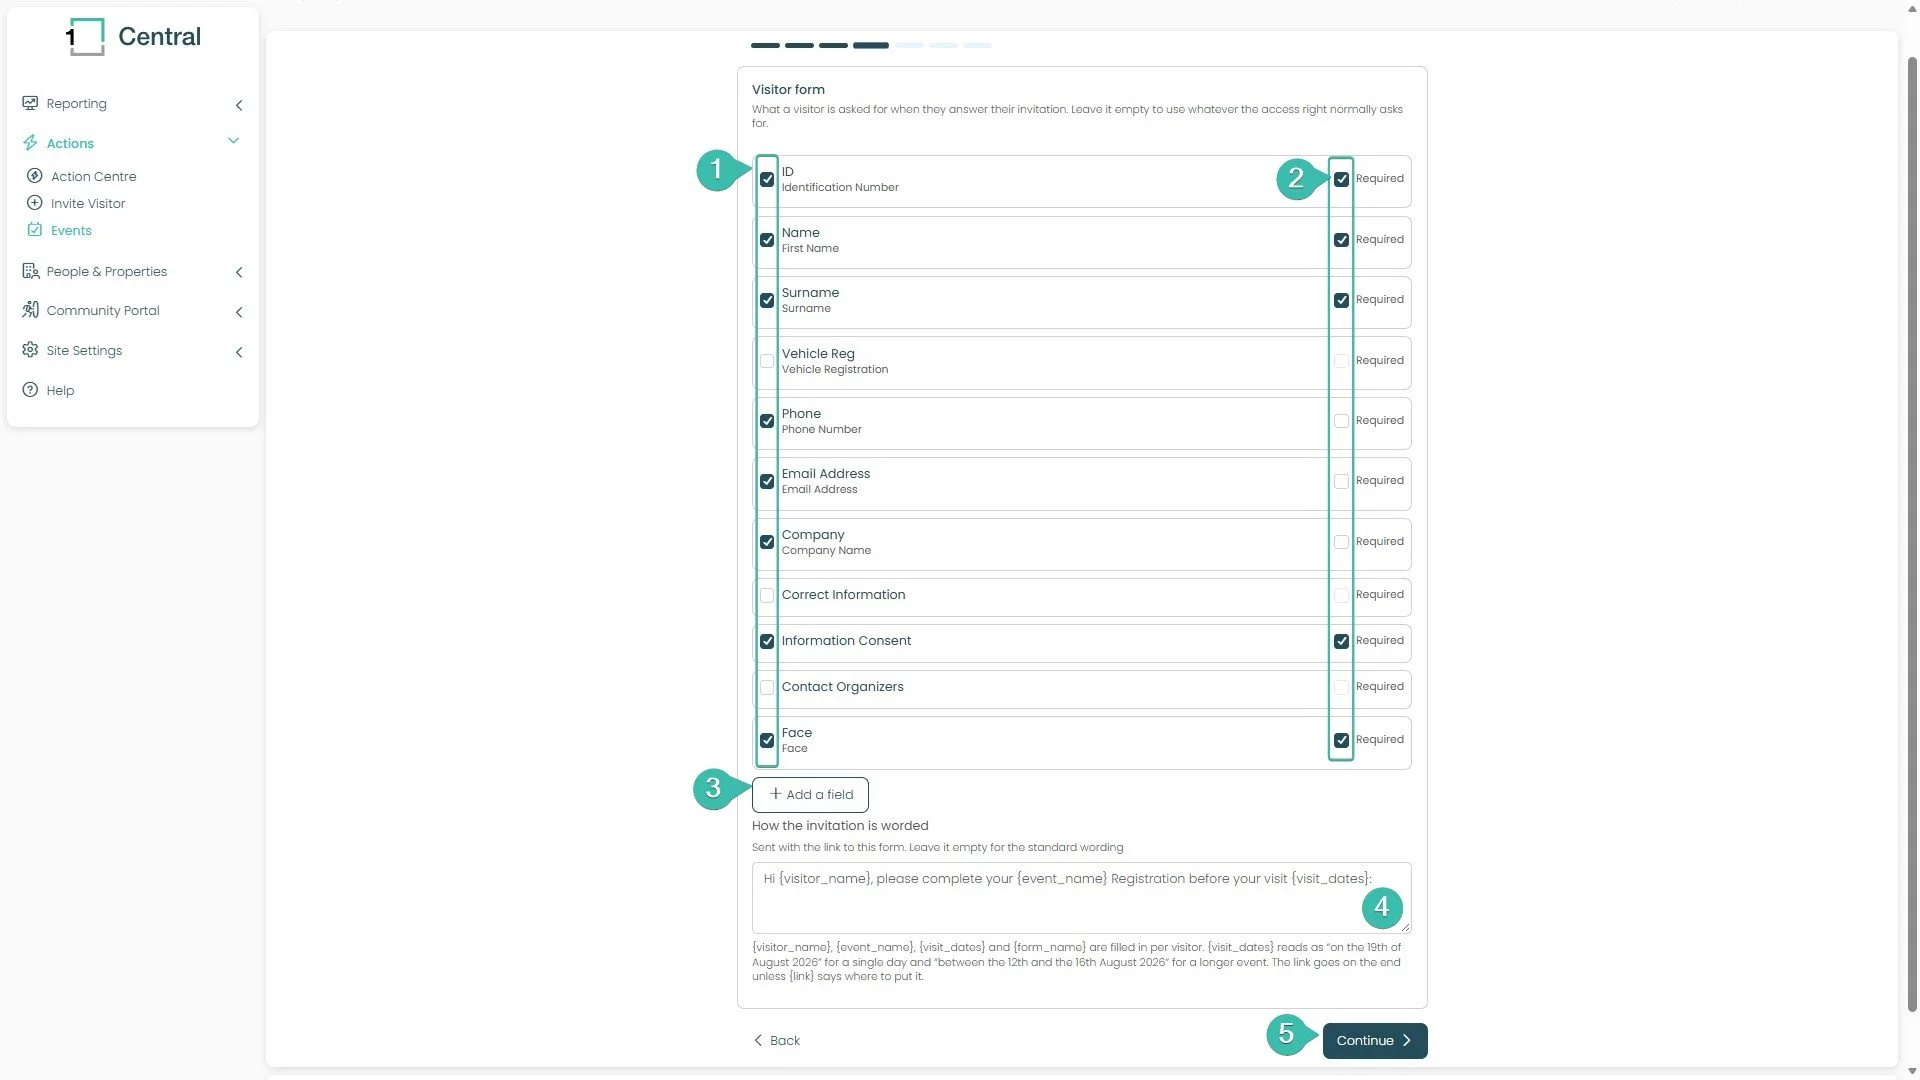
Tick the box on the left of each field the visitor should see. Untick a field to remove it.
Tick Required on the right if the visitor MUST fill in that field.
Select Add a field to add a custom field that the visitor fills in, for example Passport number.
Change the invitation wording if you want. You can use these words, which fill in for each visitor: {visitor_name}, {event_name}, {visit_dates} and {form_name}. Put {link} where the link must go. If you leave out {link}, the link goes at the end. Leave the box empty to use the standard wording.
Select Continue.
This is the form the visitor fills in. A face field is added from Step 3, so it appears in this list as well.
Step 5: Visitor details
These are notes you keep for each visitor. Visitors never see them.
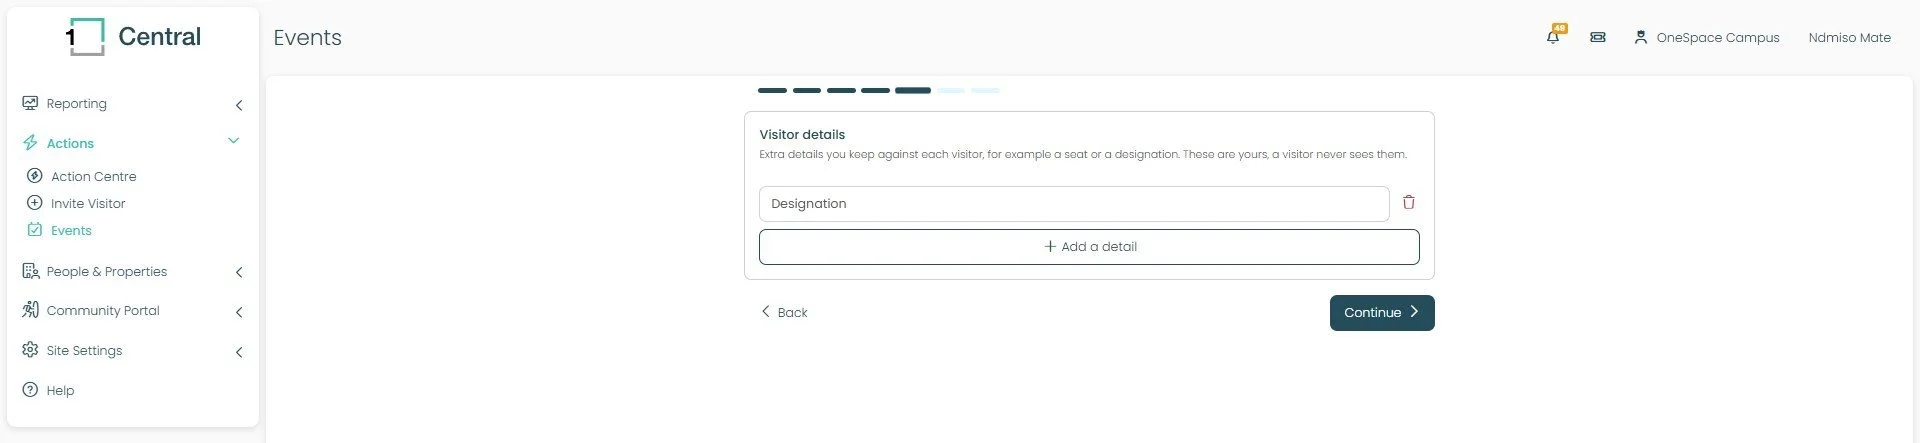
Select Add a detail and type its name. Example: Designation.
To remove a detail, select the red bin icon.
Select Continue.
Step 6: Card design
It sets how the visitor's card looks: the Portrait design the visitor receives, the Landscape design the card printer prints, and the message shown on the card page.
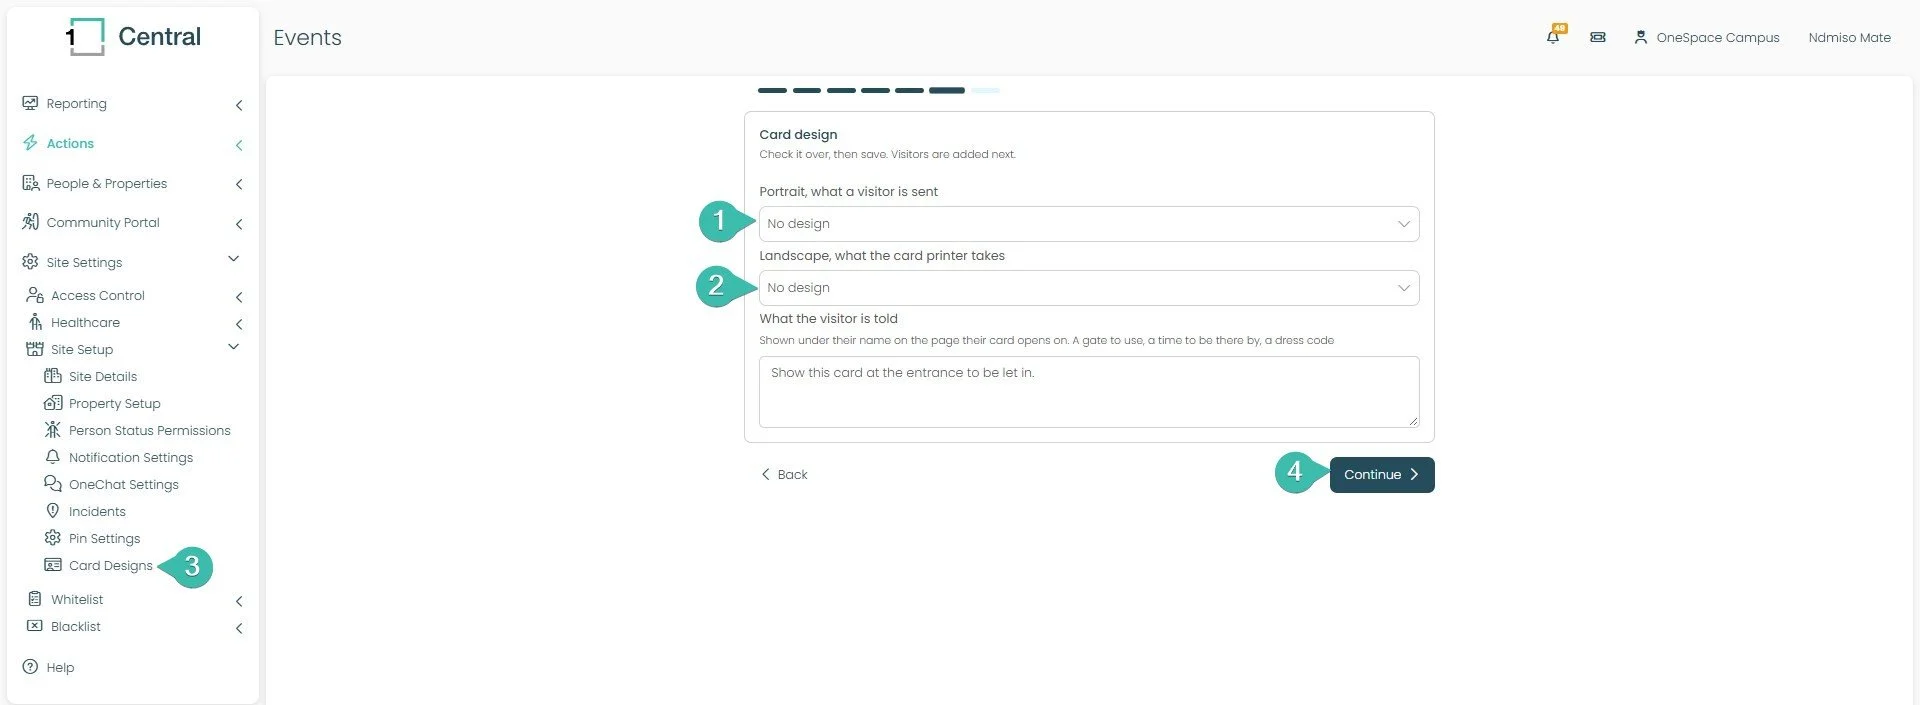
Choose a Portrait design. This is the card the visitor receives.
Choose a Landscape design. This is the card the card printer prints.
Type What the visitor is told. This text appears under the visitor's name on their card page. Example: a gate to use, a time to arrive, or a dress code.
Select Continue.
Card design is mandatory. If you do not have a design yet, make one in Site Settings, then Site Setup, then Card Designs.
Step 7: Review and create
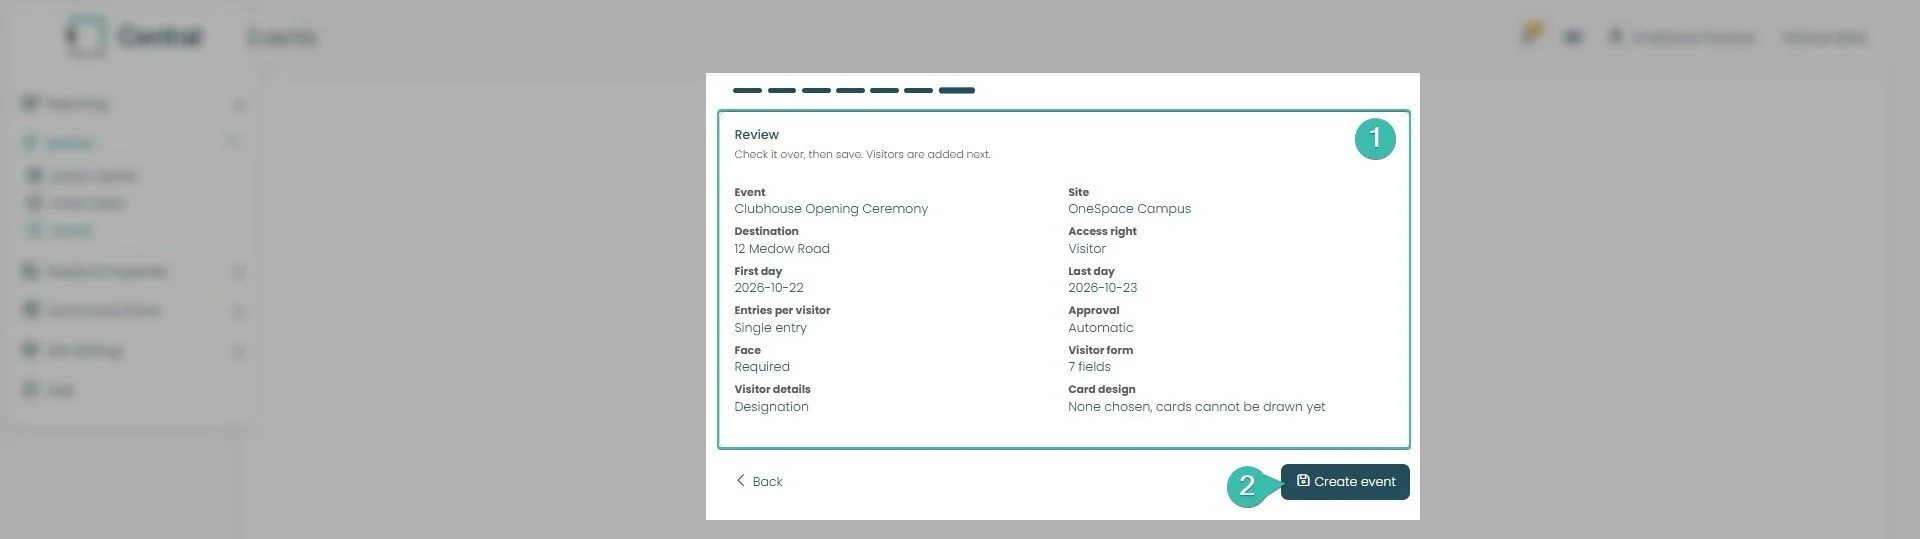
Read the Review box. Check the event, the place, the dates, the visitor form and the card design.
Select Create event.
The event is saved as a Draft. Next, add visitors. Go to
Add Visitors
You add visitors to an event that is still a Draft. You can add them one at a time, or import a list. Picture 2.1 shows the event page.
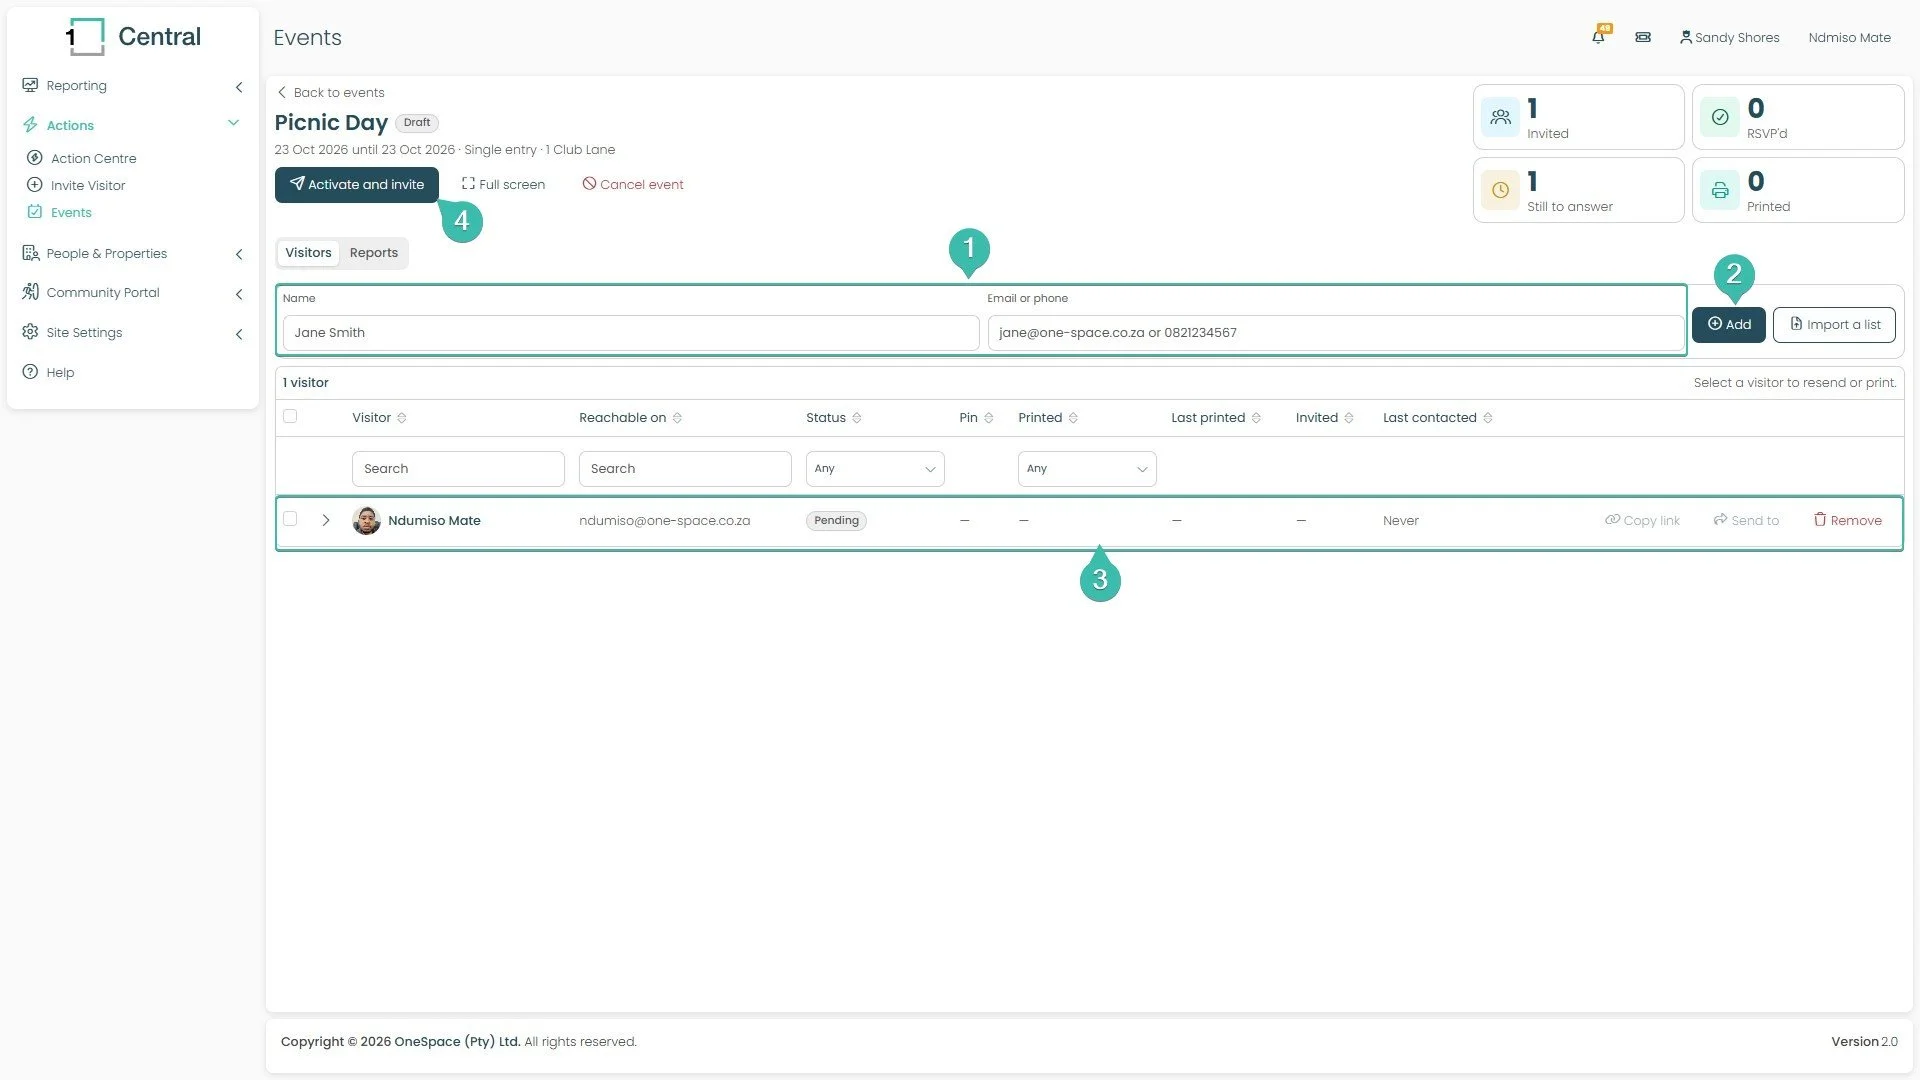
Type the visitor's Name.
Type their Email or phone. Use an email address or a phone number.
Select Add. You must fill in both boxes to the left of the Add button first. The visitor is then added to the invite list below. Their status shows Pending.
Repeat for each visitor.
When the list is ready, select Activate and invite. This sends the invitation to every visitor at once. You can still add visitors and edit the event after you activate it.
Import a Visitor list
Use it when you have many visitors. Each visitor needs only a name and an email address or a phone number.
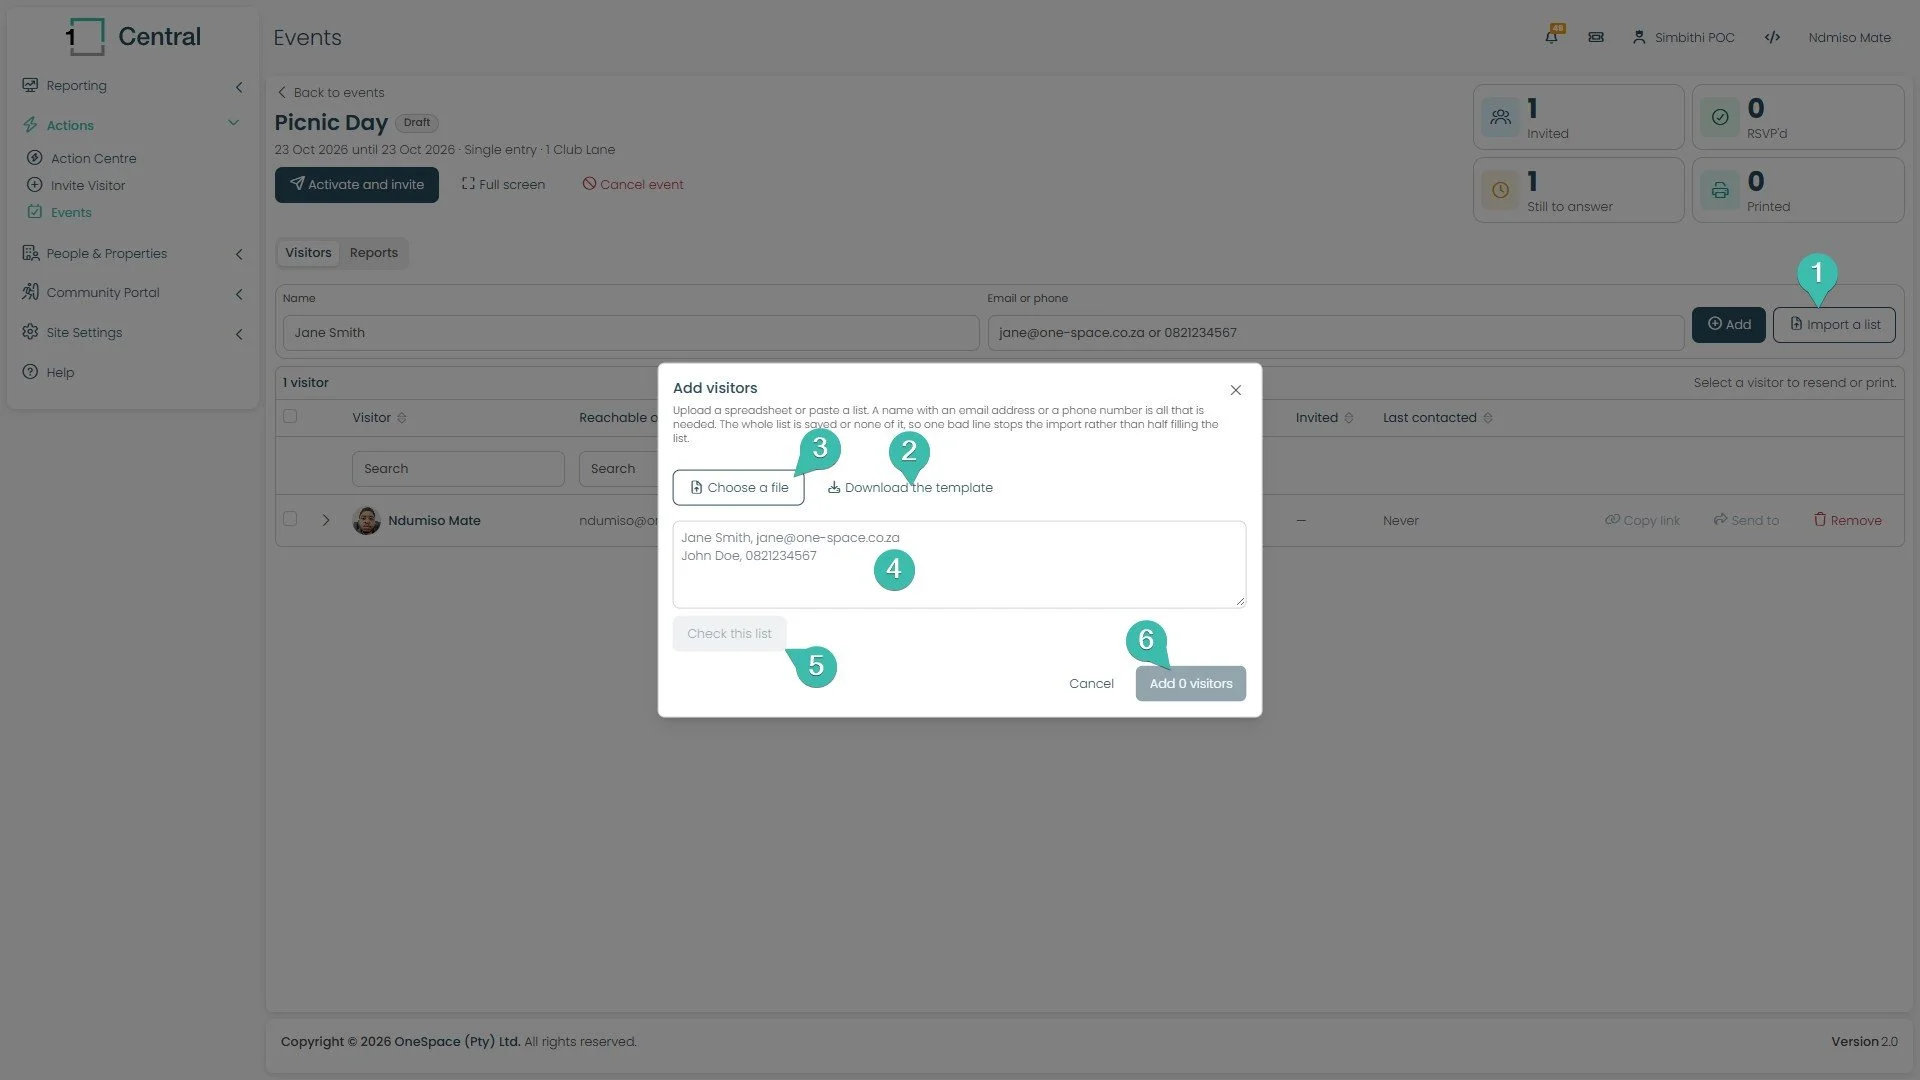
Select Import a list.
Select Download the template to get the correct layout. Open it and follow its columns.
Select Choose a file and pick your Excel file saved as CSV.
You can also paste your list into the box. Put one visitor on each line. Example: Jane Smith, jane@one-space.co.za.
Select Check this list. It shows which line has a problem. The Add button stays locked until the check passes.
Read the number on the last button, for example Add 5 visitors. Select it to add everyone.
Important: The import is all or nothing. If one line is wrong, no visitors are added. Fix the line, then try again.
The visitor form and the reports
This section has two parts. The first part shows what the visitor does. The second part shows how you follow the event. Each visitor fills in the form on their own phone or computer.
This version has an improved RSVP process. Visitors answer a new visitor form to RSVP for the event.
What the visitor does
The below picture shows the first page a visitor sees. The visitor needs a OneSpace 1iD account to answer the form. They create the account once. The next time they are invited, they sign in.
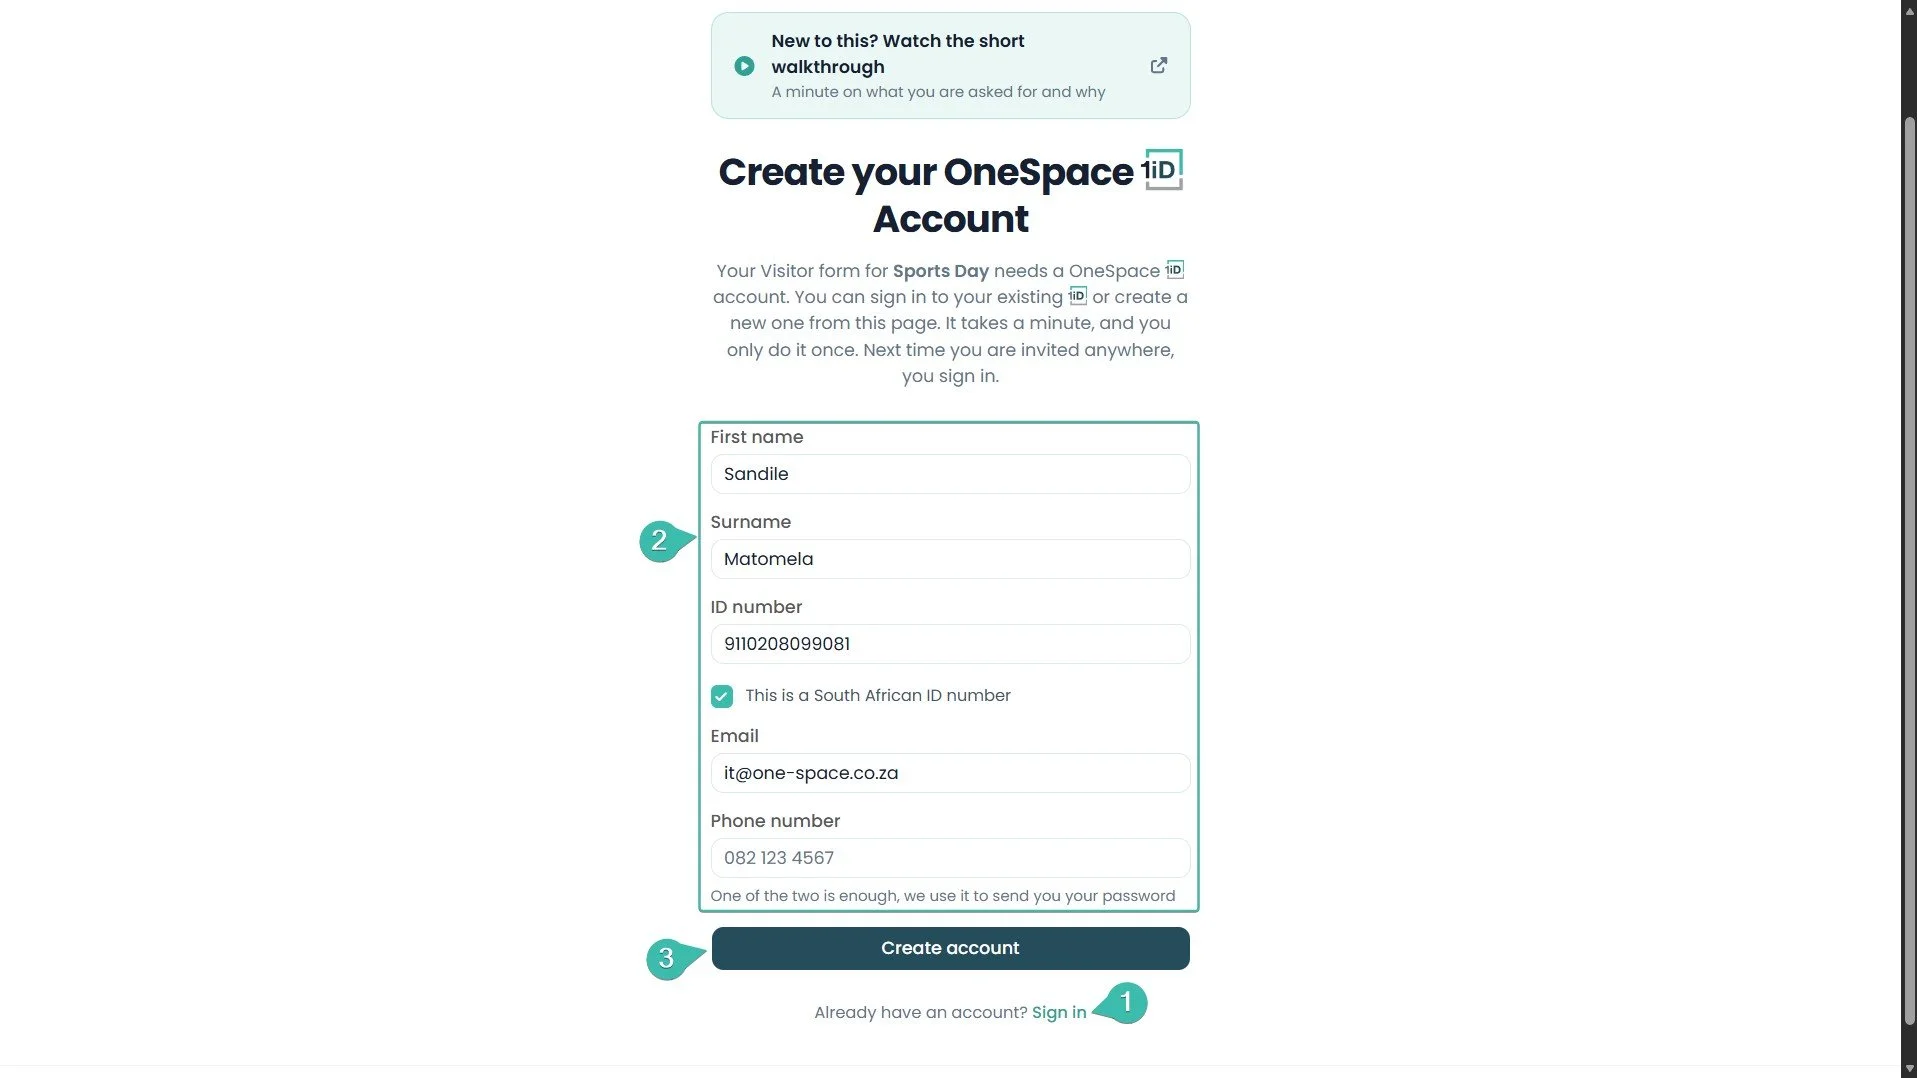
If the visitor already has a 1iD account, they select Sign in.
A new visitor types their First name, Surname and ID number. They tick This is a South African ID number if it is a South African ID.
They type an Email or a Phone number. One of the two is enough. The password is sent to it.
They select Create account.
The banner at the top, New to this? Watch the short walkthrough, opens a short video. It explains what the visitor is asked for and why.
The visitor is now signed in. Their name shows at the top right.
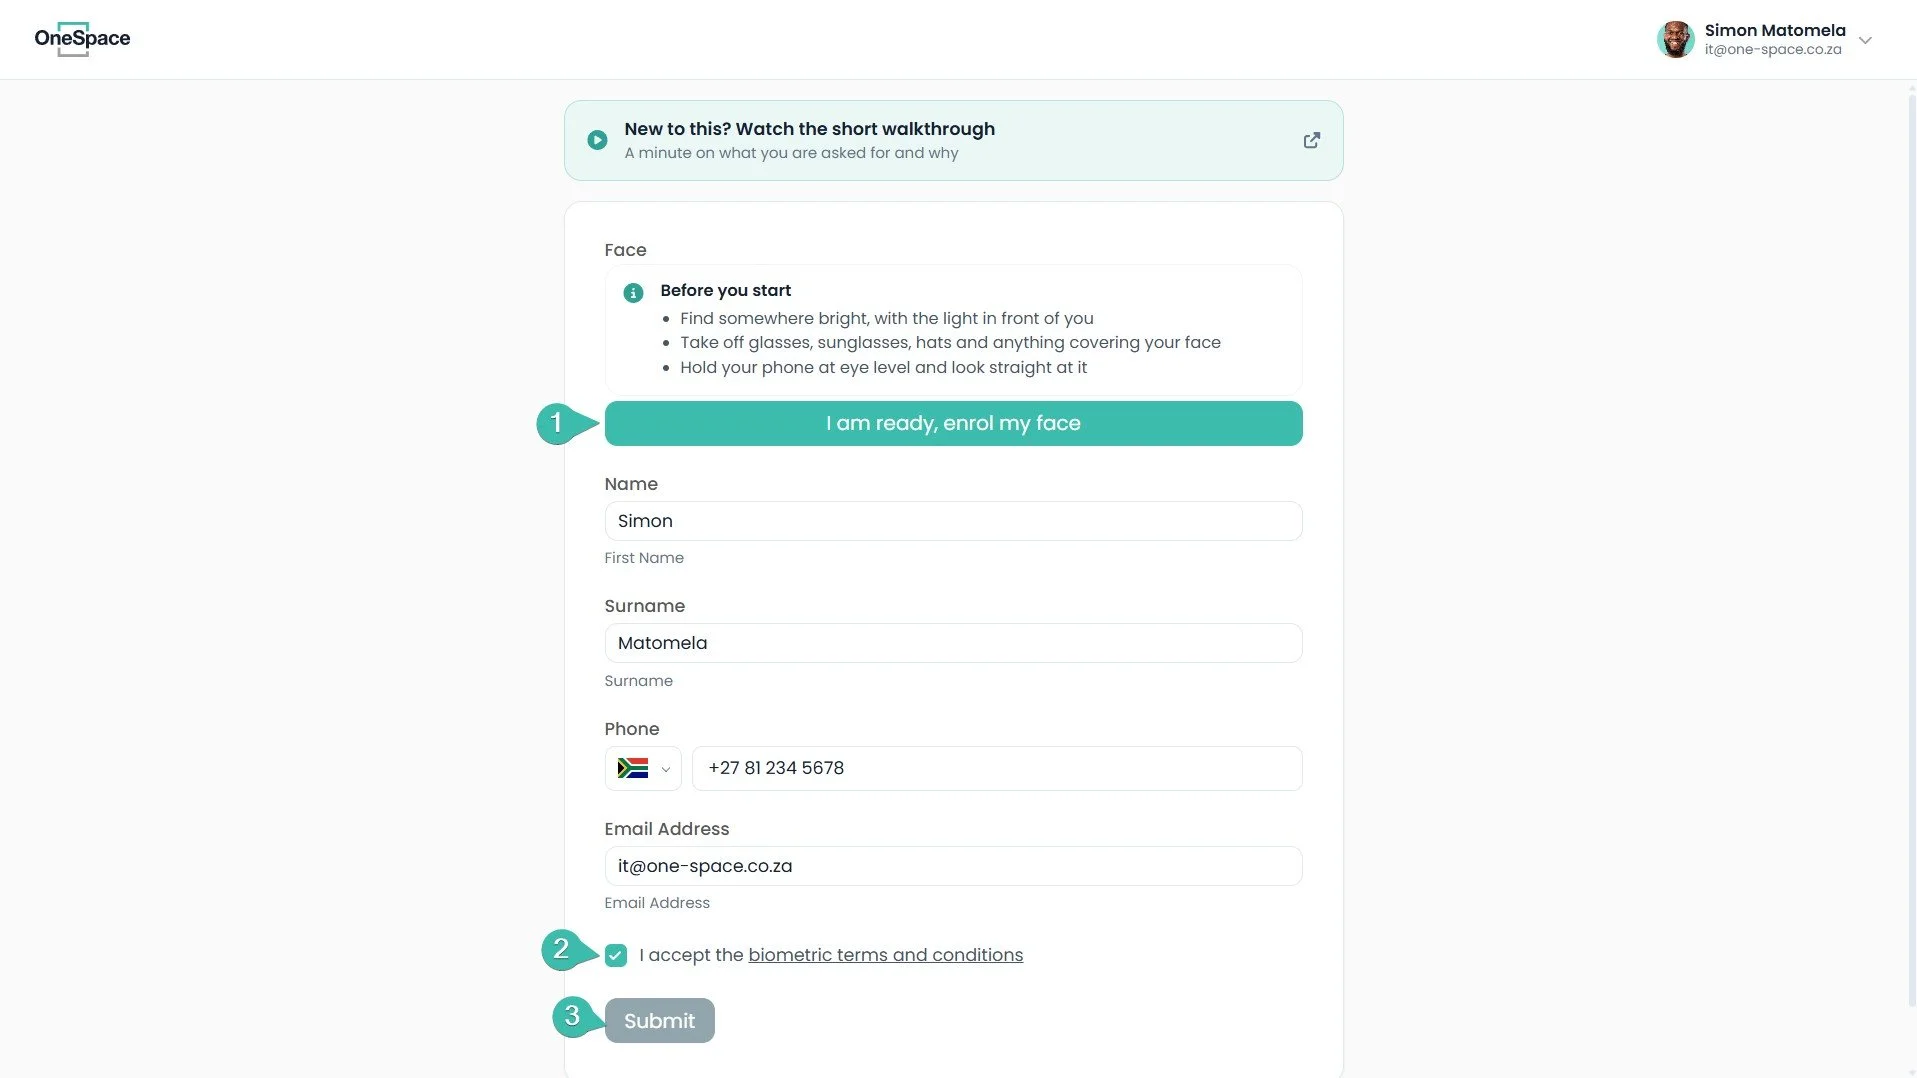
If Ask for a face is on, the form starts with Face. The visitor reads Before you start, then selects I am ready, enrol my face. They follow the steps on the screen.
The visitor fills in or checks the other fields, for example Name, Surname, Phone and Email Address. They choose the country code from the flag menu first.
The visitor ticks I accept the biometric terms and conditions.
The visitor selects Submit.
The form on your event can have more fields than this example. The fields depend on the list you built in Section 1, Step 4.
If Ask for a face is on, visitors enrol their face by filling in the form. Their face is added to OneAccess. Visitors can then use biometric access, their face, instead of a PIN.
The page says Your details are in. The visitor can close the page. Their Digital Visitor Card arrives by WhatsApp, SMS or email. The page also links to the OneSpace Connect app.
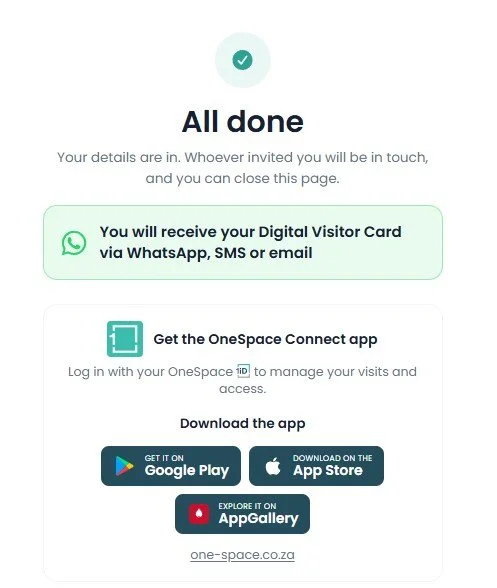
When the visitor submits the form, the system creates a Visitor PIN for them. The PIN is sent to the visitor by WhatsApp and email. You can use this PIN to validate the visitor's entry for the event.
Follow the event on the Reports tab. Open the event and select Reports.
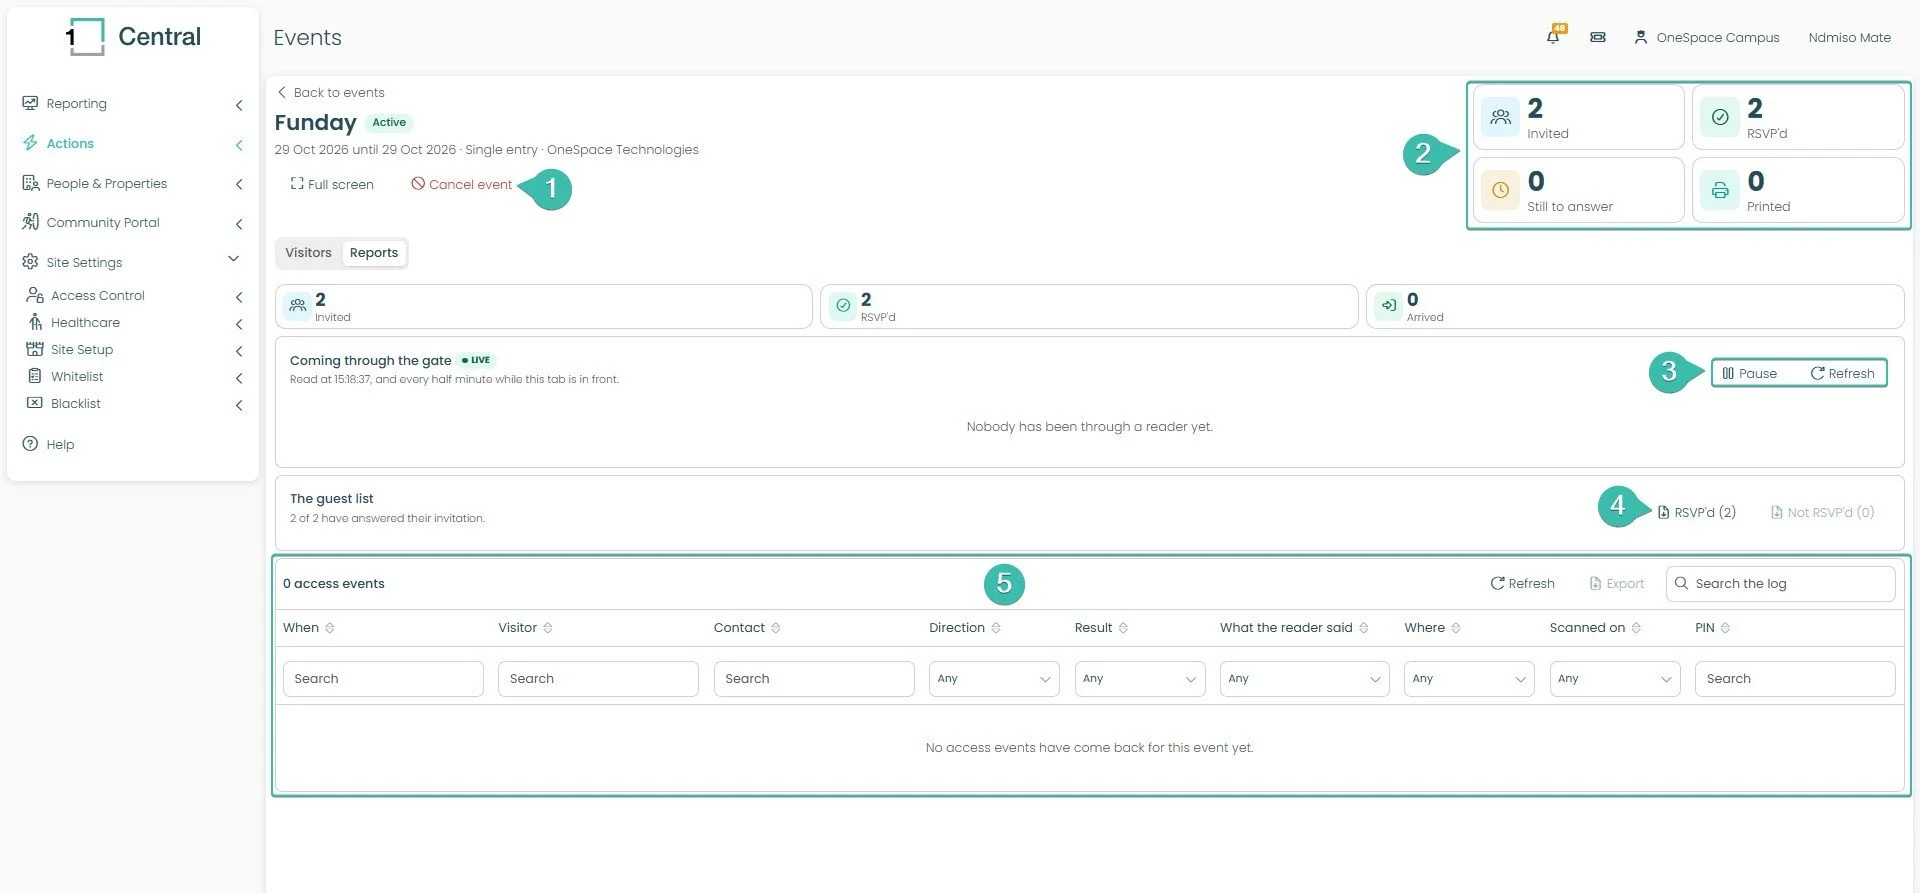
Check the four counters at the top right: Invited, RSVP'd, Still to answer and Printed.
Watch Coming through the gate. It is a live ticker of access events for the people who were invited. It updates every half minute while the tab is open. Select Pause to stop the updates, or Refresh to update now.
Select RSVP'd to download a CSV file of the guests who have replied yes.
Use the access log at the bottom to see each time a card was read. Type in Search the log to find a visitor or a PIN. Select Export to save the log.
To stop an event that will not go ahead, select Cancel event. Invitations and visitor cards are cancelled. This cannot be undone.
Manage visitors and their cards
The below picture shows the Visitors tab after a visitor has answered the form. Their status shows RSVP'd. Their Visitor PIN shows in the Pin column.
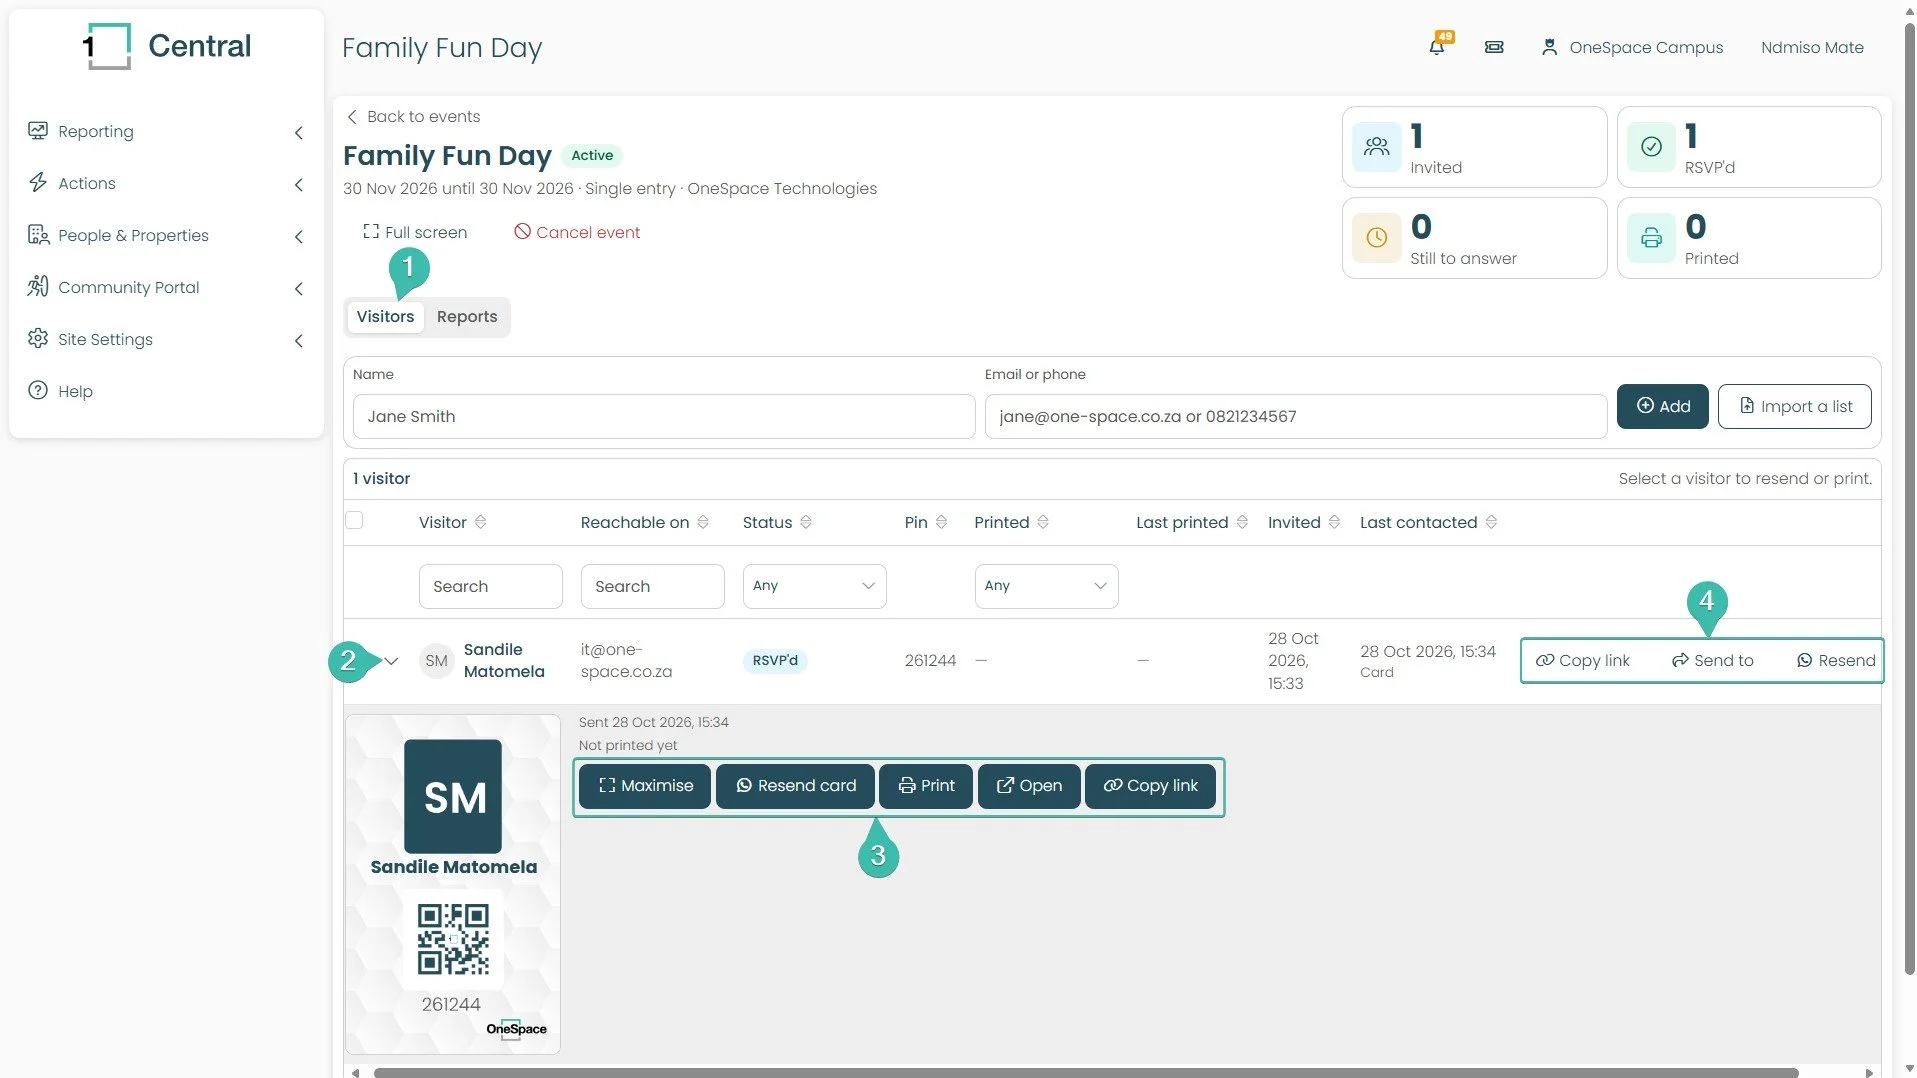
Open the event and select Visitors.
Select the arrow next to a visitor. Their row opens and shows their Digital Visitor Card.
Use the buttons next to the card. Maximise shows the card bigger. Resend card sends the card to the visitor again. Print prints the card. Open opens the card. Copy link copies the link to the card.
Use the buttons at the end of the row. Copy link copies the visitor's form link. Send to sends the invitation to another phone number or email. Resend sends the form link to the visitor by WhatsApp.