


Central
Incident Management

Thank you for selecting OneSpace Central to empower your community. We at OneSpace are more than happy to assist you in case you have any troubles with your Site Management system.
This guide was made to provide a quick reference for common actions, functions, and workings that you will be using to help manage your site and all residents on the system. If this guide fails in assisting you with the website’s functionality, please do not hesitate to email us on support@one-space.co.za.
This guide will address the following:
Incident Management
Incident Management is where you log, track, and resolve issues that happen on your estate — things like power outages, potholes, water leaks, or security concerns. Every incident is captured in one place, assigned to the right person, and followed until it is closed.
This guide walks you through the Incident Management page in Central, one screen at a time, so you can use it with confidence.

Getting to Incident Management
In the left-hand menu, click Community Portal to expand its menu.
Click Incidents. This opens the Incident Management page, shown above.
This page has three parts: a summary of all your incidents at the top, a map showing where they are happening, and a full list below where you can see and work with each one individually.
The Incident Management Overview
When you open Incident Management, you land on this Overview. It gives you a full picture of what is happening on your estate before you look at individual incidents.
Time Range Filter

The buttons in the top-right corner — 7 days, 30 days, 90 days, All time, and Custom — decide which period of time the whole page shows information for. This affects the summary, the map, and the incident list all at once.
Click a time period (for example 30 days), or click Custom to choose your own start and end dates.
Tip: Central remembers your last choice, so check this filter first if a number on the page looks smaller than you expect — you may be looking at a shorter period.
Incident Overview

This card gives you the total number of incidents logged in your selected time period, broken down by status: Reported, In Progress, and Closed. The coloured bar shows the same breakdown visually.
Below the bar, Central also warns you about anything urgent — even if it falls outside the time period you have selected. For example, it may tell you how many high-priority incidents are still open, and how long the oldest one has been waiting.
Tip: Always read the warning messages under the overview, even when things look calm above — they surface high-priority incidents that your current time filter might otherwise be hiding.
Incident Map

The map plots each incident at its reported location, using the same colours as the overview: orange for Reported, purple for In Progress, and green for Closed. Use the All categories and All statuses dropdowns above the map to narrow down what is shown, and the zoom controls in the top-left to move around the map.
The map is especially useful for spotting patterns — for example, several incidents clustered around the same street may point to one underlying problem, like a burst pipe or a failing transformer.
Incident List

Below the summary and map is the full Incident List. Each row is one incident, with columns such as Incident ID, Category, Subcategory, Responsible Service, Reporter, Priority, Status, Description, and Date of Incident.
Every column has its own filter box directly underneath its heading, so you can narrow the list down — for example, filter Category to Electricity to see only electrical incidents, or filter Status to Reported to see what still needs attention.
Rows with an arrow next to Incident IDs are groups of linked incidents (covered in the Grouping Related Incidents section). Click the arrow to expand a group and see each incident inside it.
Customizing Your Columns

1. Click Columns above the incident list.
A panel opens showing which columns are Always Shown (Incident ID, Category, Reporter, and Date of Incident cannot be removed) and which are Optional — Subcategory, Responsible Service, Priority, Status, Description, External Reference, Location, Detail, Reported date, and Coordinates.
Tick or untick the optional columns you want to see, then click Done. If you want to start over, click Reset defaults.
Tip: Keep only the columns your team actually uses day-to-day — a shorter, focused table is easier to scan than one with every column switched on.
Customizing Your Columns - Video
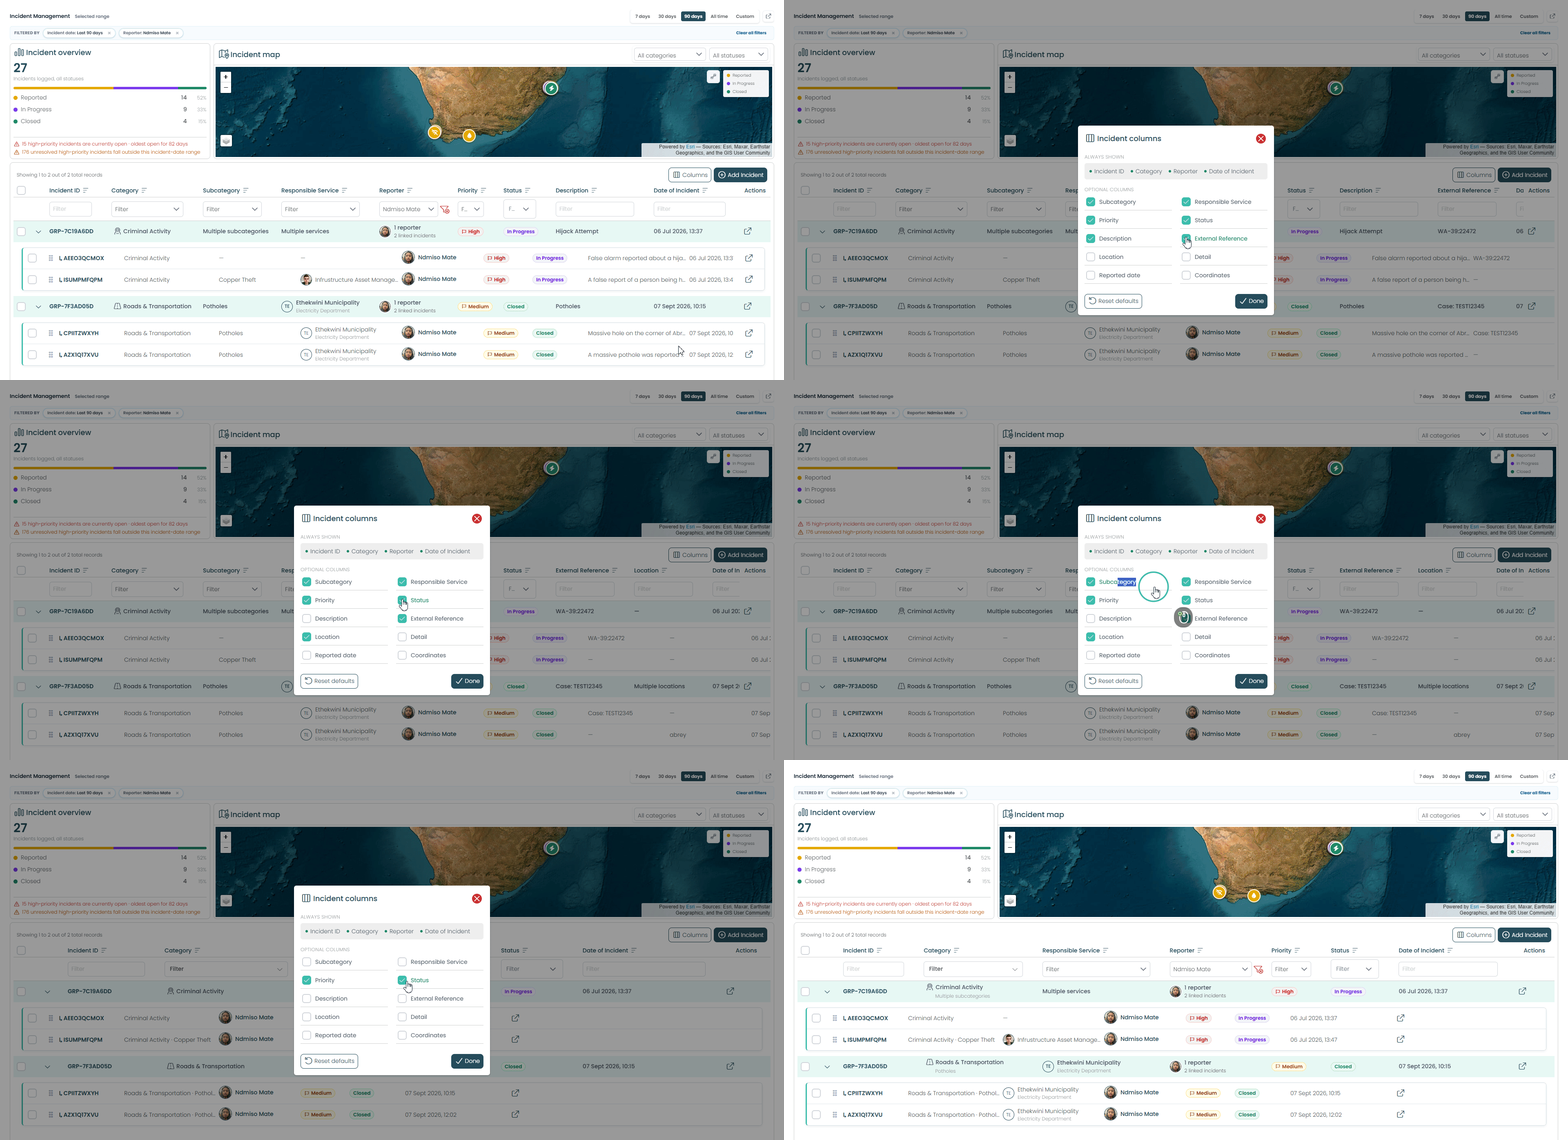
Reporting a New Incident
Anyone with access can log an incident directly from this page — you do not need to wait for a resident or guard to call it in. Central gives you two ways to fill in the incident form: a guided Wizard, or a single scrolling Form. Use whichever feels easier.
Adding an Incident — Wizard View

Click + Add Incident in the top-right corner of the Incident List.
The Wizard view opens by default, split into four tabs: Incident, Details, Location, and Images. Use the icons at the top-right of the window to switch to the single-page Form view instead, if you prefer.
On the Incident tab, choose who you are Reporting as, then fill in the Classification: the Date and time it happened, the Category and, if relevant, a Subcategory, the Responsible Service, and the Priority — Low, Medium, or High. You can also add an External Reference, such as a municipal or security case number, if one already exists.
On the right-hand side, a live Preview shows exactly what the incident will look like once it is saved. Click Next to move through Details, Location, and Images, adding a description, pinning the exact location, and attaching any photos as evidence.
Adding an Incident — Form View

Click the single-page icon at the top of the window to switch from the Wizard to the Form view.
Everything you would fill in across the Wizard's four tabs — Reporter, Classification, and Incident Details (a short Description and any extra Details) — now appears together on one page that you simply scroll down.
Once every field is complete, click Report Incident to save it.
Tip: The Description field is required — keep it short and clear (for example "Pothole outside Gate 2"). Use the optional Details field underneath for anything extra.
Section 3 of this guide, covered separately, walks through Incident Settings — where your team sets up Categories, Subcategories, and Responsible Services. It's normally configured once by an administrator rather than used day-to-day, so we'll come back to it after this section.
Grouping Related Incidents
Sometimes several people report the same underlying issue — for example, ten residents all logging the same power outage separately. Instead of managing ten separate incidents by hand, you can group them together and manage them as one.
Selecting Incidents and Taking Bulk Action
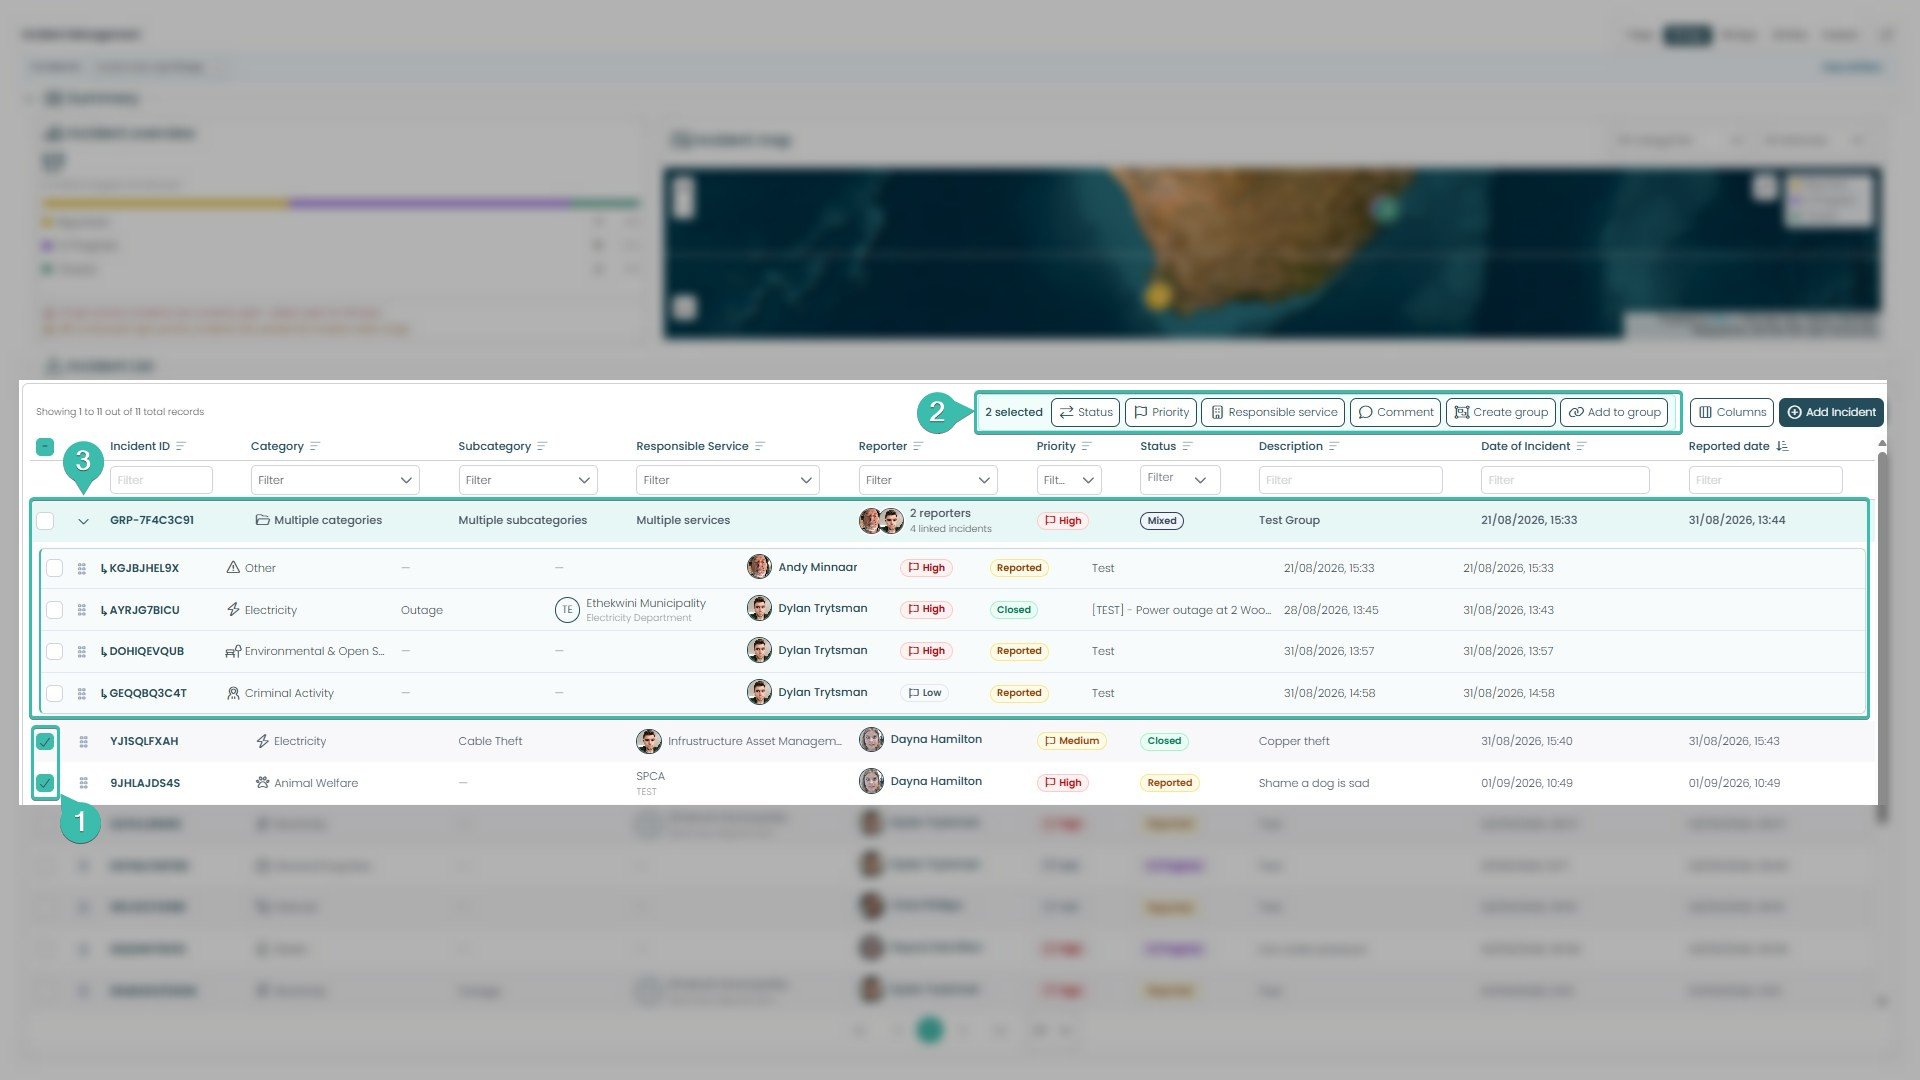
Tick the checkbox next to two or more incidents in the list that belong together.
A toolbar appears above the list showing how many incidents are selected, with quick actions: Status, Priority, Responsible service, Comment, Create group, and Add to group. Click Create group to combine your selected incidents into a single group.
You can also use this same toolbar to update the Status or Priority of several incidents at once, reassign them to a different Responsible Service, or add one Comment to all of them together — useful when one root cause affects many reports.
Creating Incident Group
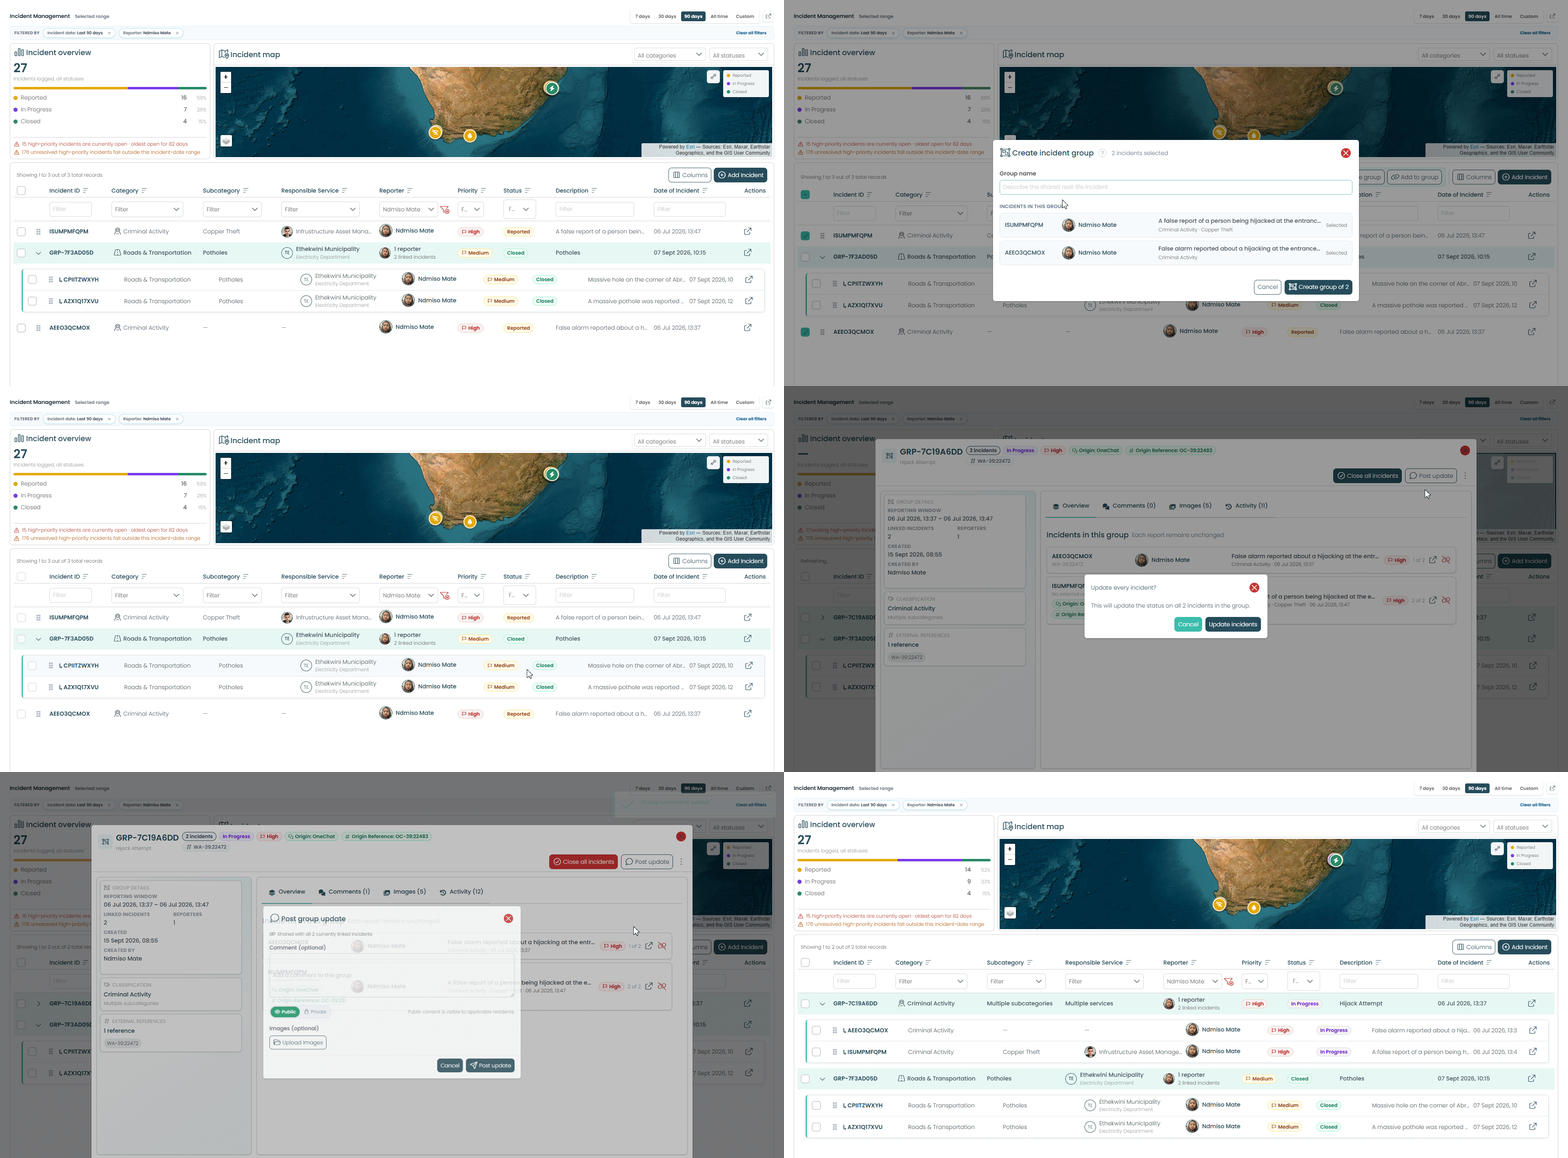
Managing an Existing Group

Once created, a group appears in the list as a single row with its own ID (for example GRP-7F4C3C91). If its linked incidents have different categories or statuses, the group simply shows Multiple categories, Multiple services, or Mixed, and lists how many reporters and linked incidents it contains.
Click the arrow next to a group's ID to expand it and see each linked incident individually — each one keeps its own category, priority, and status.
Tick more incidents lower down in the list and use the toolbar to Add to group if you find more reports of the same issue, or Remove group to take a selected incident back out.
Tip: Grouping keeps your Incident Overview and reporting accurate — a spike of 10 reports about one outage will show up as one incident, not ten, so your team isn't misled about how widespread a problem really is.
Incident Settings
Incident Settings is where you configure how incident reporting works on your estate — the categories your team and residents can choose from, the subcategories underneath them, and which responsible service each one should route to automatically.
Getting this set up properly means every new incident associated with the right person from the moment it's logged, with far less manual reassigning later.
Getting to Incident Settings

In the left-hand menu, click Site Settings to expand it.
Click Site Setup to expand it further.
Click Incidents. This opens Incident Settings.
Incident Settings is an administrative area, so only users with the right permissions will see Site Settings in their menu at all — it's normally set up once by an administrator rather than adjusted day-to-day.
Incident Categories
Central gives every site the same starting set of incident categories — Animal Welfare, Electricity, Water, Criminal Activity, and so on. These default categories cannot be renamed, edited, or deleted; they stay consistent across every OneSpace estate so that reporting and reporting terminology stays the same everywhere.
What you can control, for each category, is shown across the table: whether it is switched on for your site (Site Availability), whether residents themselves are allowed to select it when logging an incident (Available to Residents), and which team or service it routes to by default (Default Responsible Service).

Look for the three dots (⋮) in the Actions column at the far right of a category's row. Opening it lets you:
Enable or disable that category for your site — useful for switching off categories that simply don't apply to your estate, without deleting anything.
Choose or change the category's Default Responsible Service — the team or contact every new incident in that category will be routed to automatically.
Tip: Since the category list itself can't be edited, this is where your setup time is best spent: switching on only the categories your estate needs, and giving each one an accurate default responsible service.
Adding a Subcategory — and Overriding Its Responsible Service
Subcategories let you get more specific within a category — for example, splitting Electricity into Cable Theft and Outage. Click the arrow next to a category to expand it and see its existing subcategories.

Click + Add subcategory — either ① the button shown underneath an expanded category's own subcategory list, or ② the general button at the top of the page.
In the dialog, confirm or choose the Incident category it belongs to, then type a Name for the new subcategory.
Click Add subcategory to save it.
By default, a new subcategory inherits its Default Responsible Service from its parent category — notice how the Outage subcategory above is marked "Inherited from category." If one particular subcategory needs to go to a different, more specific team, you don't have to change the whole category.
Open the three dots (⋮) next to that subcategory and set its own Default Responsible Service. This overrides the inherited value for that subcategory only — for example, Cable Theft above is routed to the Infrastructure Asset Management Dept. instead of the general Electricity Department that the rest of the category uses.
Tip: Only override a subcategory's responsible service when it genuinely needs a specialist team. Everything else can simply inherit from its parent category, which keeps your setup easier to maintain.
Adding and Linking a Responsible Service

Click Manage responsible services at the top of Incident Settings.
From the Responsible Services list, click + Add service.
Fill in a Name (required), and optionally a Department, Phone, and Email.
Switch on Visible to residents if residents should see this service's name on their own incident reports.
Optionally, choose a Linked person — a real person already set up in Central — so the service is tied to a named, accountable individual rather than just a department name.
Click Add service to save it.
Tip: Linking a real person to a responsible service makes your incident records far more accurate — you can see exactly who was accountable for a resolution, not just which department handled it.
Managing Responsible Services
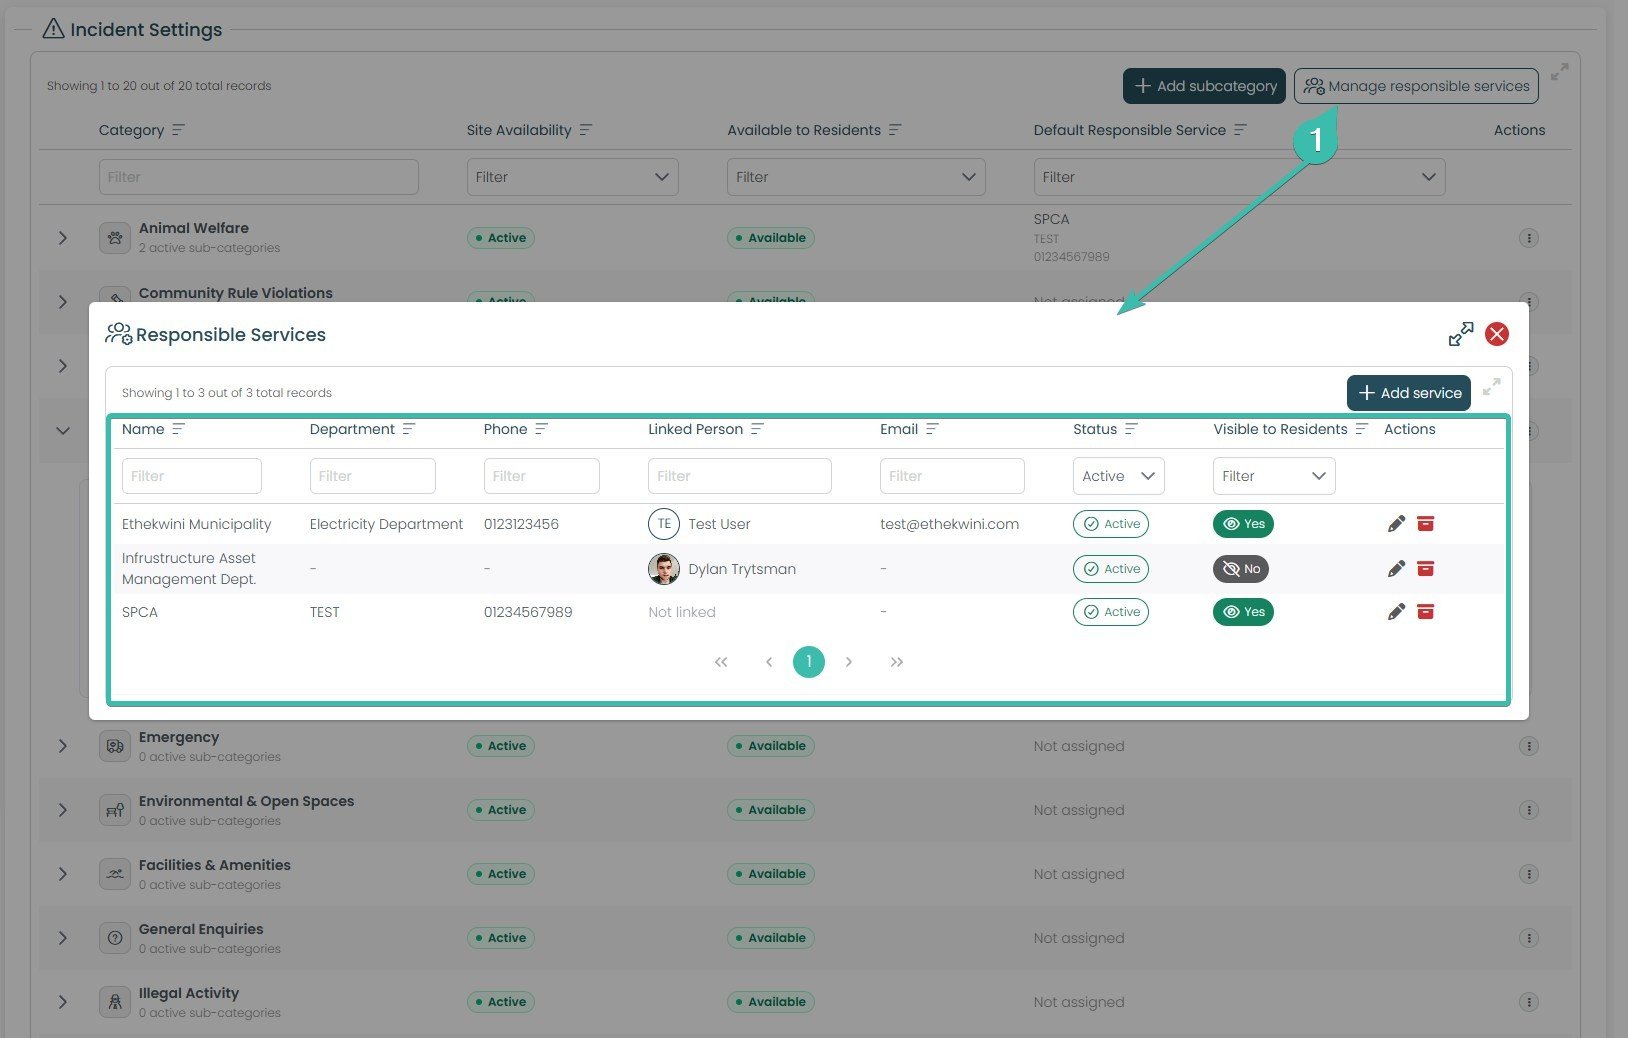
Click Manage responsible services at the top of Incident Settings.
This opens your full list of responsible services — internal departments, external contractors, or bodies like a municipality or the SPCA — each with its Department, Phone, Linked Person, Email, Status, and whether it is Visible to Residents.
Turning Visible to Residents off keeps a service's name internal — useful for a contractor or department you don't want appearing on a resident's incident feed. Use the Status filter to see only Active or Inactive services, and the pencil and bin icons on the right to edit or remove one.
Note: The linked Person needs to exist as a Person within your Central Site. Refer to the People Management Guide on how to manage people within your site.
Exporting and Scheduling Reports
Once your Incident List is showing exactly what you need, you can export it — either as a one-off file right now, or as a report Central regenerates and emails out on a schedule.
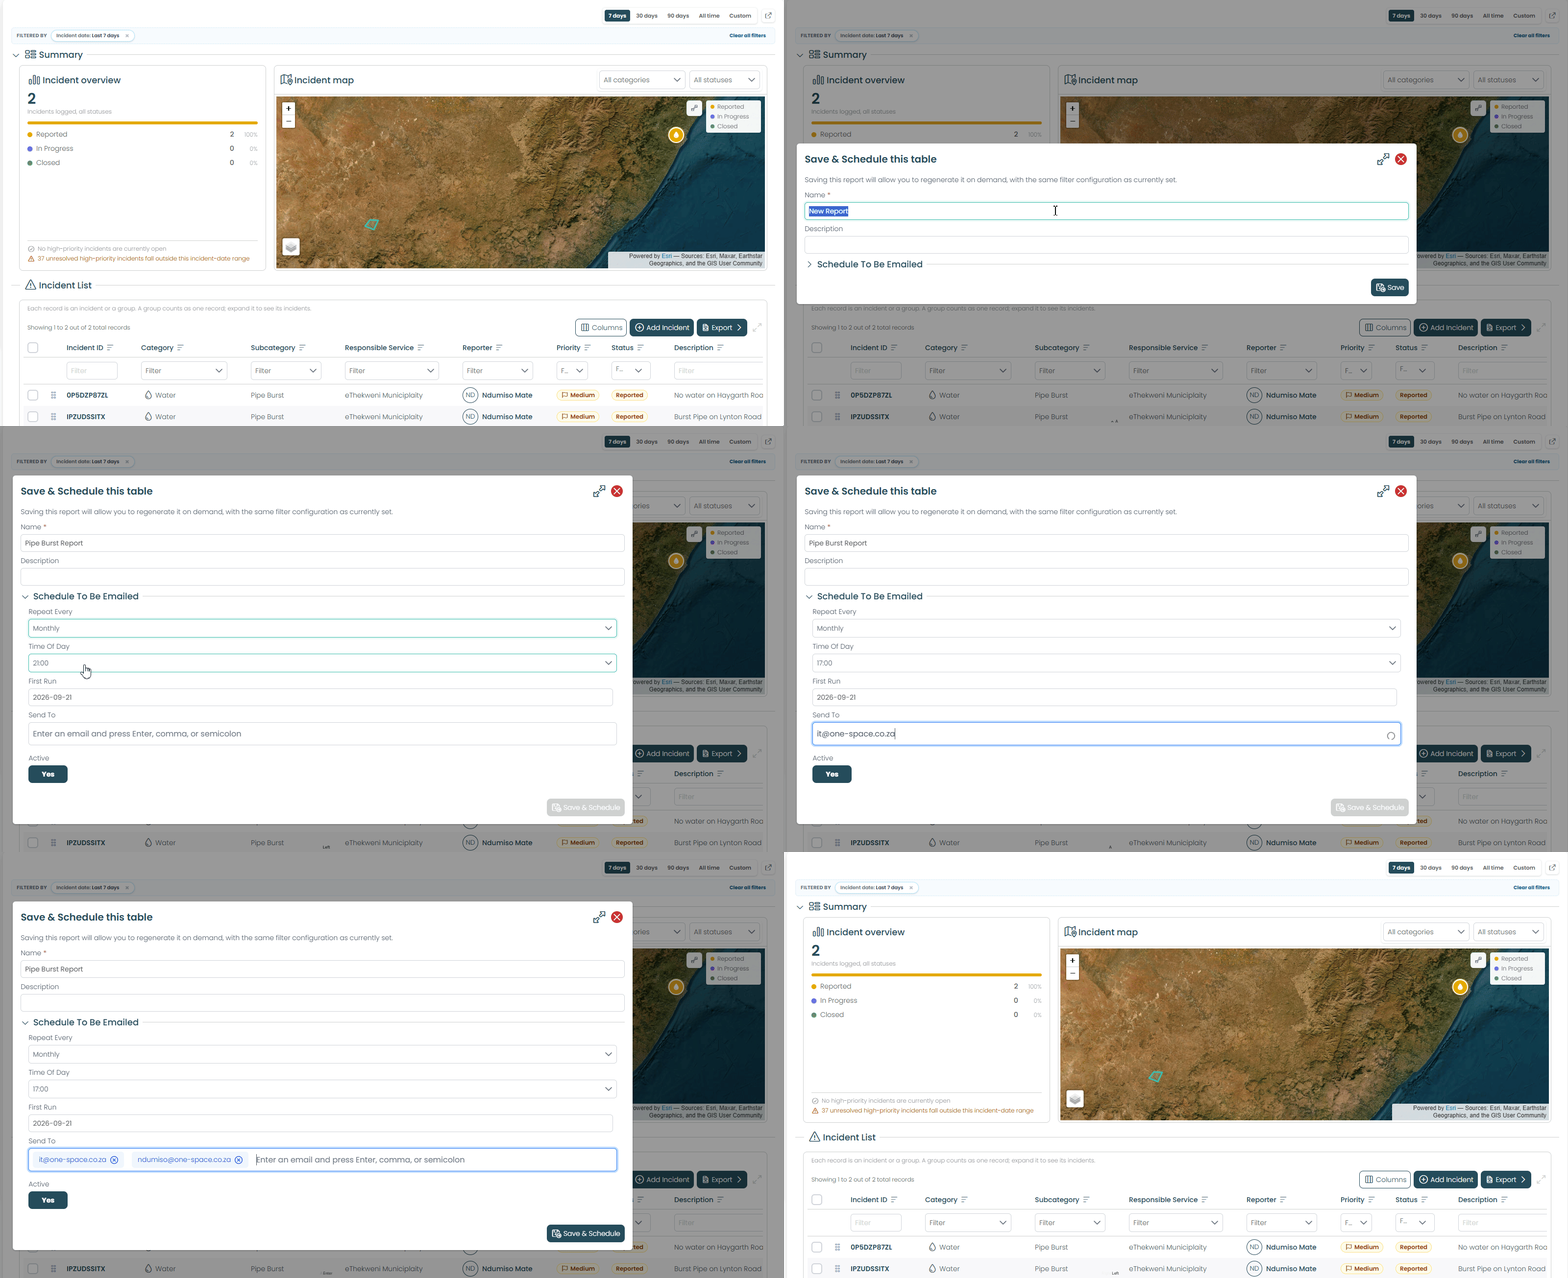
Click Export above the Incident List.
Choose Export Now for a one-off download of what's currently on screen, or Save & Schedule to set it up as a recurring, emailed report.
Selecting Save & Schedule opens a modal explaining that saving the report will let you regenerate it on demand, with the same filter configuration as currently set — in other words, it remembers exactly what your table was filtered to at the moment you saved it.
Give the report a Name (required) and, if it's useful, a short Description.
Click Schedule To Be Emailed to expand it, if you'd like the report sent out automatically rather than just saved for later.
Choose how often it should run under Repeat Every (for example Daily, Weekly, Monthly, or Custom), and set the Time Of Day and First Run date.
Under Send To, type each recipient's email address and press Enter, comma, or semicolon to add it.
Leave Active set to Yes, then click Save & Schedule to finish.
Tip: This export only captures the current view of the Incidents table. If you want a recurring report scoped to one category, one reporter, or one responsible service, filter the Incident List down to that first — then click Export → Save & Schedule. Otherwise the scheduled report will keep sending whatever your broader filters catch, not the narrower slice you actually wanted.
Finding a One-Off Export Report
Every export you run with Export Now is kept for you, so you don't need to redo it if you've closed the download or lost the file.
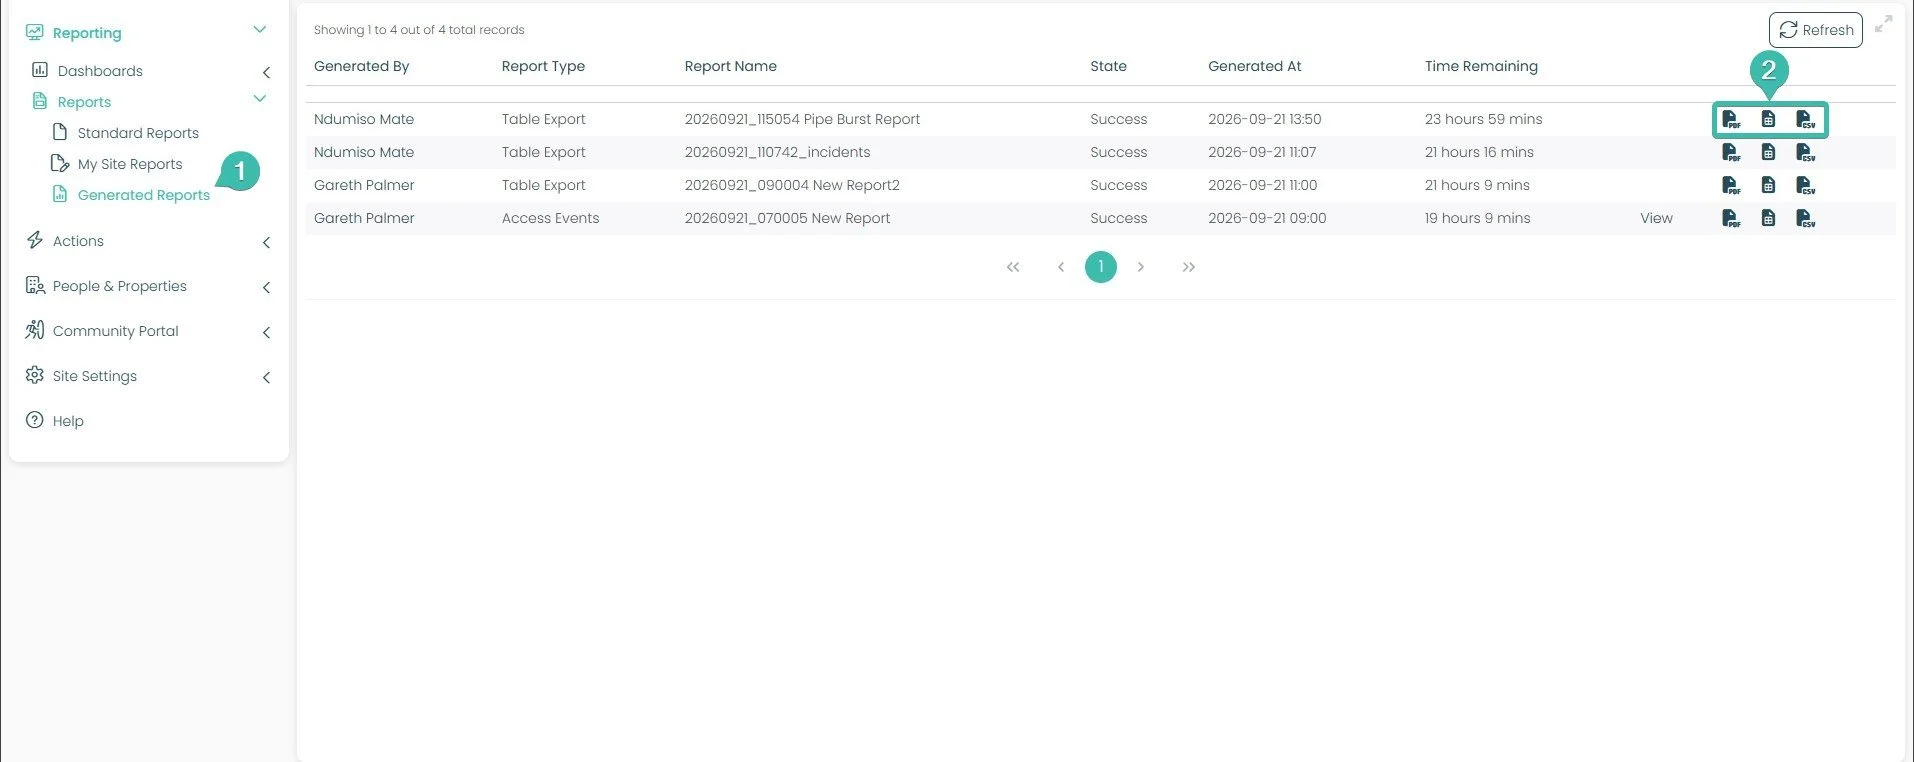
In the left-hand menu, click Reporting, then Reports, then Generated Reports ①.
Find your export by its Report Name, then click the icon for the file type you want ② — PDF, Word, or CSV.
Finding and Managing a Scheduled Report
Every report you set up with Save & Schedule lives under My Site Reports, where you can check on it, change it, or remove it at any time.
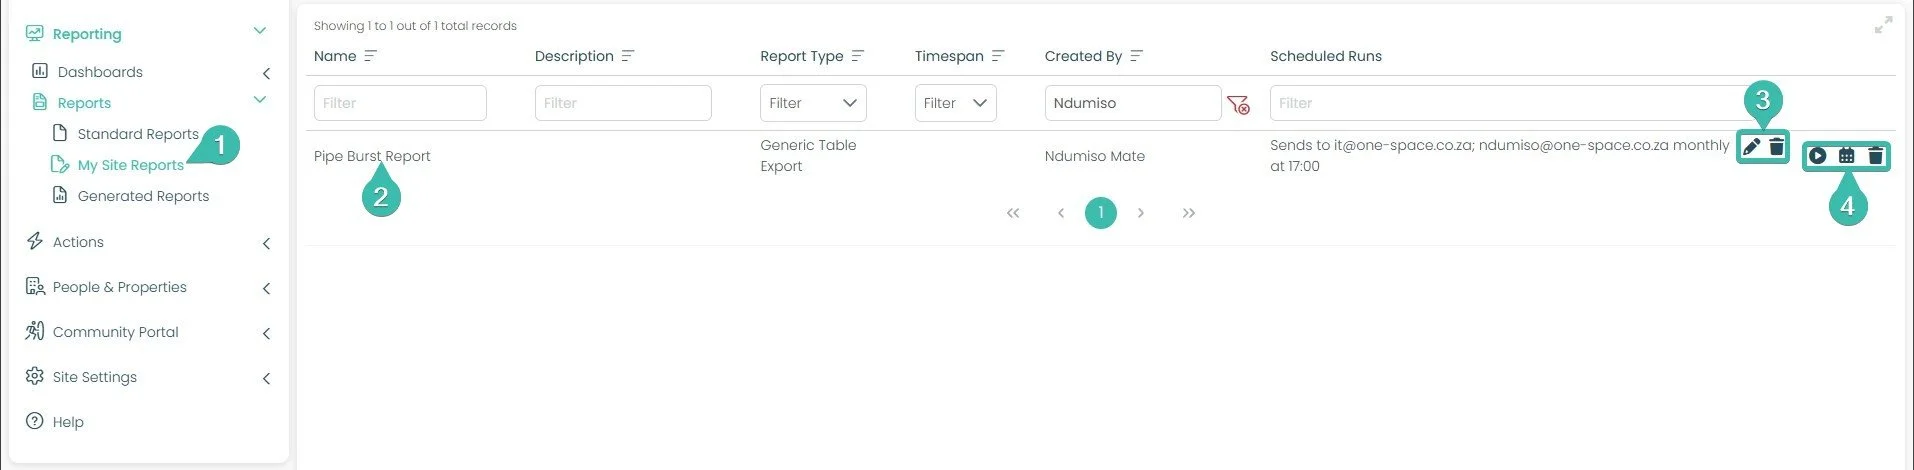
In the left-hand menu, click Reporting, then Reports, then My Site Reports ①.
Find your saved report by its Name ②.
Use the pencil and bin icons ③ to edit the report's own details, or delete it completely.
Use the play, calendar, and bin icons ④ to run that same report manually right now (it appears on your screen), adjust when it's scheduled to run next, or delete just the schedule while keeping the saved report.
Incident Management - MultiSights
MultiSights is the version of Incident Management for people who look after more than one site. It works almost the same as the page you have learned about in this guide, but instead of showing one site, it shows the incidents from many sites together, in one place.
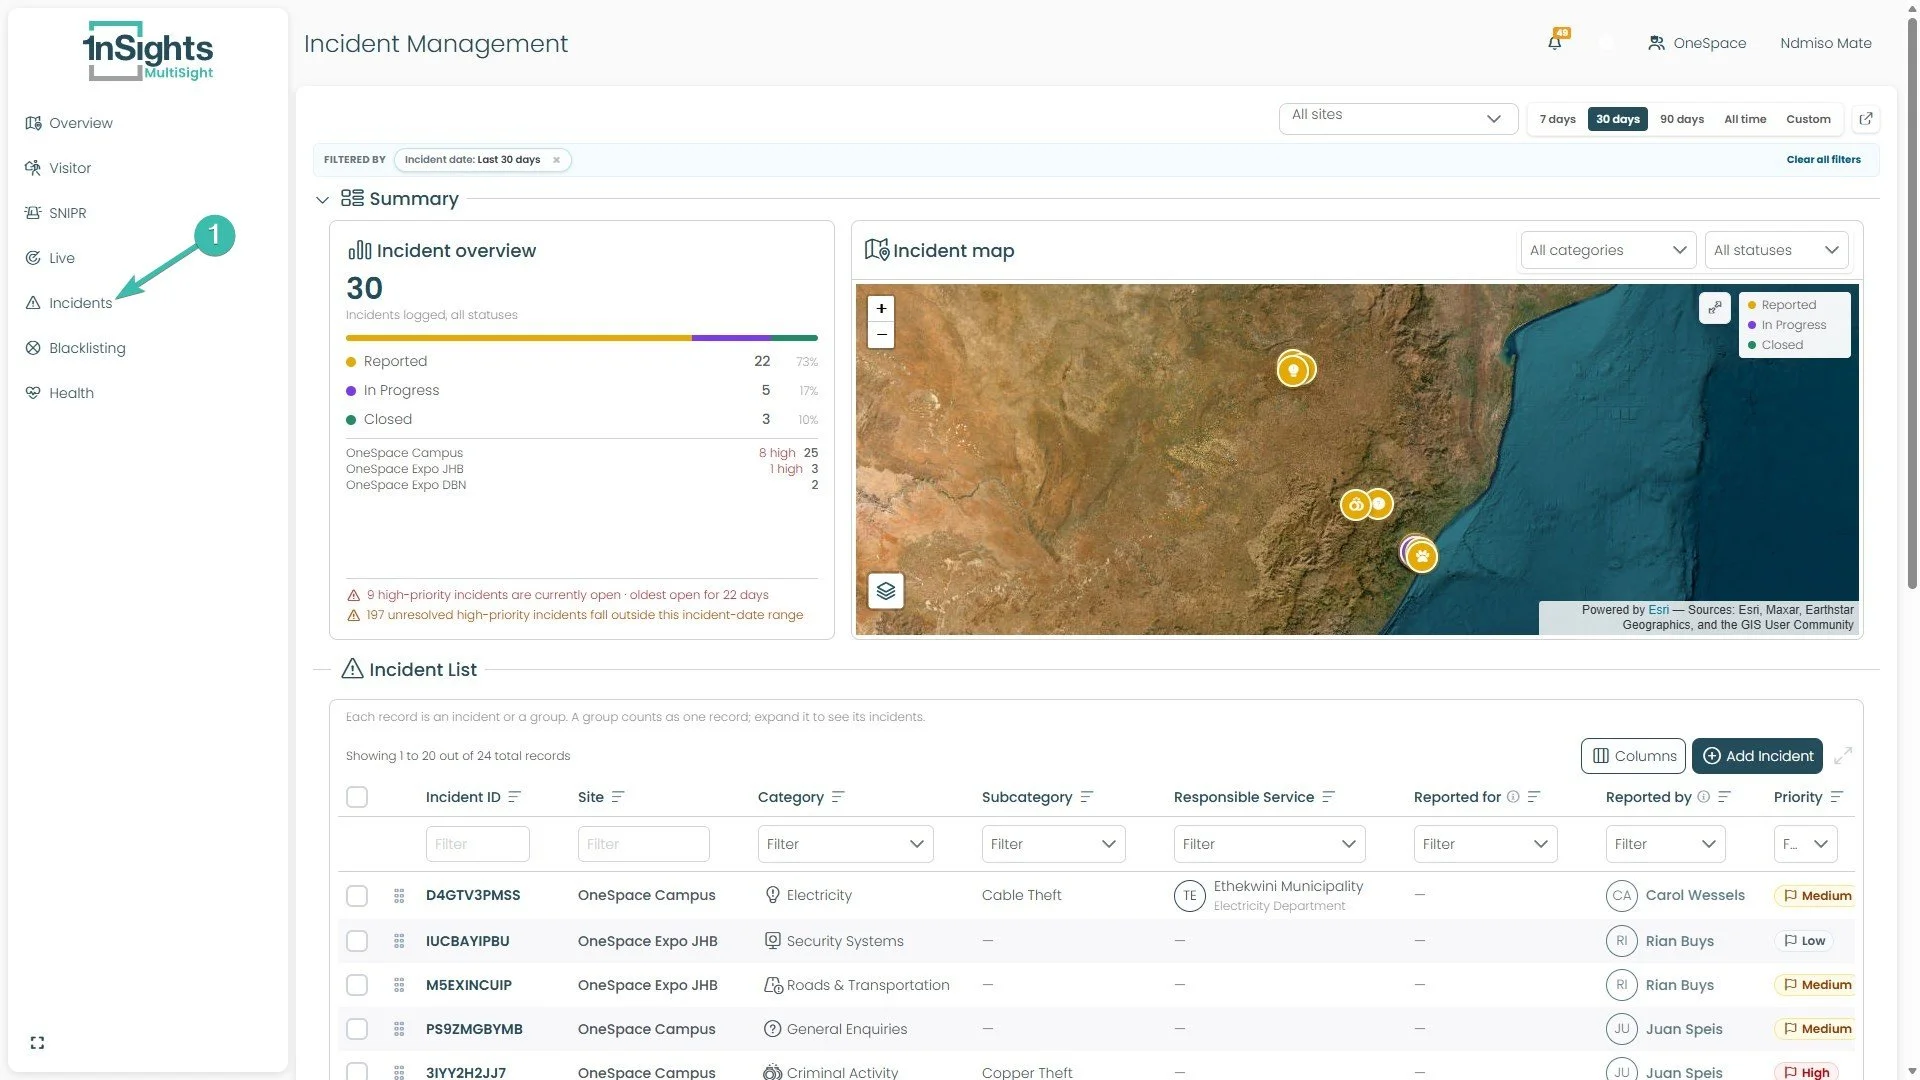
In the left-hand menu, click Incidents. This opens Incident Management in MultiSights, shown above.
Look at the Incident List near the bottom of the page. It has an extra column called Site, so you can see which site each incident belongs to.
Choosing Which Sites to Show
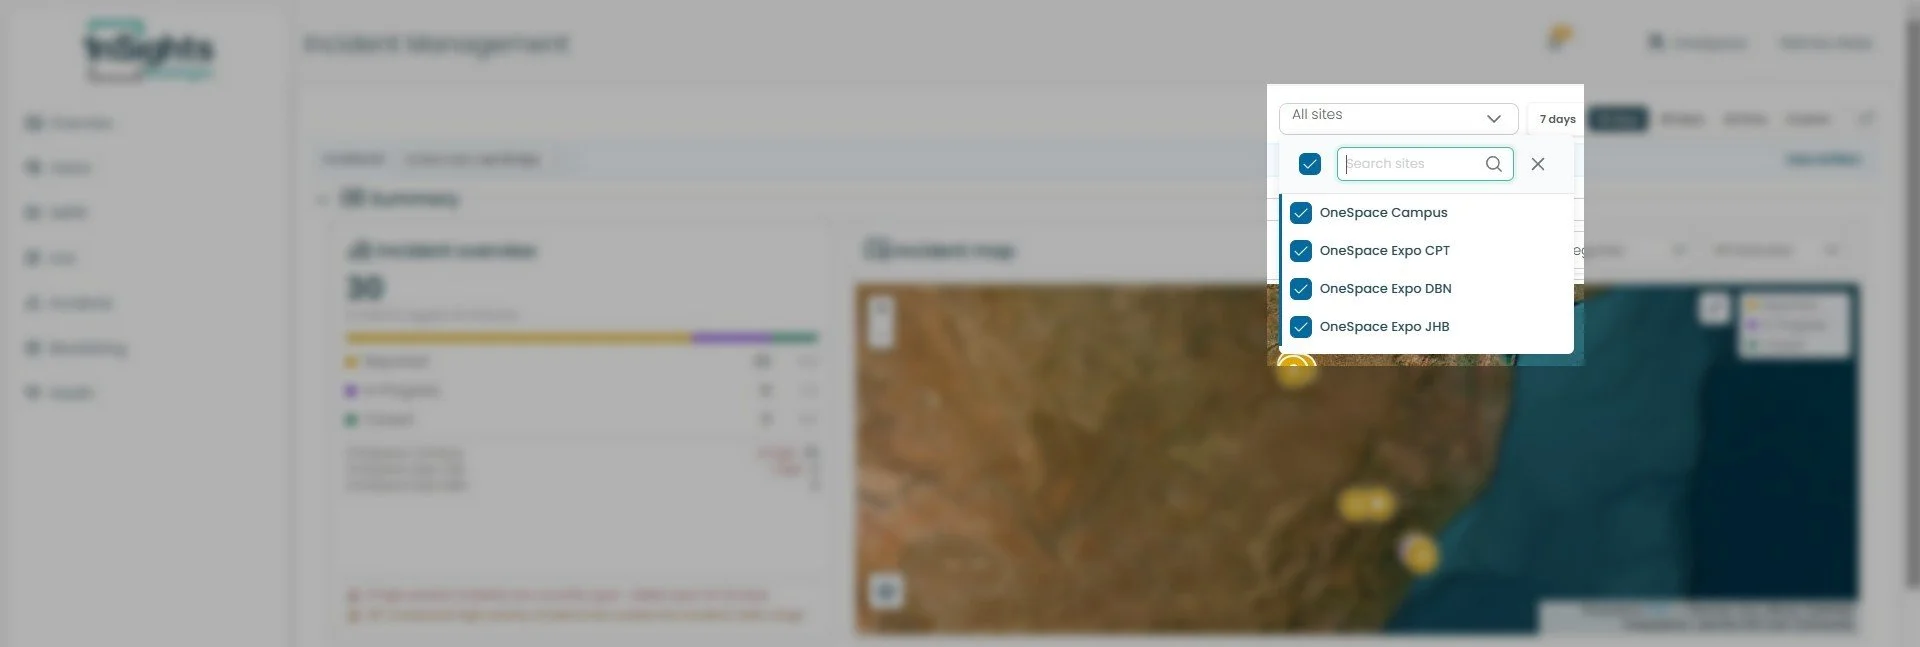
Click the All sites box in the top-right corner, next to the time range buttons.
A list of your sites opens, with a tick box next to each one. Click a tick box to show or hide that site. You can also type in the search box to find a site by its name.
The sites you choose decide which incidents appear on the page.
Tip: If a number on the page looks smaller than you expect, check the site selector. Some sites may not be ticked.
Incident Overview Across Sites
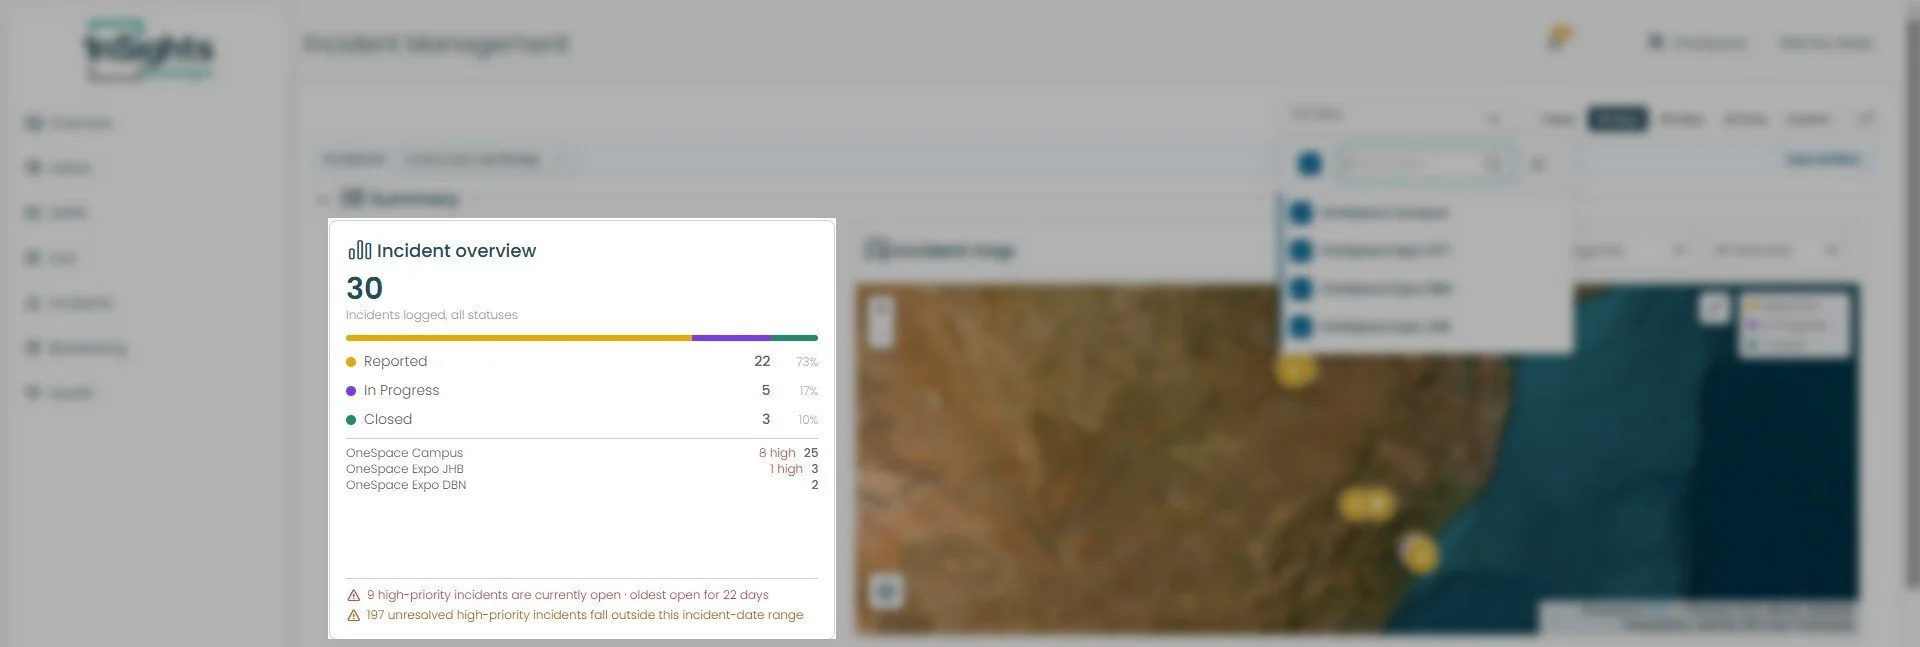
This is the same overview card you saw earlier in this guide, with the total number of incidents and the Reported, In Progress, and Closed breakdown.
The new part is the list of sites under the coloured bar. Each site is shown with its number of incidents. A red note, such as "8 high", tells you how many of those incidents are high priority. In the screenshot, OneSpace Campus has 25 incidents, and 8 of them are high priority.
Tip: Use this list to see quickly which site needs the most attention.
Incident Map
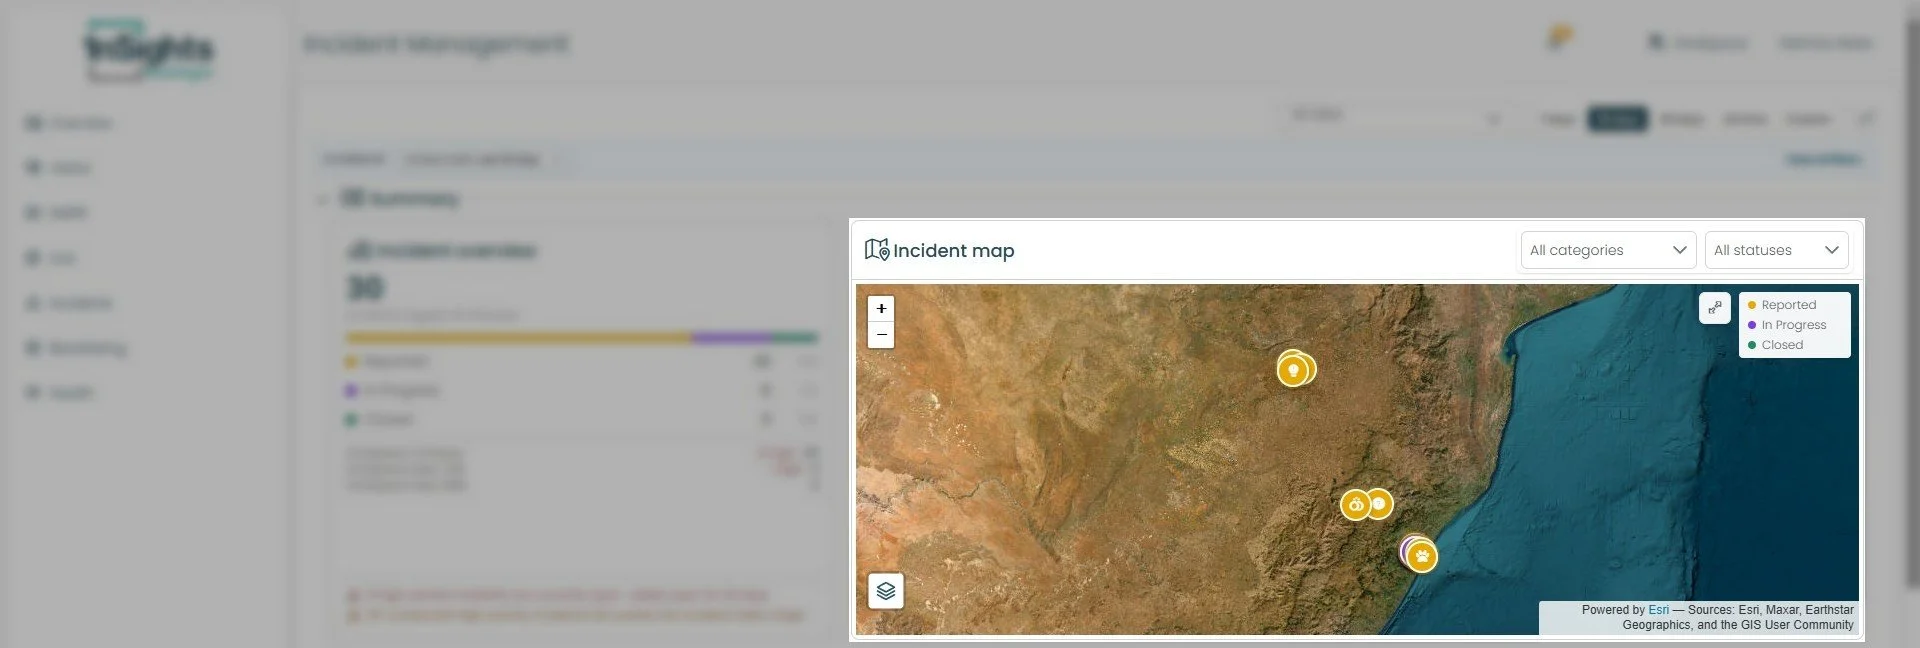
The map works the same way, and uses the same colours: orange for Reported, purple for In Progress, and green for Closed. The difference is that it now shows incidents from every site you selected, so you can see all of them together.
Use the All categories and All statuses boxes above the map to show fewer incidents, and the zoom buttons to move closer to one site or further away to see them all.
Adding an Incident for a Site
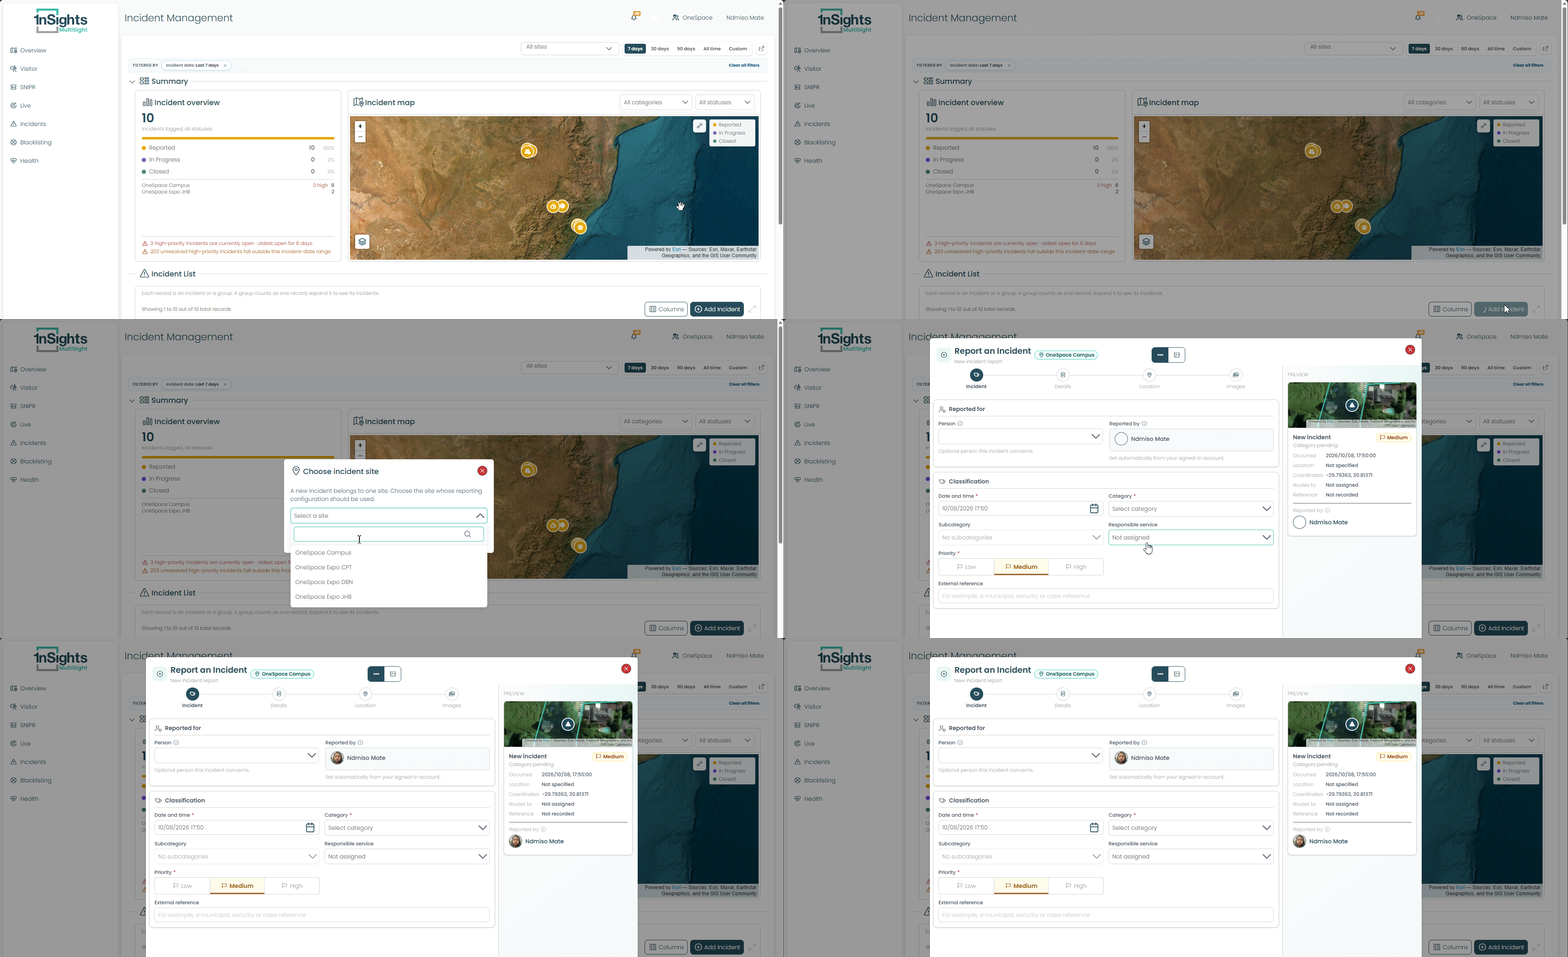
Click + Add Incident ① above the Incident List.
A box called Choose incident site opens ②. Click Select a site and choose the site where the incident happened. You can type in the search box to find it.
This step is needed because a new incident belongs to only one site. Each site has its own reporting setup (for example, the categories and responsible services from section 3), and the site you choose decides which setup is used.
After you choose the site, fill in the incident the same way you learned in section 2.
Tip: Choose the site carefully. An incident belongs to one site only, so pick the site where it really happened.