


Managing
Properties

Thank you for selecting OneSpace Central to empower your community. We at OneSpace are more than happy to assist you in case you have any troubles with your Site Management system.
This guide was made to provide a quick reference for common actions, functions, and workings that you will be using to help manage your site and all residents on the system. If this guide fails in assisting you with the website’s functionality, please do not hesitate to email us on support@one-space.co.za.
This guide will address the following:
Getting to Know Property Management
Welcome! In this section, you will learn how Central organizes your site's properties, and why setting this up correctly is so important.
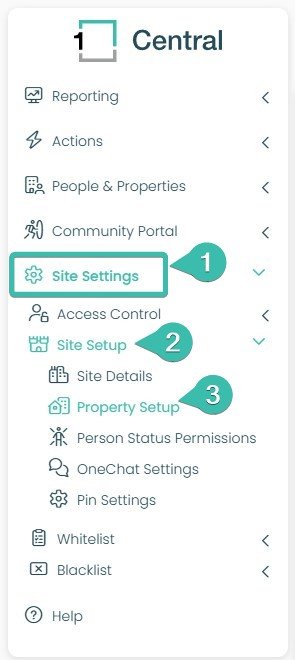
Step 1 — Open Property Setup
(Image: 0_1 Property Setup Intro_Step)
To find Property Setup, follow this path:
Click Site Settings.
Click Site Setup.
Click Property Setup.
This is where all your properties live, and where you will build your property structure.
This structure controls how far your announcements reach. If you send an announcement to a Zone, it only reaches the Units correctly placed inside that Zone. If a Unit sits in the wrong place, or on its own, outside the Building or Zone it should belong to, that Unit will not receive the announcement. Before you send any announcement, always check that every Unit is nested under the correct Building, Street, and Zone.
Understand the Property Structure
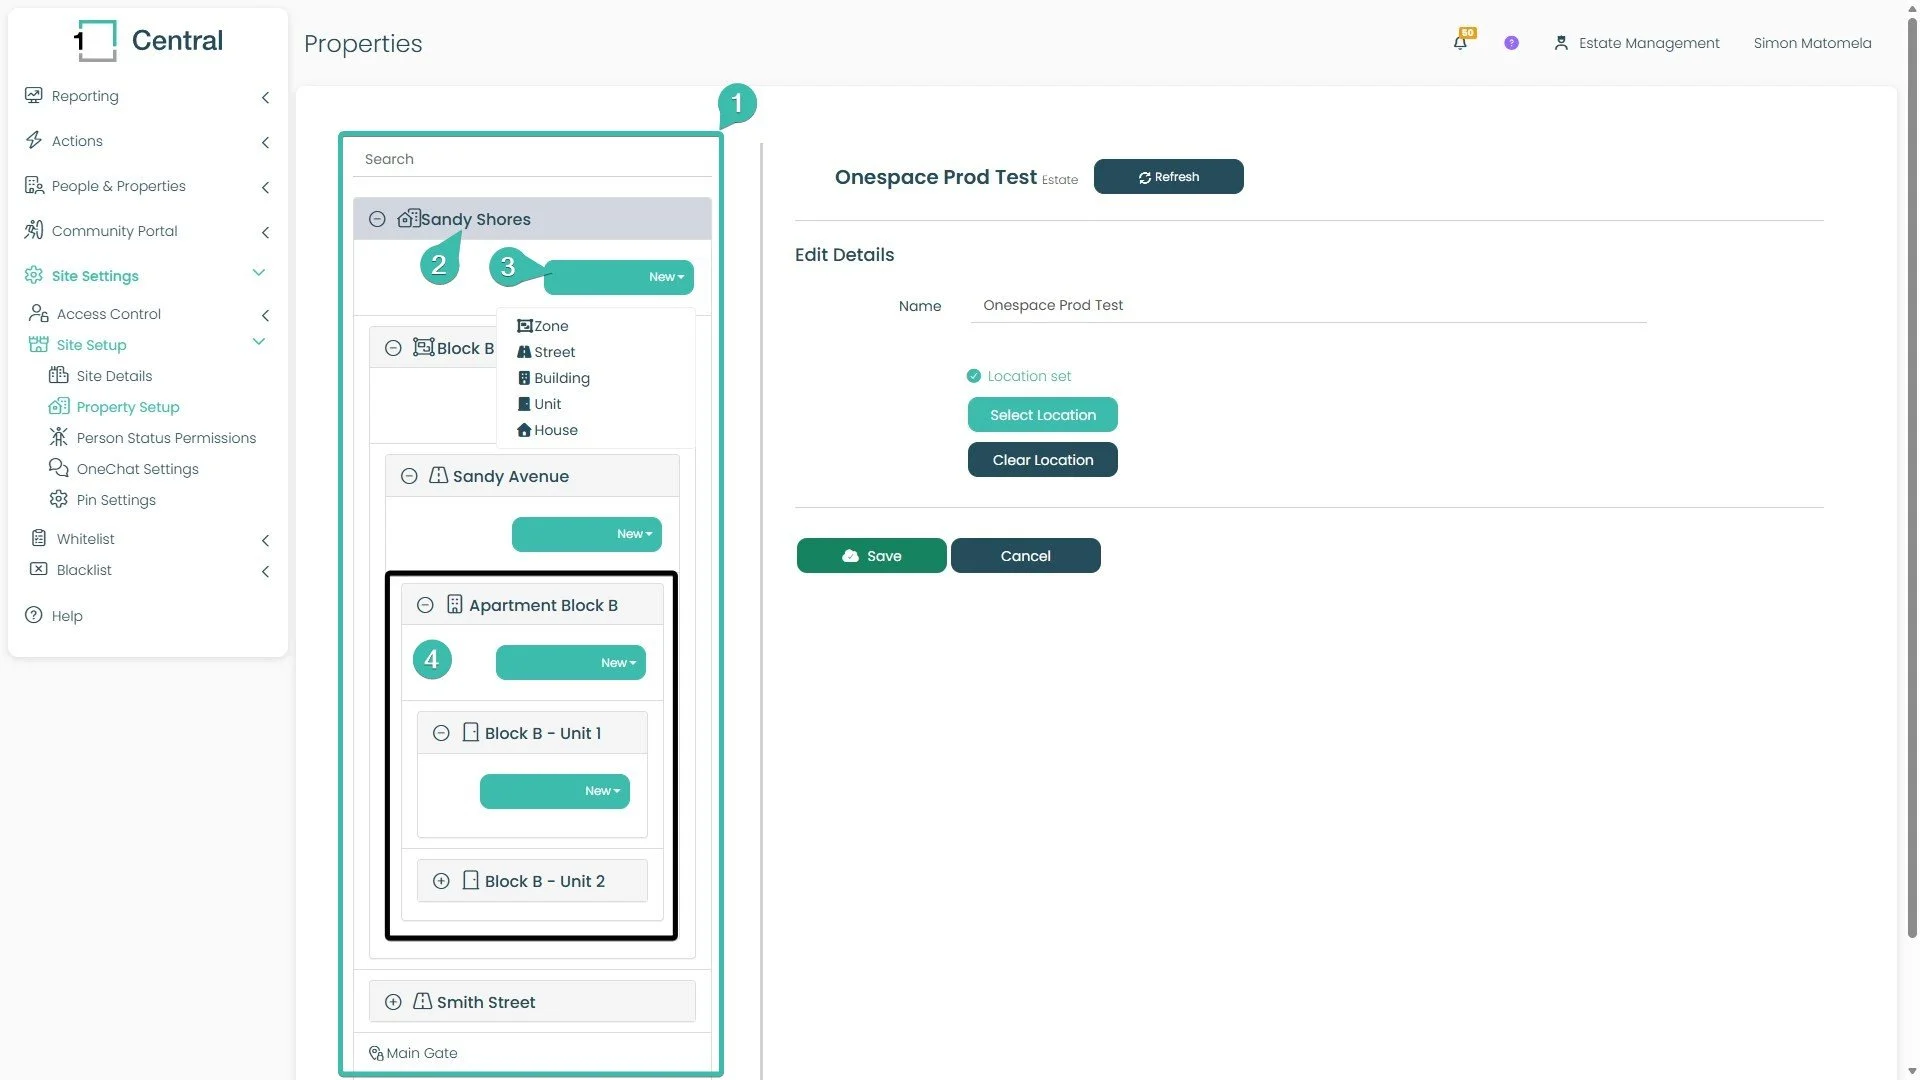
Think of your properties like a folder tree — each level sits inside the level above it.
This panel lists every property on your site, as a tree.
Sandy Shores sits at the top. This is the Estate — your whole site.
Click New next to any item to add a level under it: Zone, Street, Building, Unit, or House.
The black box shows this nesting in action: Block B - Unit 1 and Block B - Unit 2 sit inside Apartment Block B (a Building), which sits inside the Zone called Block B.
Full path: Estate (Sandy Shores) → Zone (Block B) → Street (Sandy Avenue) → Building (Apartment Block B) → Unit (Unit 1 / Unit 2).
Example: Announcement Reach
Send an announcement to Block B - Unit 1 only, and only that Unit gets it — Block B - Unit 2 does not. Send it to Apartment Block B instead, and both Units get it, because both are nested inside it. A higher level reaches everything correctly nested underneath it; a Unit only reaches itself. This is why nesting matters — a Unit sitting outside the Building it belongs to will miss announcements meant for it.
Create a New Property
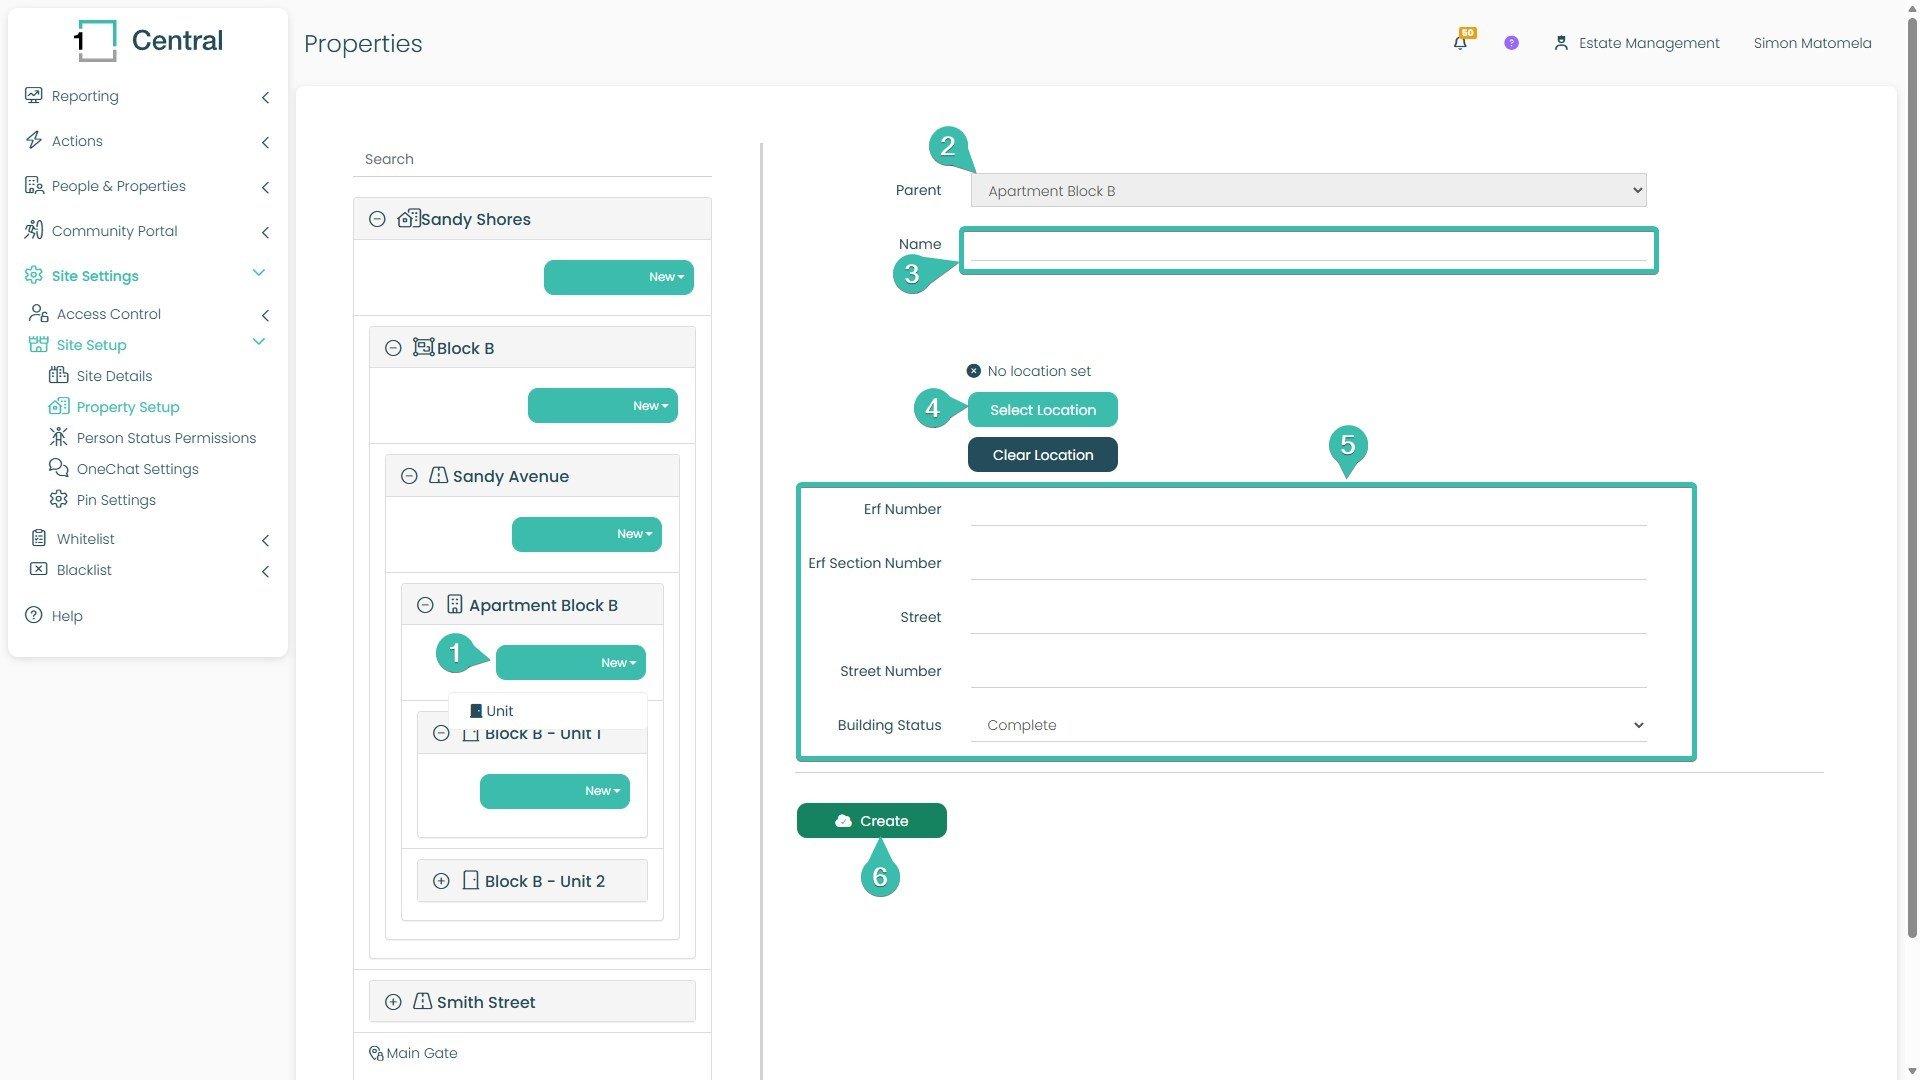
Click New next to the level where you want to add something (here, under Apartment Block B). Central only offers property types that make sense there — a Building only offers Unit.
The Parent field fills in automatically, showing where the new property will sit.
Type a Name for it.
Click Select Location to pin its exact spot on a map (optional — covered in Set Property Location below).
Fill in any extra details you have: Erf Number, Erf Section Number, Street, Street Number, Building Status.
Click Create to save it.
Edit a Property's Details
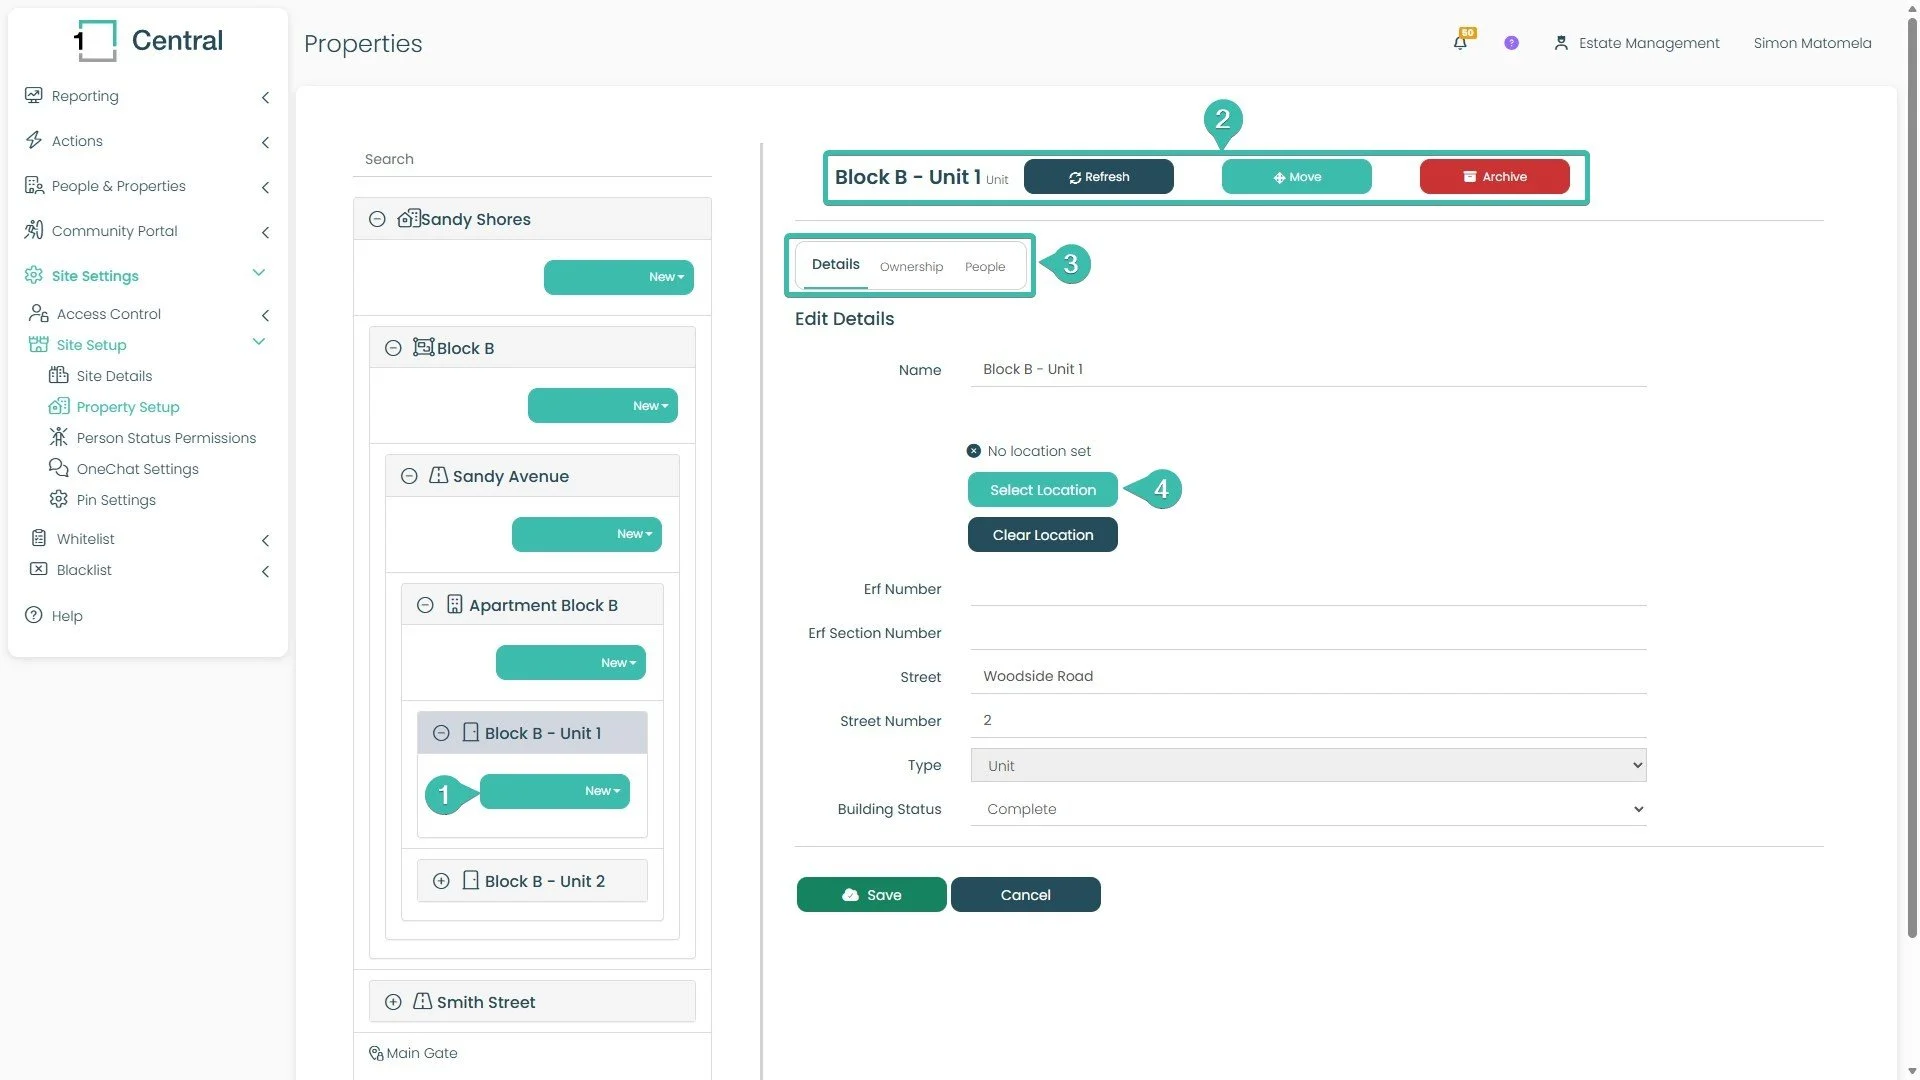
Click the property in the tree to open it (here, Block B - Unit 1).
At the top you'll see Refresh, Move, and Archive buttons.
Use the Details, Ownership, and People tabs to see different information — this guide covers Details only.
Click Select Location to update its pinned location.
Update whatever you need, then click Save.
Set a Property's Location
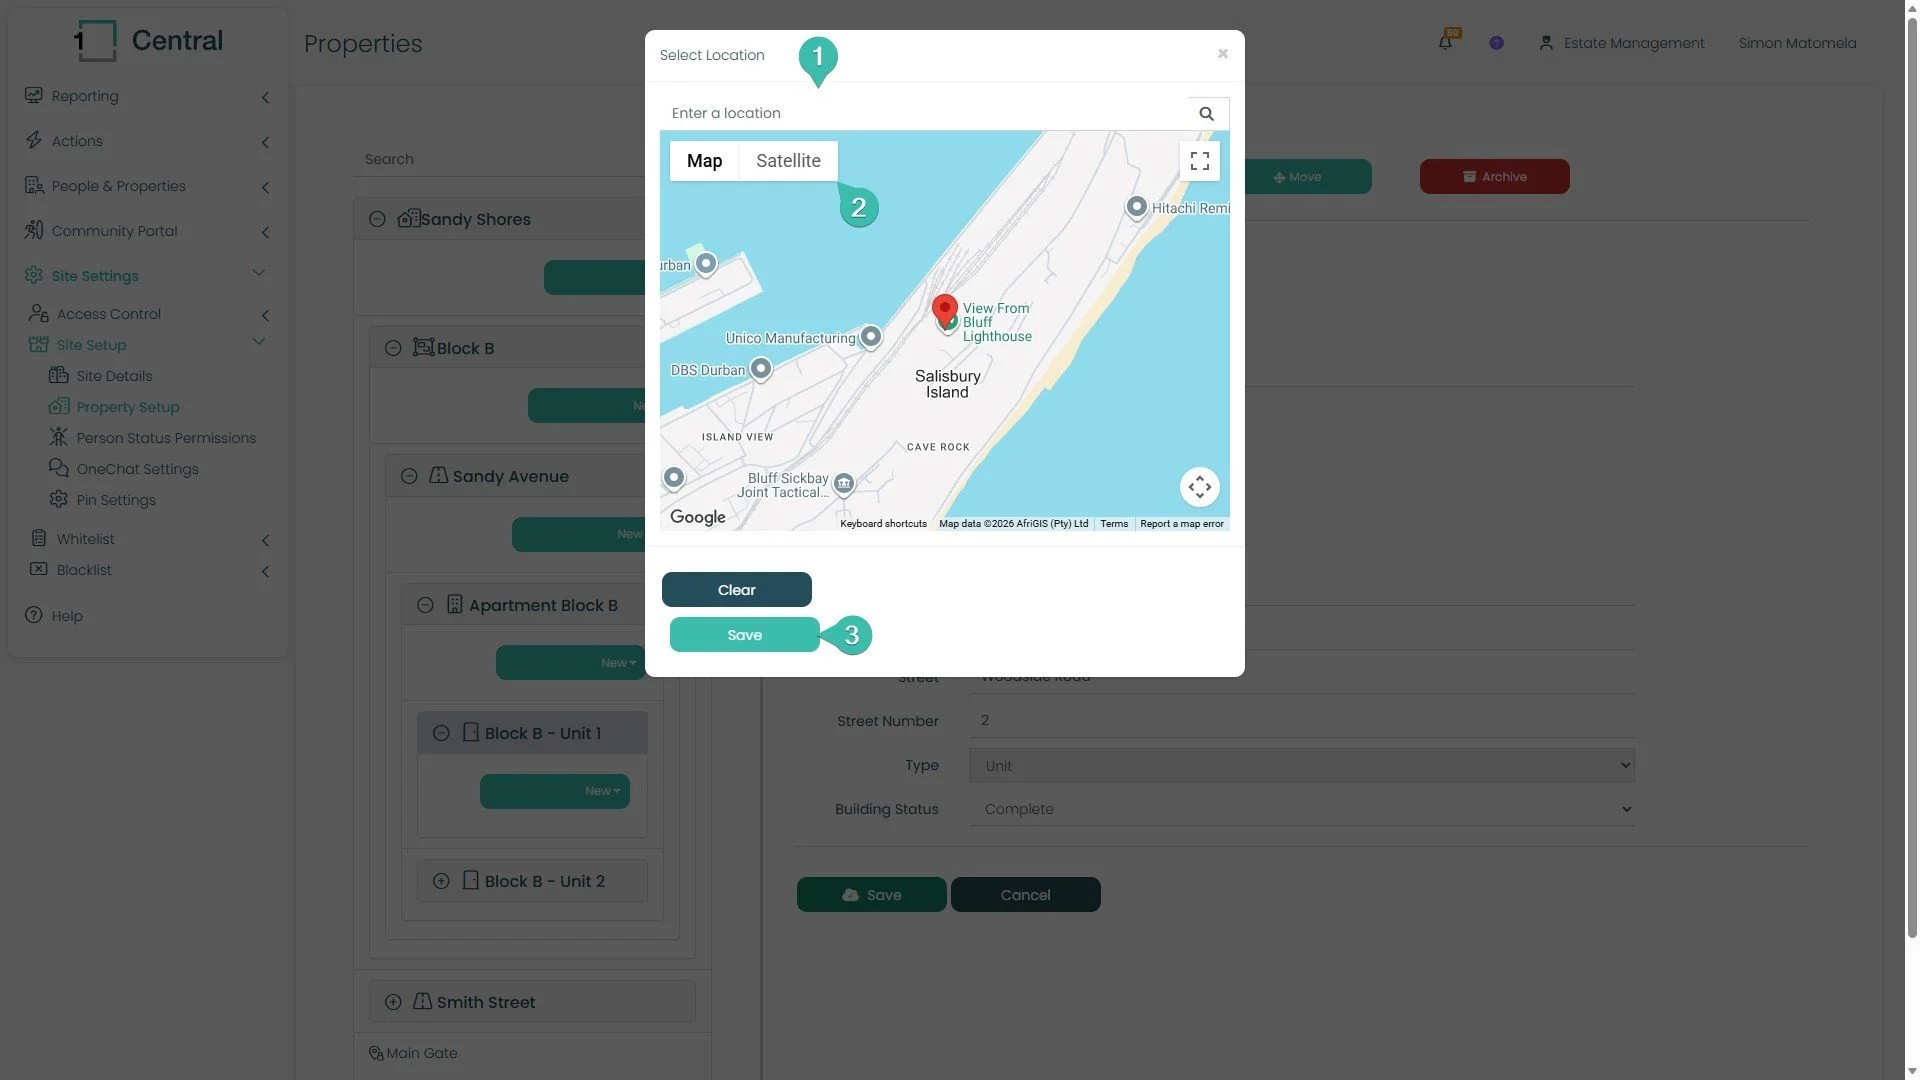
When you select the Set Location button this window will appear.
Clicking within Search will allow you to insert a street address. This will automatically move the map to your desired area.
You can change how the map is being displayed. If you wish to see the actual buildings select Satellite.
You can click and drag the red map icon to fine tune its position. Its advised you have this map pin hovering directly over the roof of your unit. When ready. Click Save to keep it.
Move a Property
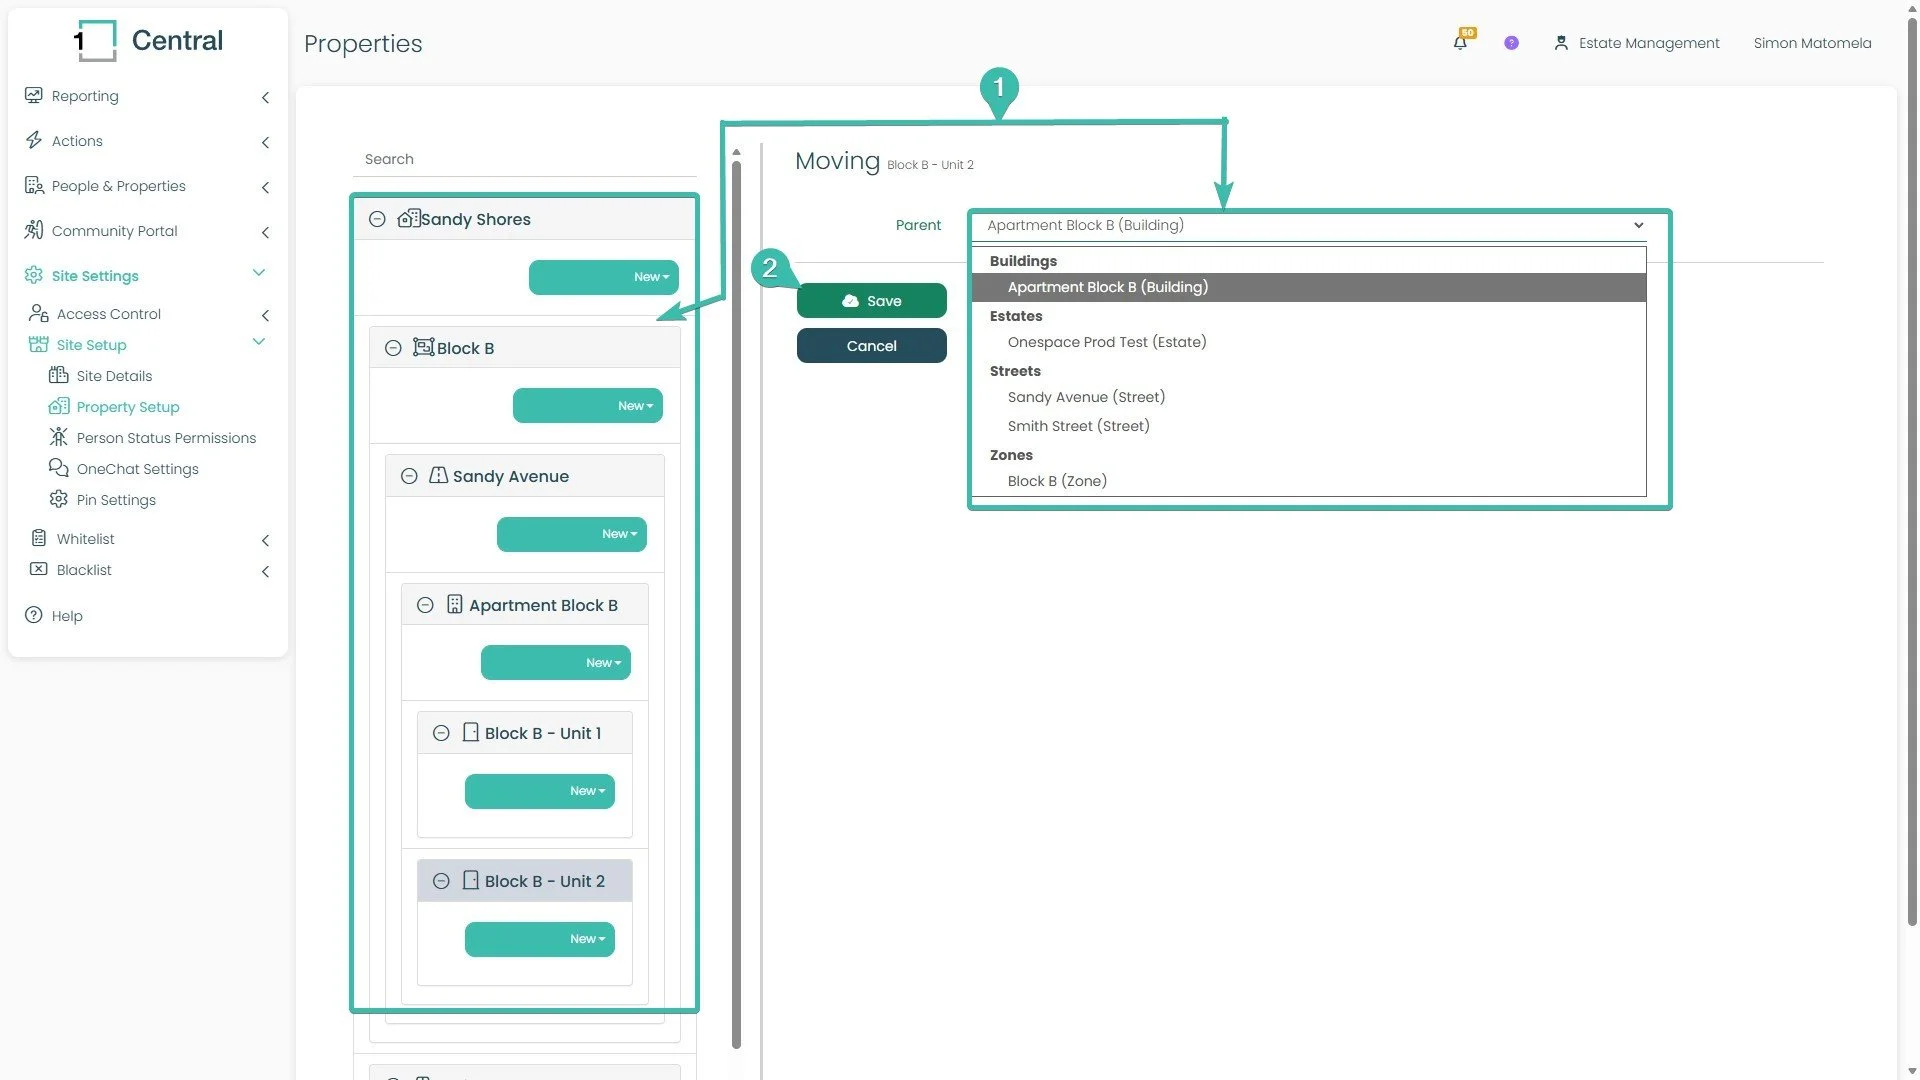
Select the property in the tree, then open the Parent dropdown and choose its new Estate, Zone, Street, or Building.
Click Save.
Moving a property changes its place in the tree — and, as covered in Section Understand the Property Structure, that changes which announcements reach it. Always double-check the new parent before saving.
Your Estate and Zone Boundaries
It is important to have your Estate boundaries set within Central so that when you view your site within your new Dashboards. Your Visitor Data for example will be presented to you neatly and accurately.
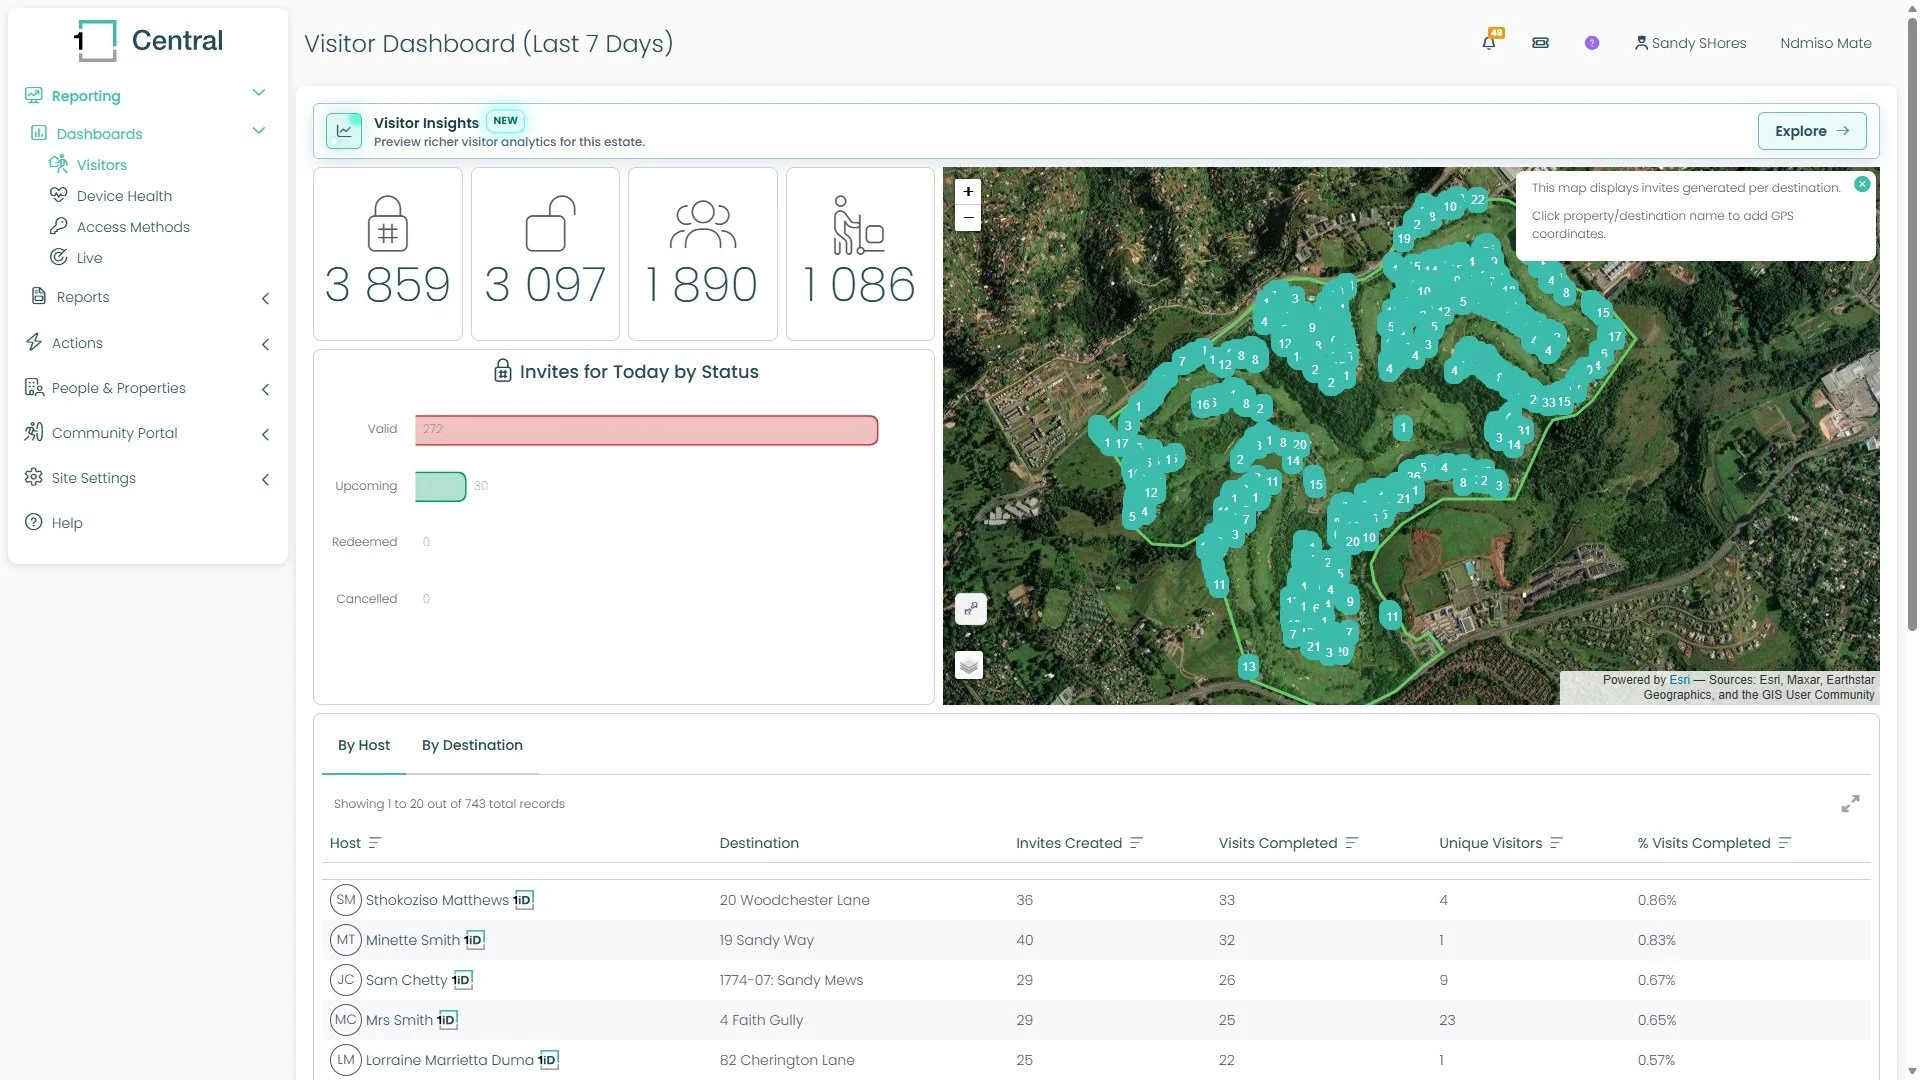
Note: This section uses a different menu. You will not find this under Site Setup. Follow this path carefully.
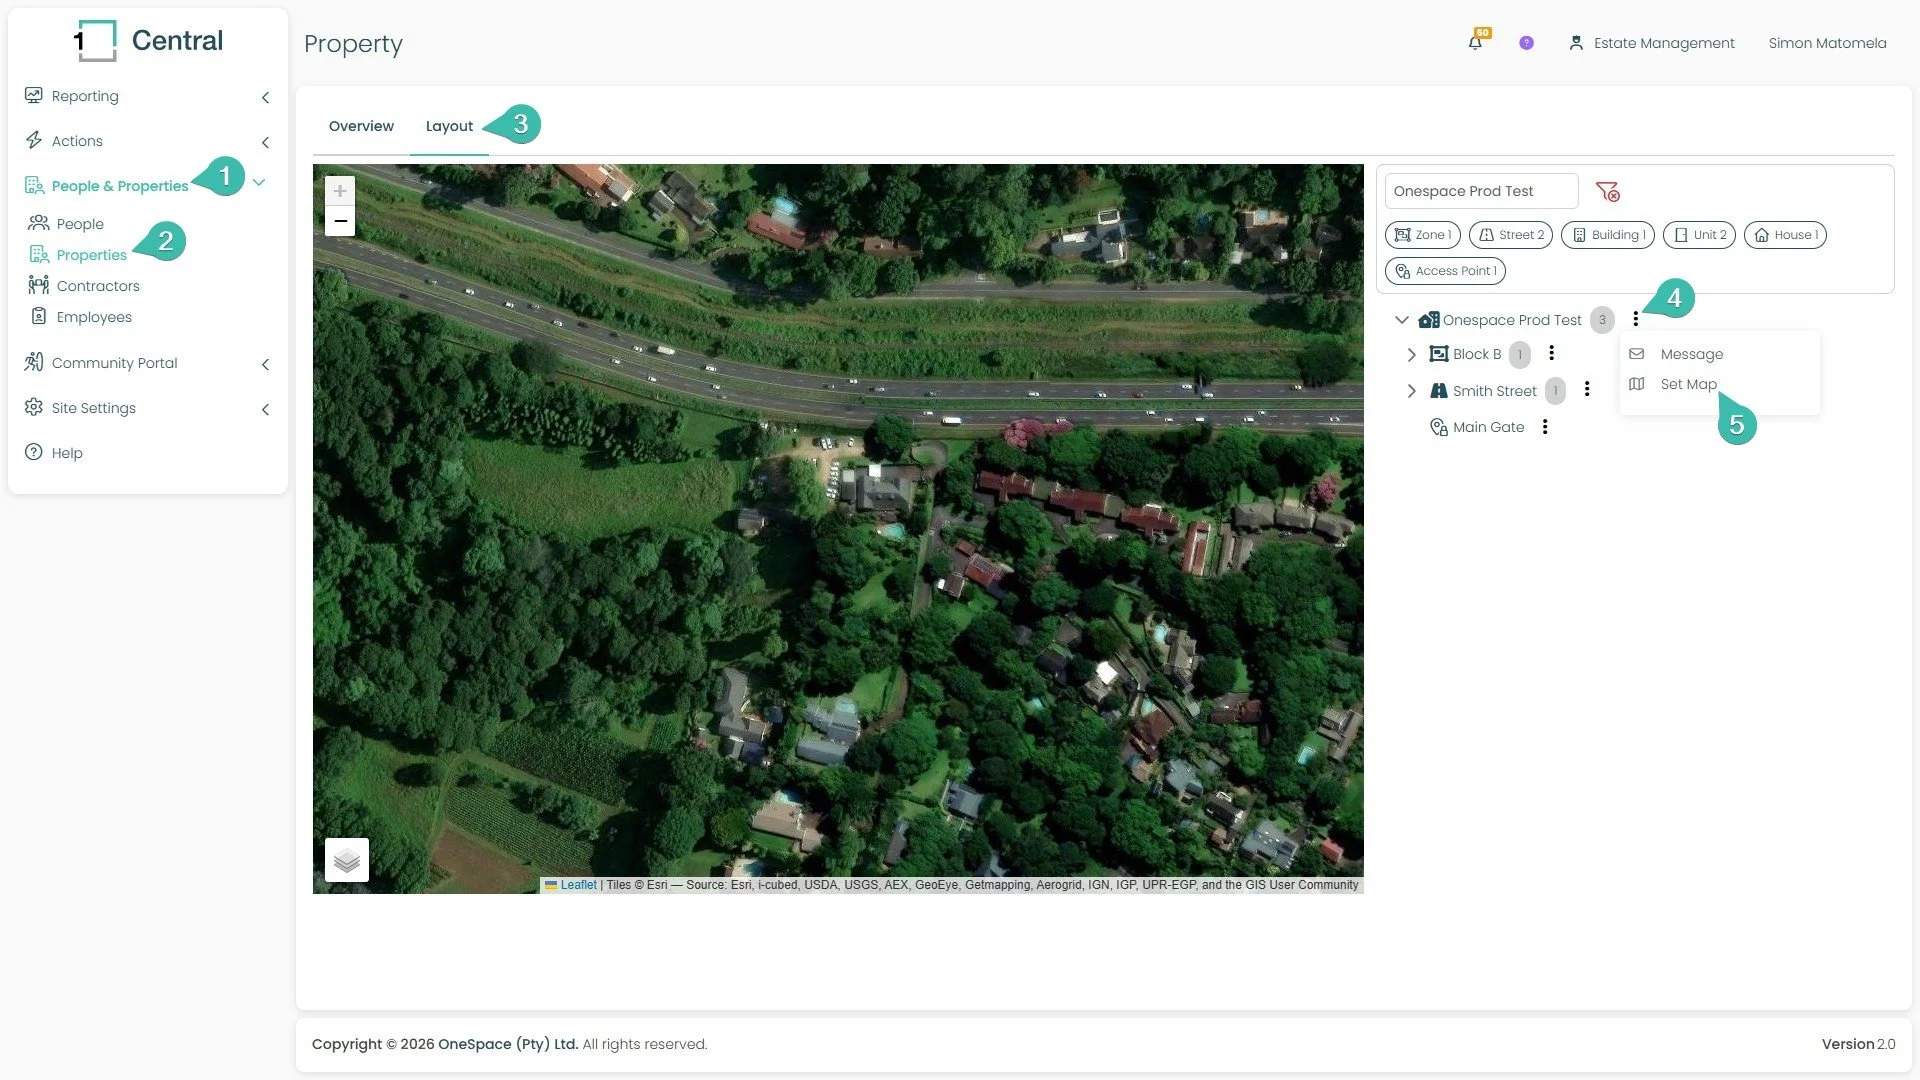
Click People & Properties.
Click Properties.
Click the Layout tab — this opens a satellite map of your site.
Find your Estate (or a Zone) in the list on the right, and click the ⋮ menu next to its name.
Select Set Map.
Setting Your Estate and Zone Boundaries
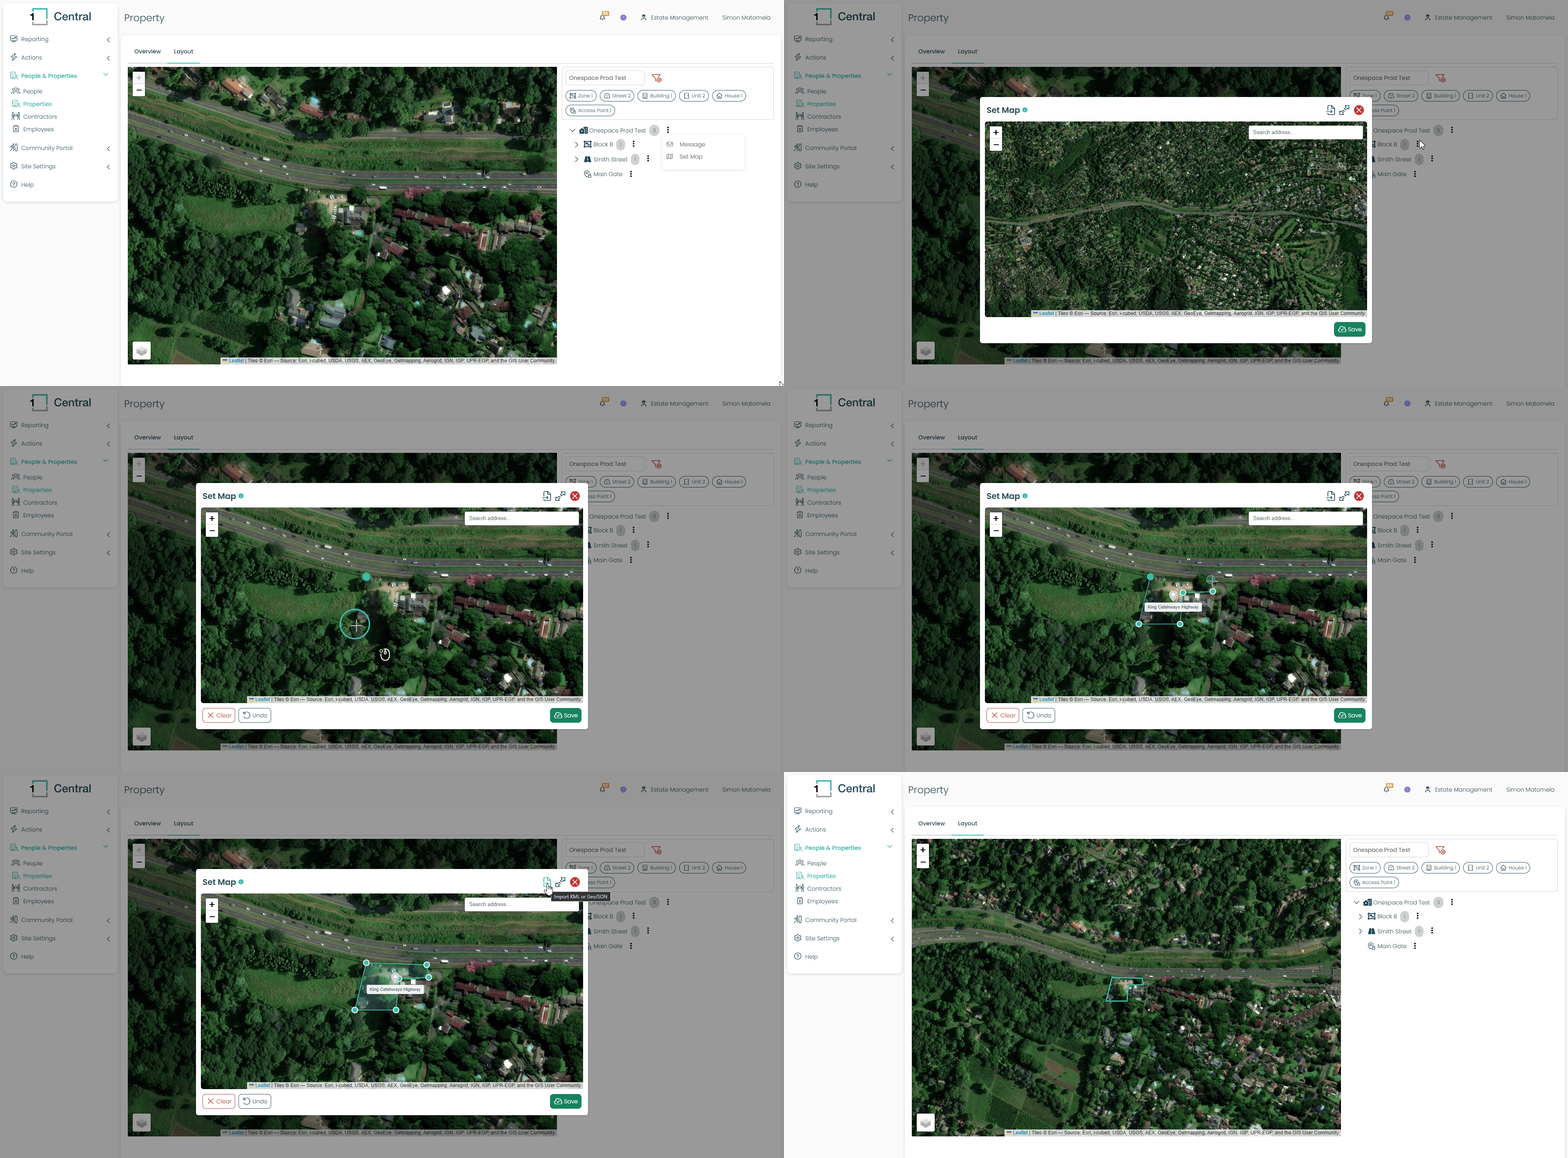
A window opens with a close-up satellite view of the area. Click points around the edge of your property, one after another, to trace its outline — each click adds a corner, and the lines join up automatically. Made a mistake? Click Undo to remove the last point, or Clear to start over.
Finish and Save
Keep adding points until the shape closes up and matches your property's real outline. Once it looks right, click Save.
You can use this same Set Map option on a Zone, not just the whole Estate — so each Zone can have its own boundary too. Accurate boundaries help Central show your site correctly on the map, and work together with the structure from Section 0 to keep everything organized.