

Connect Web User Guide
This guide covers the following:
Using the previous version of the User Portal? View the previous User Portal Web User Guide
Open Connect Web and Sign In
Previous version: View the previous OneSpace Central User Portal section
Open Connect Web
Connect Web runs in your web browser, so there is nothing to download or install.
Good to know
Connect Web gives you the same services as the Connect app, except Bluetooth access. To open gates and doors with your phone, use the Connect app (see Connect Web and the Connect App).
You use the same account for Connect Web and the Connect app.
Keep your browser up to date so Connect Web runs as expected.
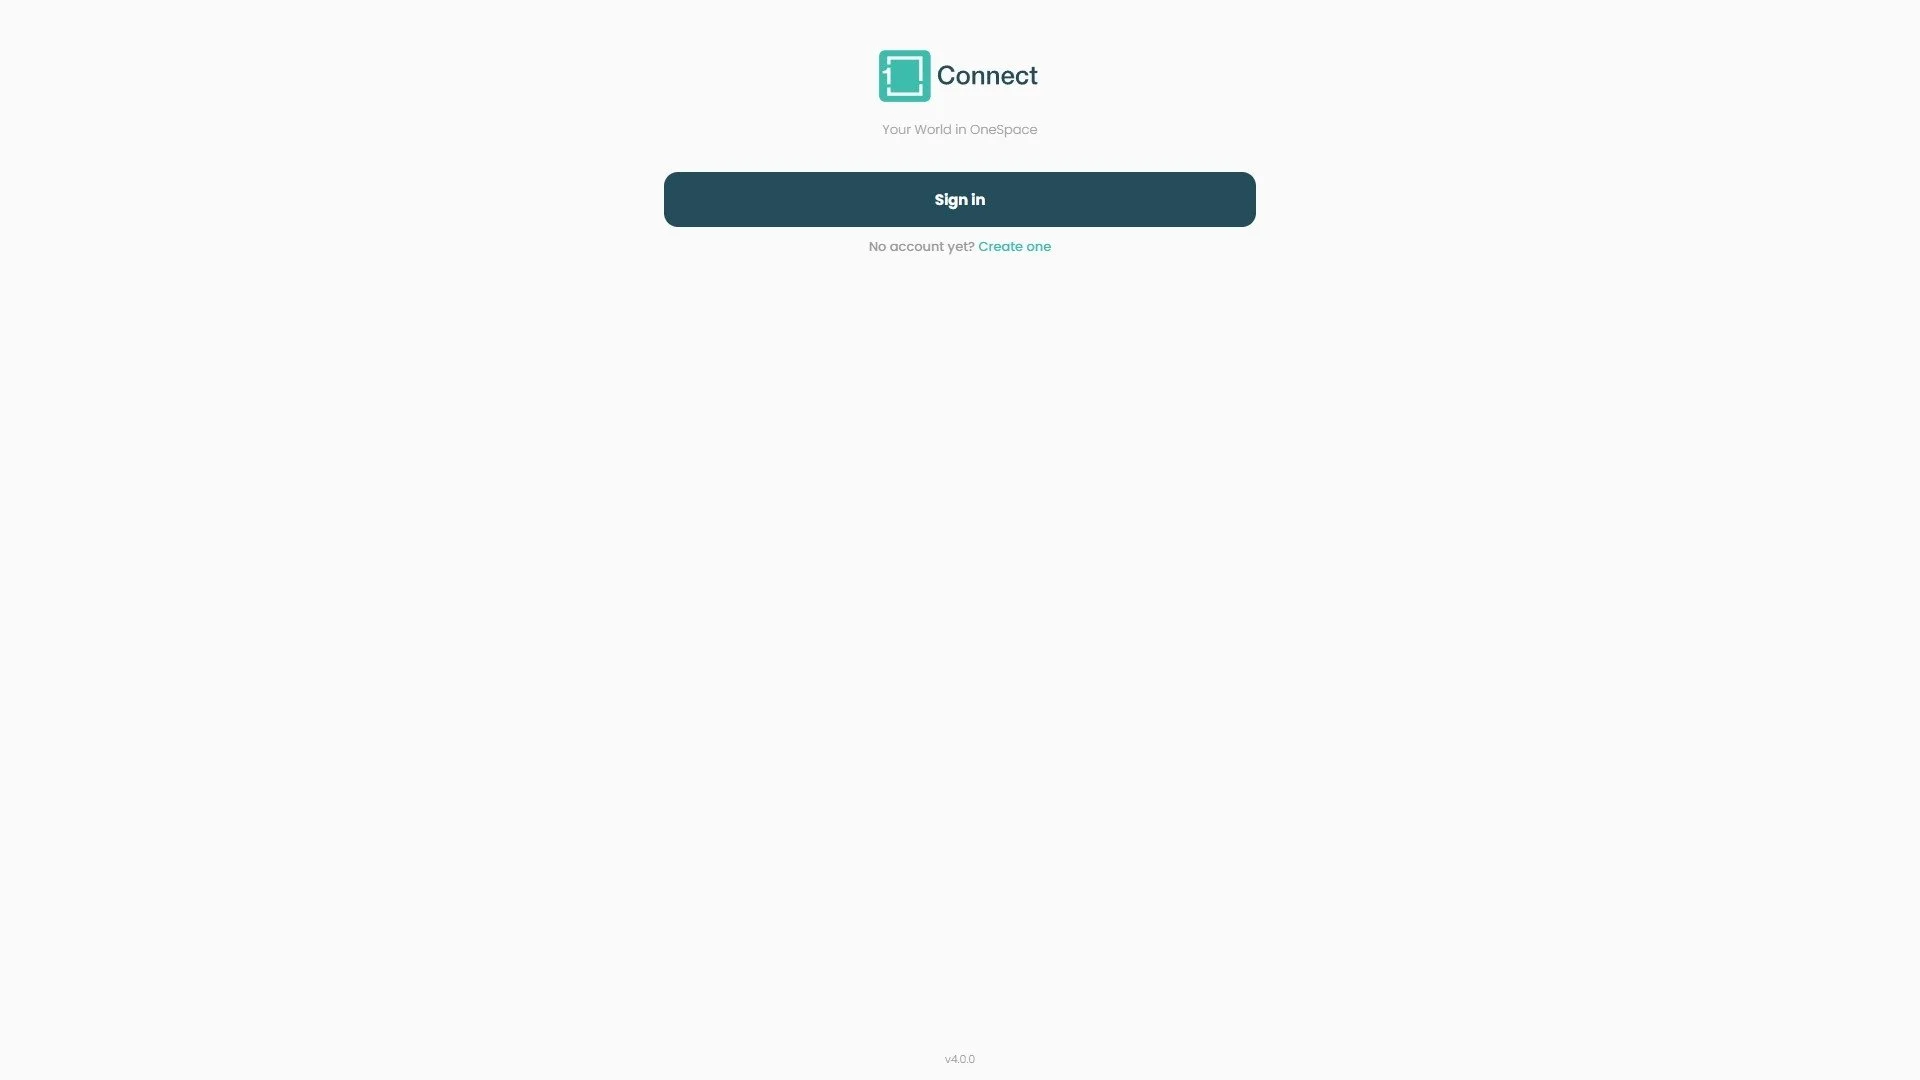
The Connect Web start page
Open your web browser on your computer, tablet or phone.
Go to connect.1s.co.za.
Bookmark the page so you can find it again quickly.
Sign in: for existing users (see Sign in).
No account yet? Create one: for new users (see Create an account).
Sign in
If you already have a OneSpace account, use the same details to sign in. Connect uses a OneSpace user ID (1iD), so one account works across OneSpace products, including the Connect app.
On the start page, click Sign in.
Enter your email address or phone number, then click Continue.
Enter your password. Click the eye icon to check what you typed.
Forgotten your password? Click Forgot password? and follow the prompts.
Click Sign in.
Create an account
New to OneSpace? On the start page, click Create one. Creating your account takes four short screens.
Good to know
Already have an account? Click Sign in at the bottom of the first Create account screen.
Click the back arrow (‹) next to Continue to go back a screen.
A tick next to your email address or mobile phone on your Account page shows it is verified.
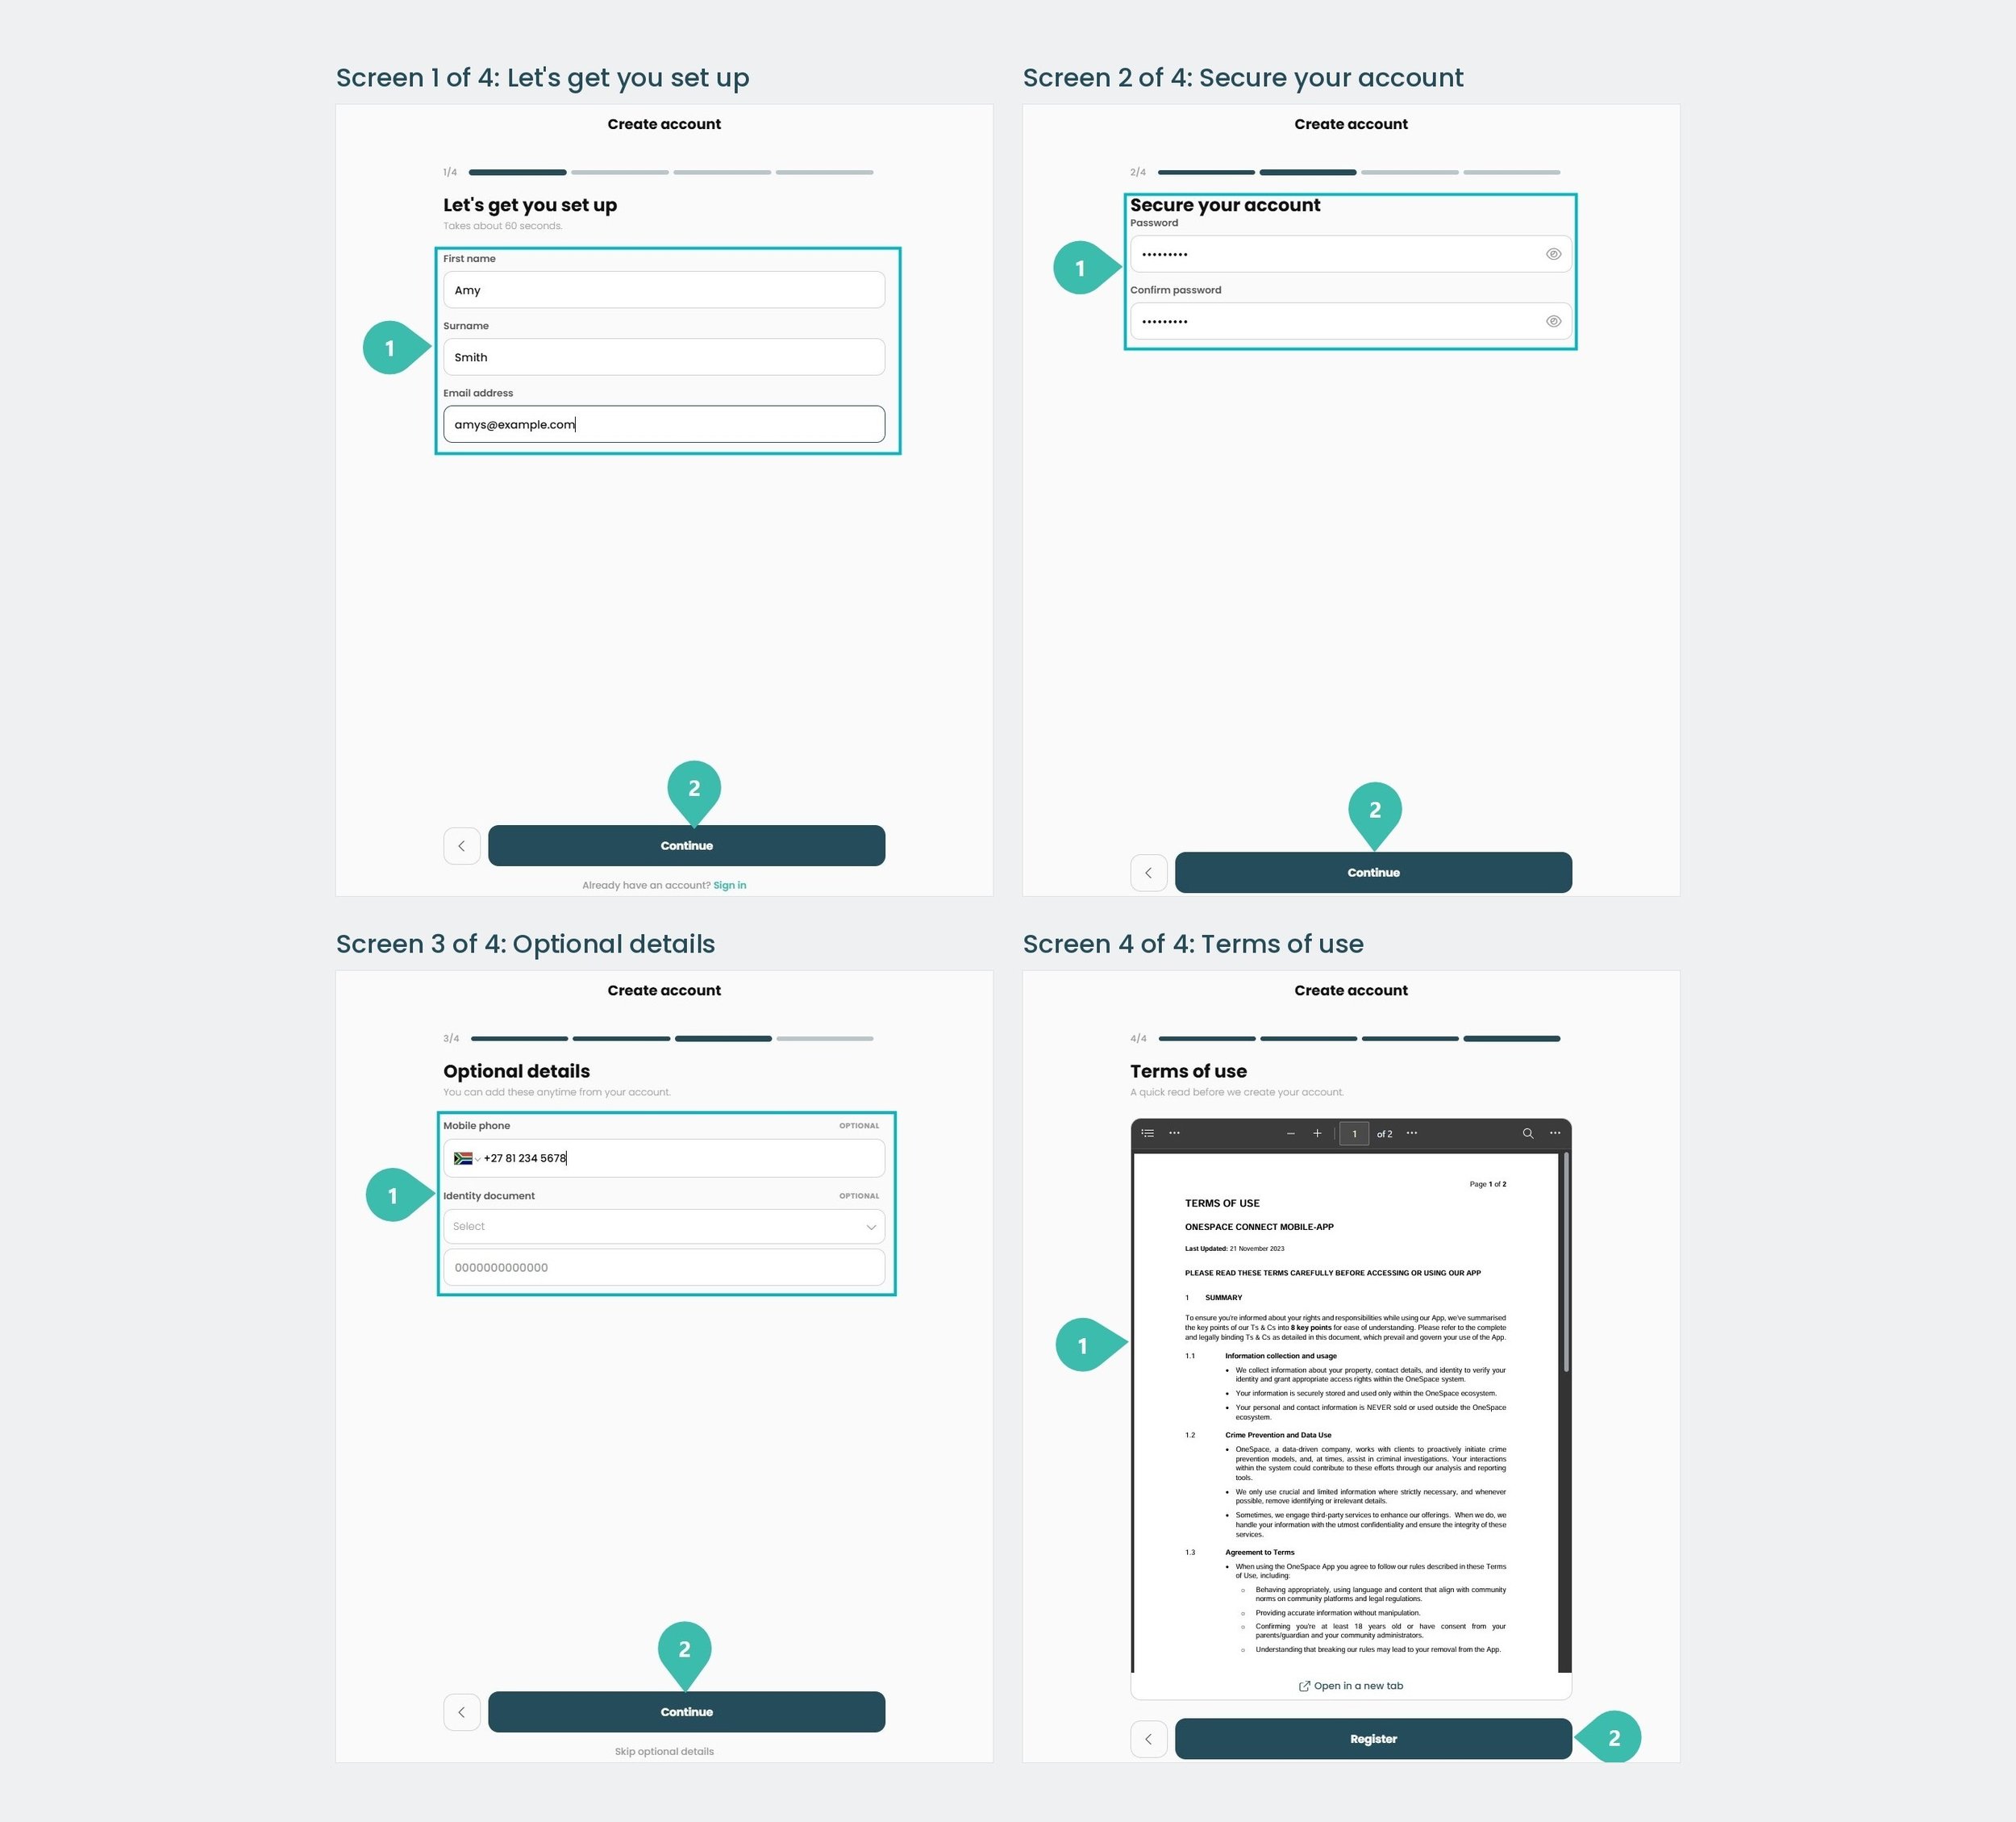
Screen 1 of 4: Let's get you set up
Enter your First name, Surname and Email address.
Click Continue.
Screen 2 of 4: Secure your account
Create a Password, then type it again in Confirm password. Click the eye icon to check what you typed.
Click Continue.
Screen 3 of 4: Optional details
Add your Mobile phone number (choose the country flag first) and your Identity document type and number. These are optional, and you can add them later from your Account.
Click Continue, or click Skip optional details.
Screen 4 of 4: Terms of use
Read the Terms of use. Use the controls at the top to move through the pages, or click Open in a new tab to read them in a full browser tab.
Click Register to create your account.
Getting Around Connect Web
Previous version: View the previous OneSpace Central User Portal section
The Home page
Your Home page gives you a quick view of your site, your messages and your visitors.
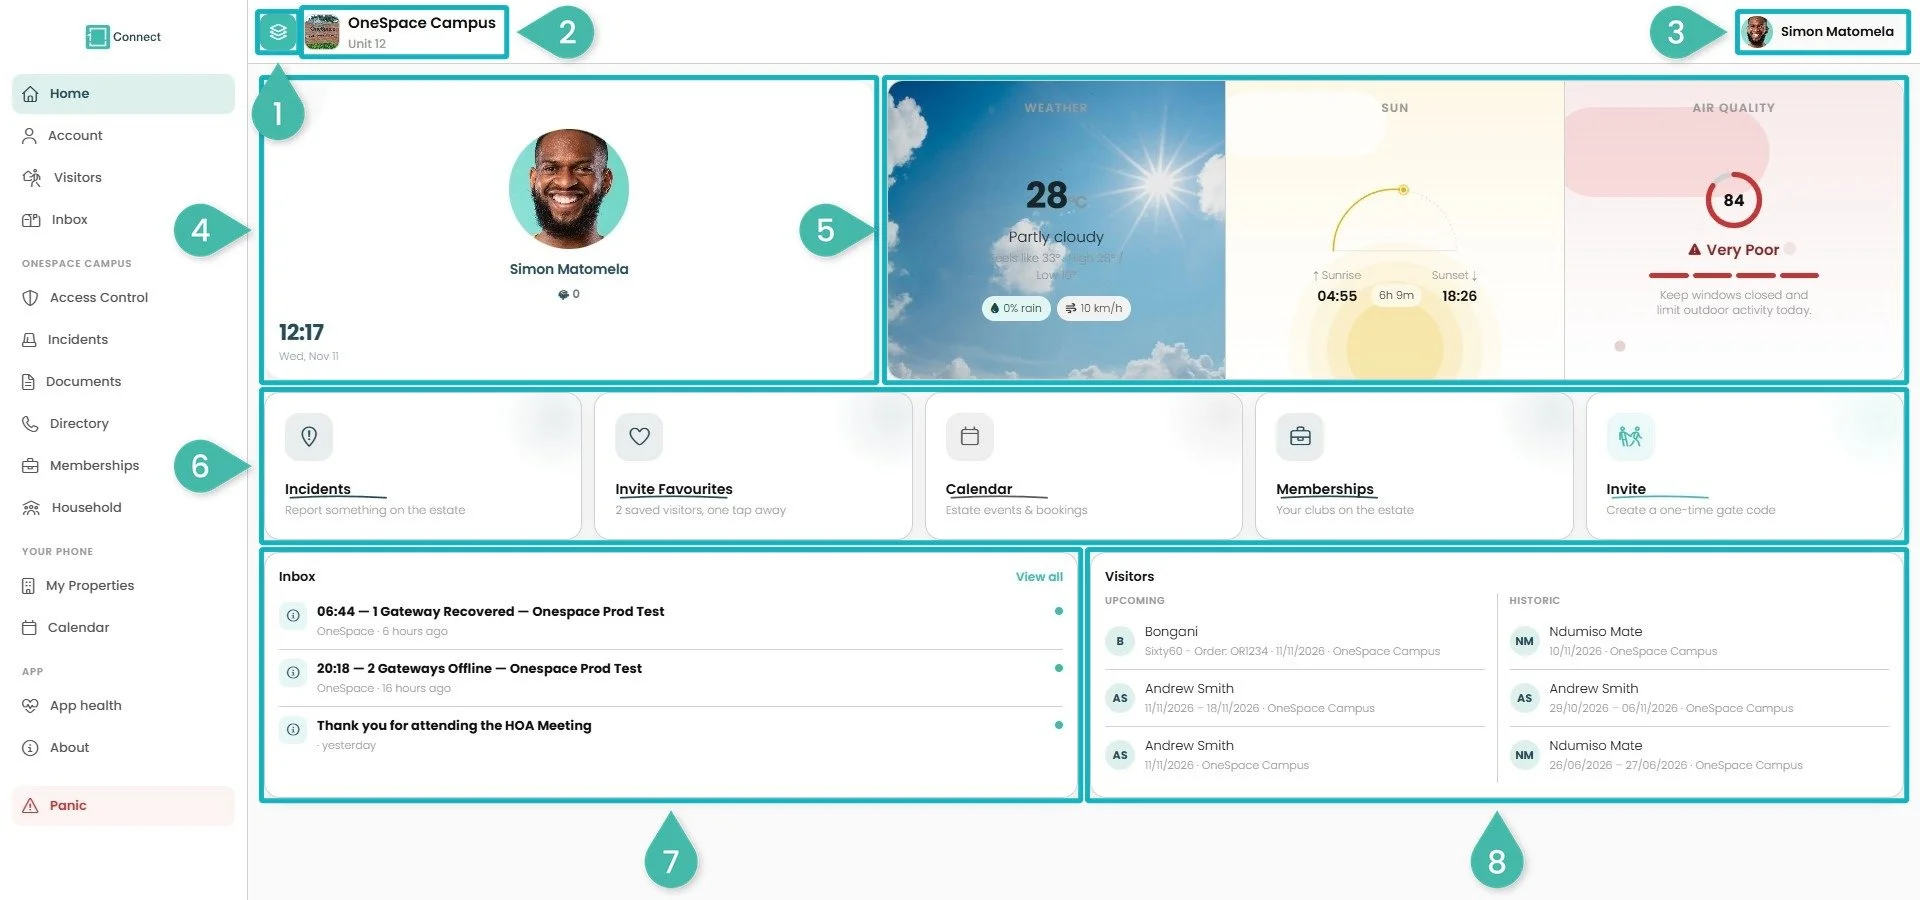
The Connect Web Home page
All sites (layers button, top left): shows items from all the sites you are enrolled at. See Sites and Properties.
Current site: the site and property you are using. Click the site name to choose another site. See Sites and Properties.
Your name (top right): opens your Account. See Your Account.
Profile card: your photo, name, the time and date, and your site's social media links (Follow Us).
Weather, Sun and Air quality: today's weather, sunrise and sunset, and the air quality at your site.
Shortcut tiles: Incidents (report something on the estate), Invite Favourites (your saved visitors), Calendar (estate events and bookings), Memberships (your clubs) and Invite (create a one-time gate code).
Inbox: your latest messages. Click View all to open the Inbox. See Inbox.
Visitors: your Upcoming and Historic visitors. See Visitor Management.
The sidebar
The sidebar on the left of every page takes you anywhere in Connect Web. It does the same job as the bottom bar and menu (☰) in the Connect app.
Good to know
The page you are on is highlighted in the sidebar.
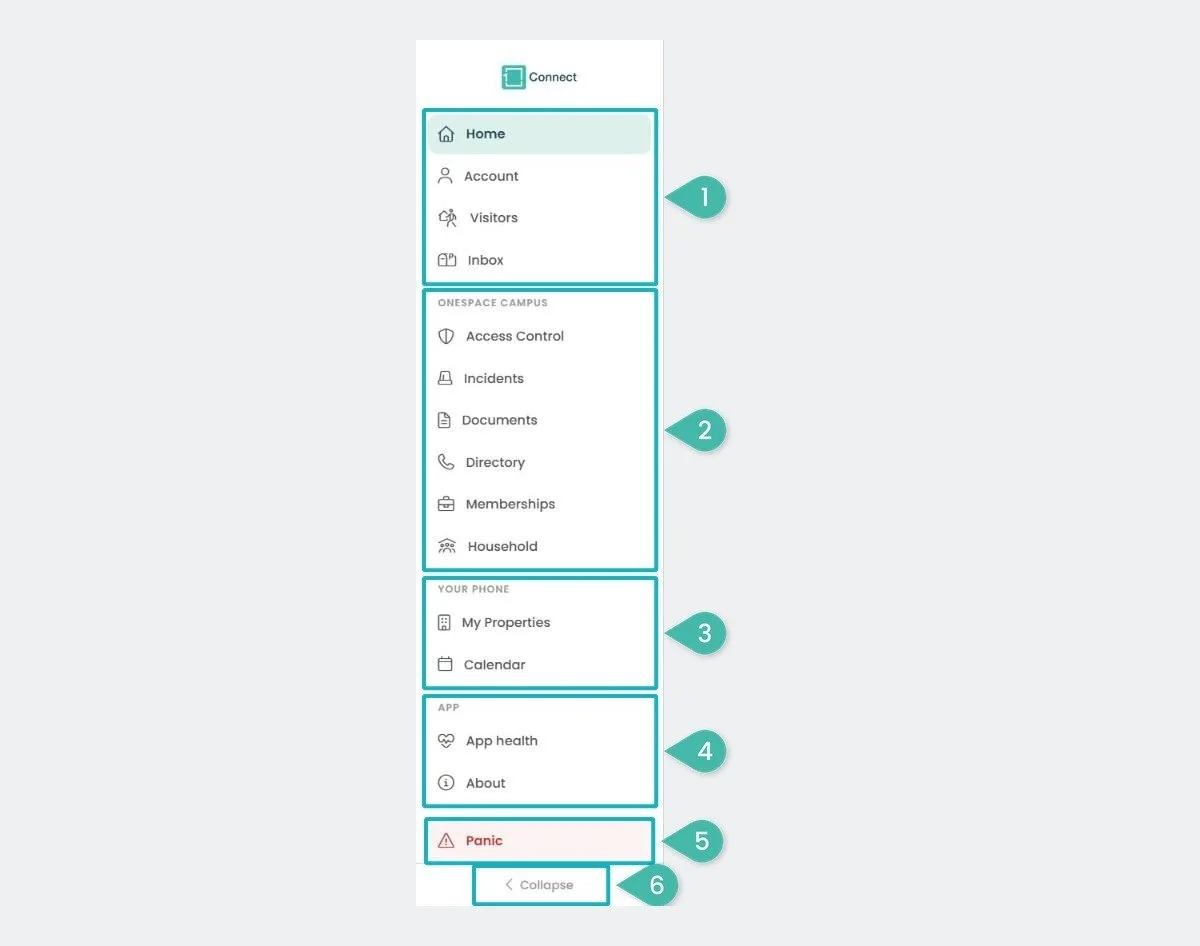
The sidebar
Home, Account, Visitors and Inbox: your Home page, your Account, your visitor passes and your messages.
Your site (headed with your current site's name): Access Control, Incidents, Documents, Directory, Memberships and Household.
Your phone: My Properties and Calendar.
App: App health and About.
Panic: sends a panic alert. See Panic.
Collapse: shrinks the sidebar to icons to give you more room. Click it again to expand the sidebar.
Using Connect Web on a smaller screen
In a narrow browser window, or in the browser on your phone or tablet, Connect Web changes to the same layout as the Connect app.
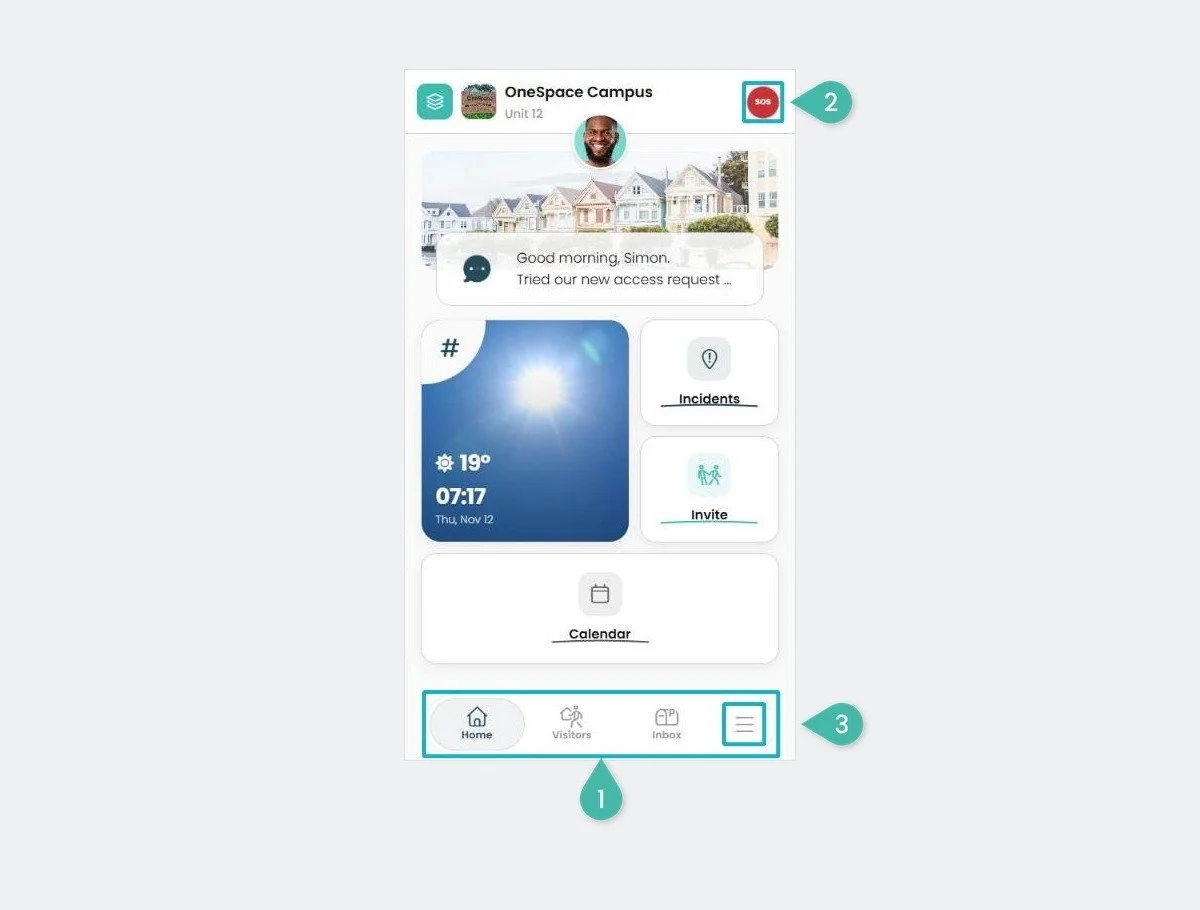
Connect Web on a smaller screen
The sidebar is replaced by a bottom bar with Home, Visitors, Inbox and the menu (☰).
SOS (top right) sends a panic alert. See Panic.
Click the menu (☰) to open the other pages, such as Access Control, Incidents and Calendar.
Your Account
Previous version: View the previous OneSpace Central User Portal section
Manage your account
Your Account holds your personal details, vehicles, pets, password and ID document.
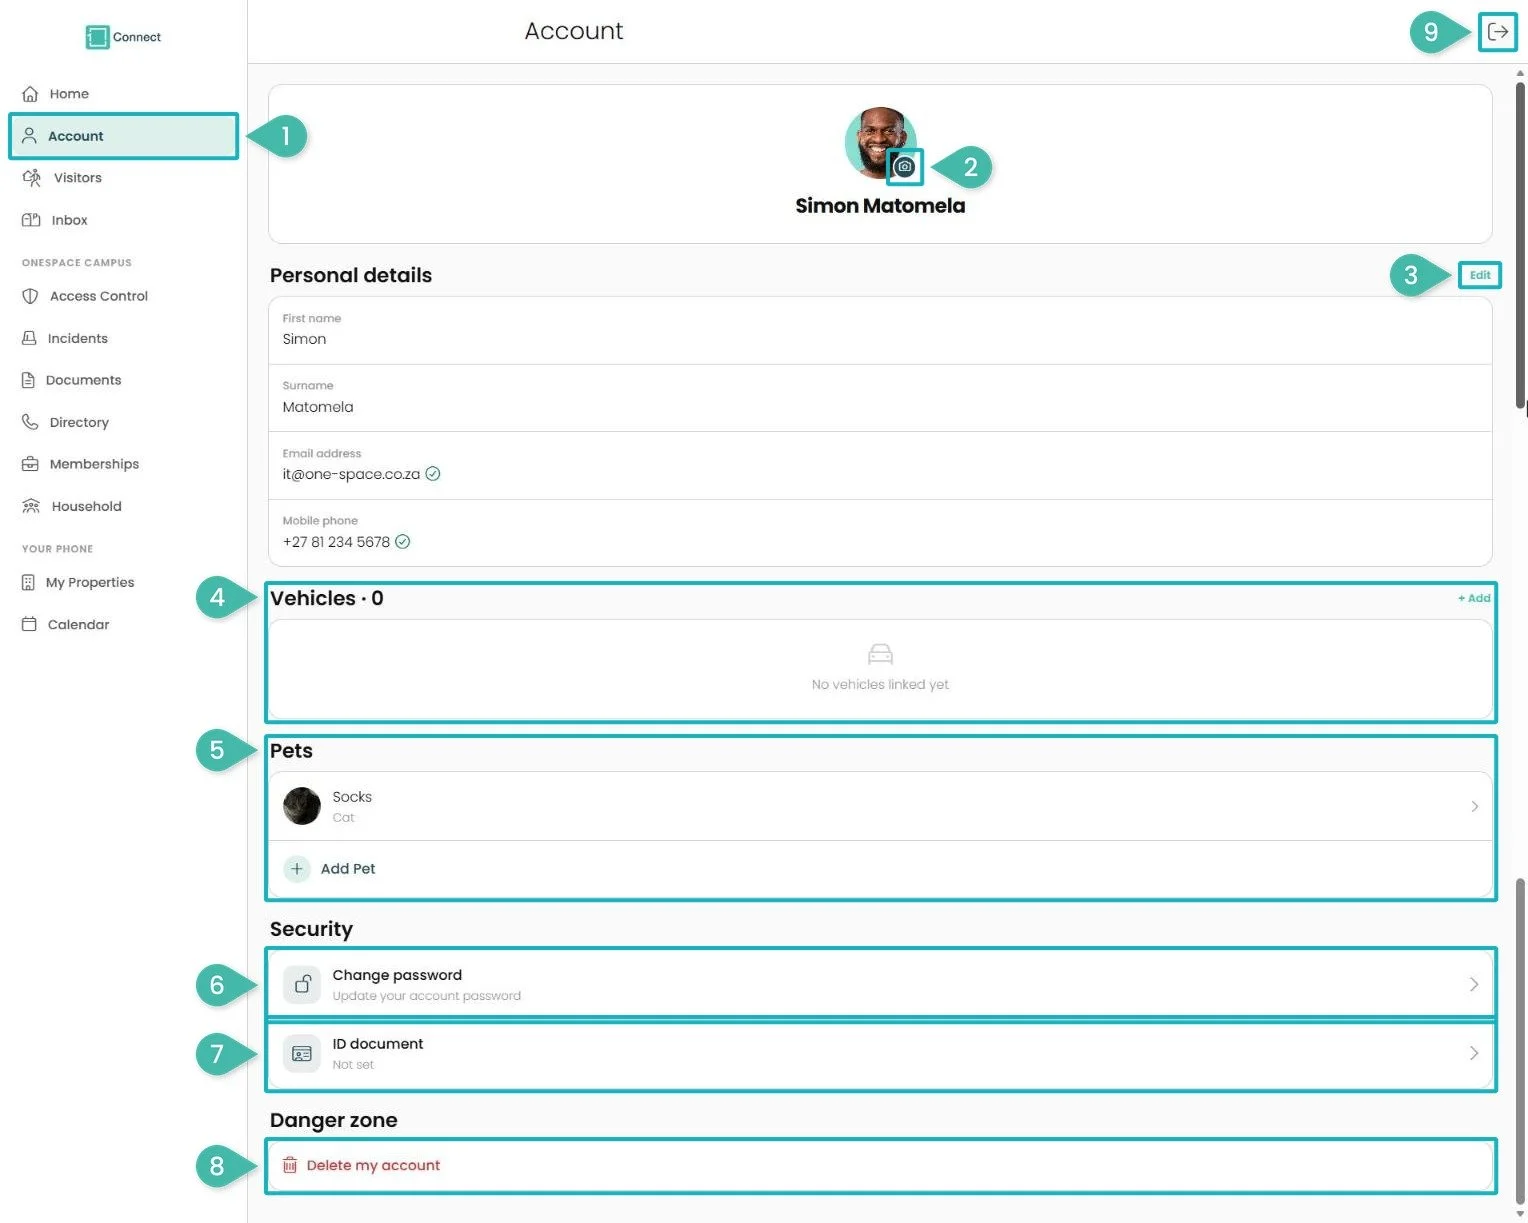
Your Account page
Click Account in the sidebar, or click your name at the top right of any page.
Profile photo: click the small icon on your photo to upload a new profile picture.
Personal details: your first name, surname, email address and mobile phone. Click Edit to change them (see Edit your personal details).
Vehicles: your vehicles. See Enrol Your Vehicles.
Pets: your pets. See Your Pets.
Security: click Change password to change your password (see Change your password).
ID document: add or update your identity document (see Your ID document).
Danger zone: Delete my account permanently removes your account. Only use this if you no longer need Connect.
Sign out: click the sign-out icon (arrow) at the top right of the Account page.
Edit your personal details
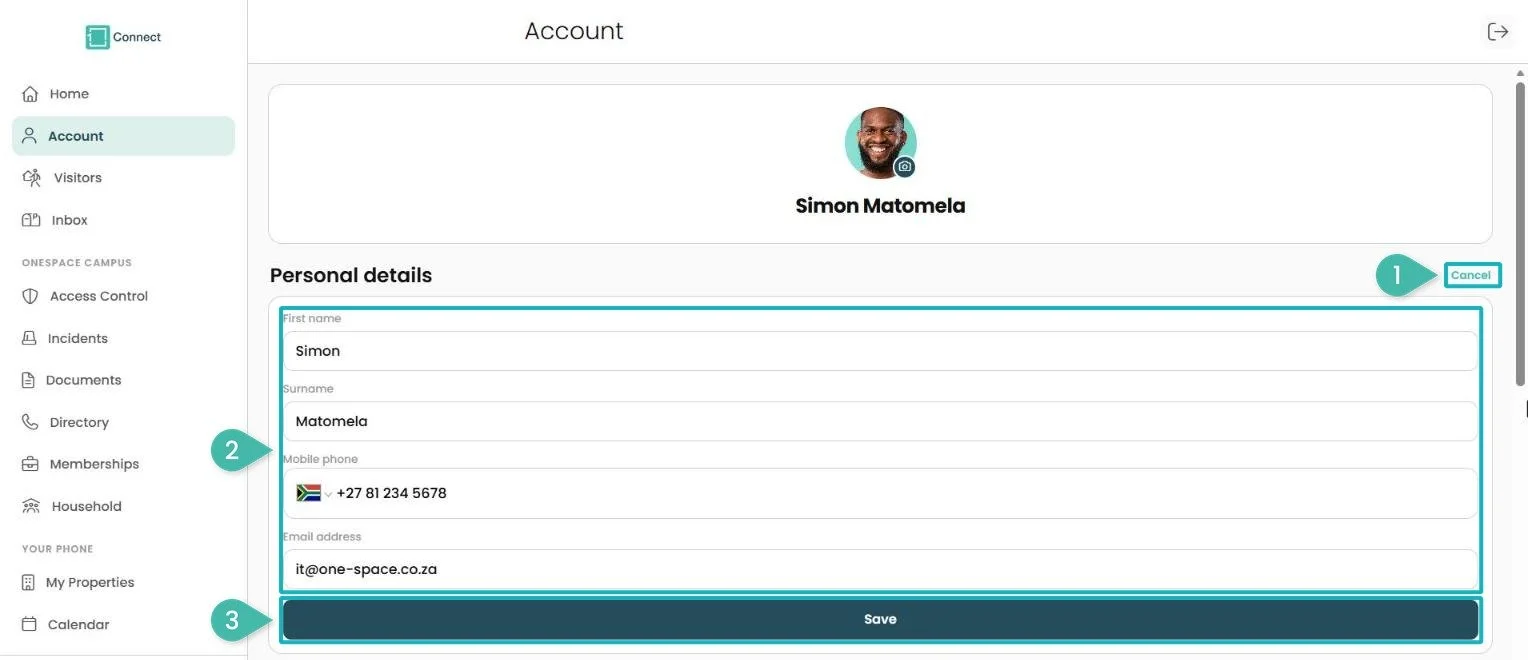
Editing your personal details
Next to Personal details, click Edit.
Change your First name, Surname, Mobile phone (choose the country flag first) or Email address.
Click Save. Click Cancel to leave your details unchanged.
Change your password
Good to know
Connect uses your OneSpace user ID, so changing your password here changes it for the Connect app and all OneSpace products.
Pick a password you don't use anywhere else, and don't share it.
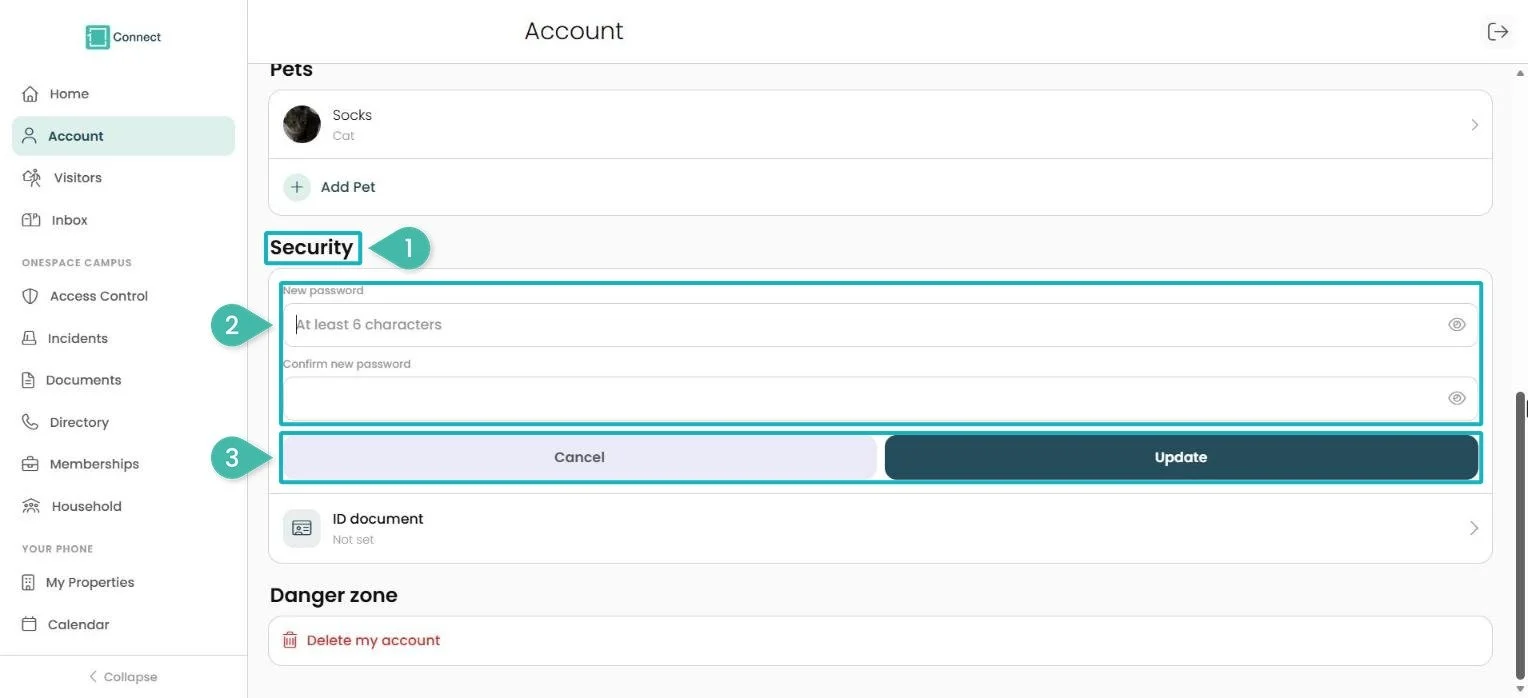
Changing your password
On your Account page, under Security, click Change password.
Enter your New password (at least 6 characters), then type it again in Confirm new password. Click the eye icon to check what you typed.
Click Update. Click Cancel to leave your password unchanged.
Your ID document
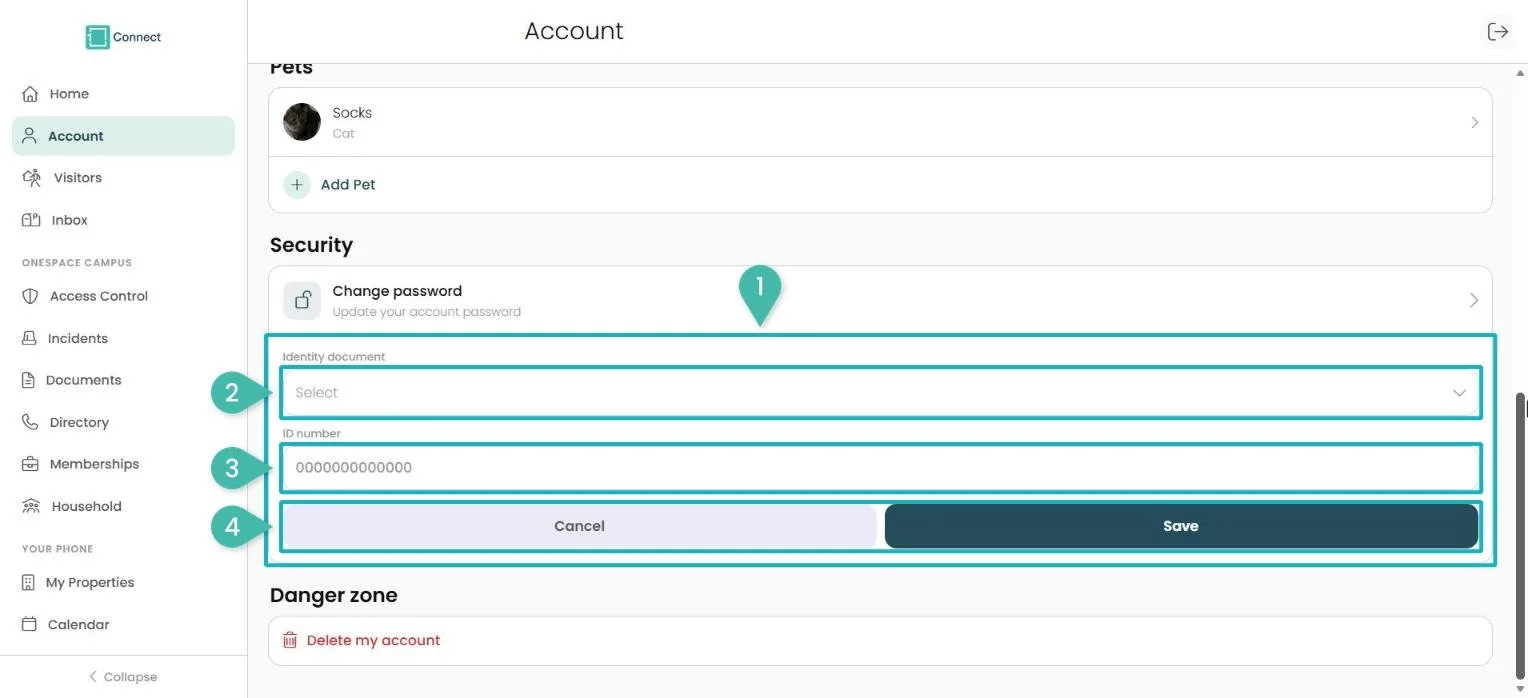
Adding your ID document
On your Account page, click ID document.
Choose your Identity document type.
Enter your ID number.
Click Save. Click Cancel to close without saving.
Your Pets
Previous version: View the previous Pets section
Your pets are saved to your own profile (your 1iD), so you add and manage them from your Account.
Open your pets
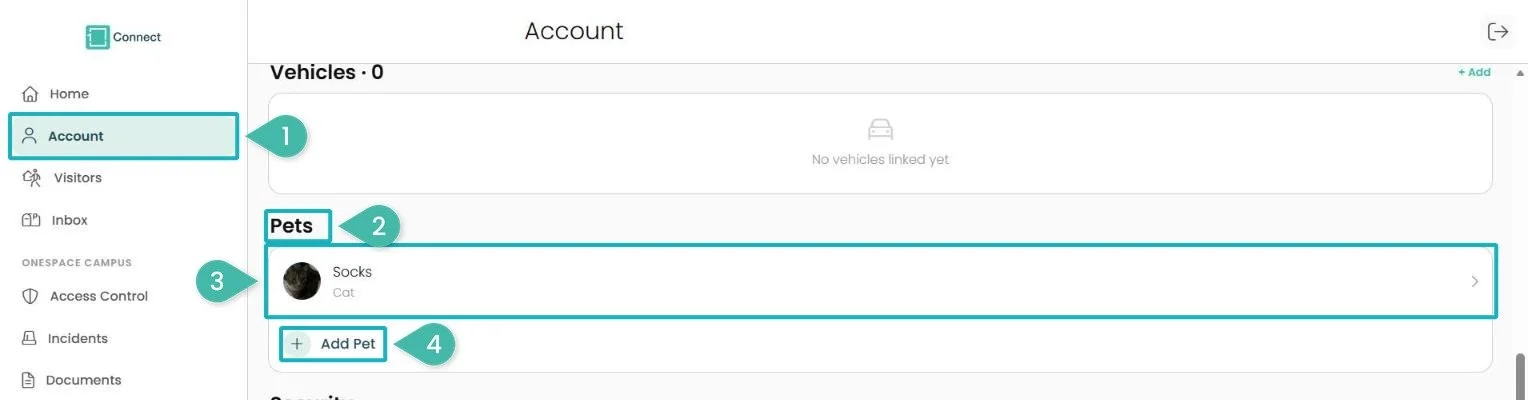
Pets on your Account page
Click Account in the sidebar.
Scroll down to Pets, below Vehicles. Each pet shows its photo, name and type.
Click a pet to open it.
Click Add Pet to add a new pet.
Add a pet
Good to know
Only Name and Type are required (marked *).
If you don't know your pet's date of birth exactly, an approximate date is fine.
Click the red X to close the Add Pet form without saving.
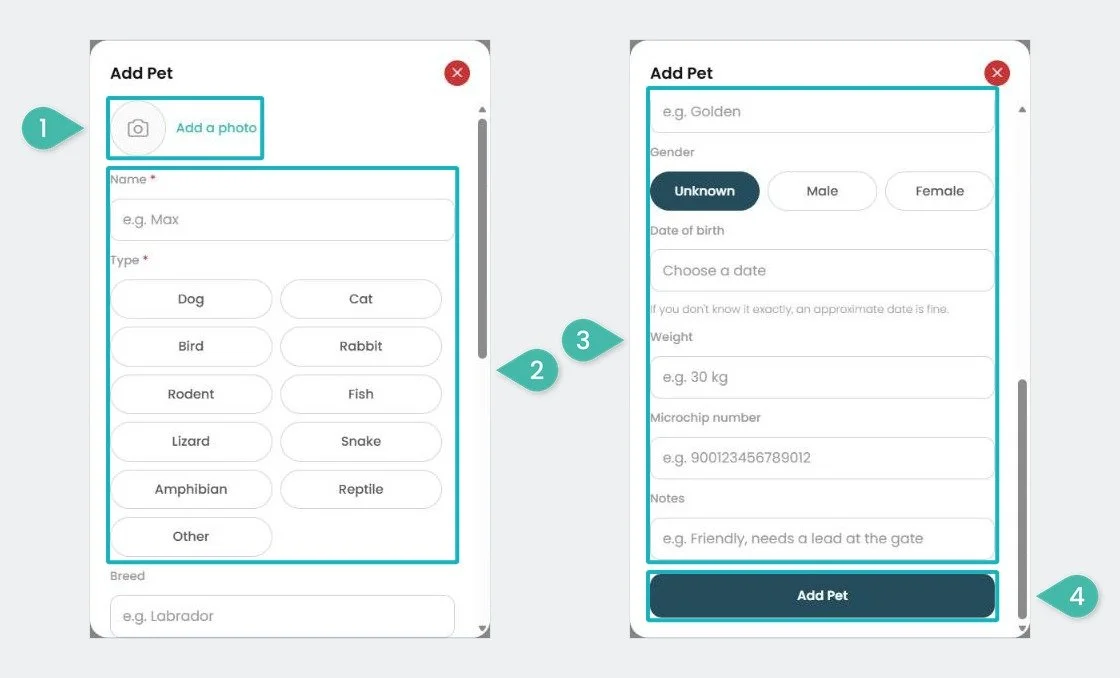
The Add Pet form
Click Add a photo to upload a photo of your pet.
Type your pet's Name and choose its Type: Dog, Cat, Bird, Rabbit, Rodent, Fish, Lizard, Snake, Amphibian, Reptile or Other.
Scroll down and fill in what you know: Breed, Colour, Gender (Unknown, Male or Female), Date of birth, Weight, Microchip number and Notes.
Click Add Pet to save. Your pet now shows under Pets on your Account.
Enrol Your Vehicles
Previous version: View the previous Vehicles section
Add your vehicles to your Account so your site can recognise them.
Good to know
Your vehicles are listed with their registration, make, model, year and colour.
Click Cancel to close the Add vehicle form without saving.
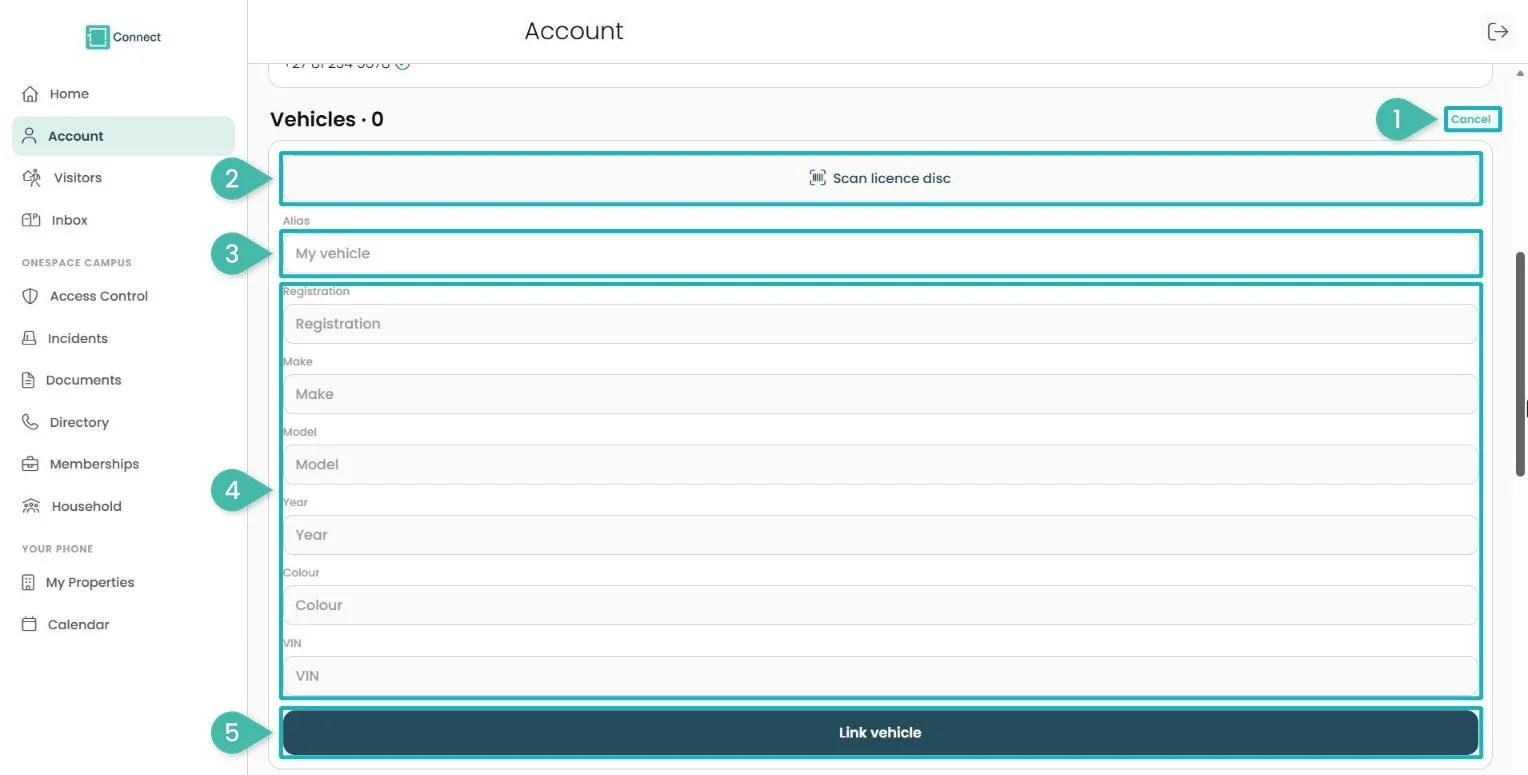
Adding a vehicle
On your Account page, next to Vehicles, click + Add.
If your computer has a camera, you can click Scan licence disc and hold the disc's long barcode up to the camera. Otherwise, type in the details yourself.
Alias (optional): give the vehicle a name you'll recognise, for example My vehicle.
Fill in or check the Registration, Make, Model, Year, Colour and VIN.
Click Link vehicle. Repeat for each vehicle.
Sites and Properties
Previous version: View the previous Ownership section
Choose the site you are using, see all your sites at once, or join the estate, office park or building you live or work at.
Choose your current site
Good to know
The Home, Visitors, Inbox and Calendar pages can show all your sites at once. Pages for your site's services (Access Control, Incidents, Documents, Directory, Memberships and Household) always show your current site, and the layers button is greyed out there.
Tasks such as inviting a visitor use your current site: the one shown at the top left.
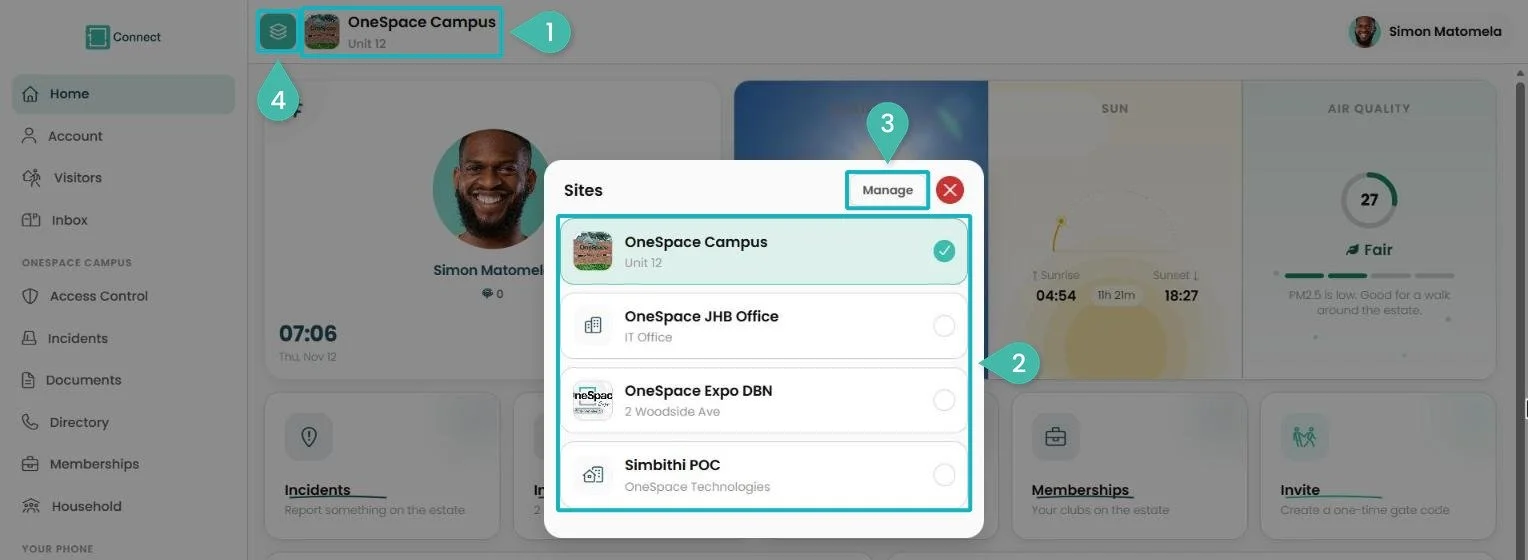
Choosing your current site and All sites
Your current site and property are shown at the top left of every page. Click the site name.
Sites: your sites are listed. Click one to make it your current site. A tick shows your current site.
Click Manage to open My Properties (see My Properties).
All sites: click the layers button (top left) to see items from all the sites you are enrolled at. Click it again to go back to your current site.
My Properties
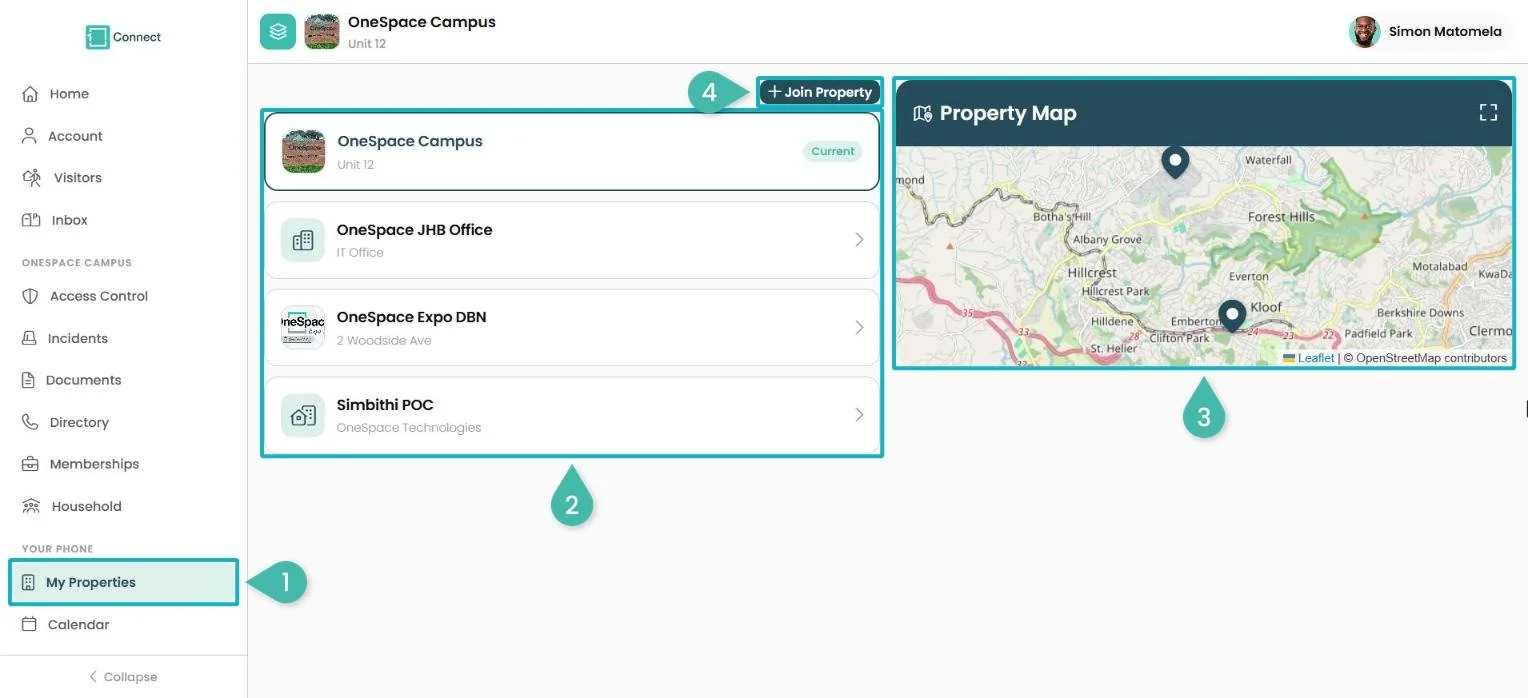
My Properties and the Property Map
Click My Properties in the sidebar.
Your properties are listed. Current marks the one you are using. Click another property to open it.
Property Map: shows where your properties are. Click the expand icon to make the map bigger.
Click + Join Property to join a new site (see Join a new site).
Join a new site
Good to know
The property is added to your list once the site manager approves your request.
You can be enrolled at more than one site. Click your site name at the top of the page to move between them (see Choose your current site).
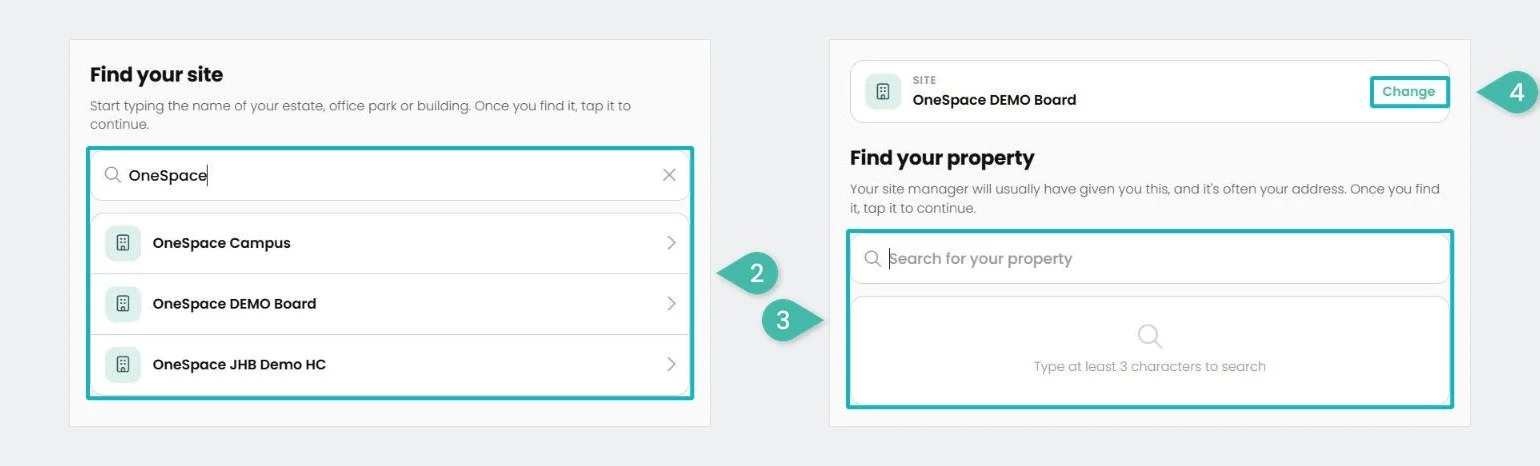
Joining a new site
On My Properties, click + Join Property.
Find your site: start typing the name of your estate, office park or building (at least 3 characters), then click it.
Find your property: search for your unit or address (your site manager will usually have given you this), then click it.
Confirm: check the site and property. Click Change to correct either one.
Click Join.
Request sent: your request goes to the site manager. Click Done.
Visitor Management
Previous version: View the previous Day Pass (Visitor PIN) section
The Visitors page
Use the Search box at the top to find a pass by name, number or PIN.
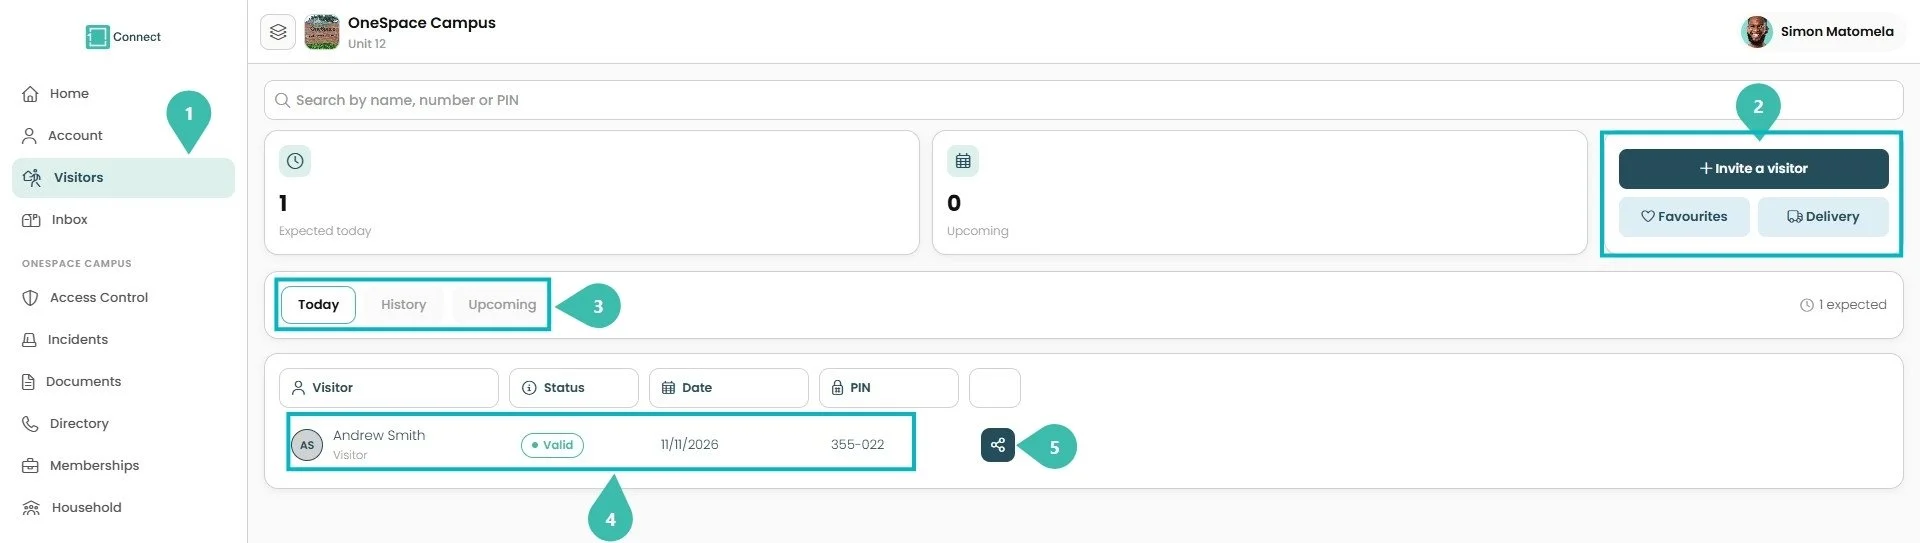
The Visitors page
Click Visitors in the sidebar.
Click + Invite a visitor (see Invite a visitor (Day Pass)), Favourites (see Favourites) or Delivery to create an invite.
Choose Today, History or Upcoming to see your visitor passes. Expected today and Upcoming above show how many visitors are on their way.
Each pass shows the visitor, its status (for example, Valid or Expired), the date and the PIN. Click a pass to open it (see Open a visitor pass).
Click the share icon to send the invite again (see Invite confirmed and sharing).
Visitor passes for all your sites
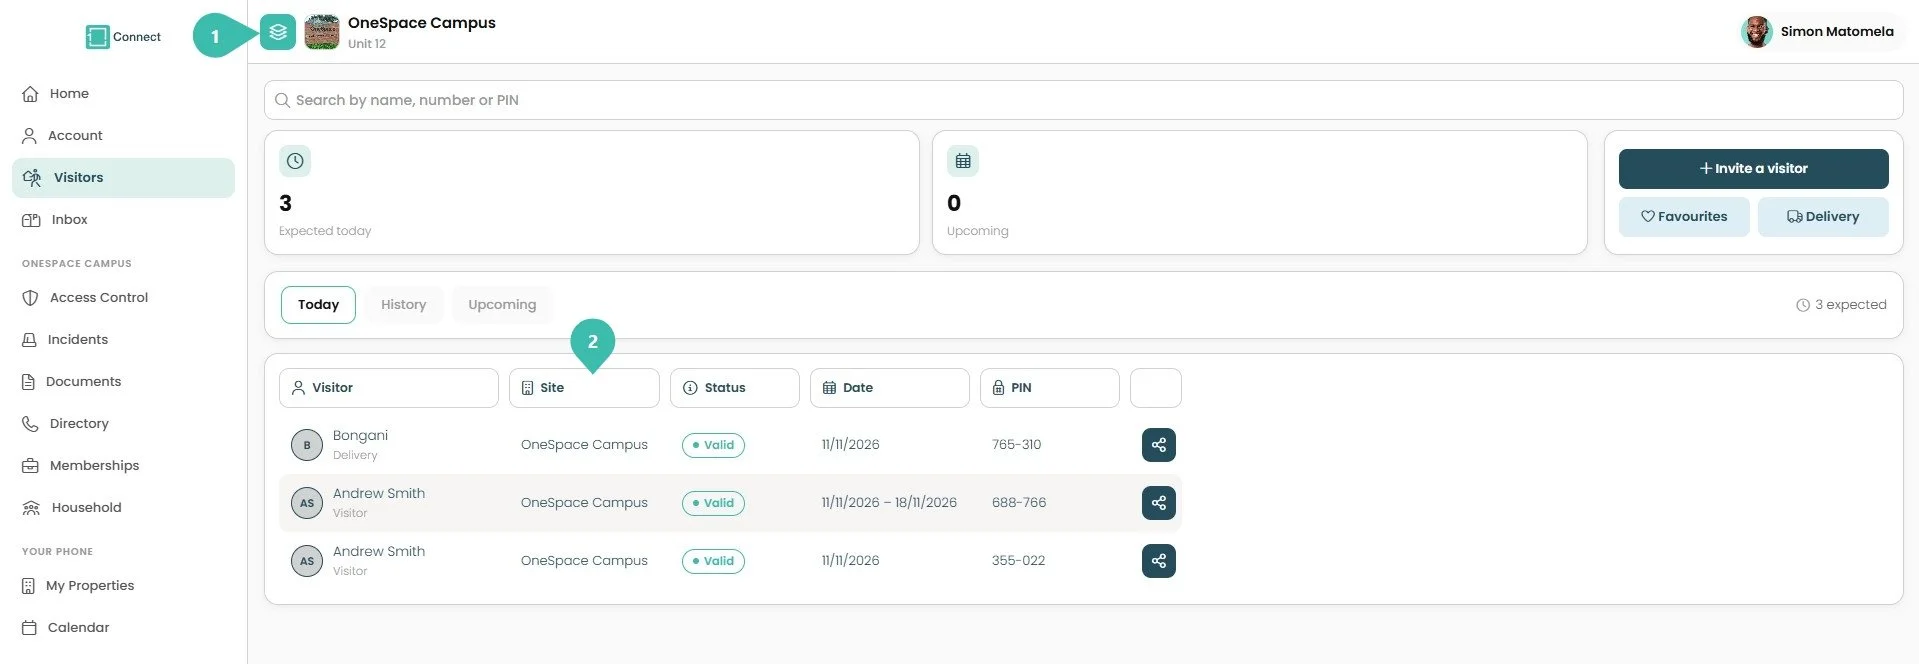
Visitor passes for all your sites
Enrolled at more than one site? Click the layers button (All sites) at the top left. It turns teal while it is on.
A Site column shows which site each pass is for. Click the layers button again to go back to your current site.
Invite a visitor (Day Pass)
Good to know
Visits can start up to 14 days ahead.
The last day can be up to 365 days after the first.
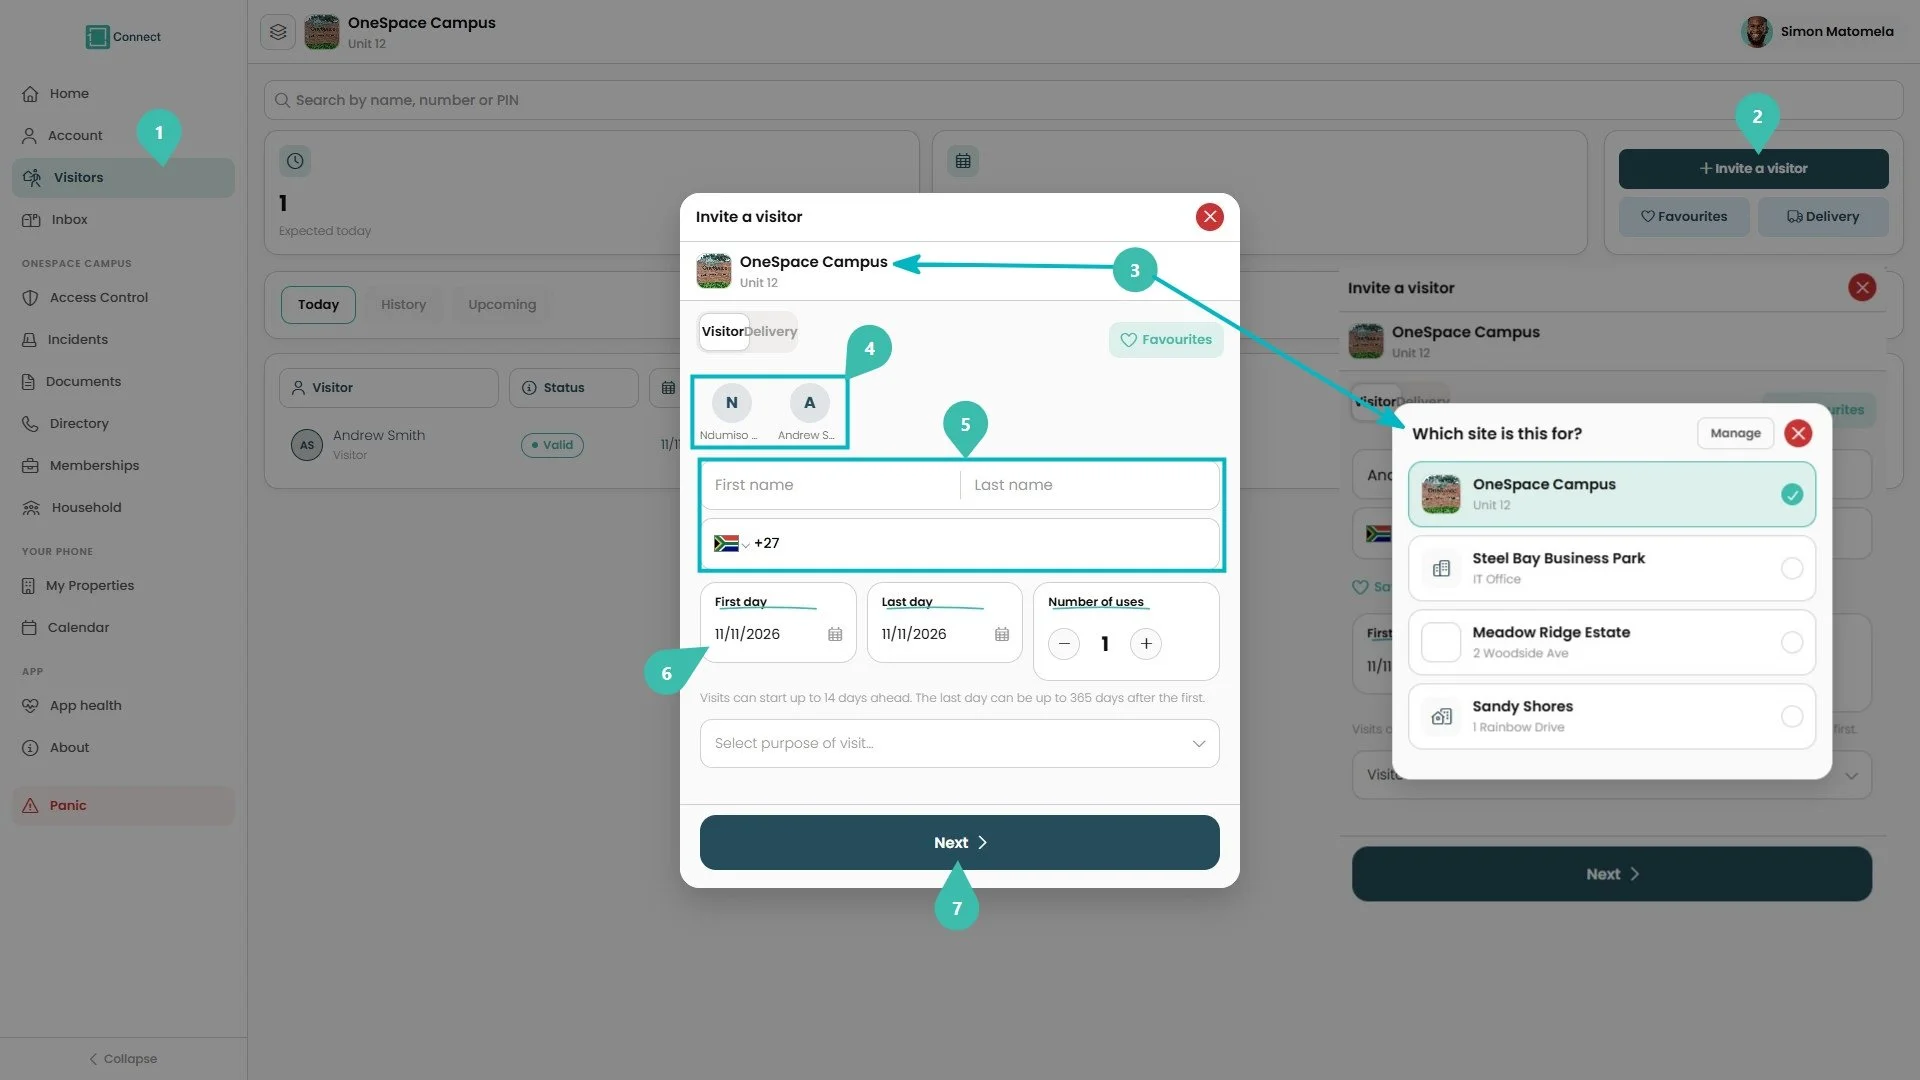
Inviting a visitor for the day
Click Visitors in the sidebar.
Click + Invite a visitor. You can also click the Invite tile on the Home page.
Check the site and property at the top. To invite the visitor to a different property, click the site name and choose it under Which site is this for?
Click a recent visitor to fill in their details, or click Favourites to choose a saved visitor.
Enter the visitor's First name, Last name and phone number (choose the country flag first).
Set the First day, Last day and Number of uses. For a Day Pass, set the first and last day to the same date. Click + or − to set how many times the PIN can be used.
Choose the purpose of visit (the options depend on your site), then click Next.
Longstay Pass and saving a favourite
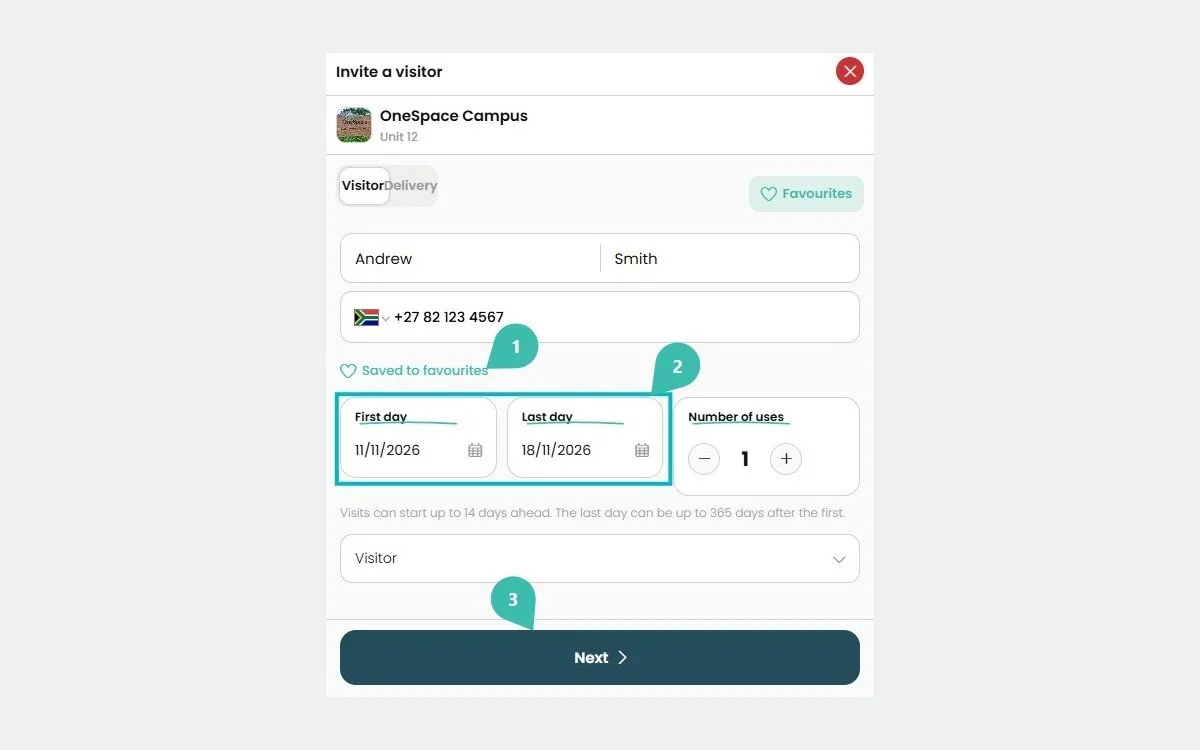
A Longstay Pass, saved to favourites
Click the heart under the phone number to save the visitor to your favourites at the same time. It shows Saved to favourites once saved.
For a Longstay Pass, set the Last day to a later date so the pass covers several days.
Click Next.
Invite confirmed and sharing
The shared message includes your name, the site and property, the PIN and the visit dates, plus any directions your site has set up.
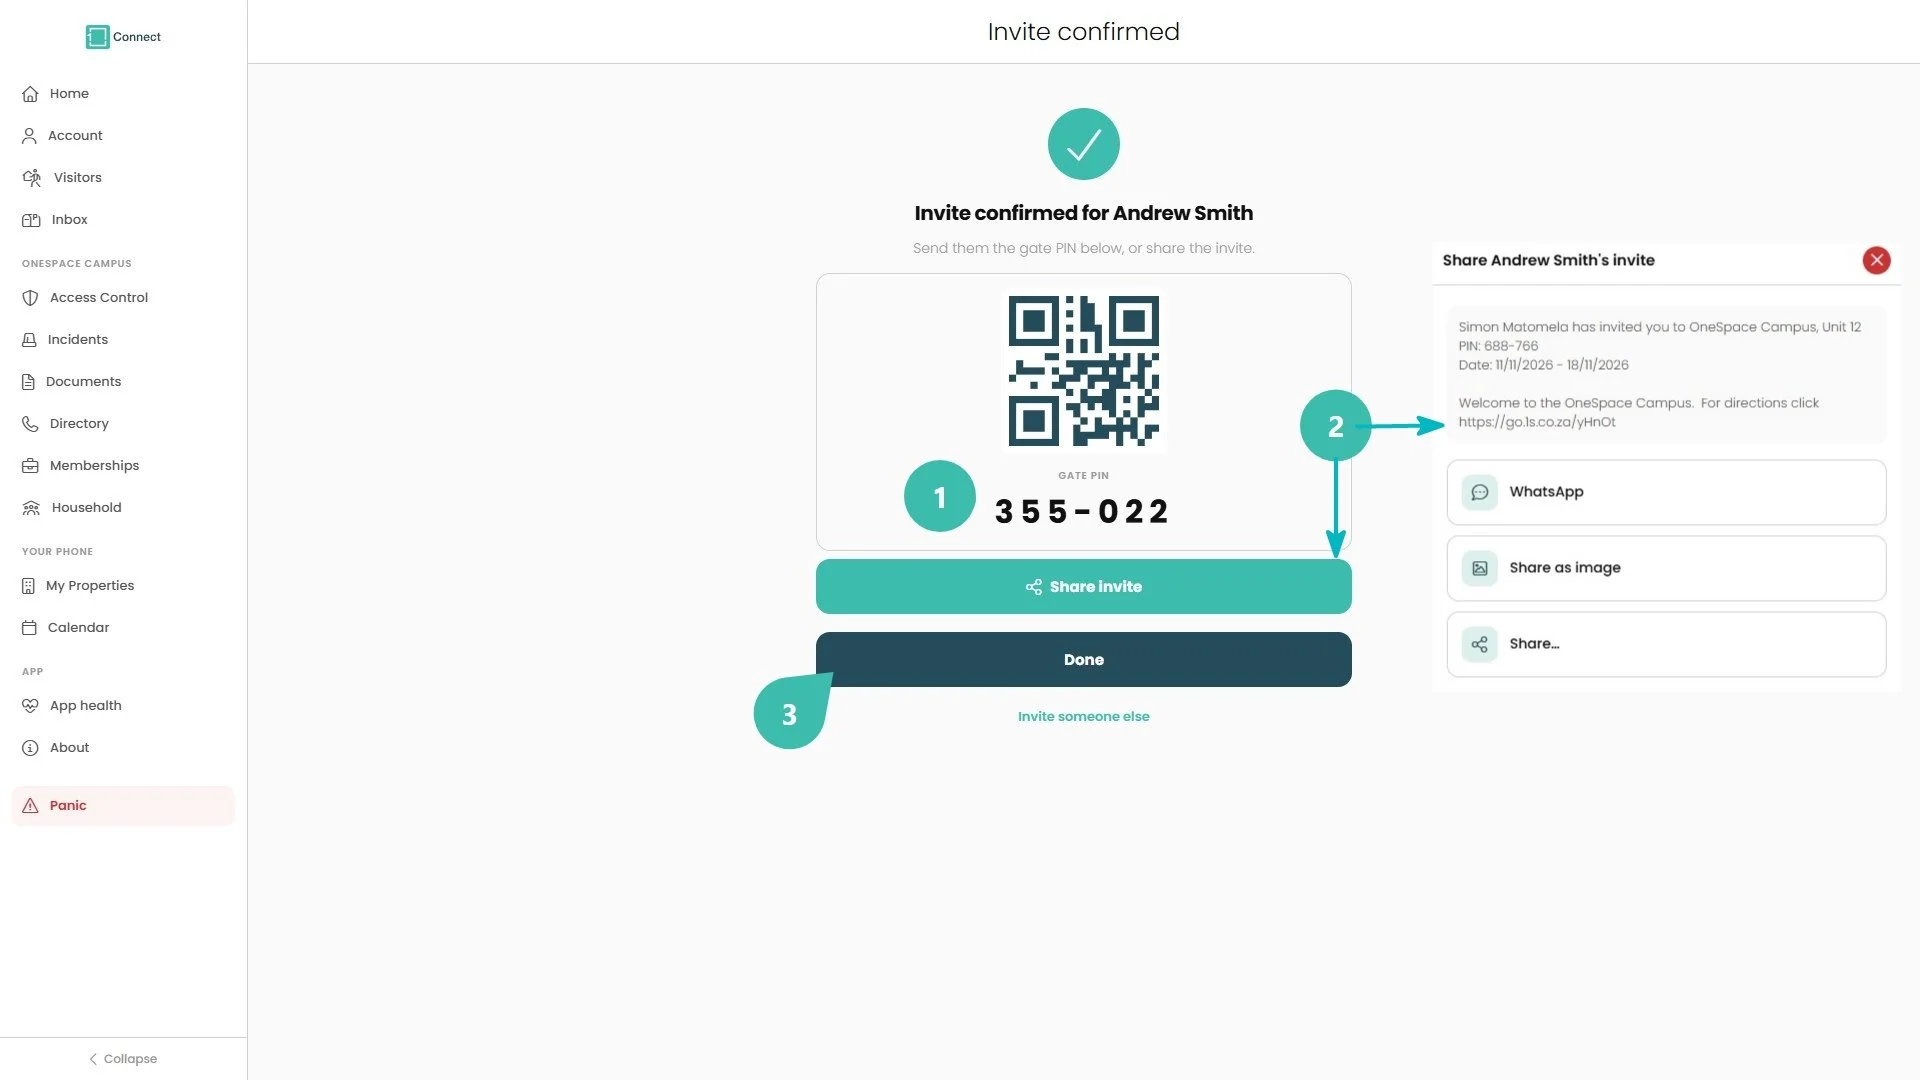
Invite confirmed and sharing options
Invite confirmed shows the visitor's QR code and Gate PIN.
Click Share invite, then choose WhatsApp, Share as image or Share… (any other app on your computer). The message is previewed at the top.
Click Done when you're finished, or click Invite someone else to start a new invite.
Sharing an invite again from the Visitors page
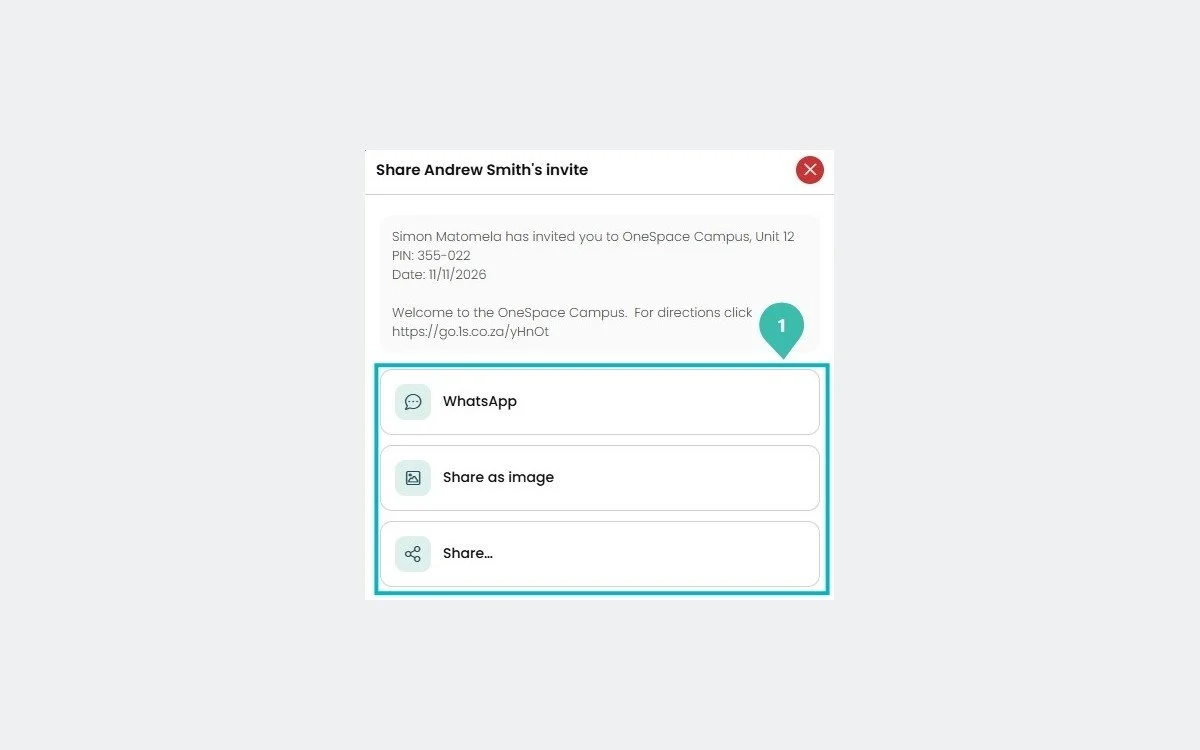
Sharing an invite again from the Visitors page
To share an invite again later, click the share icon next to the pass on the Visitors page, then choose how to send it.
Favourites
Save visitors you invite often so you can invite them in a few clicks. On the Visitors page, click Favourites, or click Favourites in the Invite a visitor window.
Good to know
Use Search favourites to find a favourite quickly.
Click the pencil icon to edit a favourite, or the bin icon to delete it.
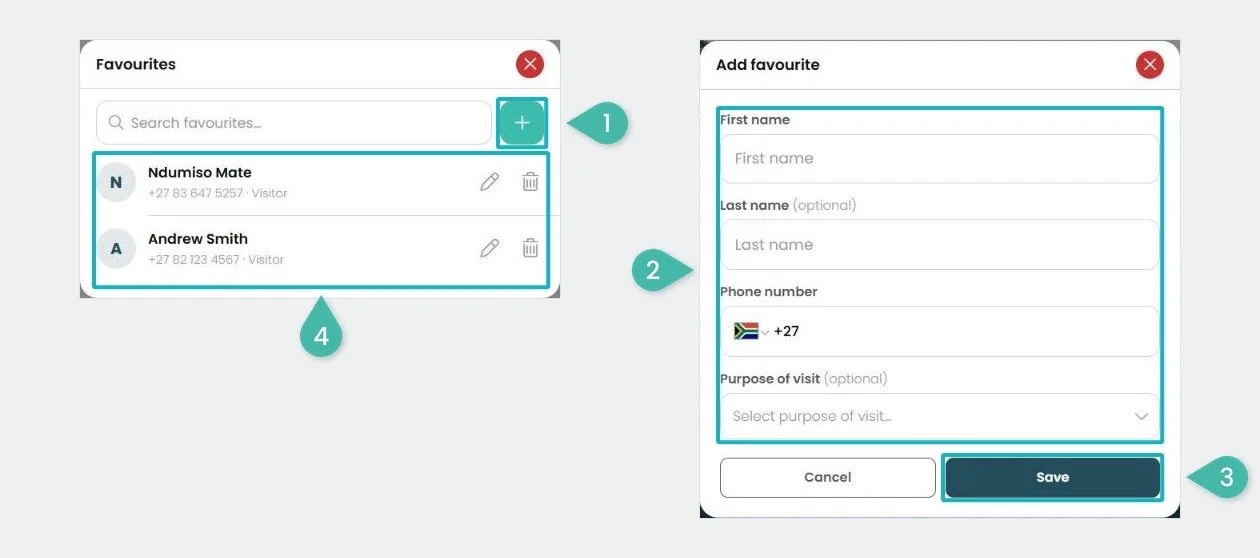
Your favourites and adding a favourite
Click the + button.
Enter the visitor's First name, Last name (optional) and Phone number. You can also choose a Purpose of visit (optional).
Click Save.
Your favourite is added to the list.
Open a visitor pass
Click a pass on the Visitors page to open it.
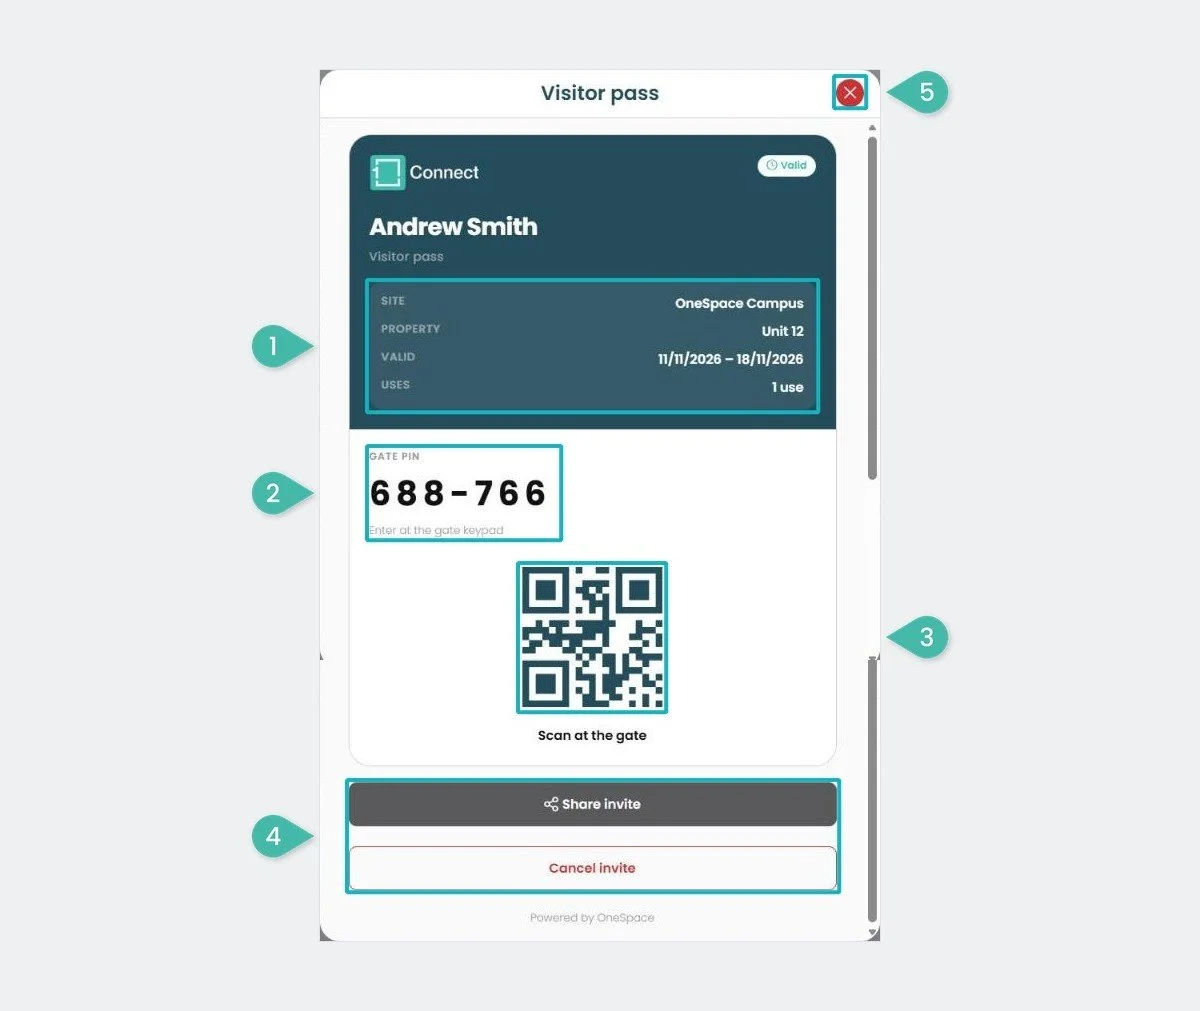
A visitor pass
The pass shows the visitor's name, the site, property, the dates it is valid and the number of uses.
Gate PIN: the visitor enters it at the gate keypad.
QR code: the visitor scans it at the gate.
Click Share invite to send the pass again, or Cancel invite to cancel it.
Click the red X to close the pass.
Access Control
Previous version: View the previous Access Devices section
See your access methods and gate activity, and request new access methods from your site manager.
Your access methods
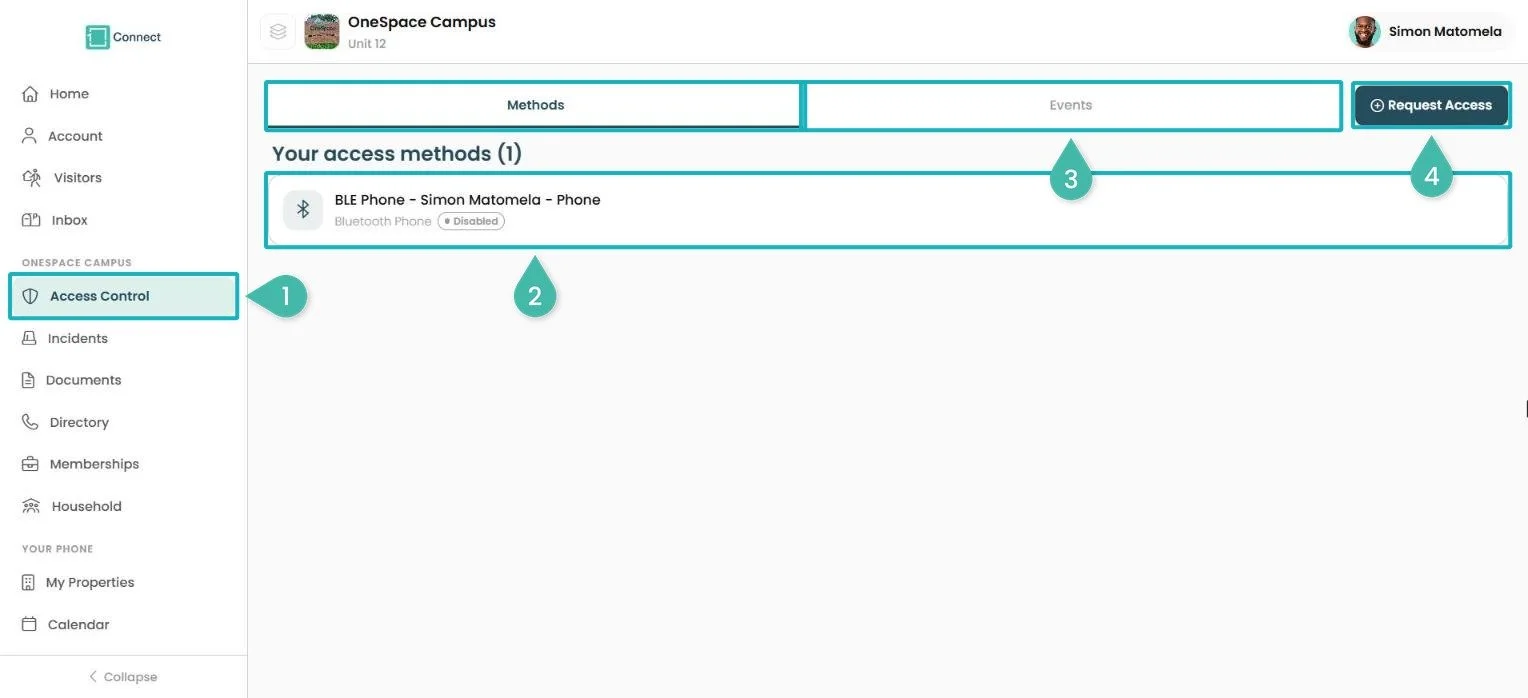
The Access Control page
Click Access Control in the sidebar.
Methods lists your access methods and their status (for example, Disabled).
Events shows your gate activity.
Click Request Access to request a new method (see Request an access method).
Request an access method
Good to know
You can request a Bluetooth Phone method from Connect Web, but you can't open gates with Bluetooth from Connect Web. To open gates and doors with your phone, use the Connect app on your phone.
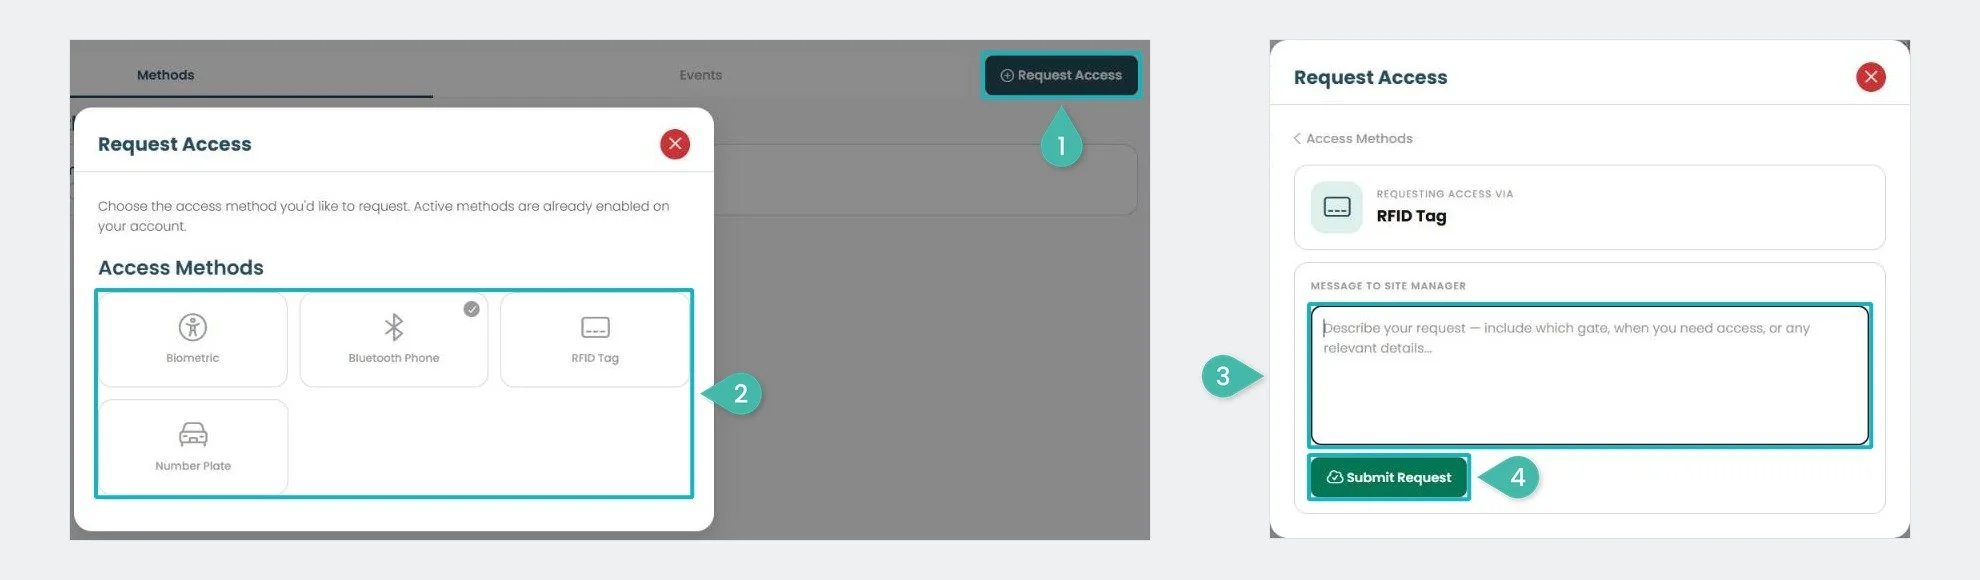
Requesting an access method
Click Request Access.
Choose an access method: Biometric, Bluetooth Phone, RFID Tag or Number Plate. Methods that are already active on your account are ticked.
Write a message to the site manager. Include which gate, when you need access and any other relevant details.
Click Submit Request. Your site manager will approve or decline it.
Incident Reporting
Previous version: View the previous Incidents section
Report an on-site issue, such as an electrical fault, and follow its progress.
The Incidents page
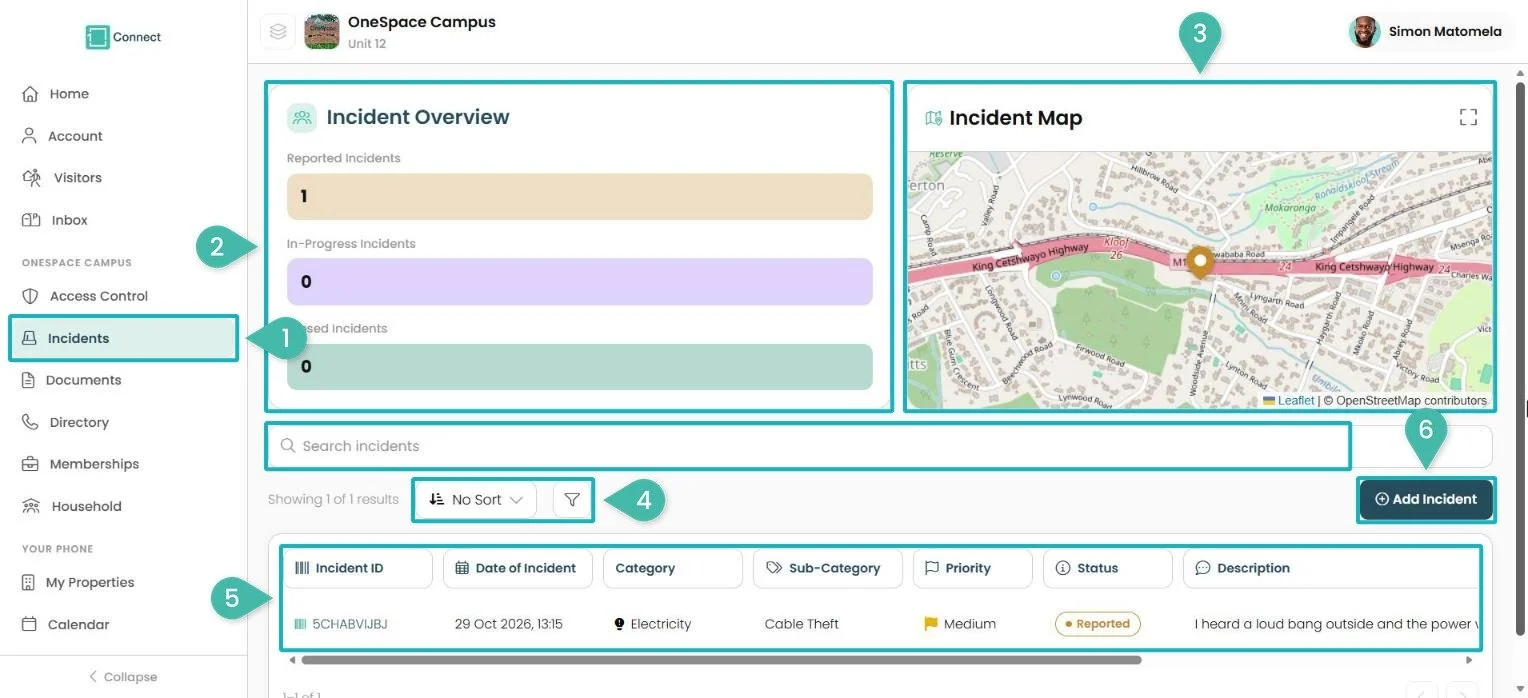
The Incidents page
Click Incidents in the sidebar, or click the Incidents tile on the Home page.
Incident Overview: how many of your incidents are Reported, In-Progress and Closed.
Incident Map: where your incidents are. Click the expand icon to make the map bigger.
Use Search incidents, sort and the filter to find an incident.
Your incidents are listed with their incident ID, date, category, sub-category, priority, status (for example, Reported) and description.
Click Add Incident to report a new incident (see Report an incident).
Report an incident
Report something on the estate in four short stages.
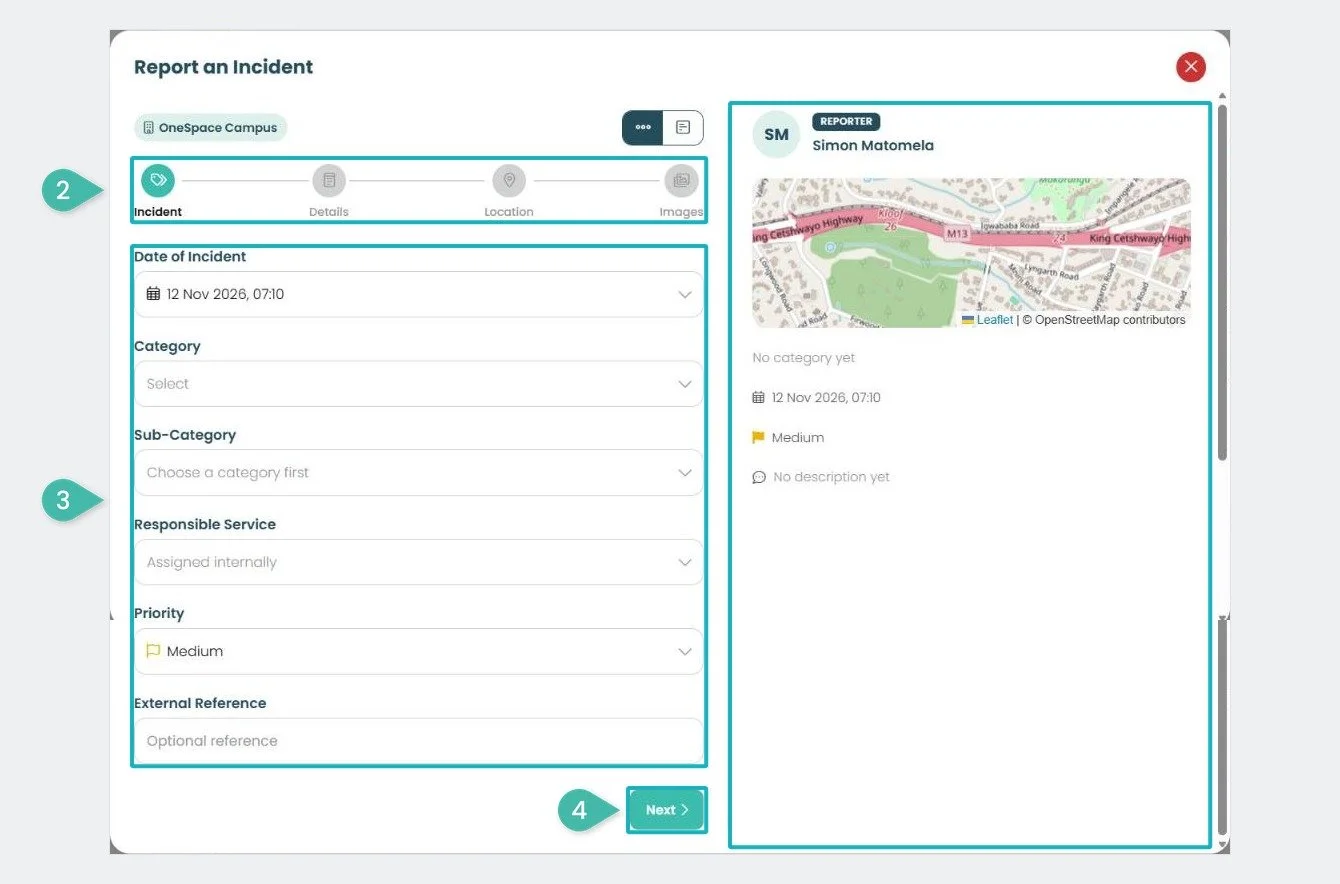
Reporting an incident
On the Incidents page, click Add Incident.
The report has four stages: Incident, Details, Location and Images. The panel on the right previews your report as you fill it in.
Incident: check the Date of Incident, then choose the Category, Sub-Category, Responsible Service and Priority. Add an External Reference if you have one (optional).
Click Next.
Details: describe what happened, and add any further details.
Click Next.
Location: enter the place or area and pin the location on the map.
Click Next.
Images: add photos from your computer.
Click Report Incident. Click Back at any stage to change your answers.
Panic
Previous version: View the previous User Portal Web User Guide (this section is new)
Use Panic in an emergency to send a panic alert with your location and identity.
Good to know
If your browser asks to use your location, click Allow so your location can be sent with the alert.
On a computer, your location is the computer's location. If you're away from your computer in an emergency, use the Connect app on your phone.
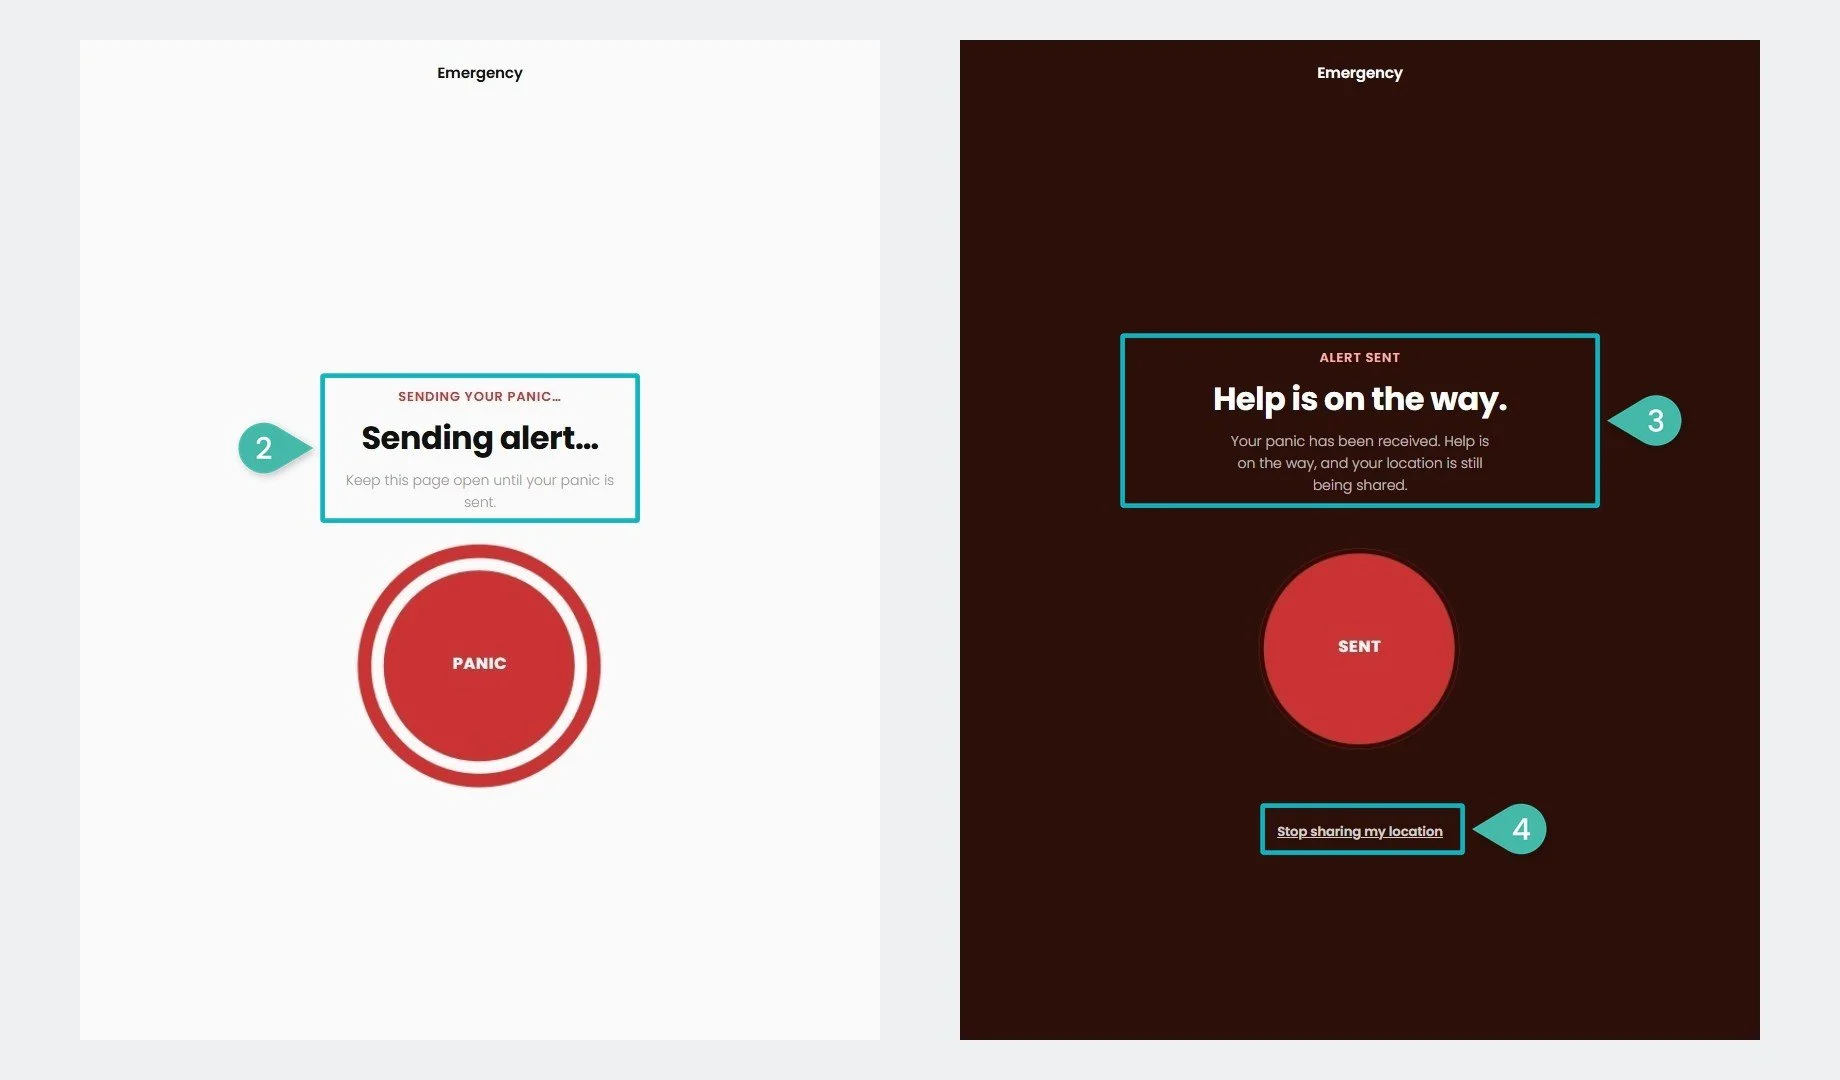
Sending a panic alert, and the alert sent
Click Panic at the bottom of the sidebar. On a smaller screen, click SOS at the top right.
The Emergency page opens and shows Sending alert…. Keep the page open until your panic is sent.
Alert sent: the page confirms Help is on the way. Your location is still being shared.
Click Stop sharing my location when you no longer need to share it.
Inbox
Previous version: View the previous Announcements section
Your Inbox holds messages and notices from your site, such as broadcasts (announcements from your site) and gateway status updates.
Good to know
To see messages from all your sites, click the layers button (All sites) at the top left.
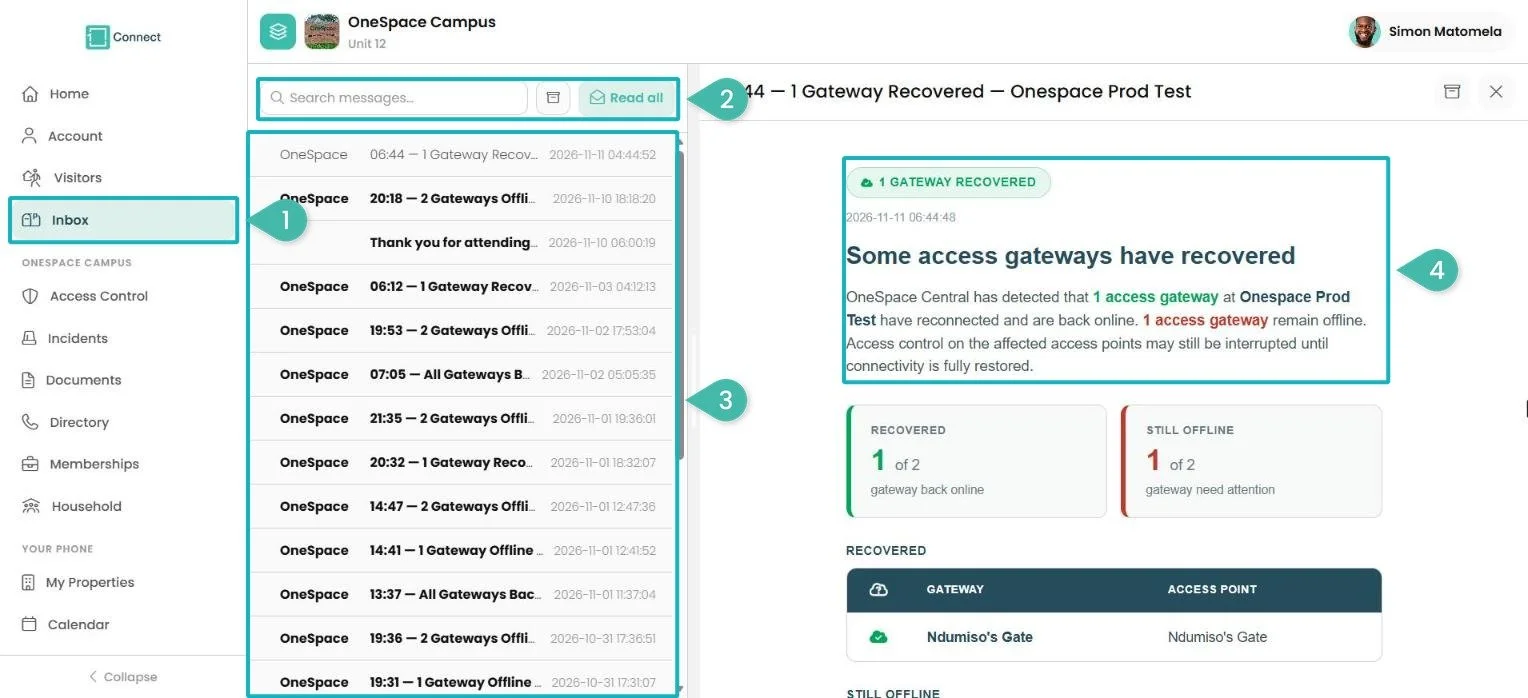
The Inbox and a message
Click Inbox in the sidebar, or click View all on the Home page's Inbox panel.
Search messages, open your archive, or click Read all to mark everything as read.
Your messages are listed on the left, newest first.
Click a message to read it on the right.
Your Site Services
Previous version: View the previous Events section
The services for your current site are in the sidebar under your site's name, plus the Calendar under Your phone. Broadcasts (announcements from your site) arrive in your Inbox (see Inbox).
The Calendar
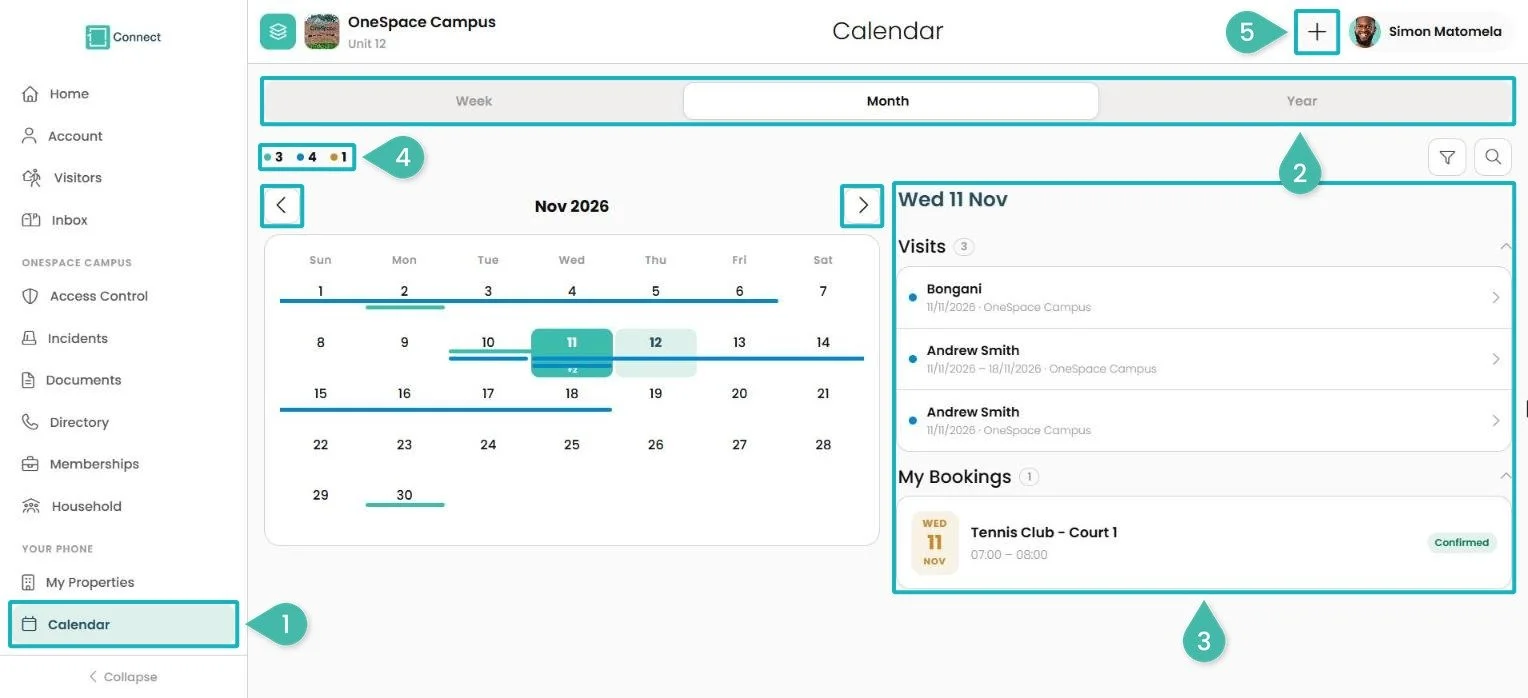
The Calendar
Click Calendar in the sidebar, or click the Calendar tile on the Home page.
Choose Week, Month or Year at the top. Use the arrows to move to the previous or next month. Today is highlighted.
Click a day to see what's on in the panel on the right, including My Bookings.
The coloured dots above the calendar count your events, visits and bookings. Days with something on are underlined in that item's colour.
Click the + button (top right) to Book a facility, Invite a person or Invite Delivery (see Book a facility).
Calendar filter and search
Good to know
Events are published by your site manager.
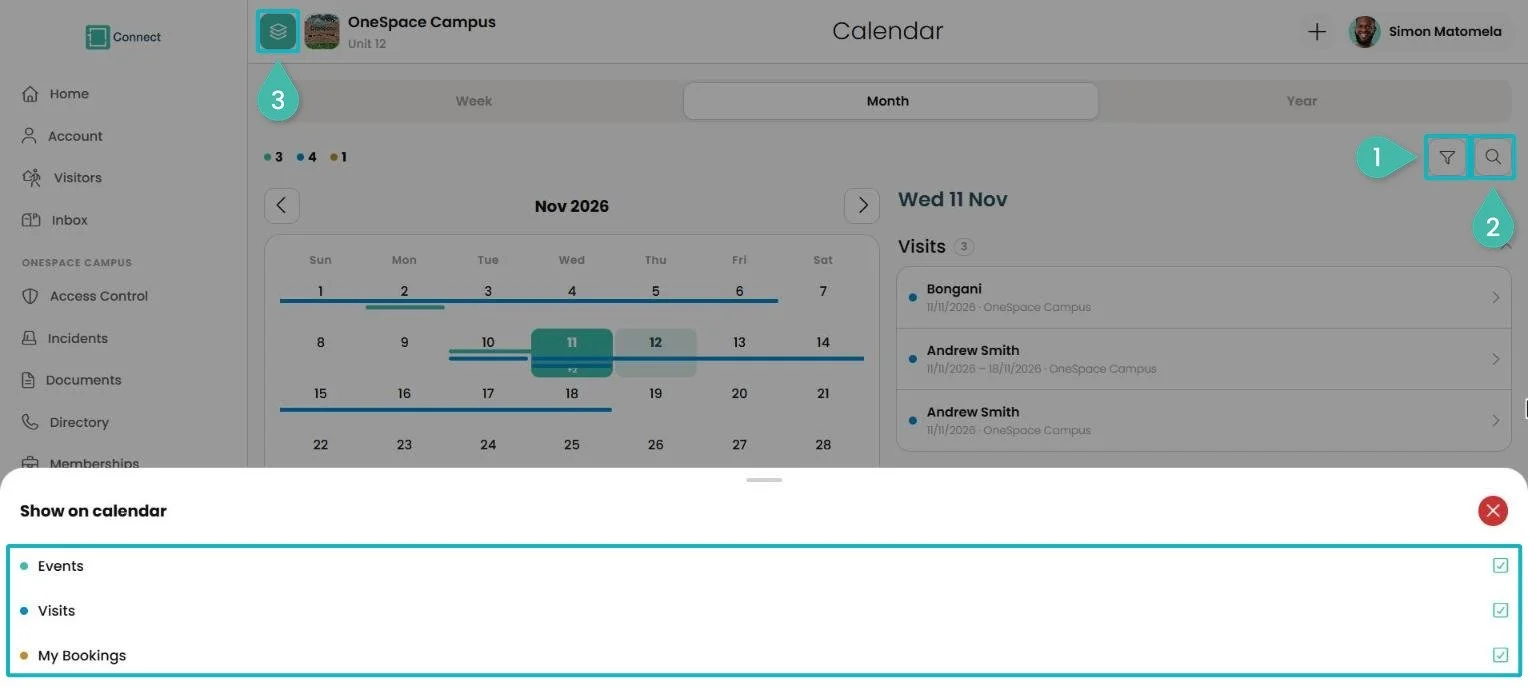
The Calendar filter and search
Click the filter icon and tick Events, Visits and My Bookings to show them, or untick them to hide them.
Click the search icon to search the calendar.
Click the layers button (All sites) to see the calendar for all your sites.
Book a facility
Previous version: View the previous Creating Bookings section
Good to know
Your bookings show on the calendar as My Bookings.
Facilities and their available slots are set by your site manager. Ask them if you need different times.
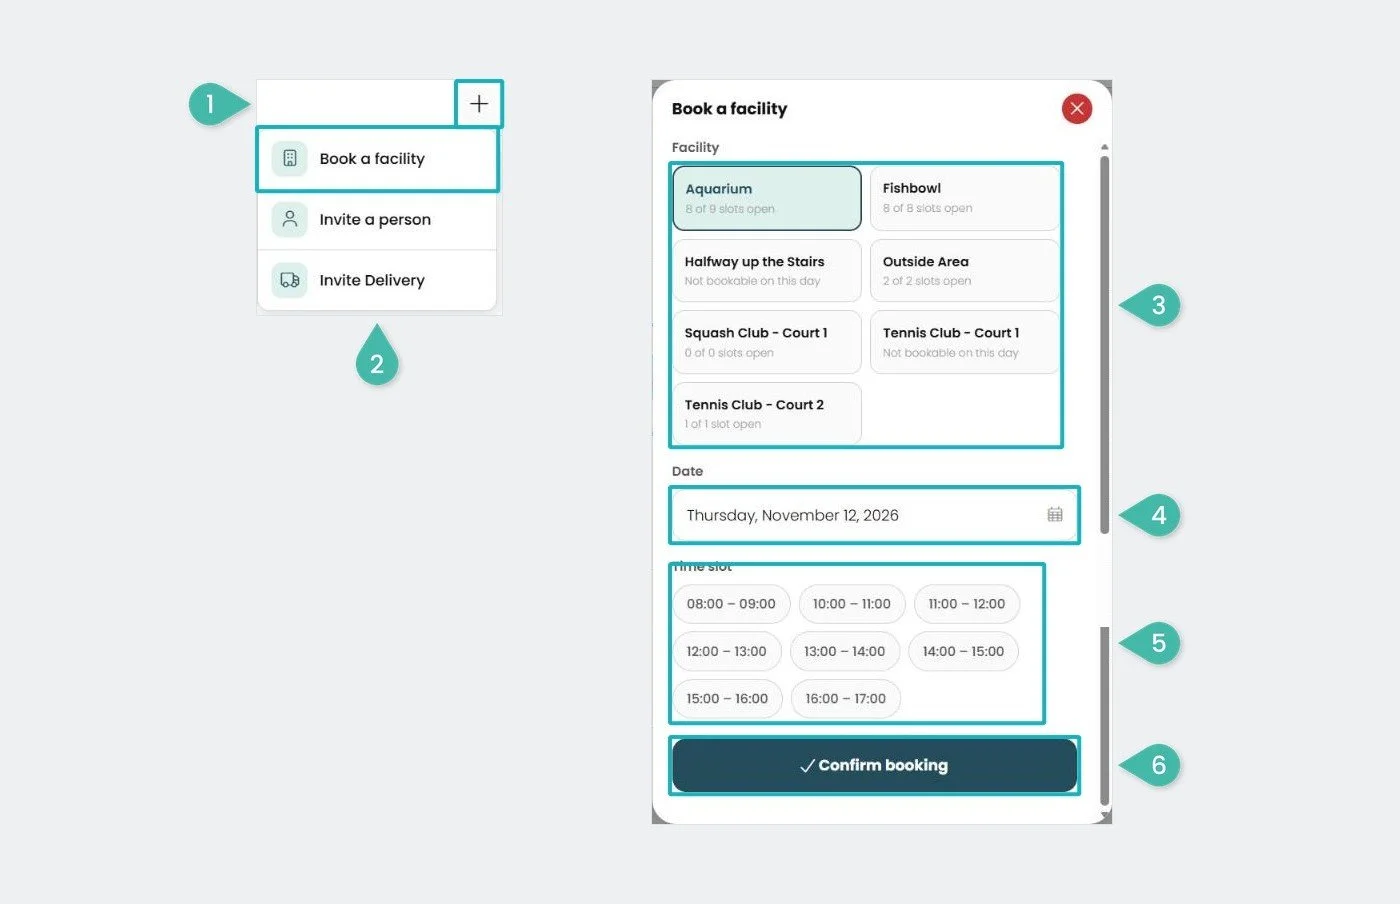
Booking a facility
On the Calendar, click the + button (top right).
Click Book a facility.
Facility: click the facility you want. Each one shows how many slots are open, for example 7 of 9 slots open, or Not bookable on this day.
Date: choose the day you want to book.
Time slot: click an available time slot.
Click Confirm booking.
Memberships
Previous version: View the previous Memberships section
Good to know
Renewal dates and fees are set by your site manager.
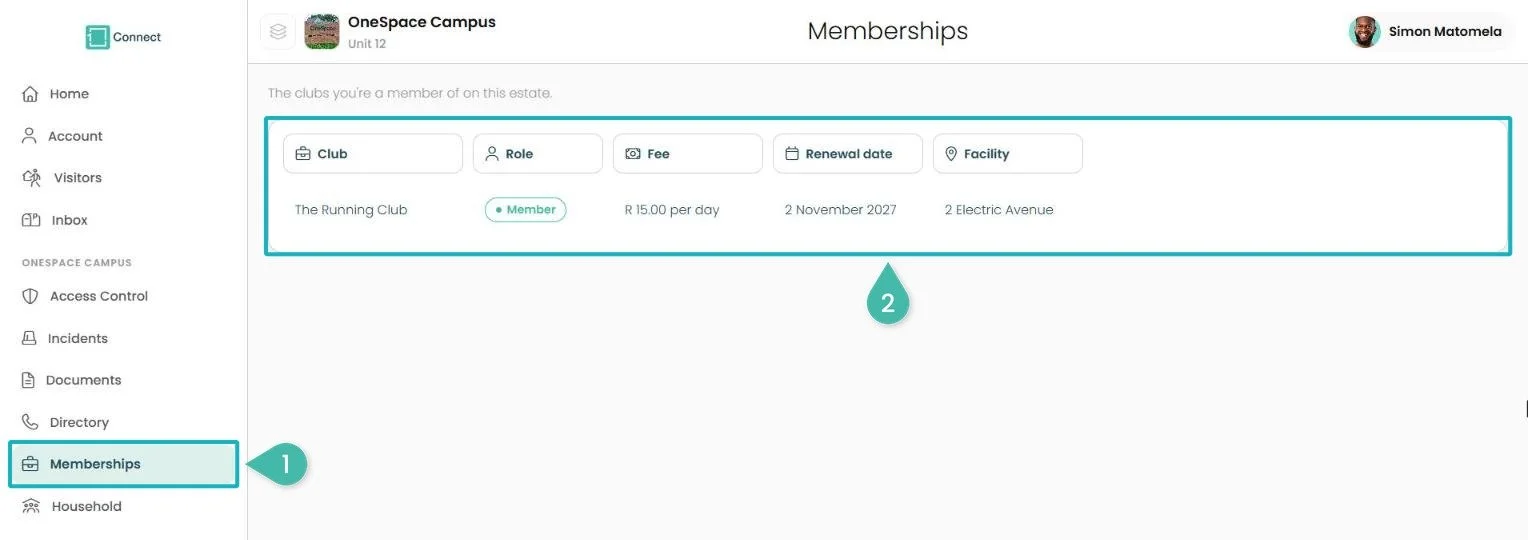
Your club memberships
Click Memberships in the sidebar, or click the Memberships tile on the Home page.
Your clubs at your current site are listed with the Club, your Role (for example, Member), the Fee, the Renewal date and the Facility where it meets.
Documents
Previous version: View the previous Documents section
Good to know
Documents are files your site manager has shared with everyone on your site, such as rules, levies and minutes.
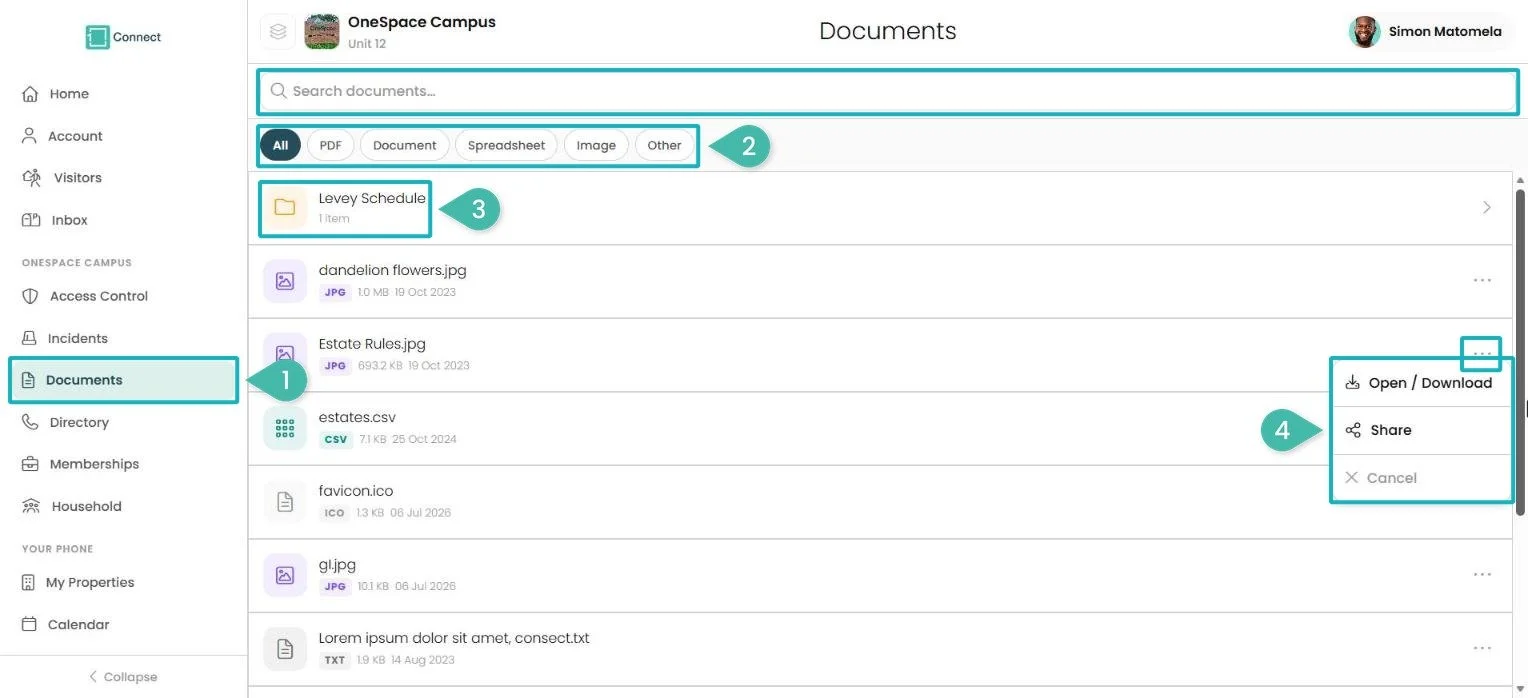
Finding and opening your site's documents
Click Documents in the sidebar.
Type a file name in Search documents, or click a type to filter the list: All, PDF, Document, Spreadsheet, Image or Other.
Folders (for example, Levy Schedule) show how many items they hold. Click a folder to open it.
Click the … next to a file, then click Open / Download or Share. Click Cancel to close the menu.
Directory
The Directory lists local businesses and useful contacts for your site.
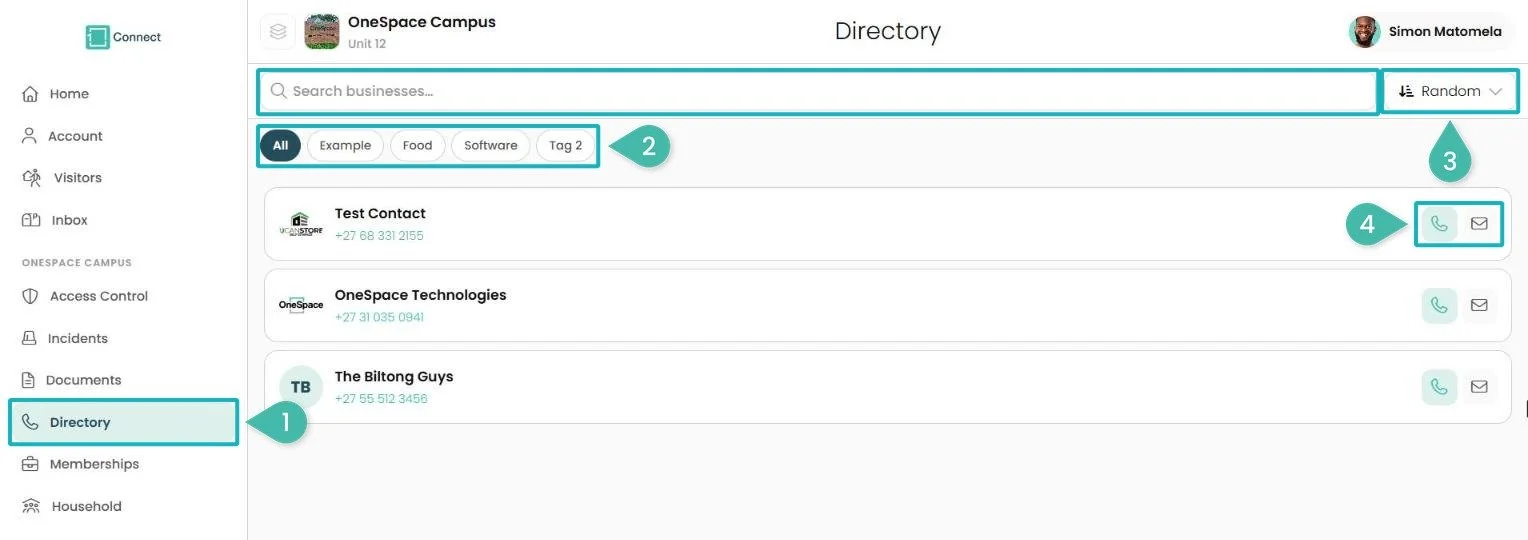
The Directory
Click Directory in the sidebar.
Type in Search businesses, or click a category to filter the list.
Use the sort menu to change the order of the list.
Click the phone icon to call a business, or the envelope icon to email it.
App Health and About
Previous version: View the previous User Portal Web User Guide (this section is new)
App health
Good to know
Something not working? Check App health first. If everything shows OK, contact OneSpace support (see Support below).
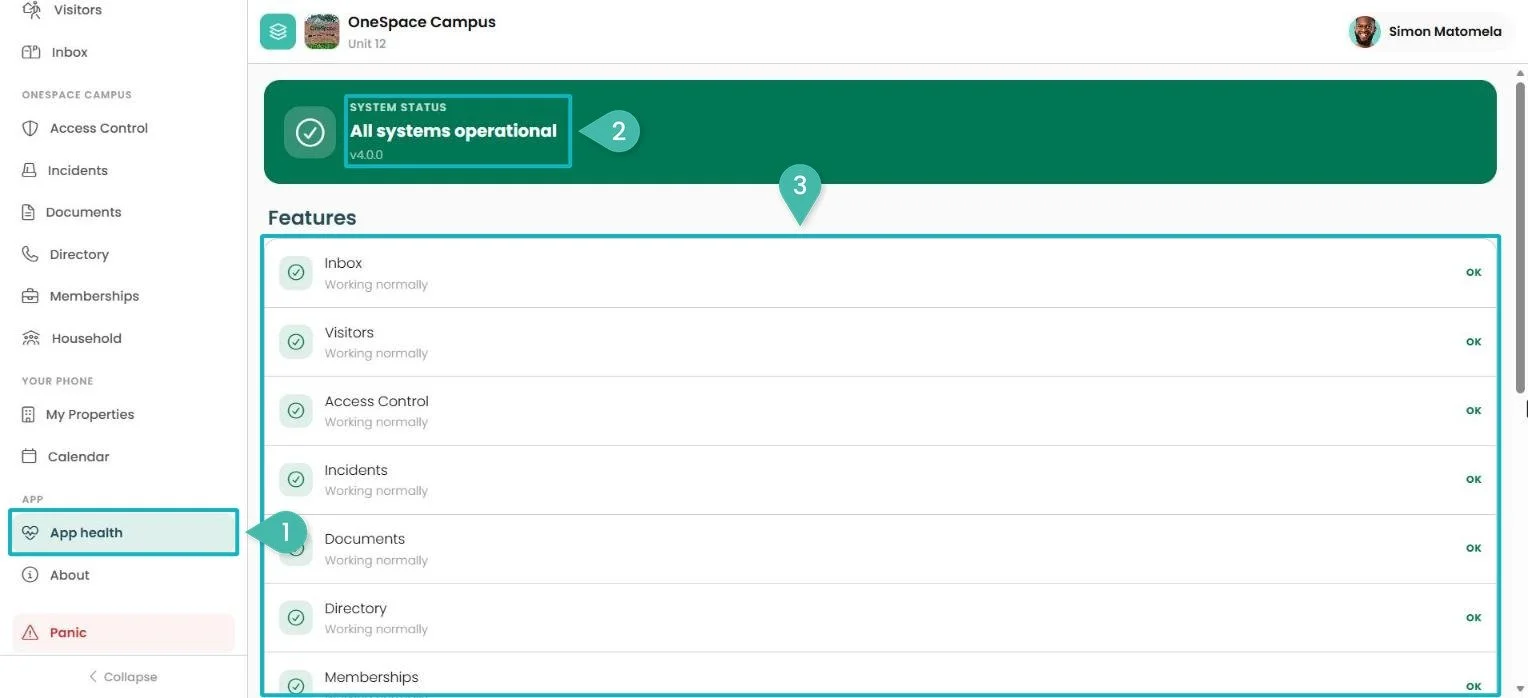
App health
Click App health in the sidebar.
System status shows whether all systems are operational, and the version of Connect Web.
Features lists each part of Connect (for example, Inbox, Visitors and Access Control) and whether it is working normally.
About
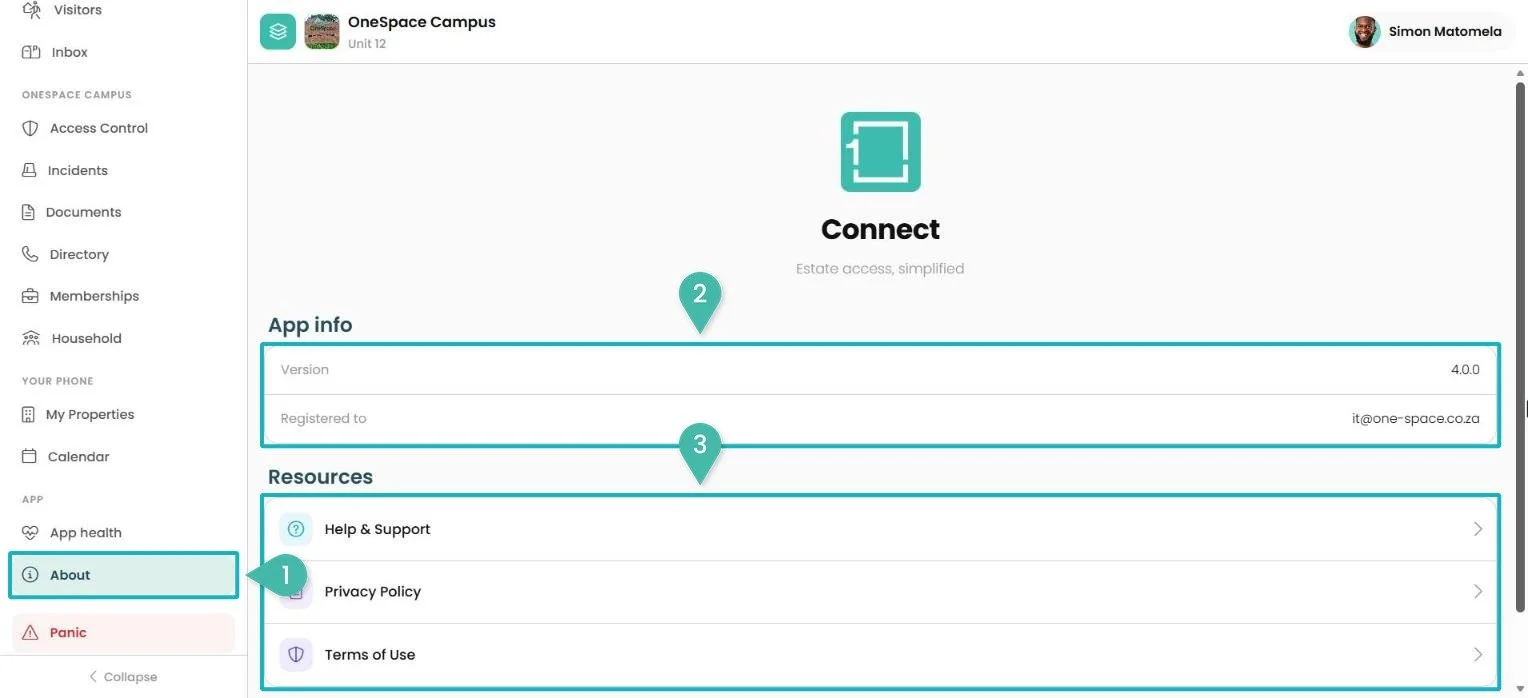
About Connect
Click About in the sidebar.
App info: the version and the account it is registered to.
Resources: Help & Support, Privacy Policy and Terms of Use.
Connect Web and the Connect App
Previous version: View the previous User Portal Web User Guide (this section is new)
Connect Web and the Connect app use the same account and the same information. A few features need your phone:
Open gates and doors with Bluetooth (gateway tile, Bluetooth® Access, Shake to open, Arrival chime)
Connect app: Yes · Connect Web: No. Use the Connect appRequest an access method (including Bluetooth Phone)
Connect app: Yes · Connect Web: YesVisitors, deliveries and favourites
Connect app: Yes · Connect Web: YesChoose visitors from your phone's contacts
Connect app: Yes · Connect Web: No. Type the details inUpdate Face ID and Scan ID from your Account
Connect app: Yes · Connect Web: No. Use the Connect appIncidents, Inbox, Calendar, facility bookings, Memberships, Documents, Directory and Household
Connect app: Yes · Connect Web: YesPanic
Connect app: Yes (SOS) · Connect Web: Yes (Panic in the sidebar)App settings (notifications and phone calendar)
Connect app: Yes · Connect Web: No
Support
Need help with Connect Web? Contact OneSpace:
Head Office: OneSpace Campus, 2 Woodside Avenue, Kloof
Email: Support@one-space.co.za
Phone: (+27) 31 035 0941