

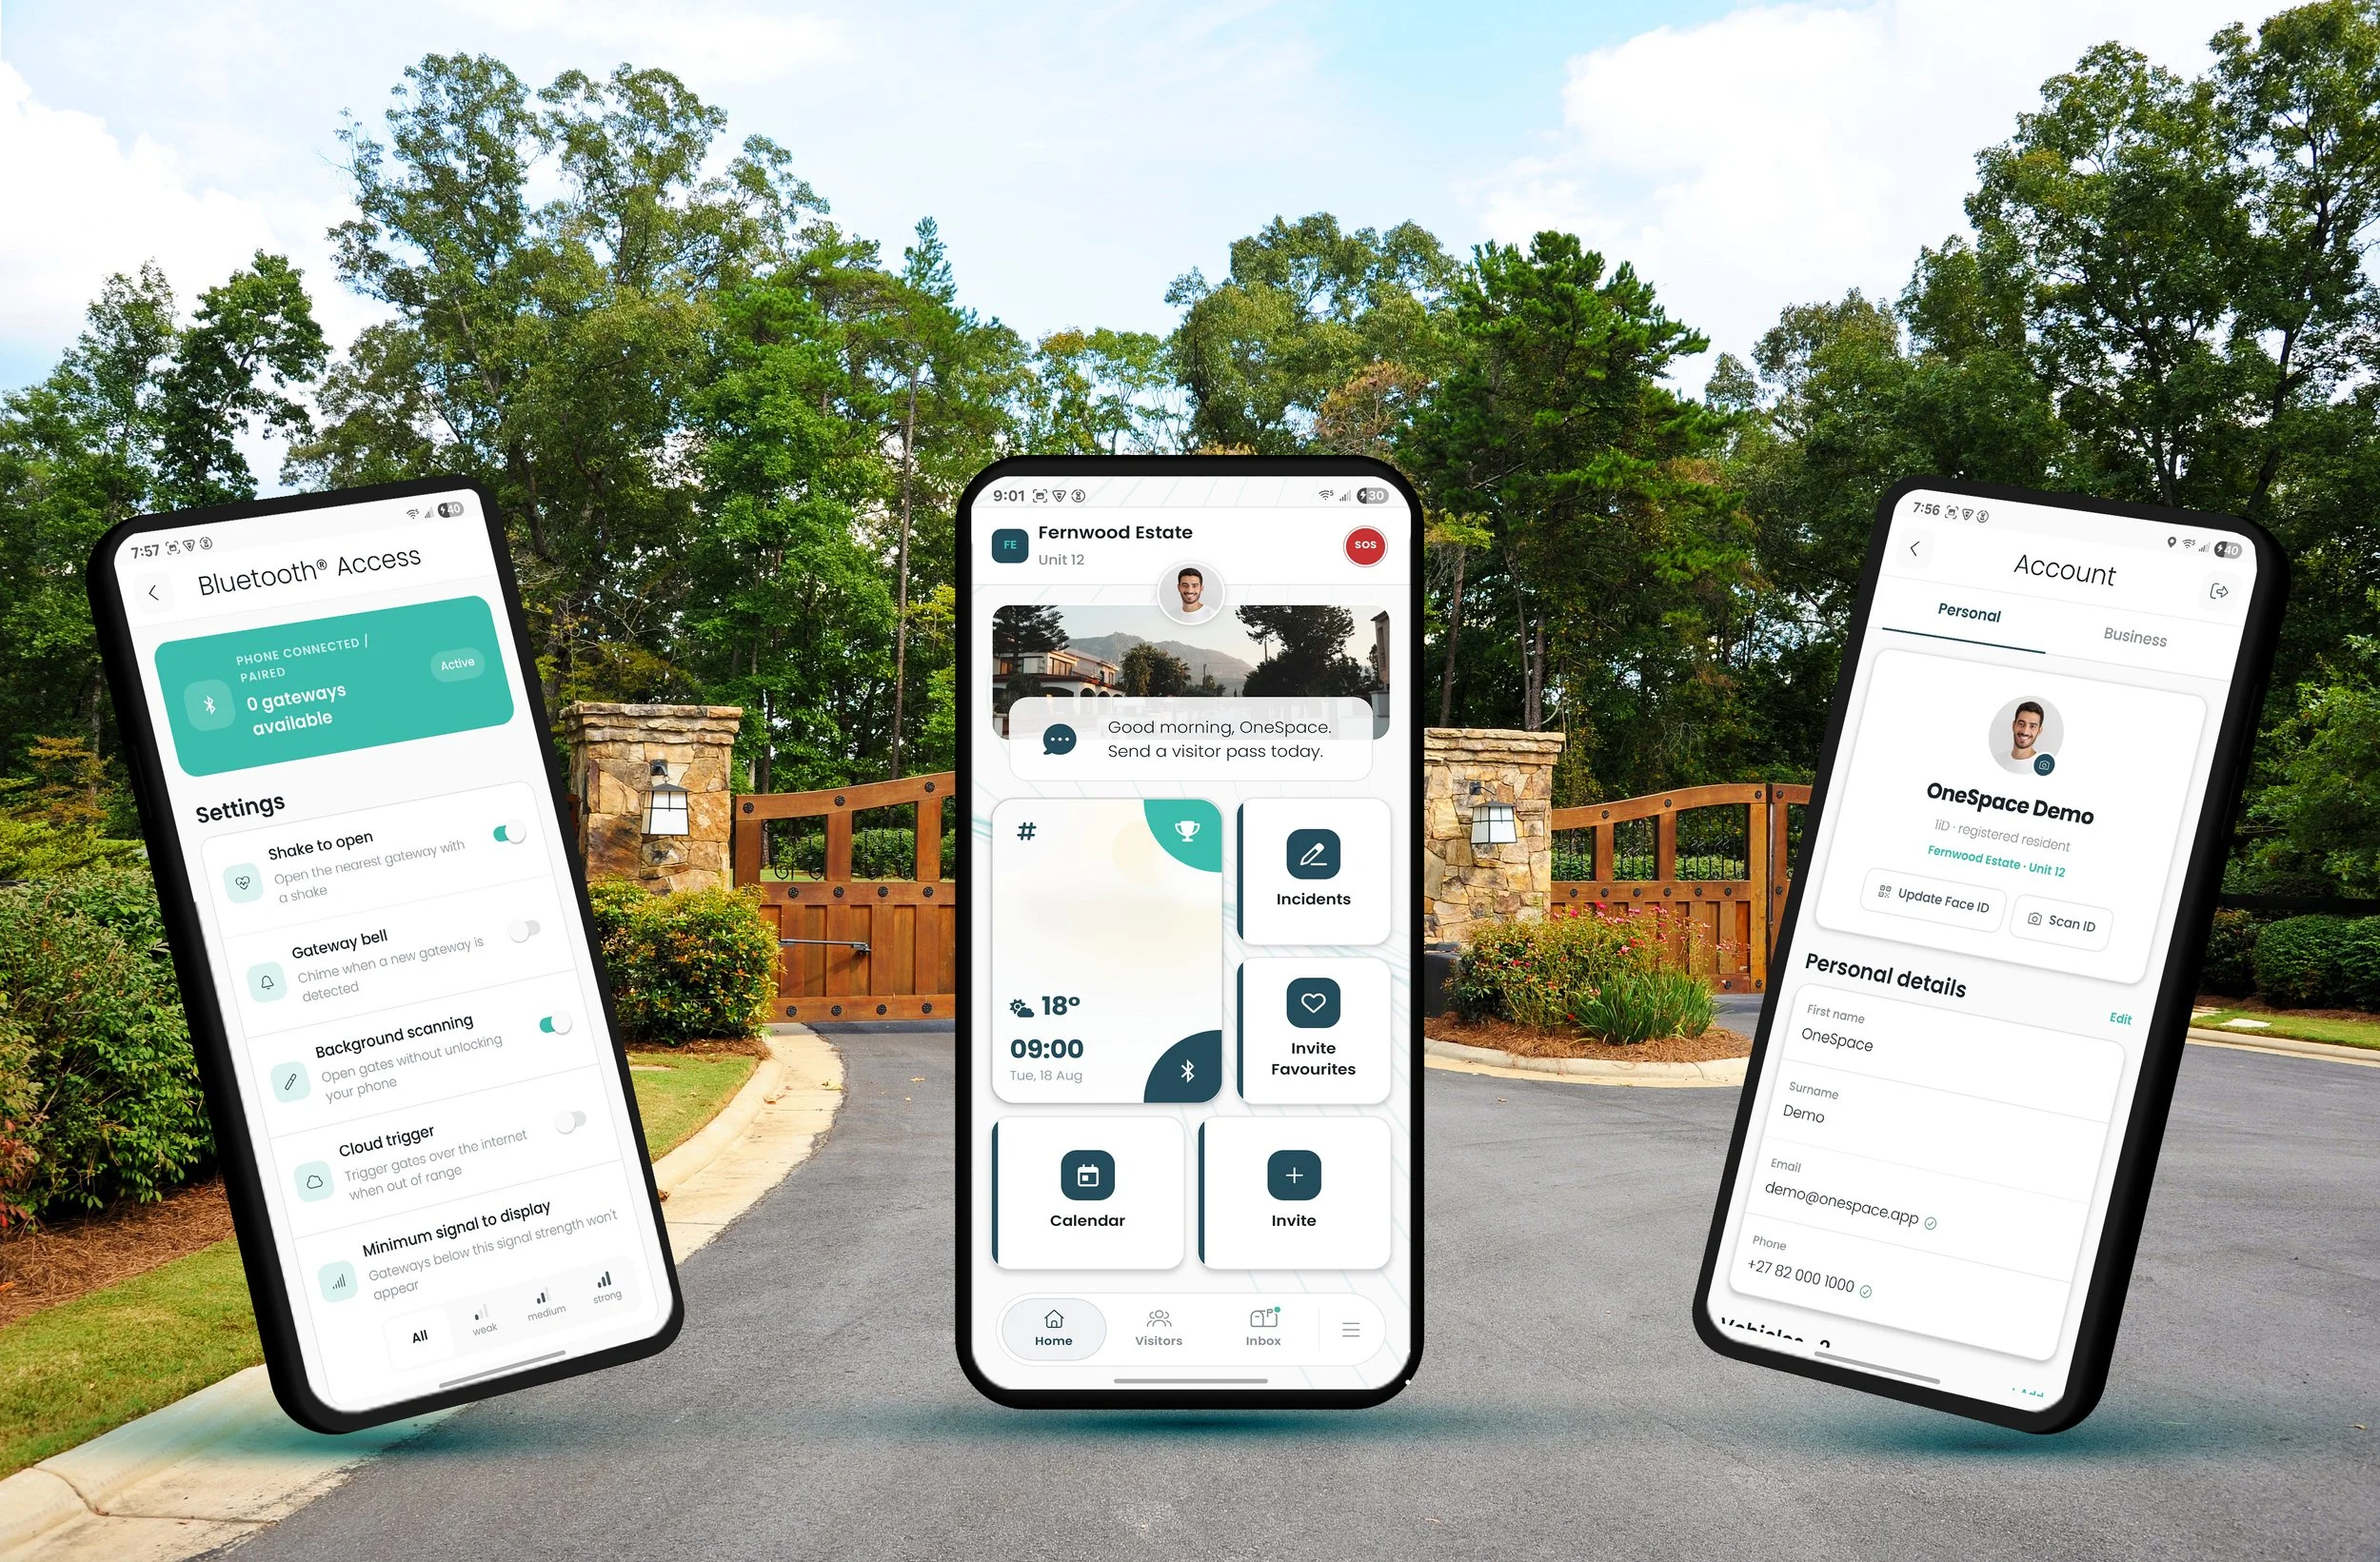
Connect App User Guide


Using the previous version of the app? View the previous Connect App User Guide
Downloading the Connect App
Download the OneSpace Connect App from your phone’s App Store.

Minimum specifications:
Android V5 (Lollipop) or higher

Minimum specifications:
iOS V11 or higher

Minimum specifications:
Android V5 (Lollipop) or higher
Note: The OneSpace Connect App requires the smartphone to be running a current version of the operating system.
Setup
Once the app is downloaded and installed. Proceed with opening the app. You should now be on the Login page.
Login
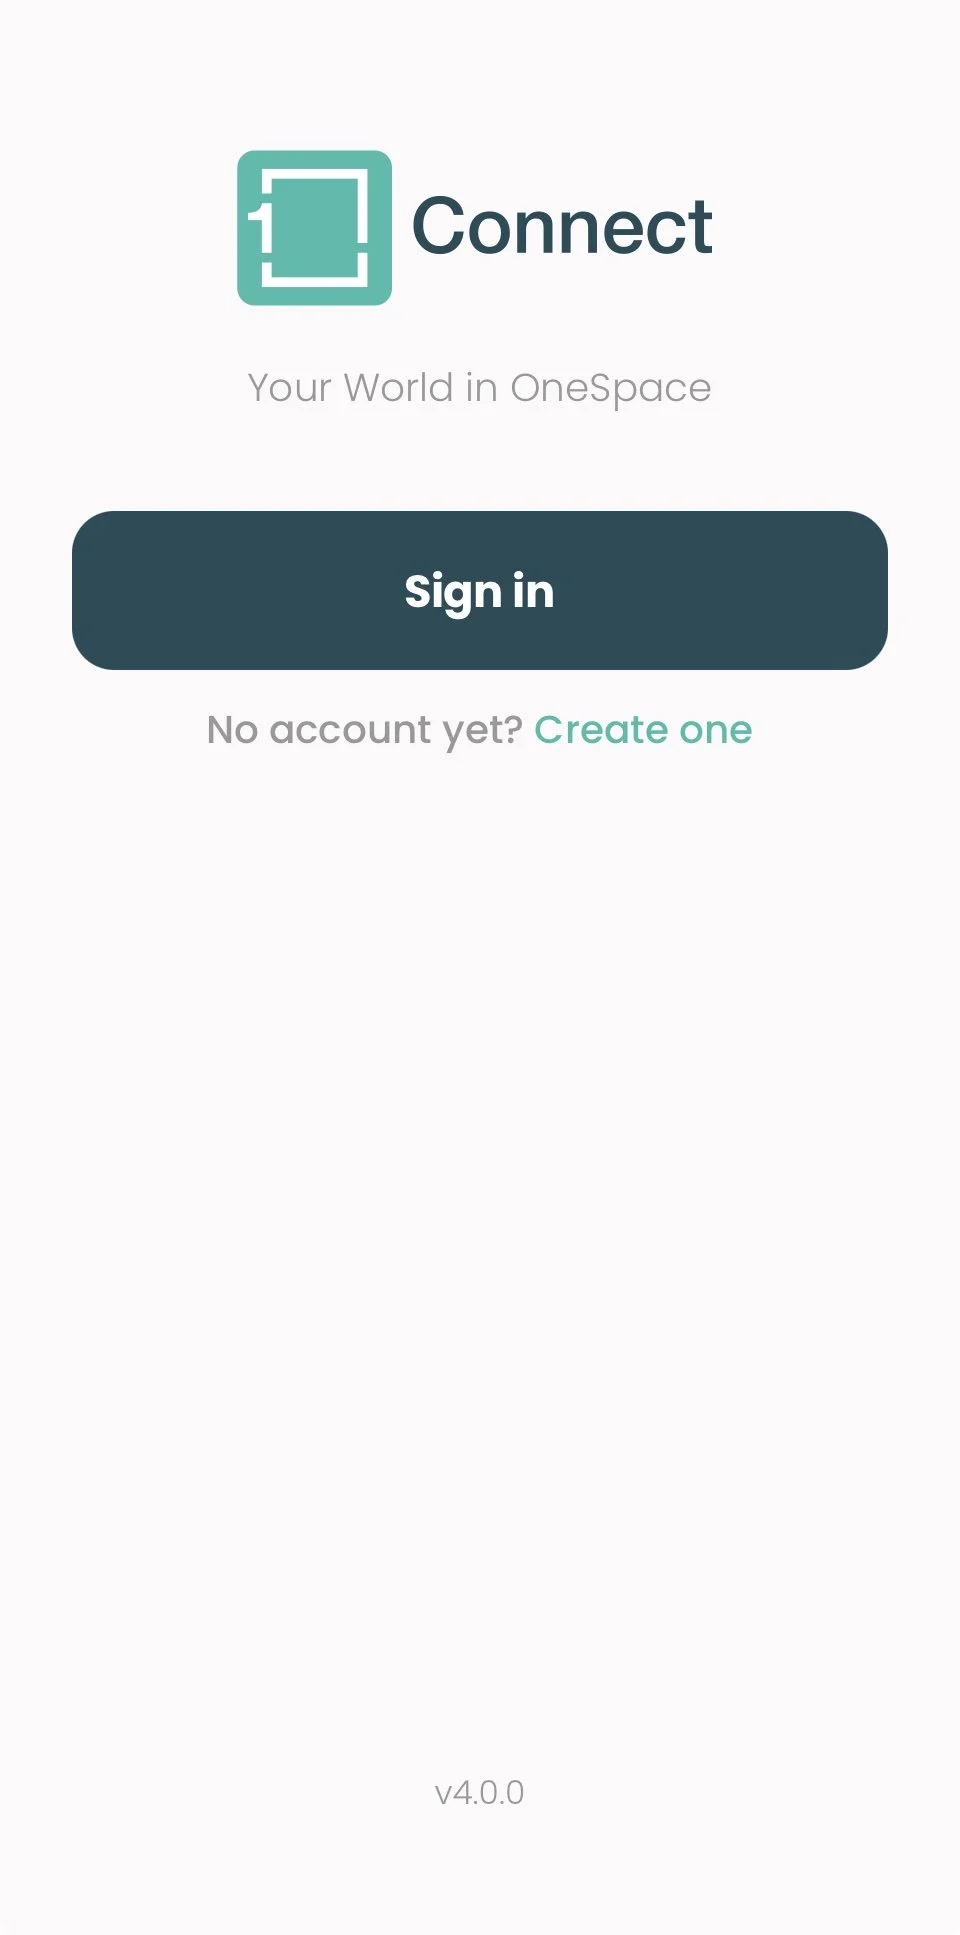
OneSpace Connect App uses a user ID system, meaning that you will have the same account details to access any of our products.
If you have an existing account, enter your phone number or email address in the username field, enter your password and press Login.
If you have not logged in before, select Register.
Register
After pressing Register, complete the following steps:
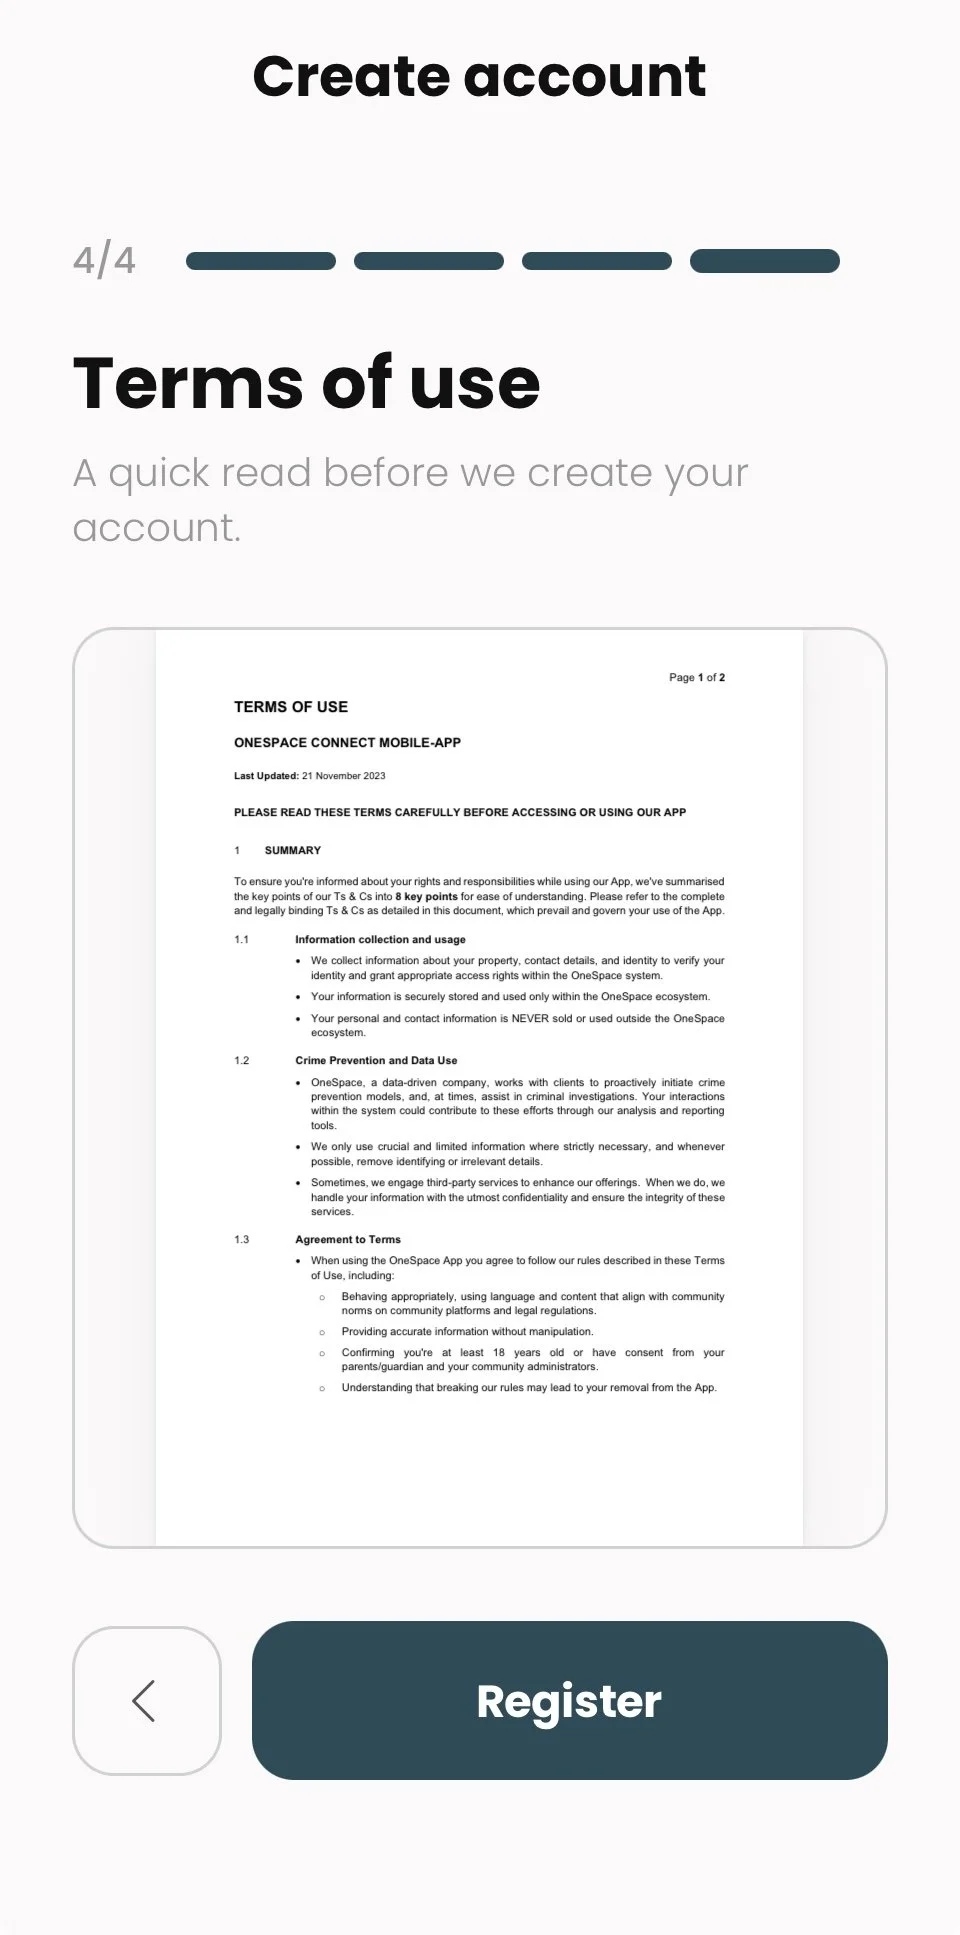
Read and Accept the app terms & conditions.
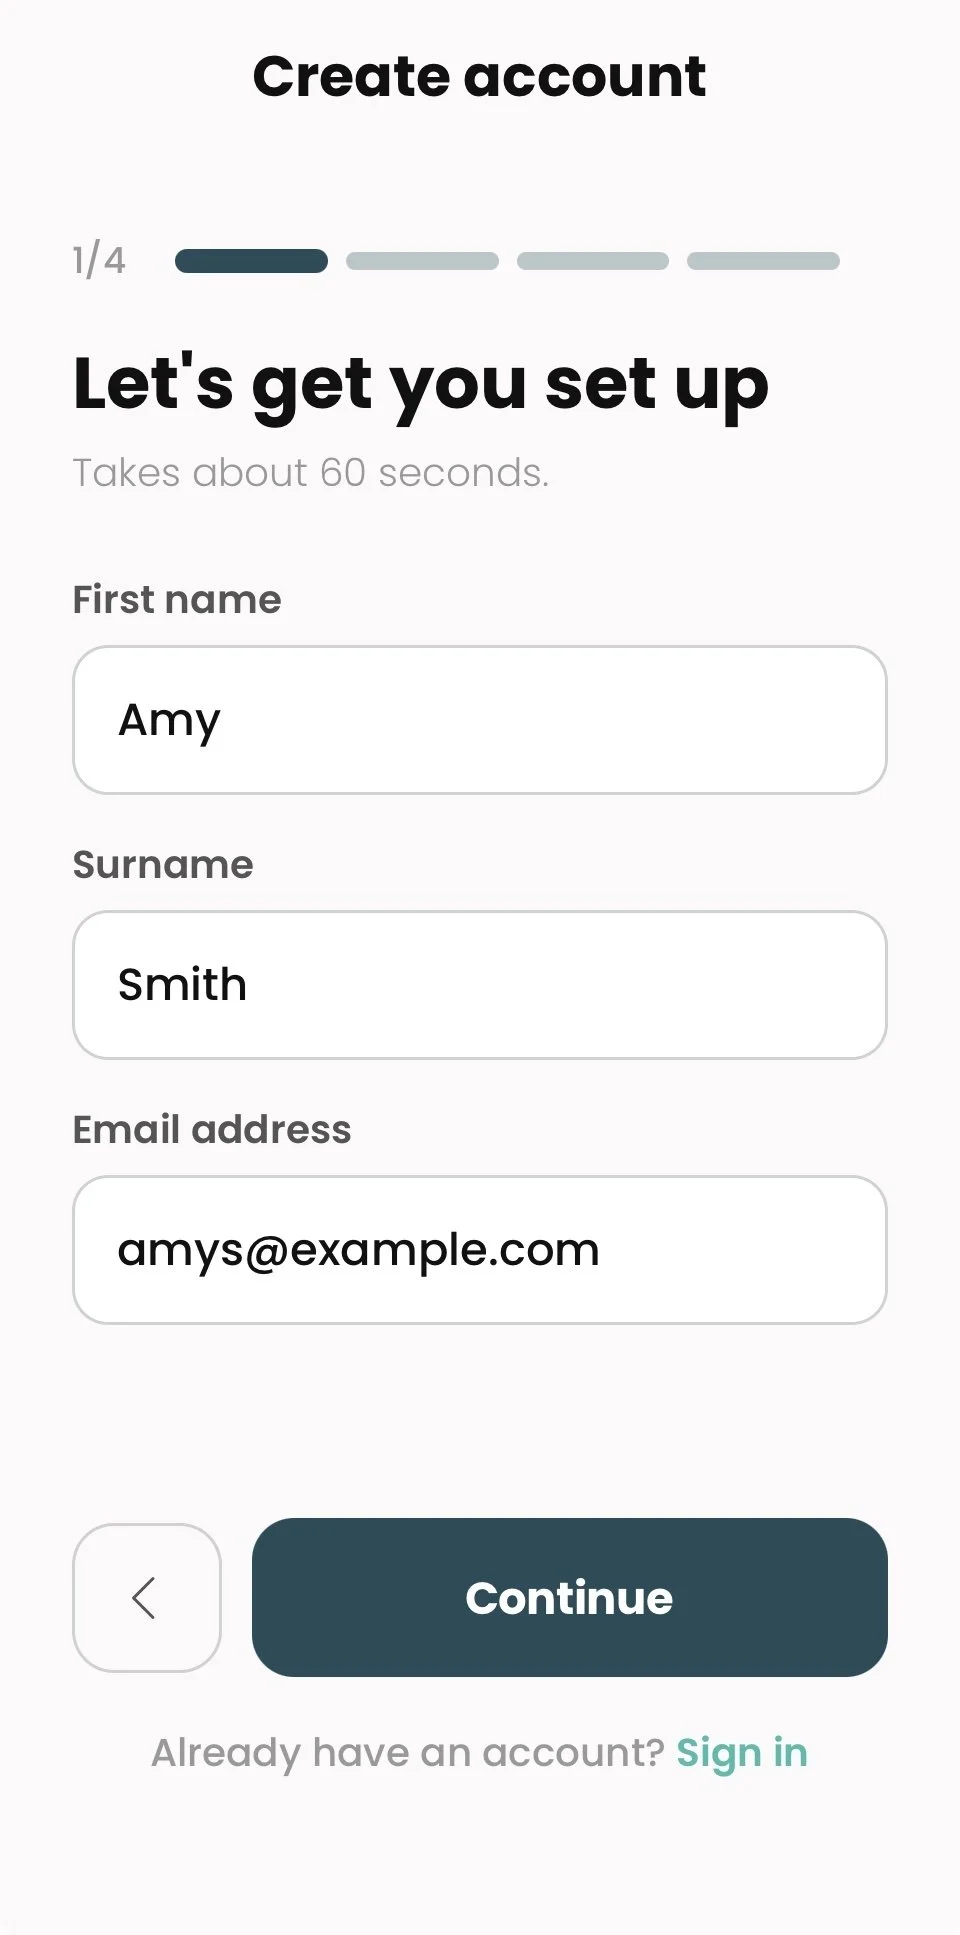
Enter your Name, Surname and Email then press Next.
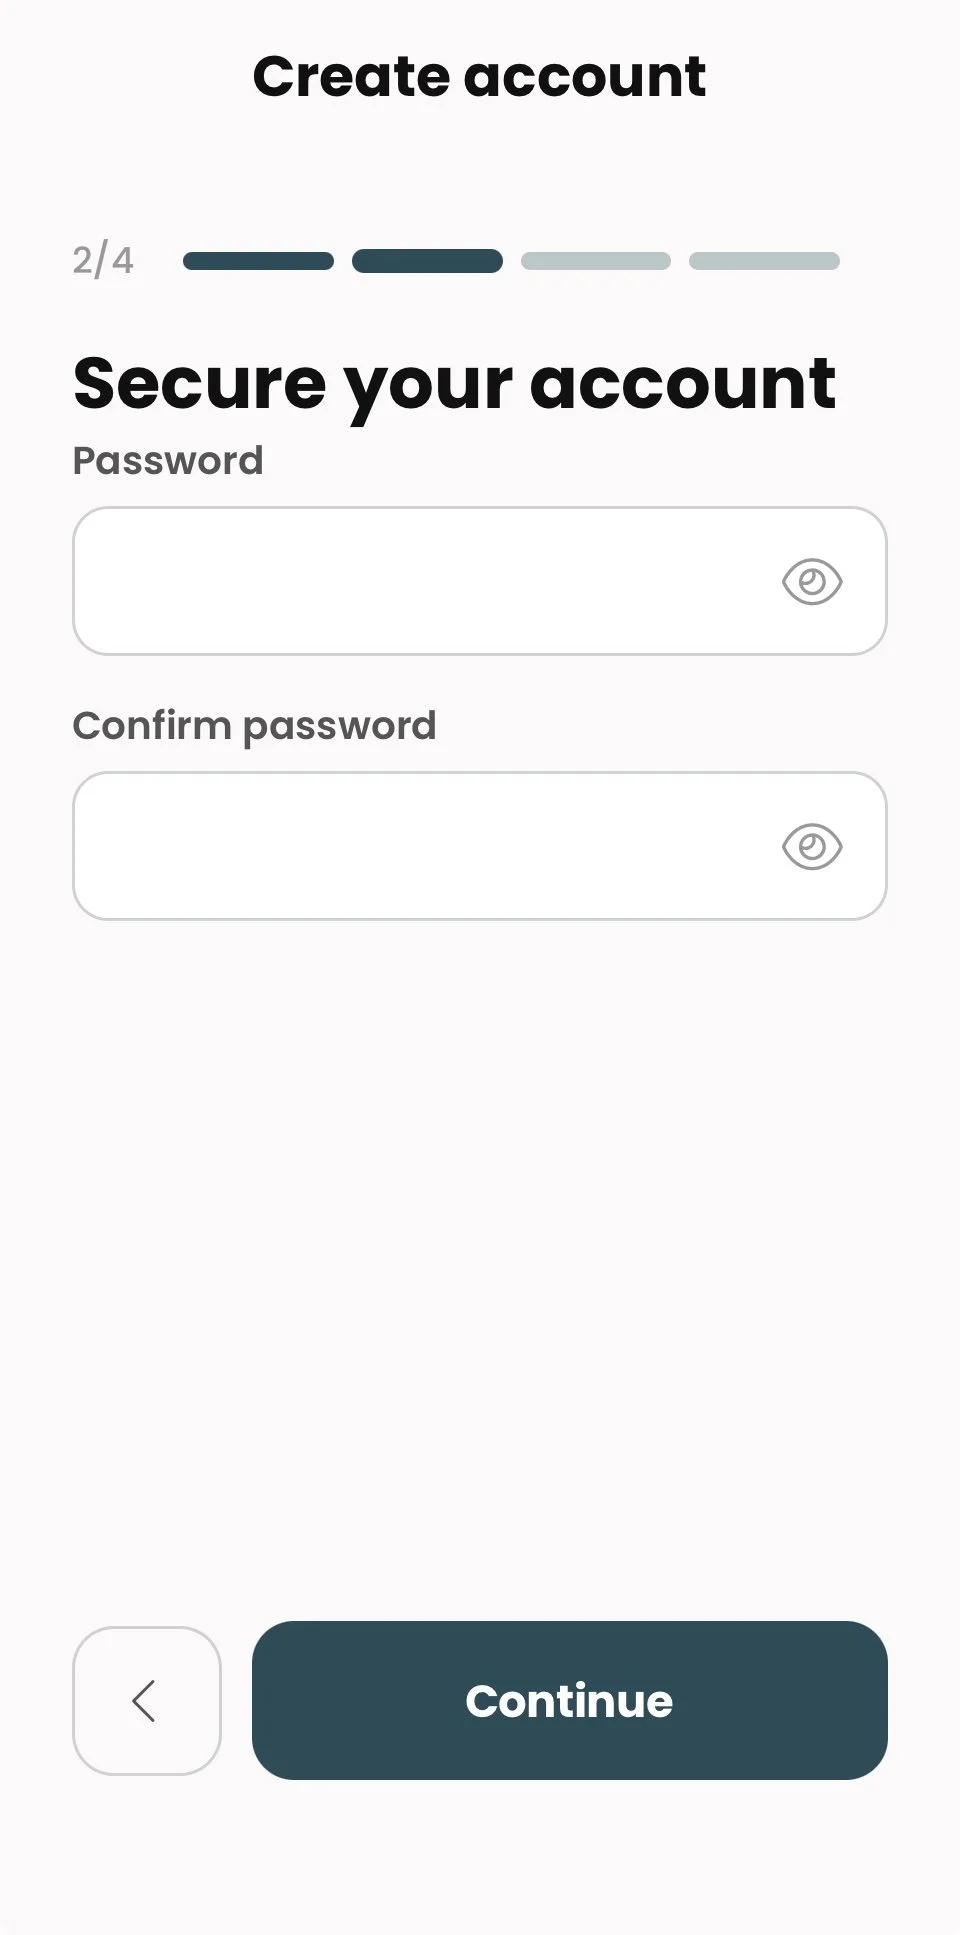
Create a password for your account (minimum 6 character/digits), enter it again in the second field to confirm it, and press Next.
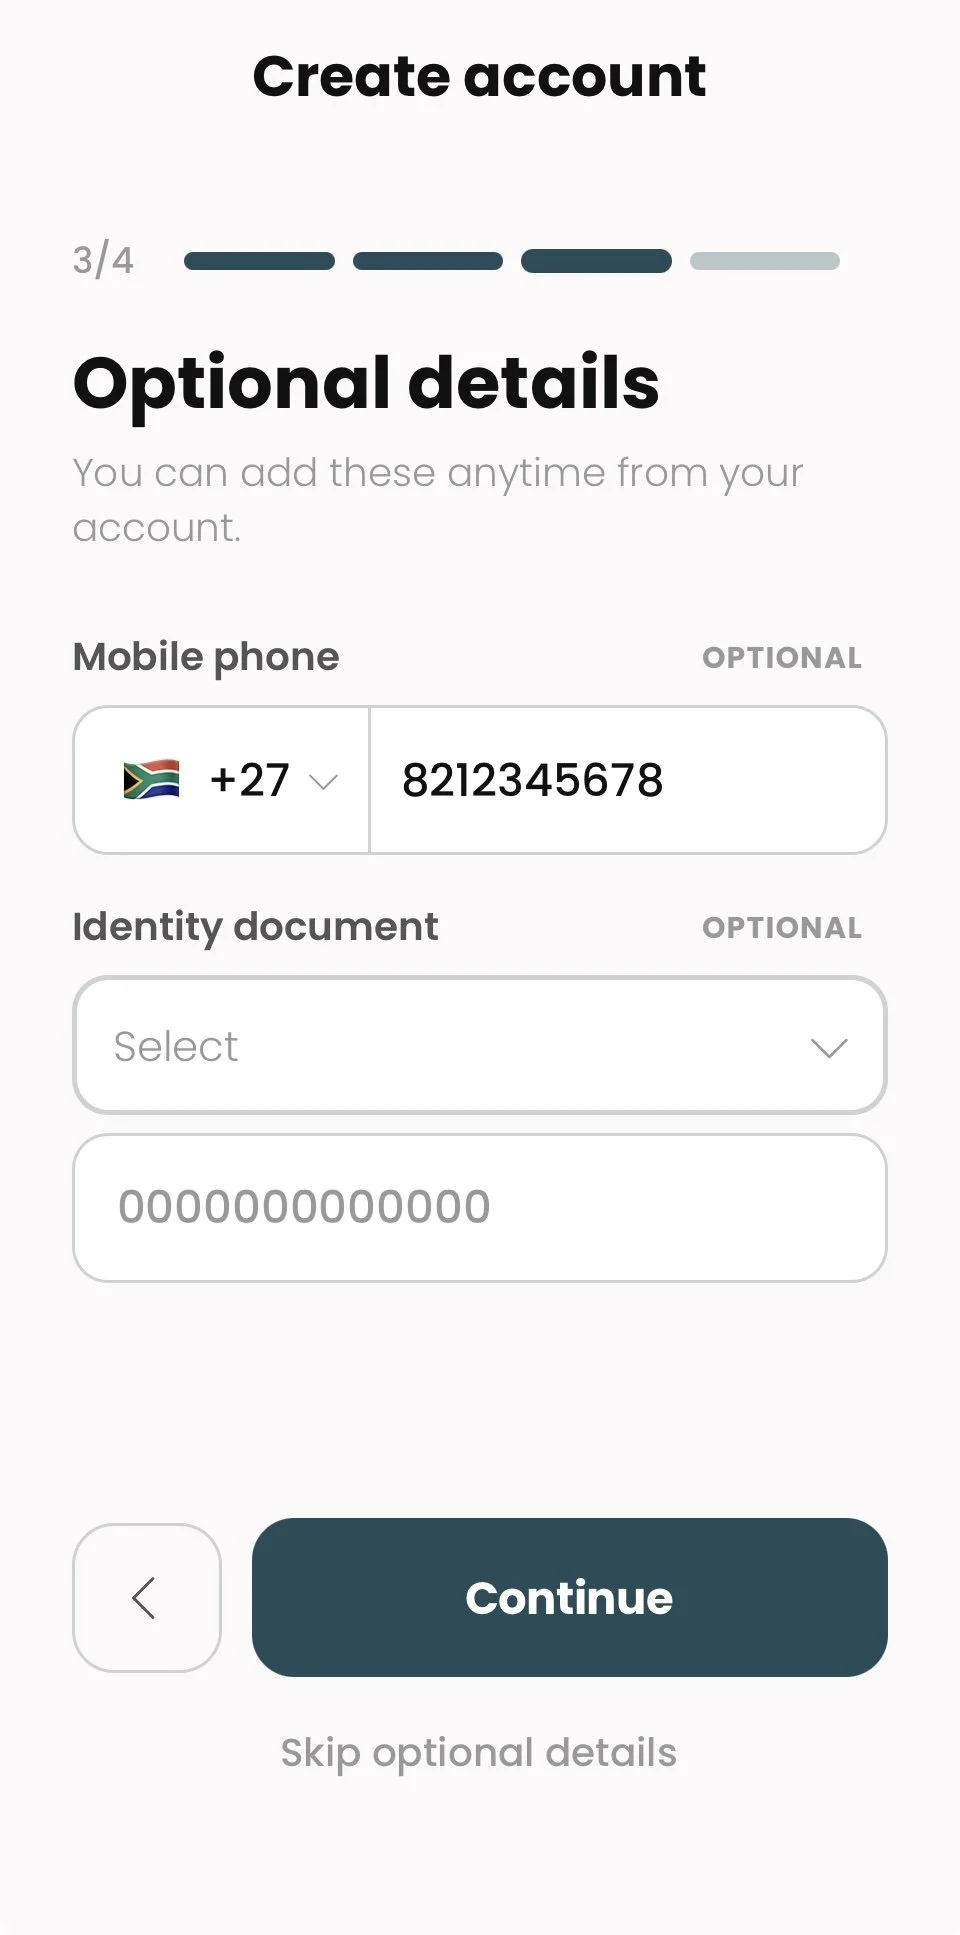
You may enter either your ID or Passport Number. This is entirely optional.
Then select Next.
Getting Around the App
Previous version: View the previous Connect App User Guide (this section is new)
The Home screen
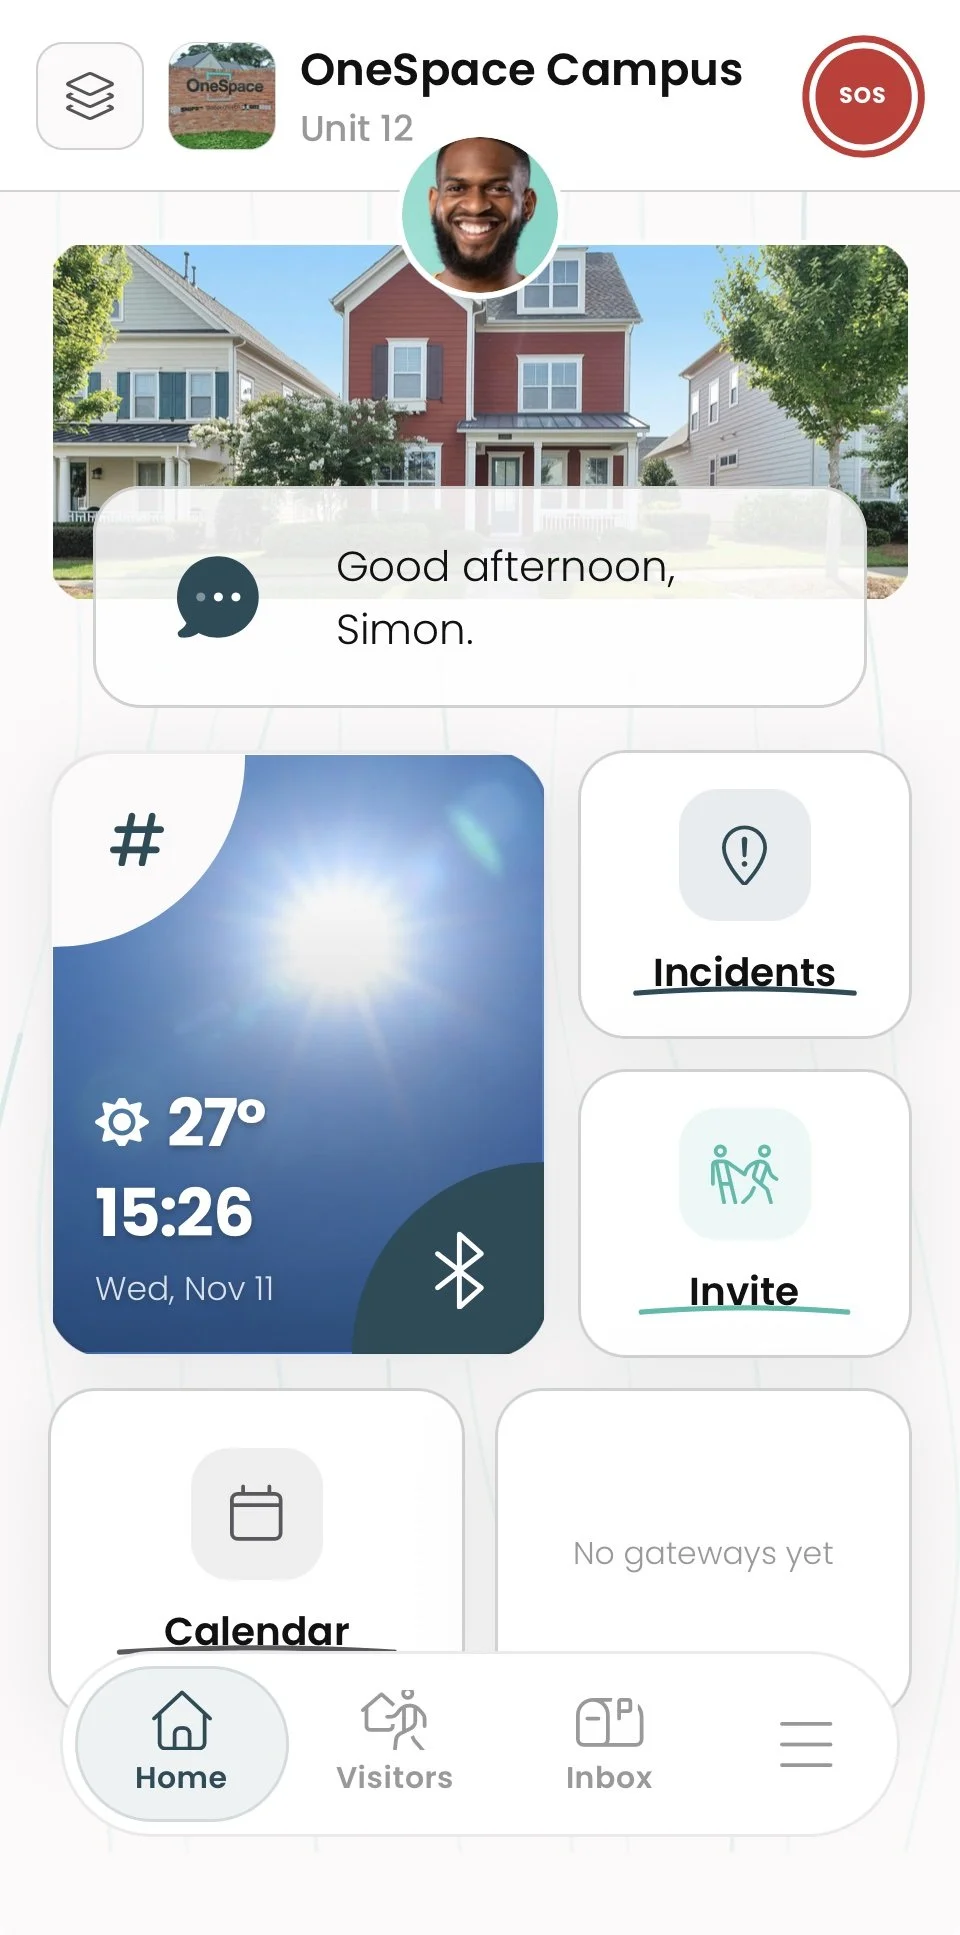
The Home screen has a new look. Here's what each part does:
Current site (top left, above your profile photo): the site you are currently using. Tap the site name to choose another site.
Select all Sites (layers button, top left): selects all the sites you are enrolled at.
SOS (top right): sends a panic alert.
Your profile photo: opens your Account.
Greeting: a quick message or suggestion for your day.
Notice tile: the weather, date and time, and your latest notice.
Incidents, Invite and Calendar tiles: shortcuts to report an incident, invite a visitor or see what's on.
Gateway tile: the gates and doors near you that you can use with your phone. It shows No gateways yet when none are available.
The bottom bar and menu
Home: returns to the Home screen.
Visitors: your visitor passes and invites.
Inbox: messages and notices from your site.
Menu (☰): opens your profile, your site's services (Access Control, Incidents, Documents, Directory, Memberships), your phone (My Properties, Bluetooth® Access and Calendar) and the app settings.
Your Account
Are you using the Previous version of Connect?: Click here to View this section in the previous Connect App User Guide
Watch the below video to learn about how to manage your 1iD Account within the Connect App
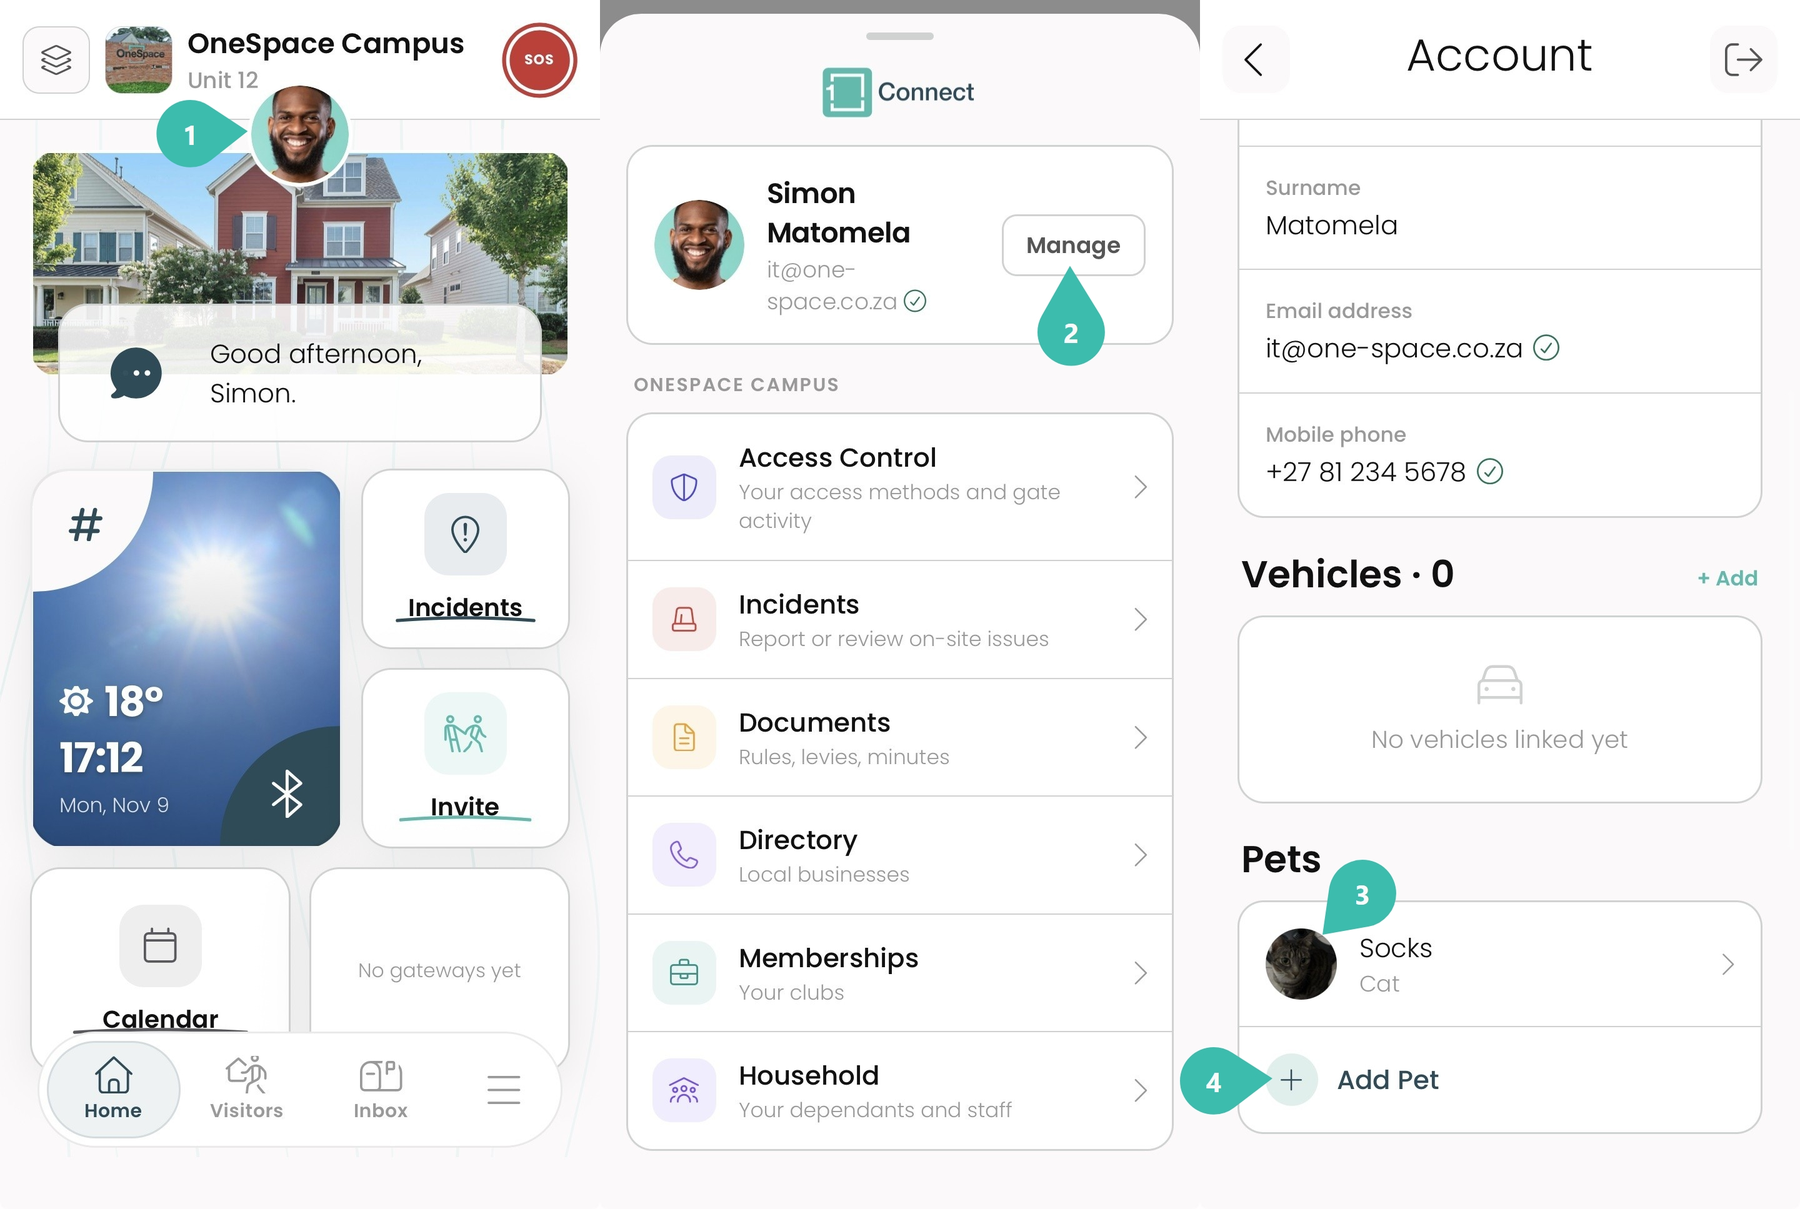
Open your Account from your profile photo on the Home screen to update your details, face, ID and pets.
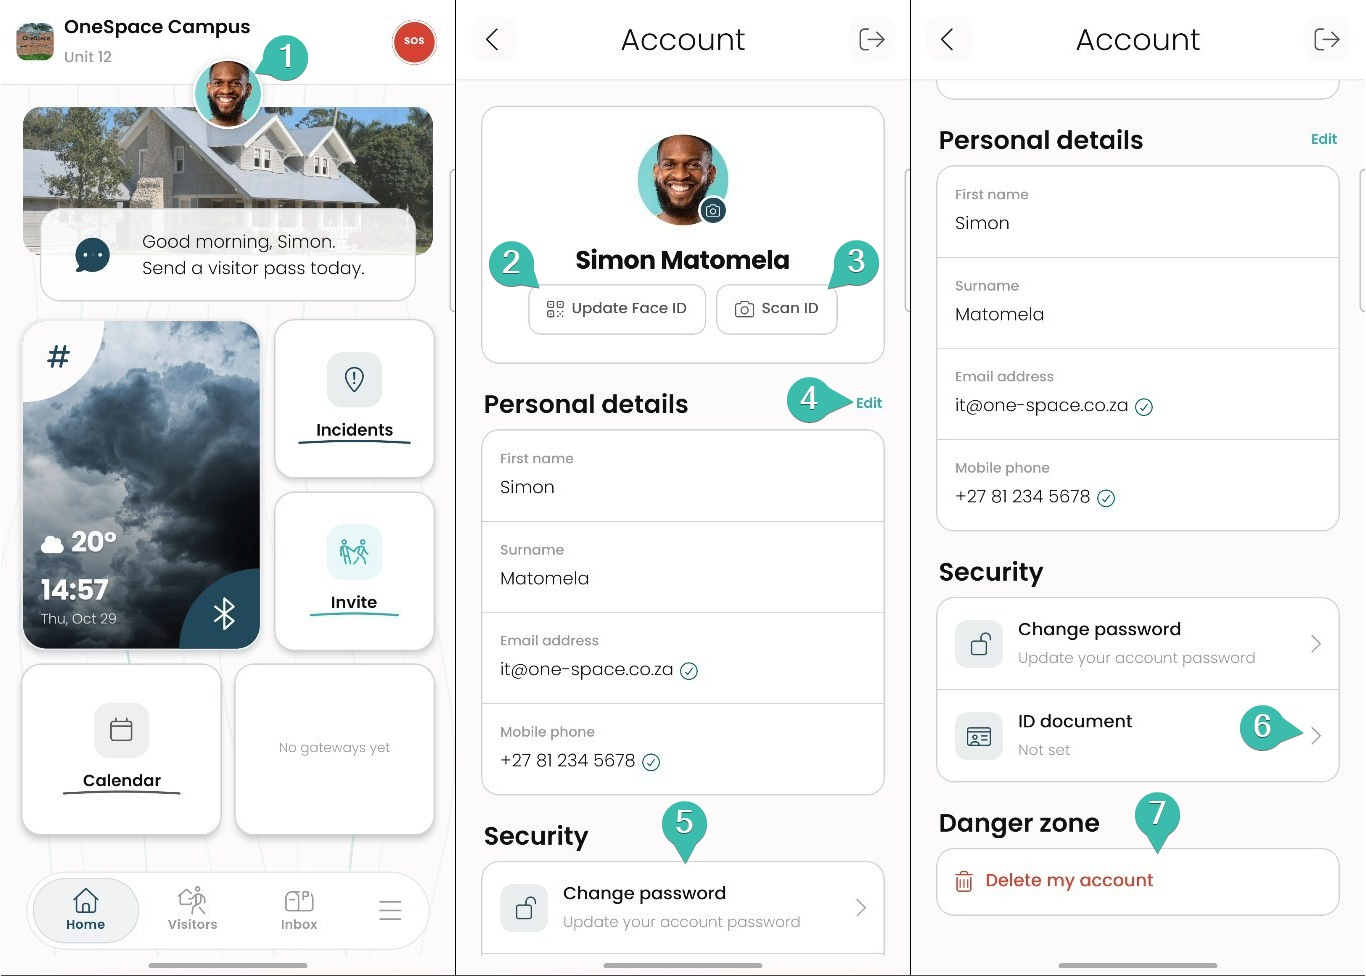
On the Home screen, tap your profile photo to open your Account.
Update Face ID: add or update the face used for biometric access.
Scan ID: scan your identity document.
Edit: change your personal details (first name, surname, email address and mobile phone).
Change password: see Change your password below.
Pets: add and view your pets. See Your Pets.
ID document: add or view your identity document details.
Delete my account: permanently removes your account. Only use this if you no longer need Connect.
You can change your account password from your Account. Your new password needs at least 8 characters.
Good to know: Connect uses your OneSpace user ID, so changing your password here changes it for all OneSpace products. Pick a password you don't use anywhere else, and don't share it.
Change your password
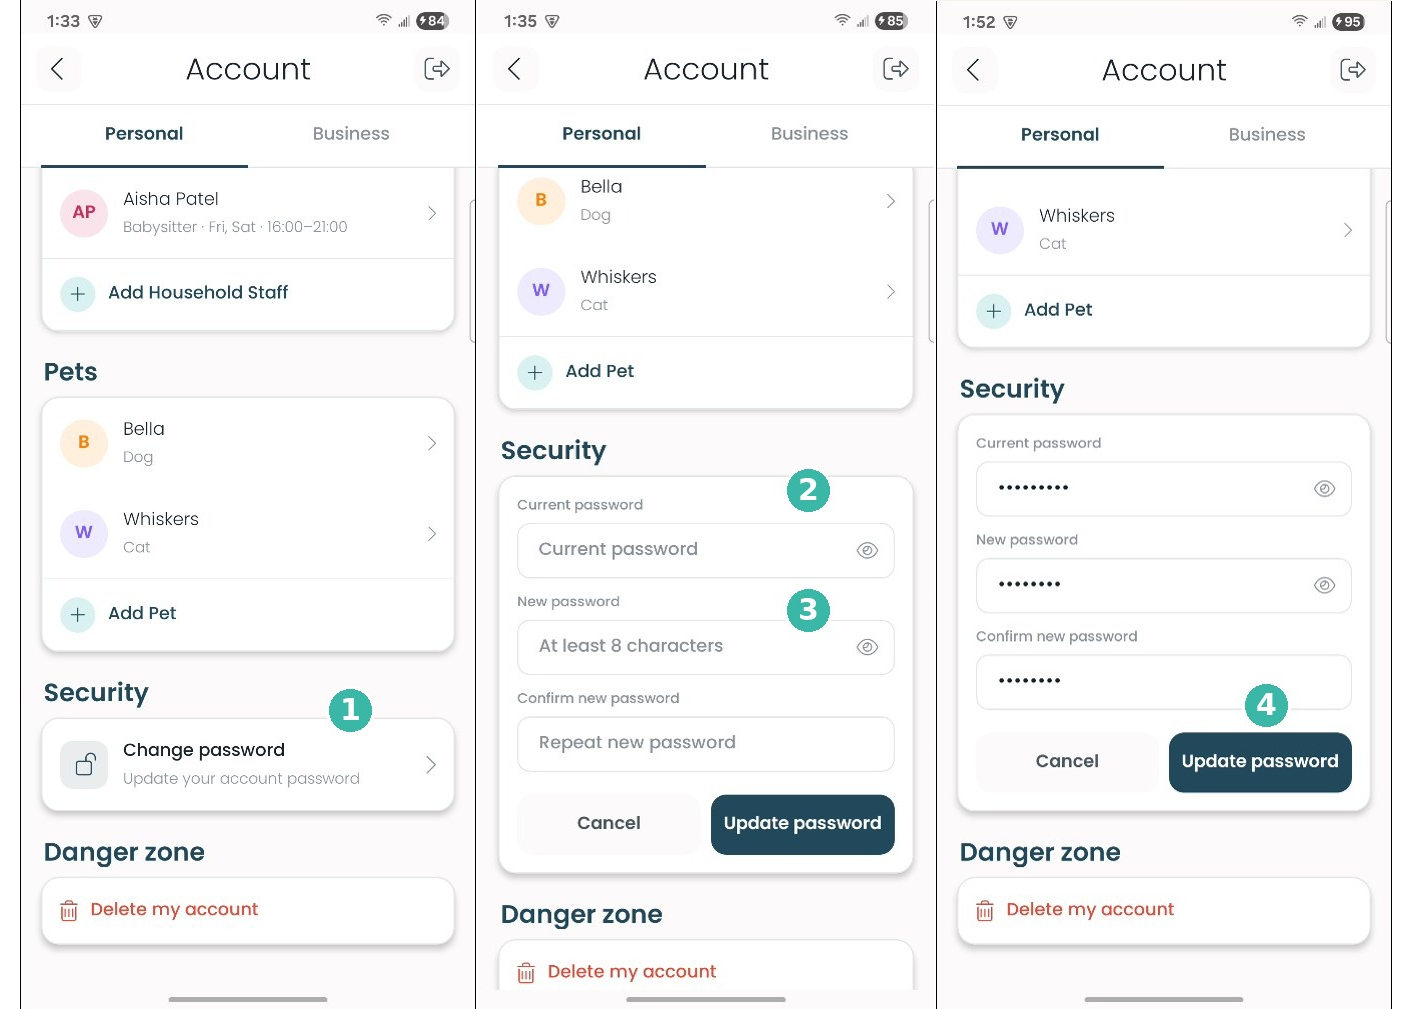
On your Account, scroll to Security and tap Change password.
Enter your current password.
Enter your new password, then repeat it in Confirm new password. Tap the eye icon to check what you typed.
Tap Update password. Tap Cancel to leave your password unchanged.
Your Pets
Previous version: View the previous Connect App User Guide (this section is new)
Your pets are saved to your own profile (your 1iD), so you add and manage them from your Account.
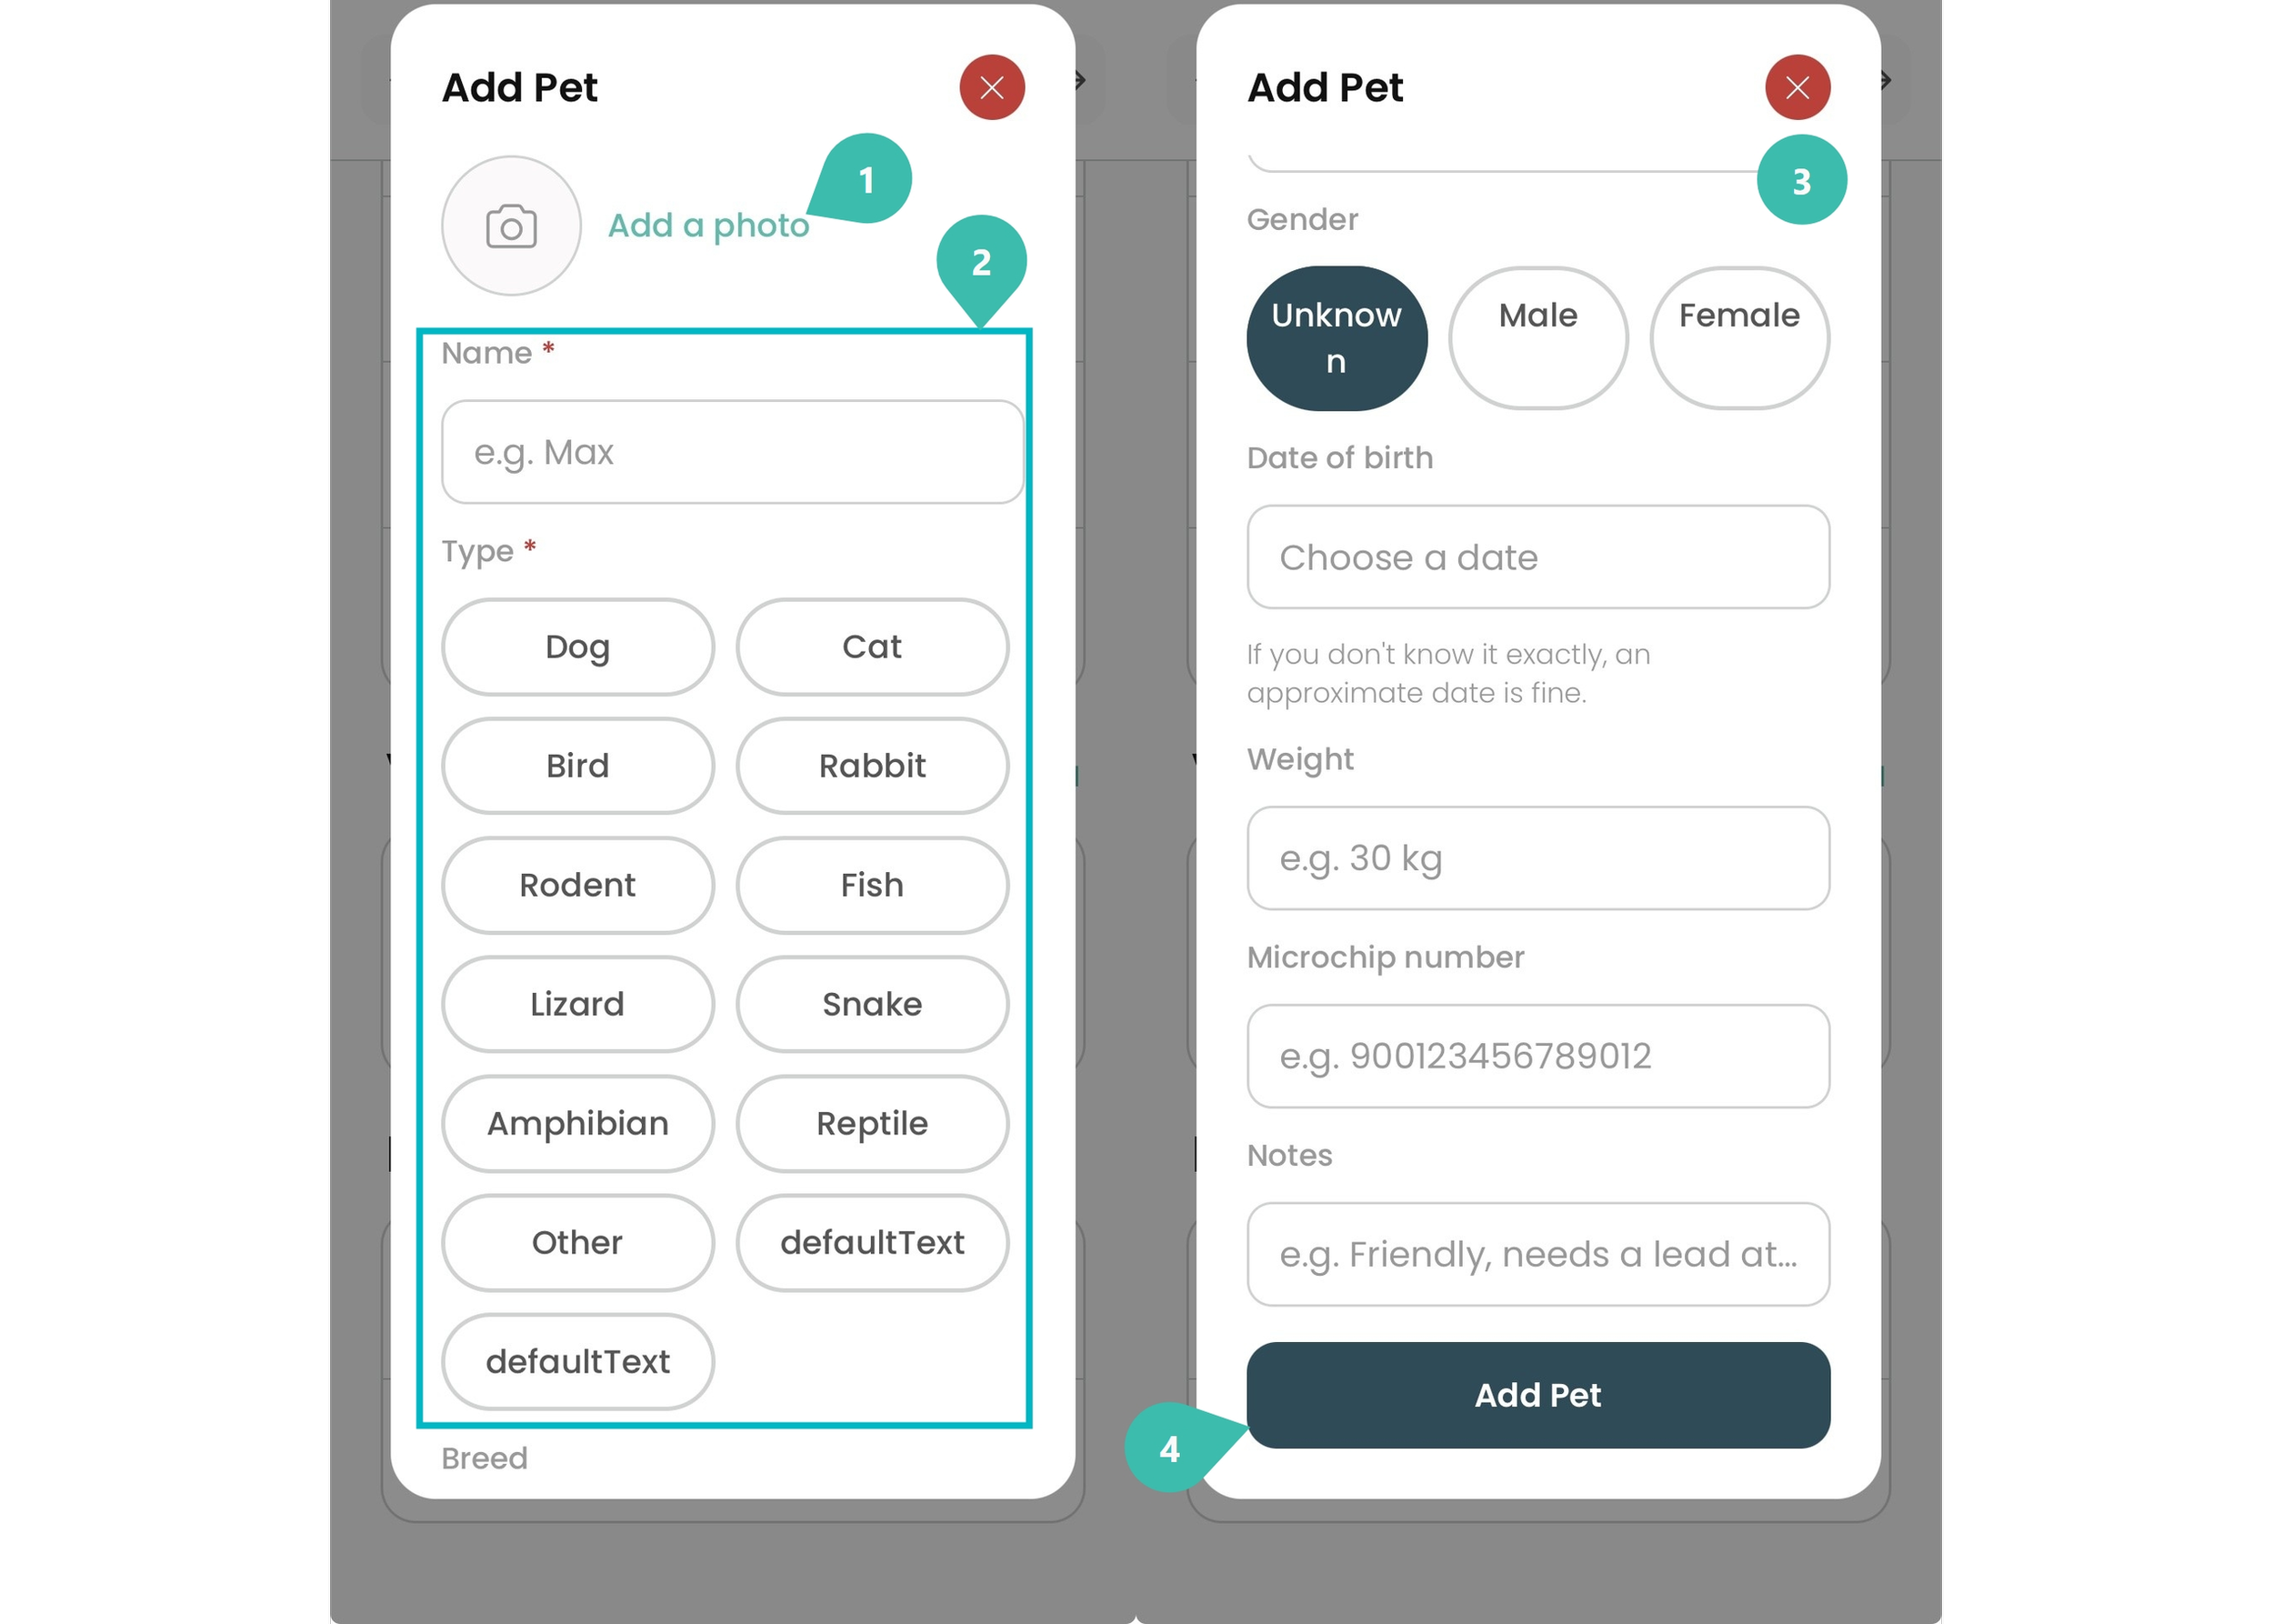
Good to know: Only Name and Type are required (marked *). If you don't know your pet's date of birth exactly, an approximate date is fine. Gender stays on Unknown until you choose Male or Female. Tap the red X to close the Add Pet form without saving.
Open your pets
On the Home screen, tap your profile photo. You can also open the menu (☰) and tap Manage.
On your Account, scroll down to Pets, below Vehicles. Each pet shows its photo, name and type.
Tap a pet to open it.
Tap Add Pet to add a new pet.
Add a pet
Tap Add a photo to add a photo of your pet.
Type your pet's Name and choose its Type: Dog, Cat, Bird, Rabbit, Rodent, Fish, Lizard, Snake, Amphibian, Reptile or Other.
Scroll down and fill in what you know: Breed, Gender (Unknown, Male or Female), Date of birth, Weight, Microchip number and Notes.
Tap Add Pet to save. Your pet now shows under Pets on your Account.
Previous version: View this section in the previous Connect App User Guide
Add your vehicles to your Account so your site can recognise them.
Good to know: Your vehicles are listed with their registration, make, model, year and colour. To remove a vehicle, tap the red bin icon next to it. Tap Cancel to close the Add vehicle form without saving.
Enrol Your Vehicles
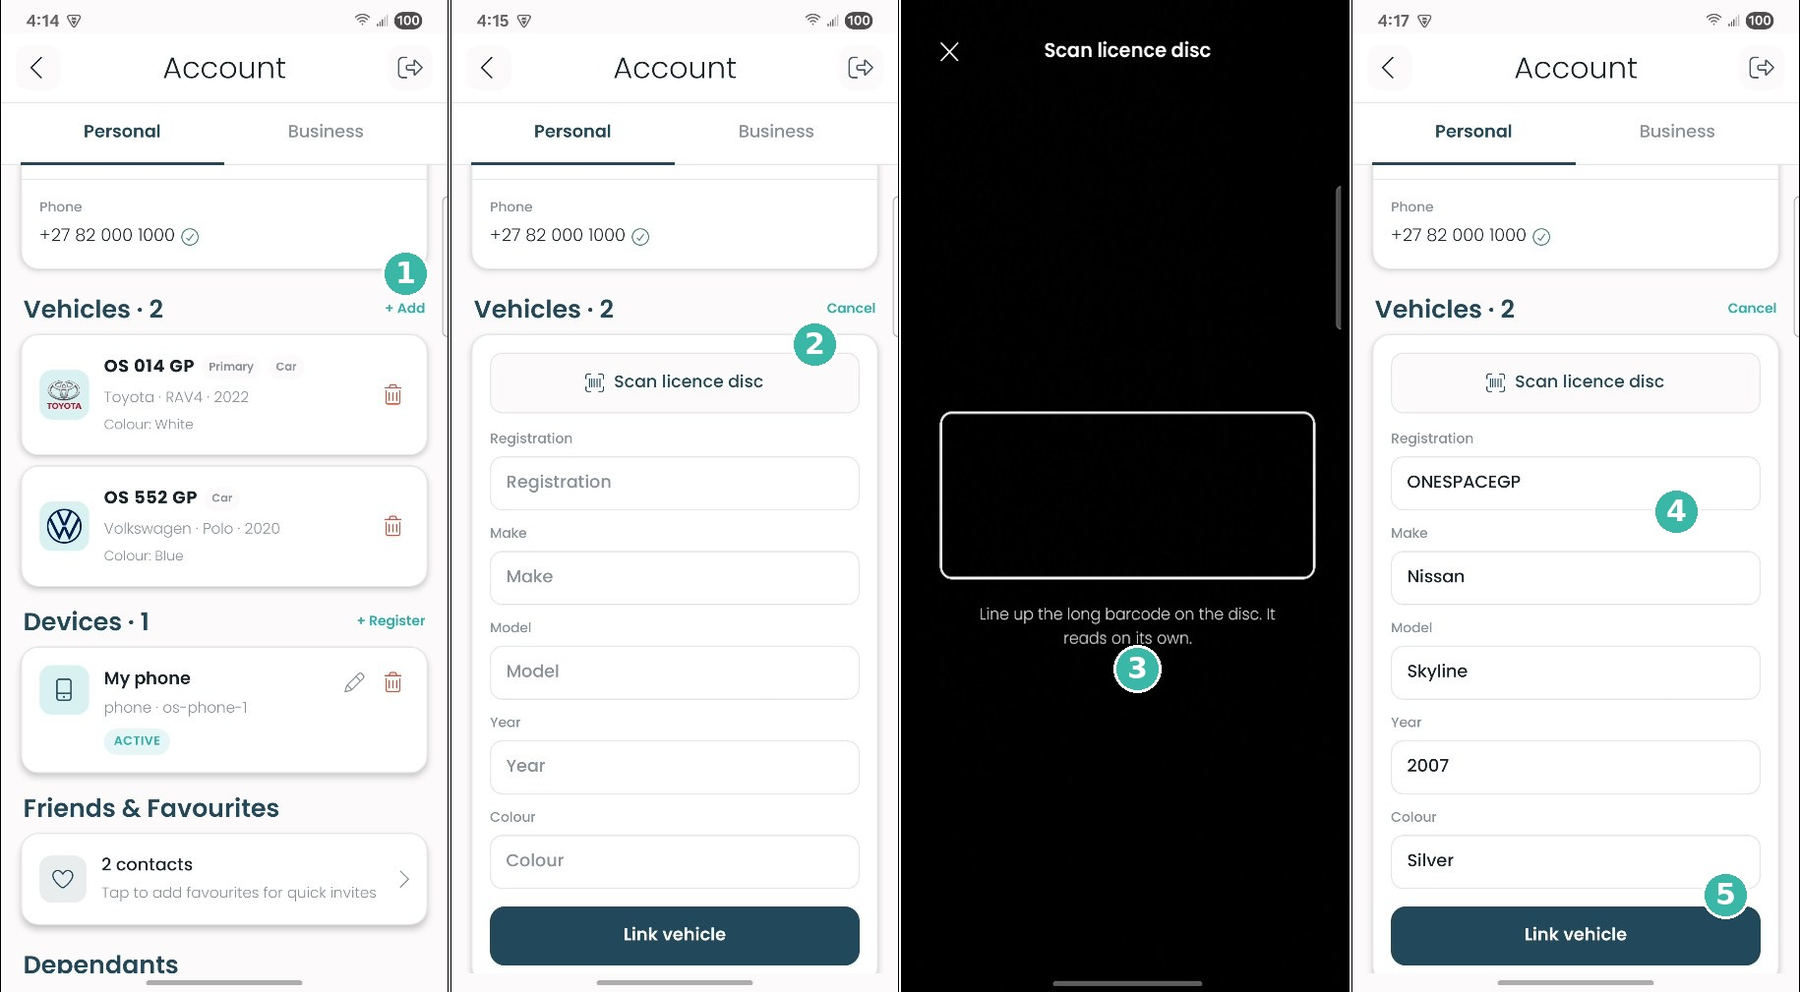
On your Account, go to Vehicles and tap + Add.
Tap Scan licence disc.
Line up the long barcode on the licence disc inside the frame. It reads on its own.
Check the details filled in from the disc: Registration, Make, Model, Year and Colour. Type them in yourself if you can't scan the disc.
Tap Link vehicle. Repeat for each vehicle.
Enrol to a Site and Switch Property
Previous version: View this section in the previous Connect App User Guide
Choose the site you are using, select all your sites at once, or join the estate, office park or building you live or work at.
Good to know: New: the Site Layers filter. The Calendar, Visitors, Incidents and Inbox pages each have a layers button. Tap it to see items from all your sites at once, and tap it again to go back to your current site. Tasks such as inviting a visitor use your current site: the one shown above your profile photo.
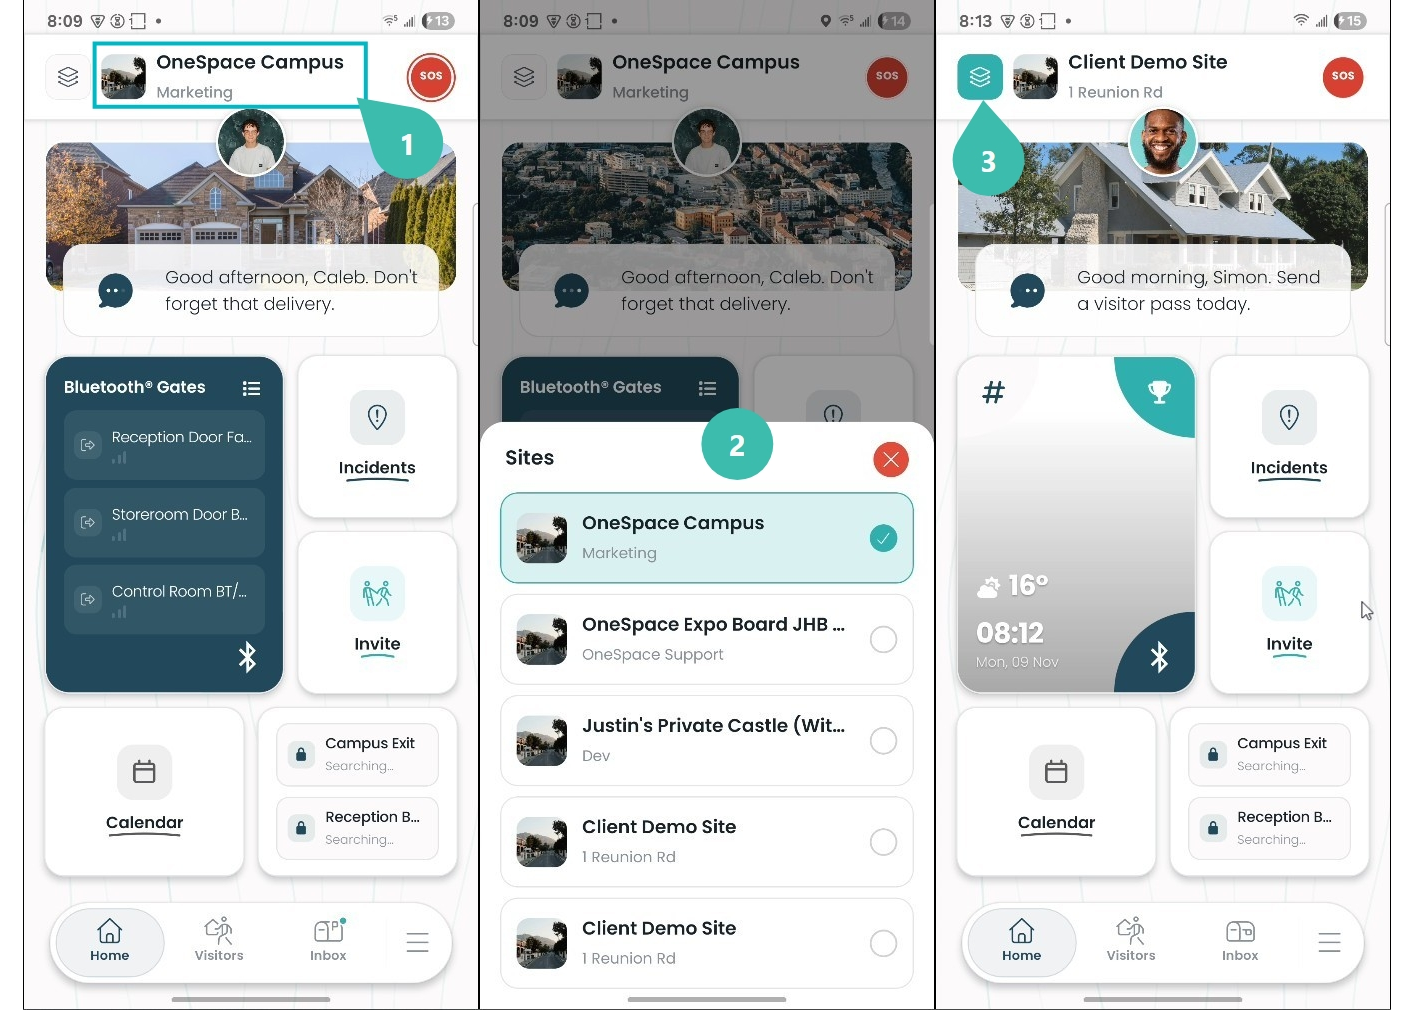
Choose your current site
Your current site is shown at the top of the Home screen, above your profile photo. Tap the site name.
Sites: your sites are listed. Tap one to make it your current site. A tick shows your current site.
Select all Sites: tap the layers button (top left) to select all the sites you are enrolled at. The button turns teal, and it stays on until you tap it again.
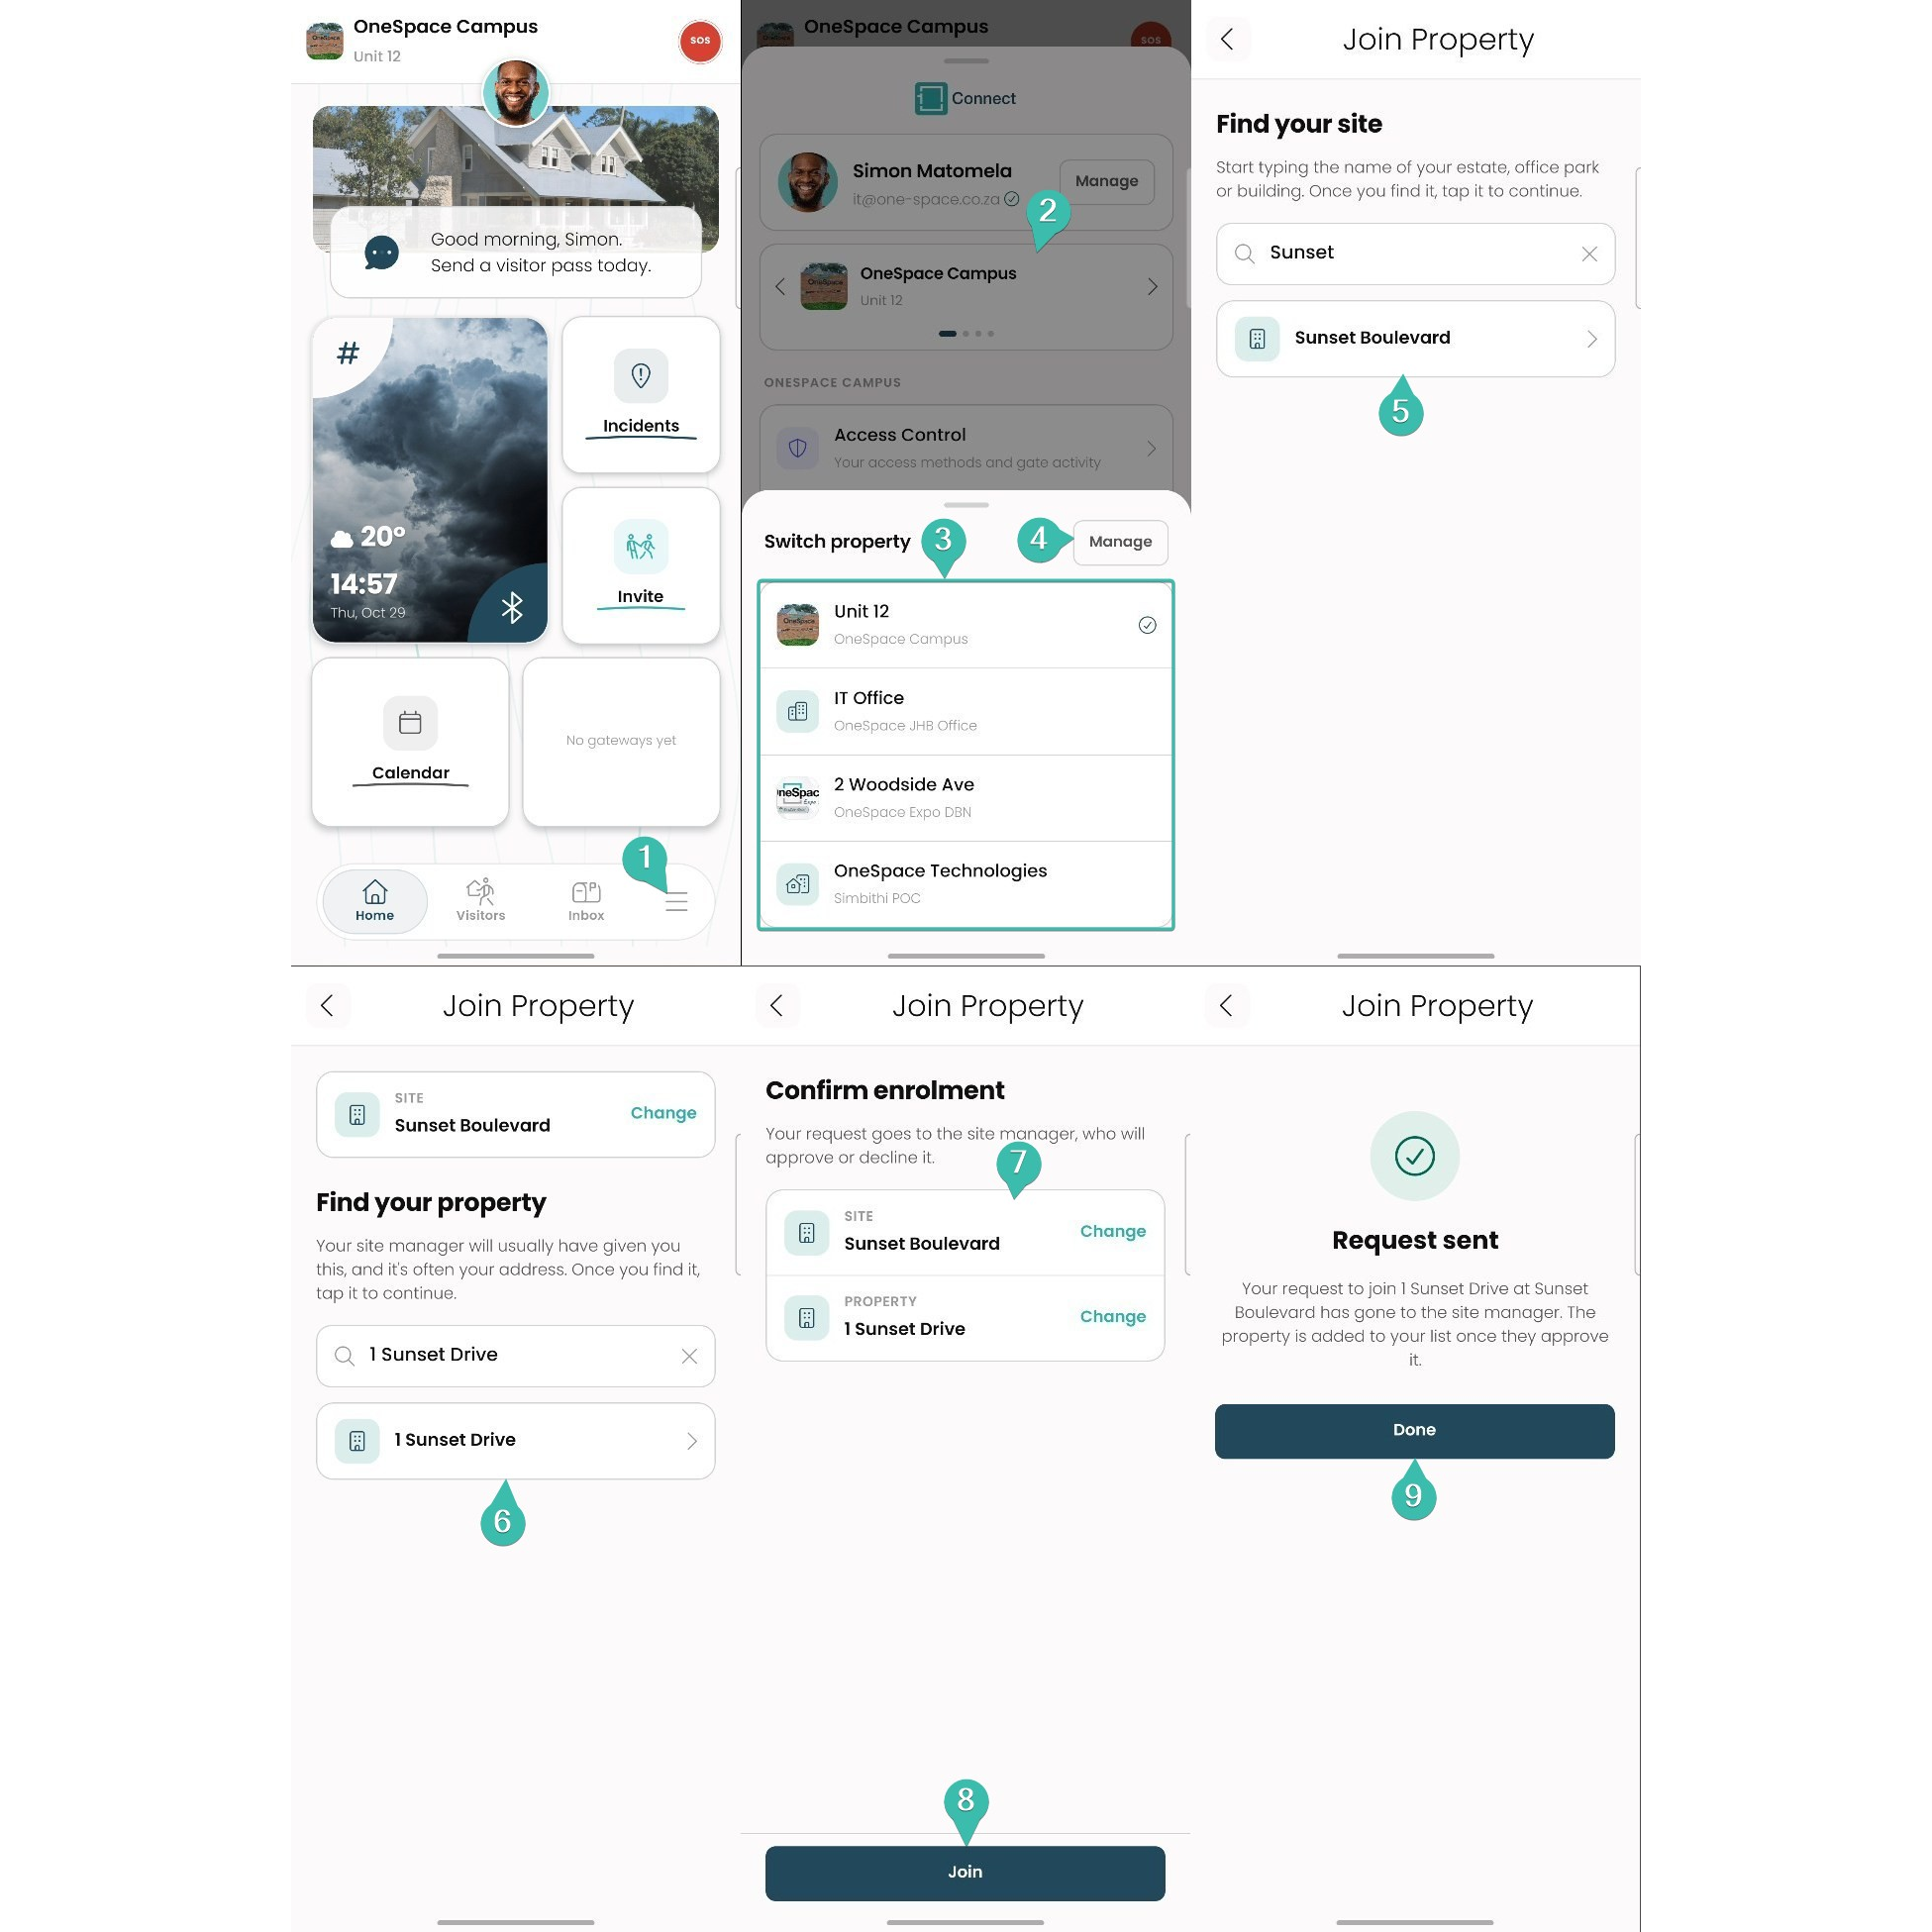
Join a new site
Tap the menu (☰) on the bottom bar.
Tap your current property card.
Your properties are listed here, with a tick next to the one you are using.
To join a new site, tap Manage.
Find your site: start typing the name of your estate, office park or building, then tap it.
Find your property: search for your unit or address (your site manager will usually have given you this), then tap it.
Confirm enrolment: check the site and property. Tap Change to correct either one.
Tap Join.
Request sent: your request goes to the site manager. Tap Done.
The property is added to your list once the site manager approves your request. You can be enrolled at more than one site; tap your site name on the Home screen to move between them.
Visitor Management
Previous version: View this section in the previous Connect App User Guide
The Visitors tab shows your visitor passes on a timeline, with each pass's dates, site and status (for example, Expired). Search by name, number or PIN, or tap the filter icon to narrow the list. Tap a pass to see it. Enrolled at more than one site? Tap the layers button (the Site Layers filter) to see visitor passes for all your sites.
Invite a visitor
Good to know: Visits can start up to 14 days ahead. The last day can be up to 365 days after the first.
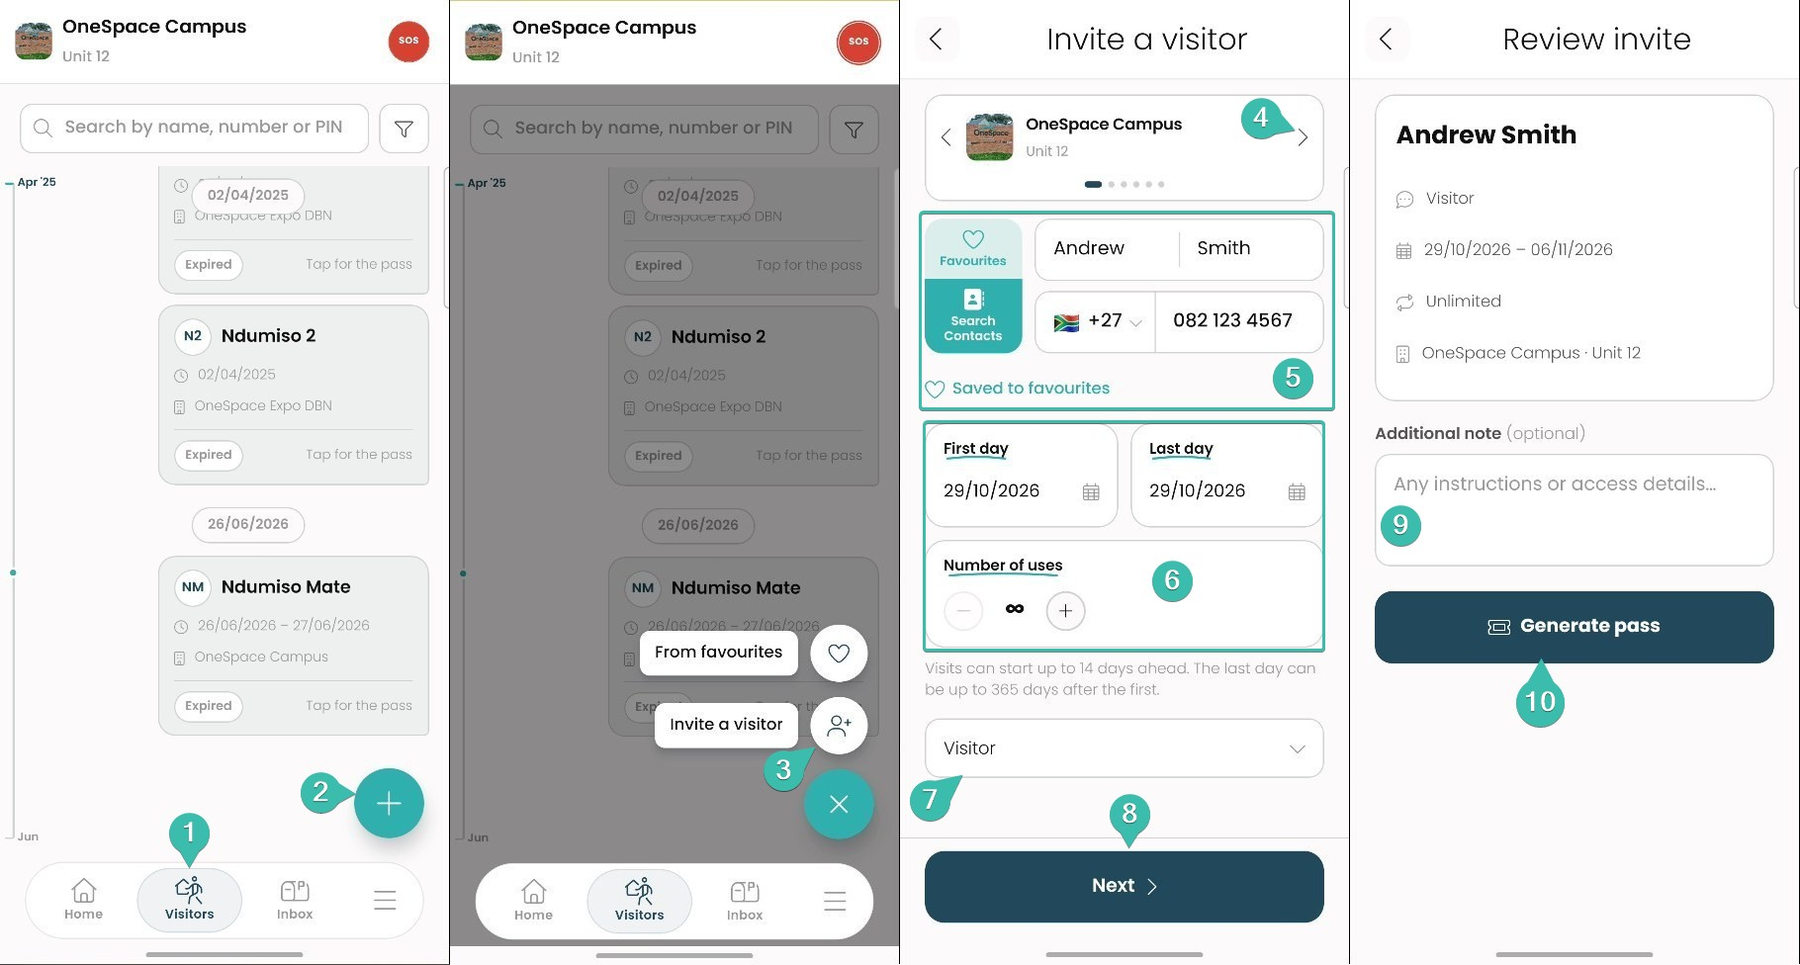
Tap Visitors on the bottom bar.
Tap the + button.
Tap Invite a visitor, or From favourites to pick a saved visitor.
Use the arrows to choose the property the invite is for. It starts on your current site.
Enter the visitor's name and phone number, or tap Favourites or Search Contacts to fill them in. Tap the heart to save the visitor to your favourites.
Set the First day, Last day and Number of uses (see Day Pass and Longstay Pass below).
Choose the visitor type (for example, Visitor). Types depend on your site.
Tap Next.
Review invite: check the details and add an Additional note if needed, such as instructions or access details.
Tap Generate pass.
Day Pass and Longstay Pass
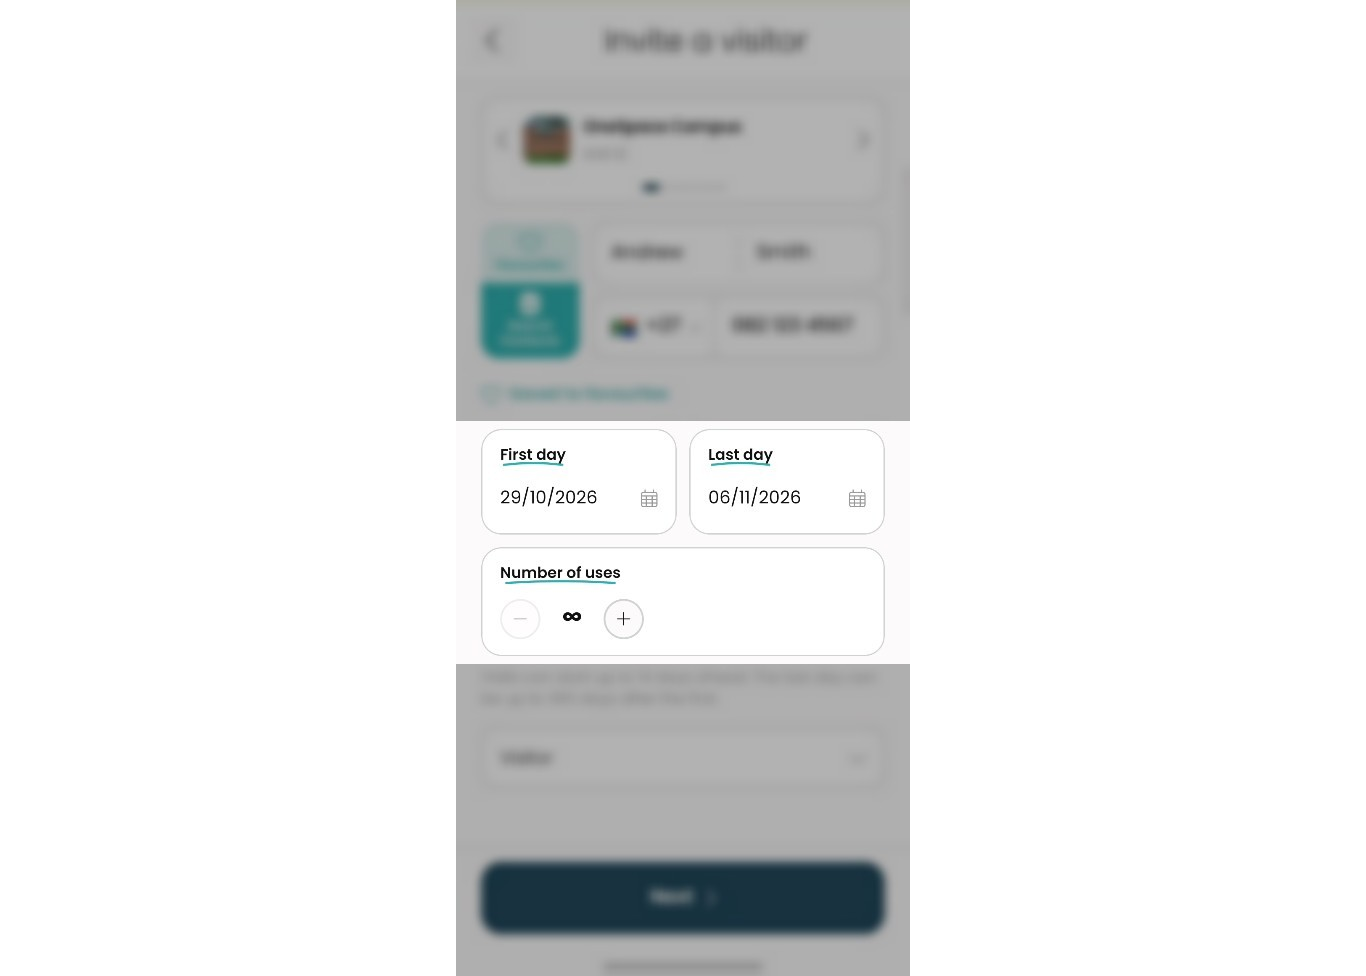
Day Pass: set the First day and Last day to the same date.
Longstay Pass: set the Last day to a later date so the pass covers several days.
Number of uses: tap + or − to set how many times the PIN can be used. ∞ means unlimited use.
Share the invite
Once the pass is generated, Invite confirmed shows a QR code and the gate PIN.
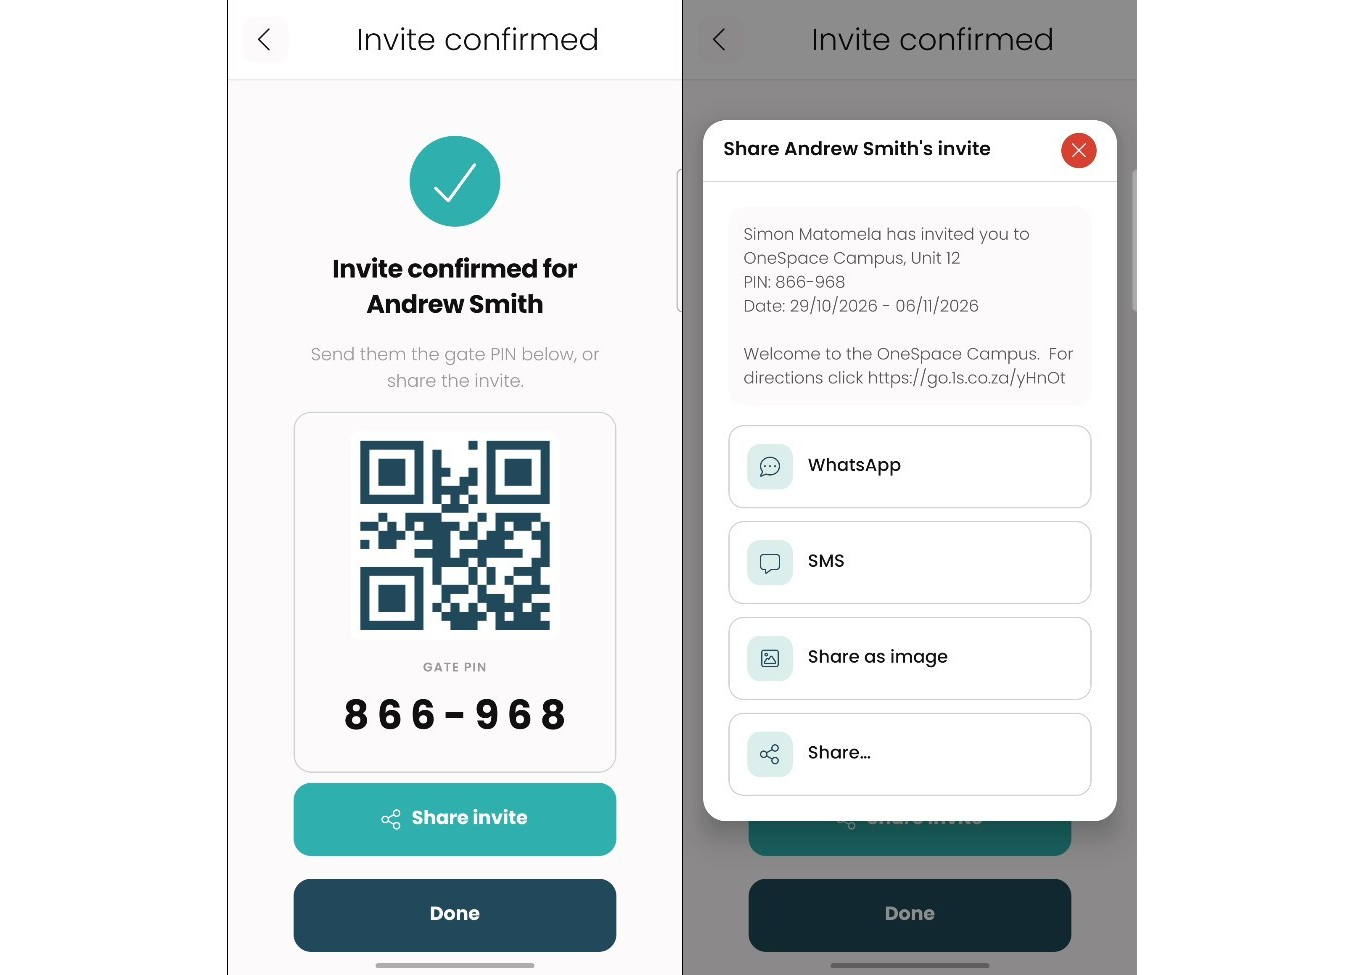
Tap Share invite.
Choose how to send it: WhatsApp, SMS, Share as image or Share... (any other app on your phone).
Tap Done when you're finished.
The shared message includes your name, the property, the PIN and the visit dates, plus any directions your site has set up.
Favourites
Save visitors you invite often so you can invite them in a few taps. On the Invite a visitor screen, tap Favourites.
Good to know: Use the search box to find a favourite quickly. Tap the pencil icon to edit a favourite, or the bin icon to delete it. Tap the heart while inviting a new visitor to save them to favourites at the same time.
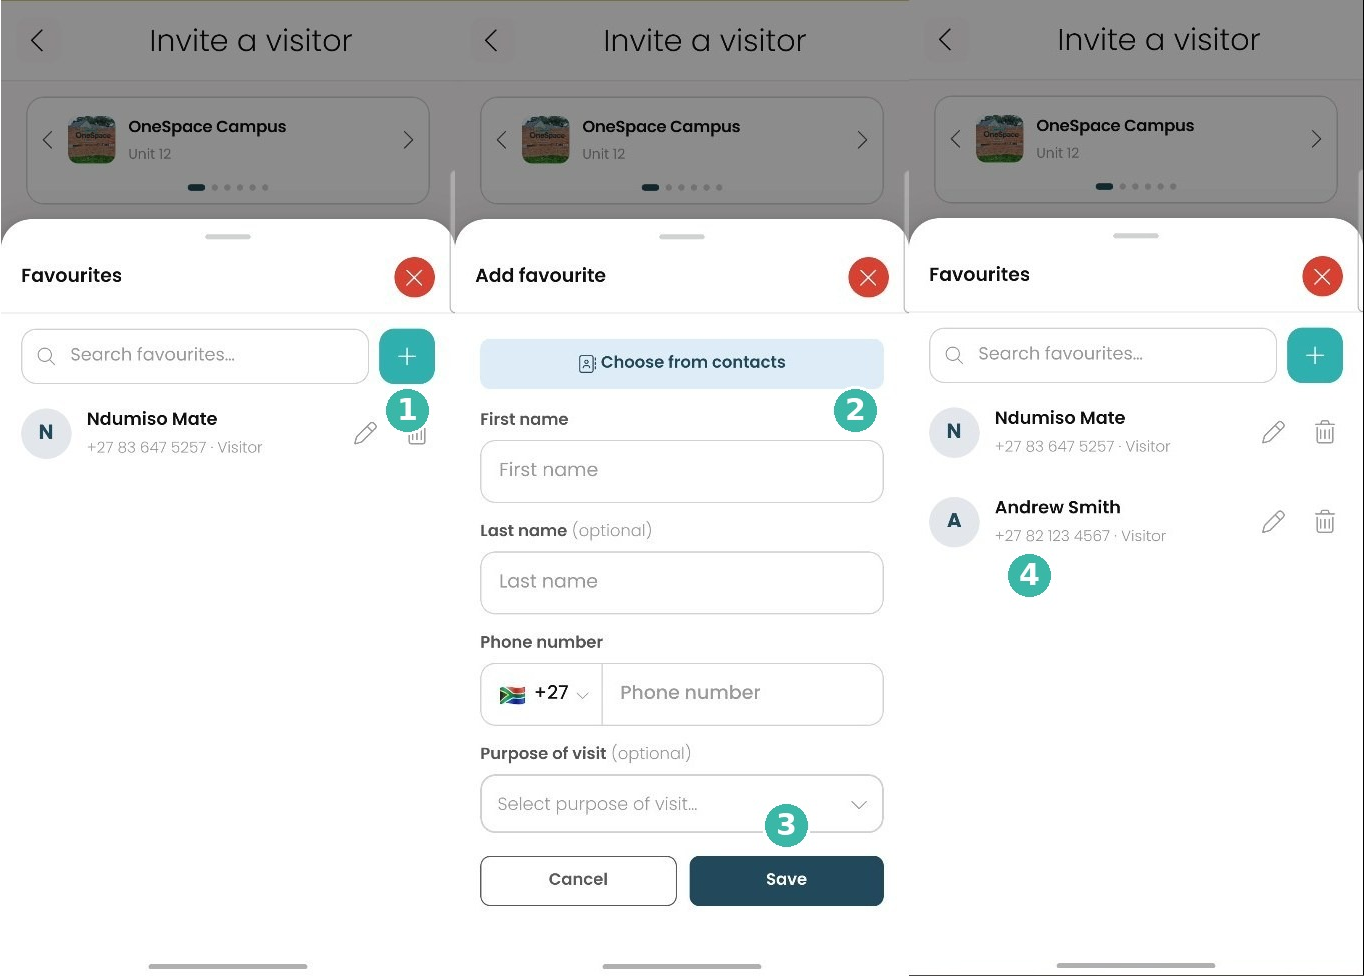
Tap the + button.
Tap Choose from contacts, or enter the visitor's first name, last name (optional) and phone number. You can also choose a purpose of visit (optional).
Tap Save.
Your favourite is added to the list.
Access Control
Previous version: View this section in the previous Connect App User Guide
See your access methods and gate activity, and request new access methods from your site manager.
Request an access method
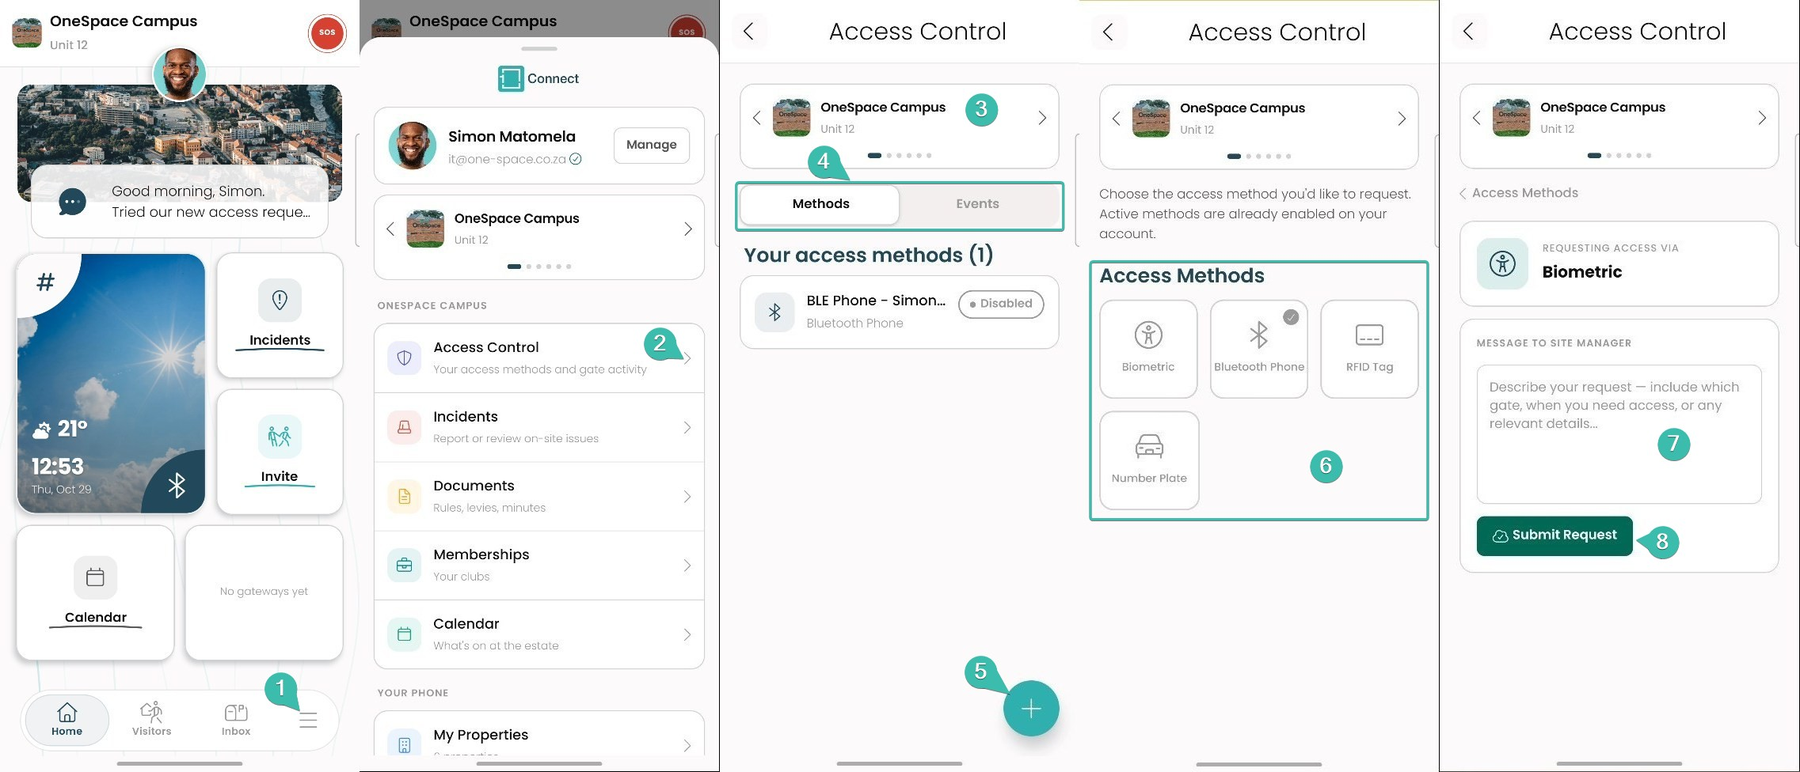
Tap the menu (☰) on the bottom bar.
Tap Access Control.
Use the arrows to choose the property.
Methods lists your access methods and their status (for example, Disabled). Events shows your gate activity.
Tap the + button to request a new method.
Choose an access method: Biometric, Bluetooth Phone, RFID Tag or Number Plate. Methods that are already active on your account are ticked.
Write a message to the site manager. Include which gate, when you need access and any other relevant details.
Tap Submit Request. Your site manager will approve or decline it.
Using Bluetooth Access
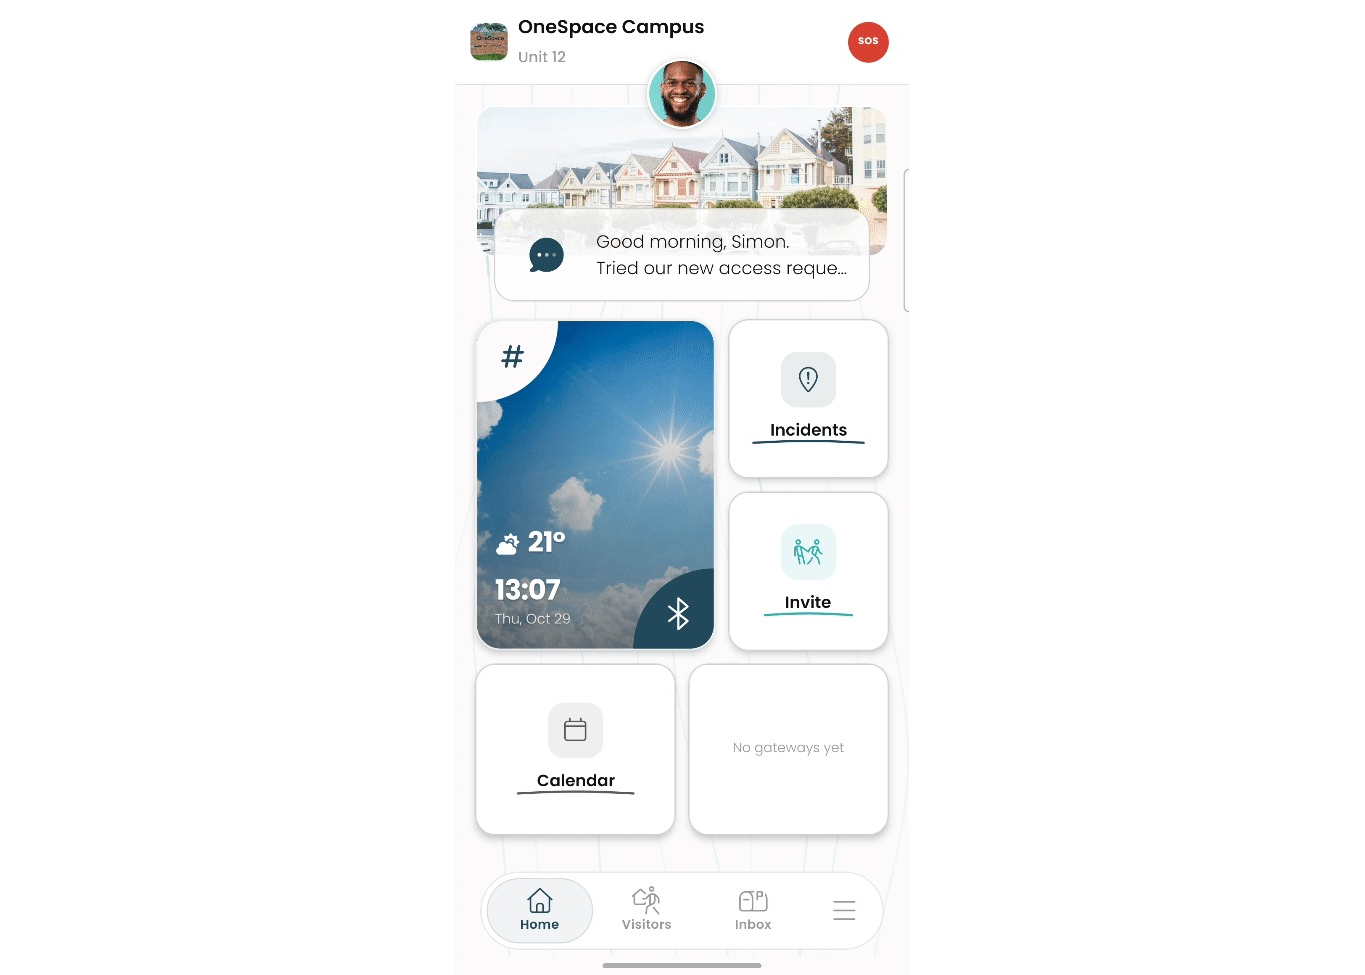
Bluetooth access only works if your site has it installed and your Bluetooth Phone method is active.
Turn on Bluetooth and allow location access for Connect.
The gates and doors near you appear in the gateway tile on the Home screen. They show Searching... while the app looks for them.
Tap a gate or door in the tile to open it.
If a gate you should have access to doesn't appear, contact your site manager.
To rename, pin or hide gates, or choose which gates show on your Home screen, see App Settings.
Incident Reporting
Previous version: View this section in the previous Connect App User Guide
Report an on-site issue, such as an electrical fault, and follow its progress.
Report an incident
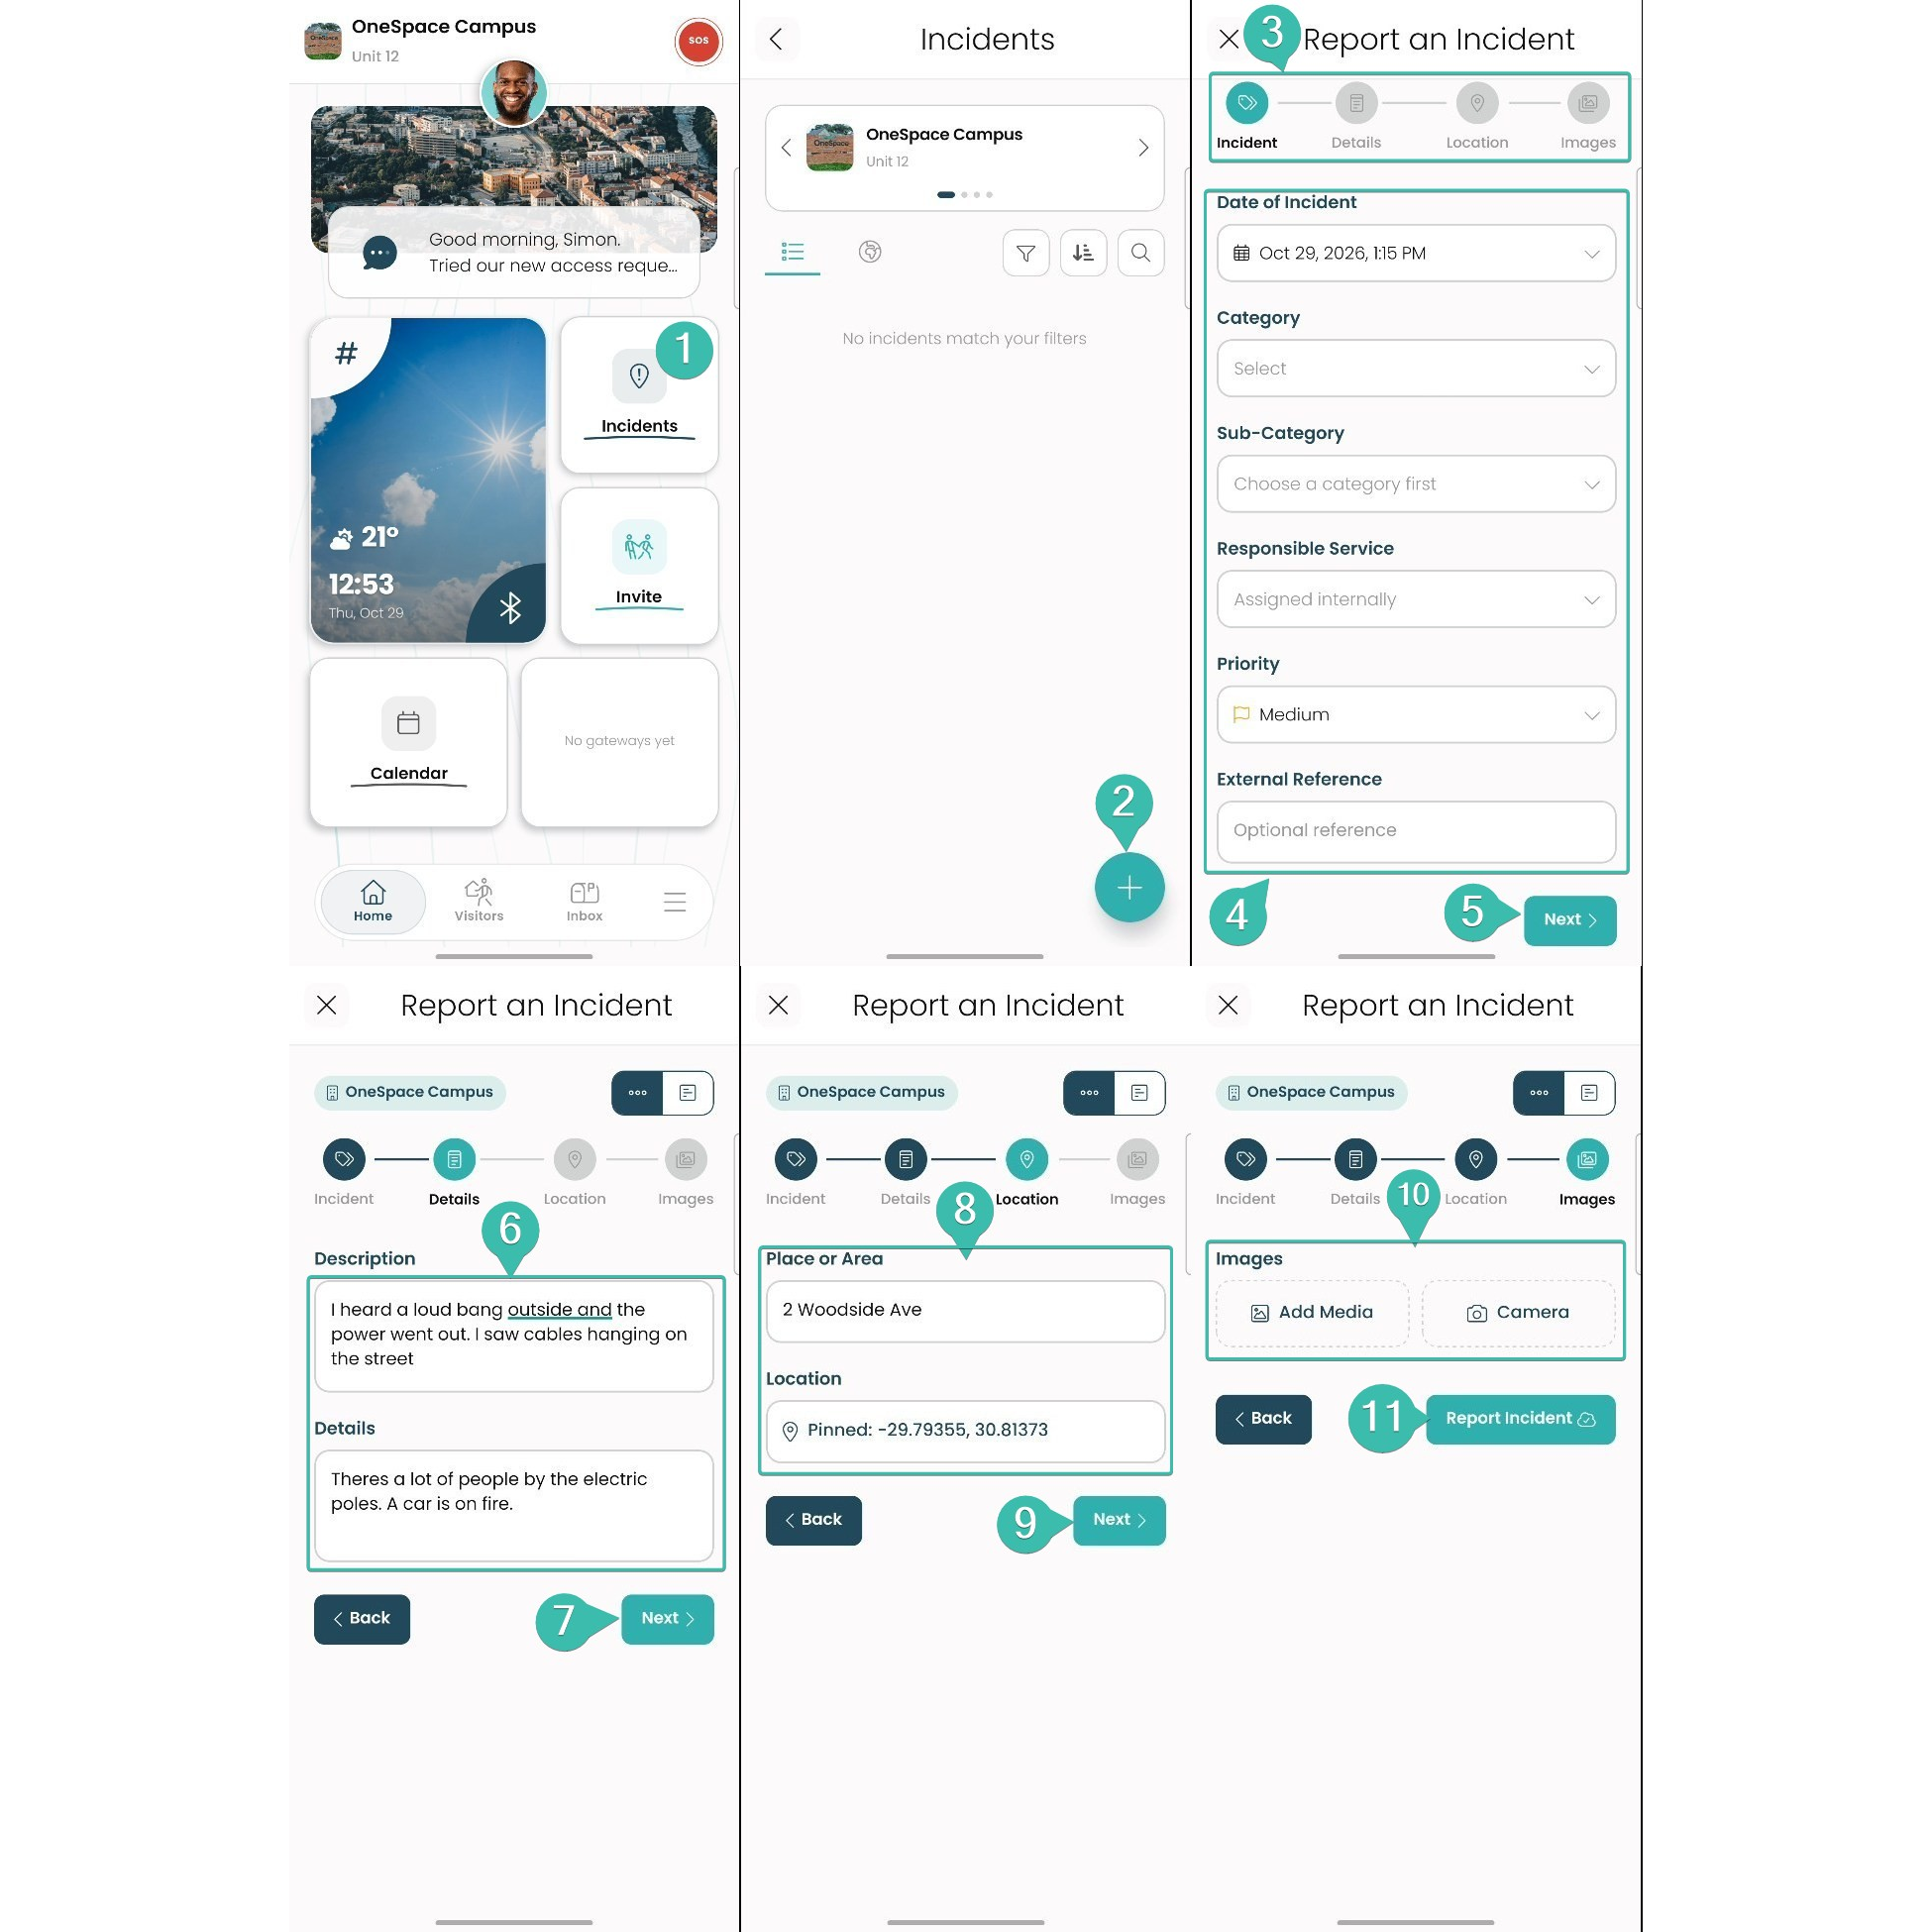
On the Home screen, tap Incidents. You can also open Incidents from the menu (☰).
Tap the + button.
The report has four stages: Incident, Details, Location and Images.
Incident: check the date and time, then choose the Category, Sub-Category, Responsible Service and Priority. Add an External Reference if you have one (optional).
Tap Next.
Details: describe what happened, and add any further details.
Tap Next.
Location: enter the Place or Area and pin the Location.
Tap Next.
Images: tap Add Media to choose photos from your phone, or Camera to take one.
Tap Report Incident. Tap Back at any stage to change your answers.
Track your incidents
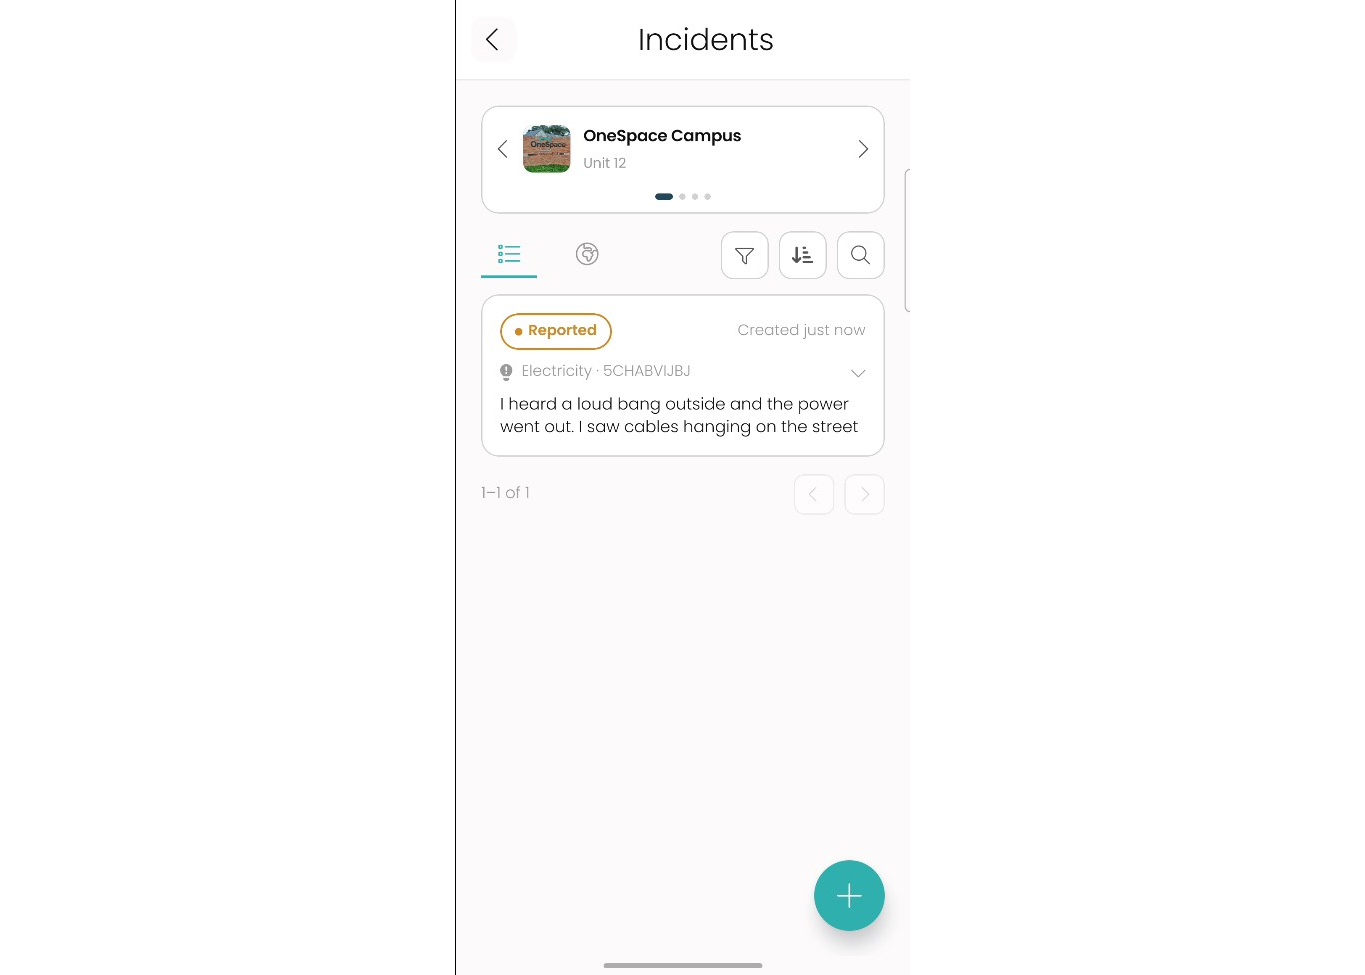
Your incidents are listed with their status (for example, Reported), category, reference number and description.
Use the arrows at the top to switch property.
To see incidents for all your sites, tap the layers button (the Site Layers filter) on the Incidents page, or turn on Select all Sites on the Home screen.
Switch between the list and map views, and use filter, sort and search to find an incident.
Panic (SOS)
Previous version: View this section in the previous Connect App User Guide
Use SOS in an emergency to send a panic alert with your location and identity.
Good to know: Your panic keeps sending even if you leave the Emergency screen. A banner shows while your panic is still active.
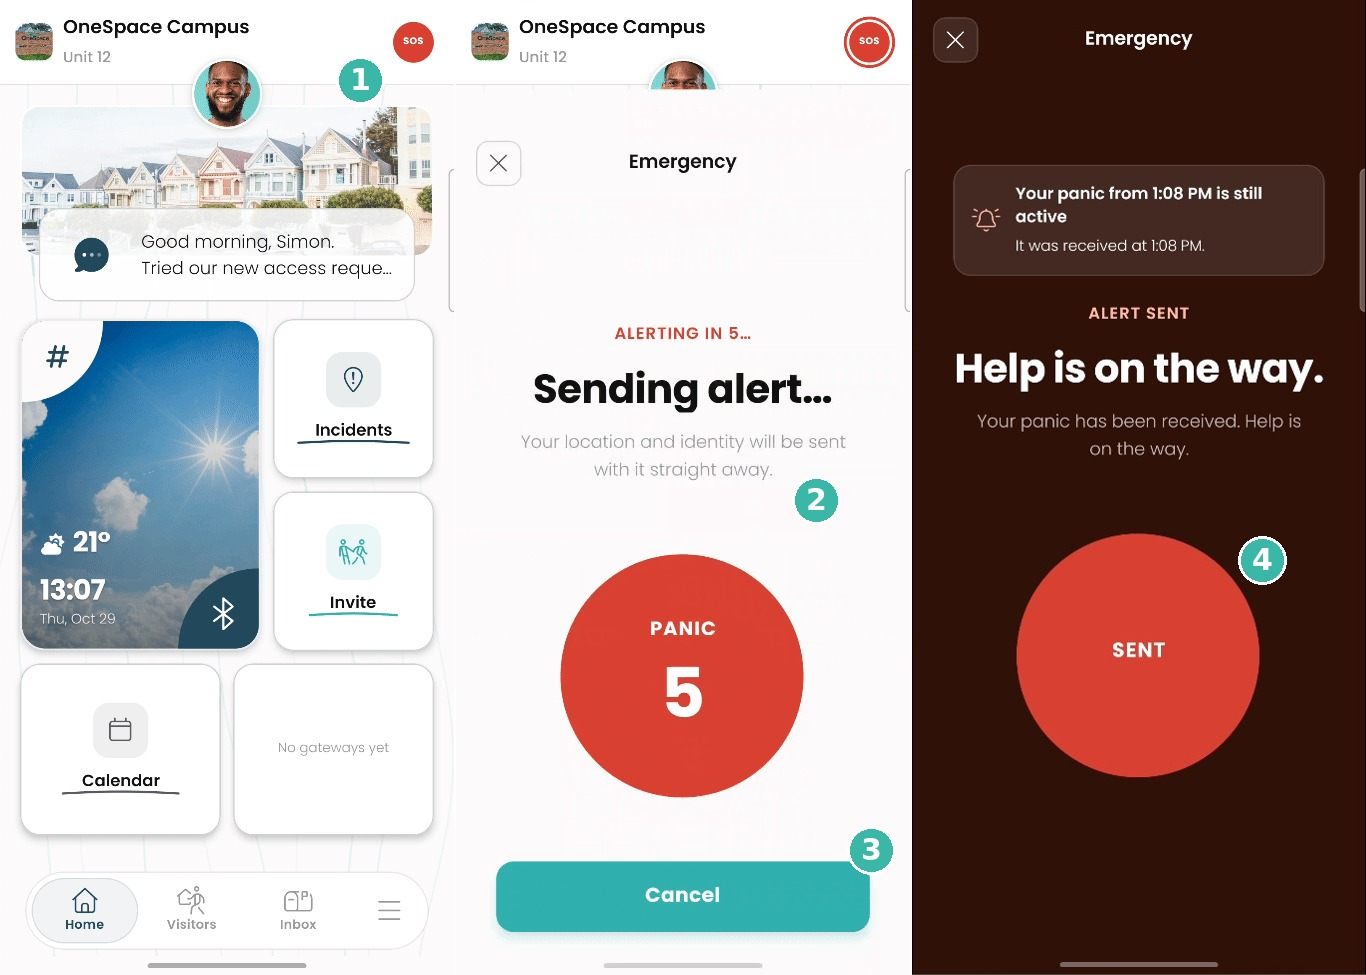
On the Home screen, tap SOS (top right).
A 5-second countdown starts. Your location and identity are sent with the alert.
Tap Cancel before the countdown ends if you sent it by mistake.
Alert sent: the screen confirms Help is on the way and shows the time your panic was received.
Inbox
Previous version: View the previous Connect App User Guide (this section is new)
Your Inbox holds messages and notices from your site, such as broadcasts (announcements from your site) and gateway status updates.
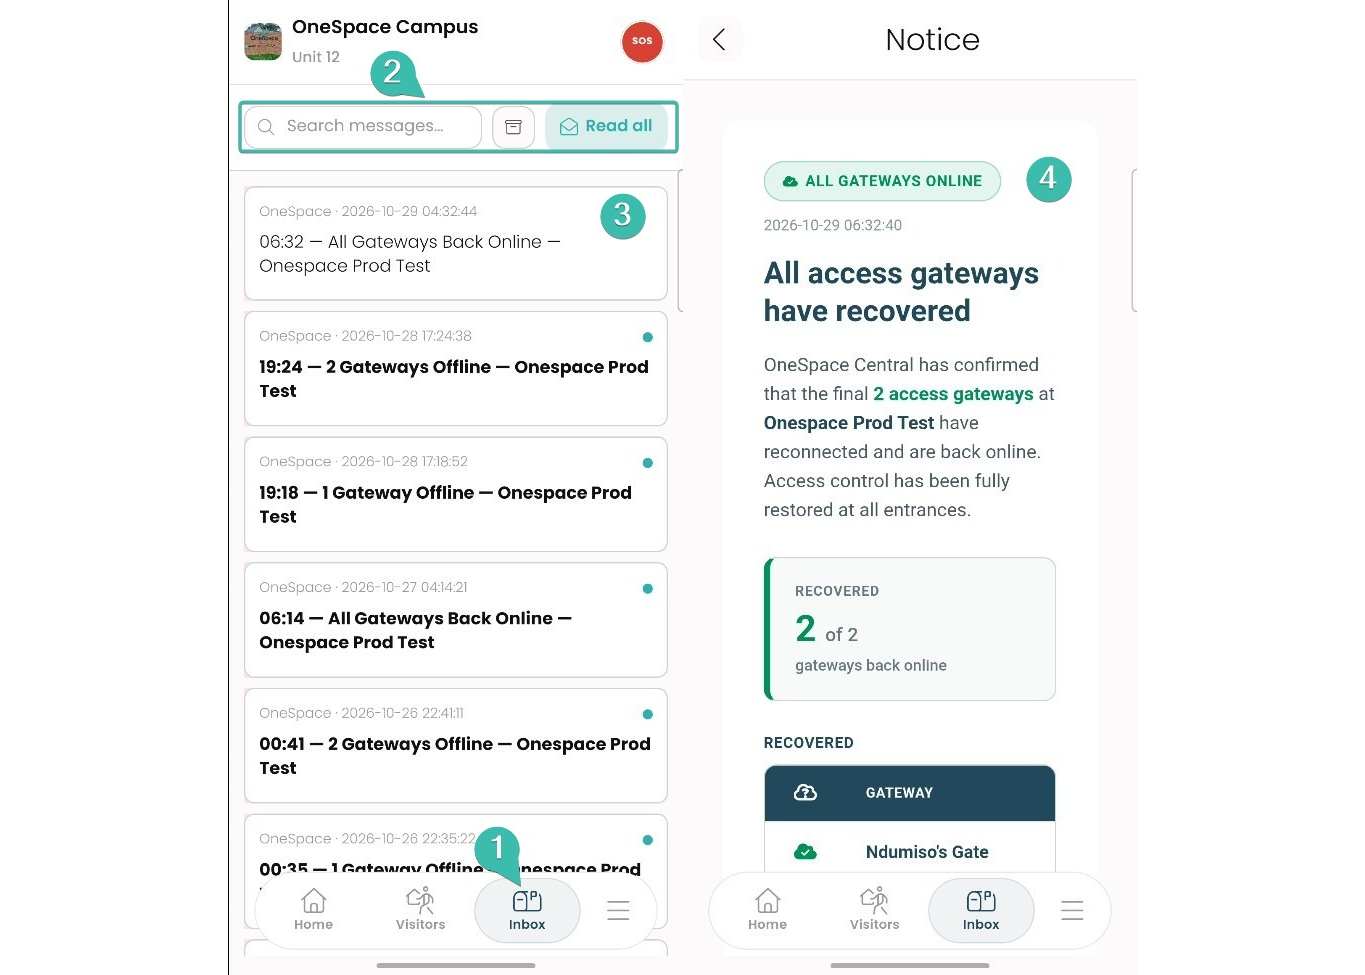
Tap Inbox on the bottom bar.
Search your messages, open your archive, or tap Read all to mark everything as read.
Your messages are listed newest first. A dot shows a message you haven't read.
Tap a message to open the full notice.
To see messages from all your sites, tap the layers button (the Site Layers filter) on the Inbox page, or turn on Select all Sites on the Home screen.
Events & Facility Booking
Previous version: View the previous Connect App User Guide (this section is new)
Features from the old User Portal now live in the Connect app. Use the Calendar to see what's on at your estate and to book a facility, Memberships to see your clubs, and Documents to open your site's files. Broadcasts (announcements from your site) now arrive in your Inbox.
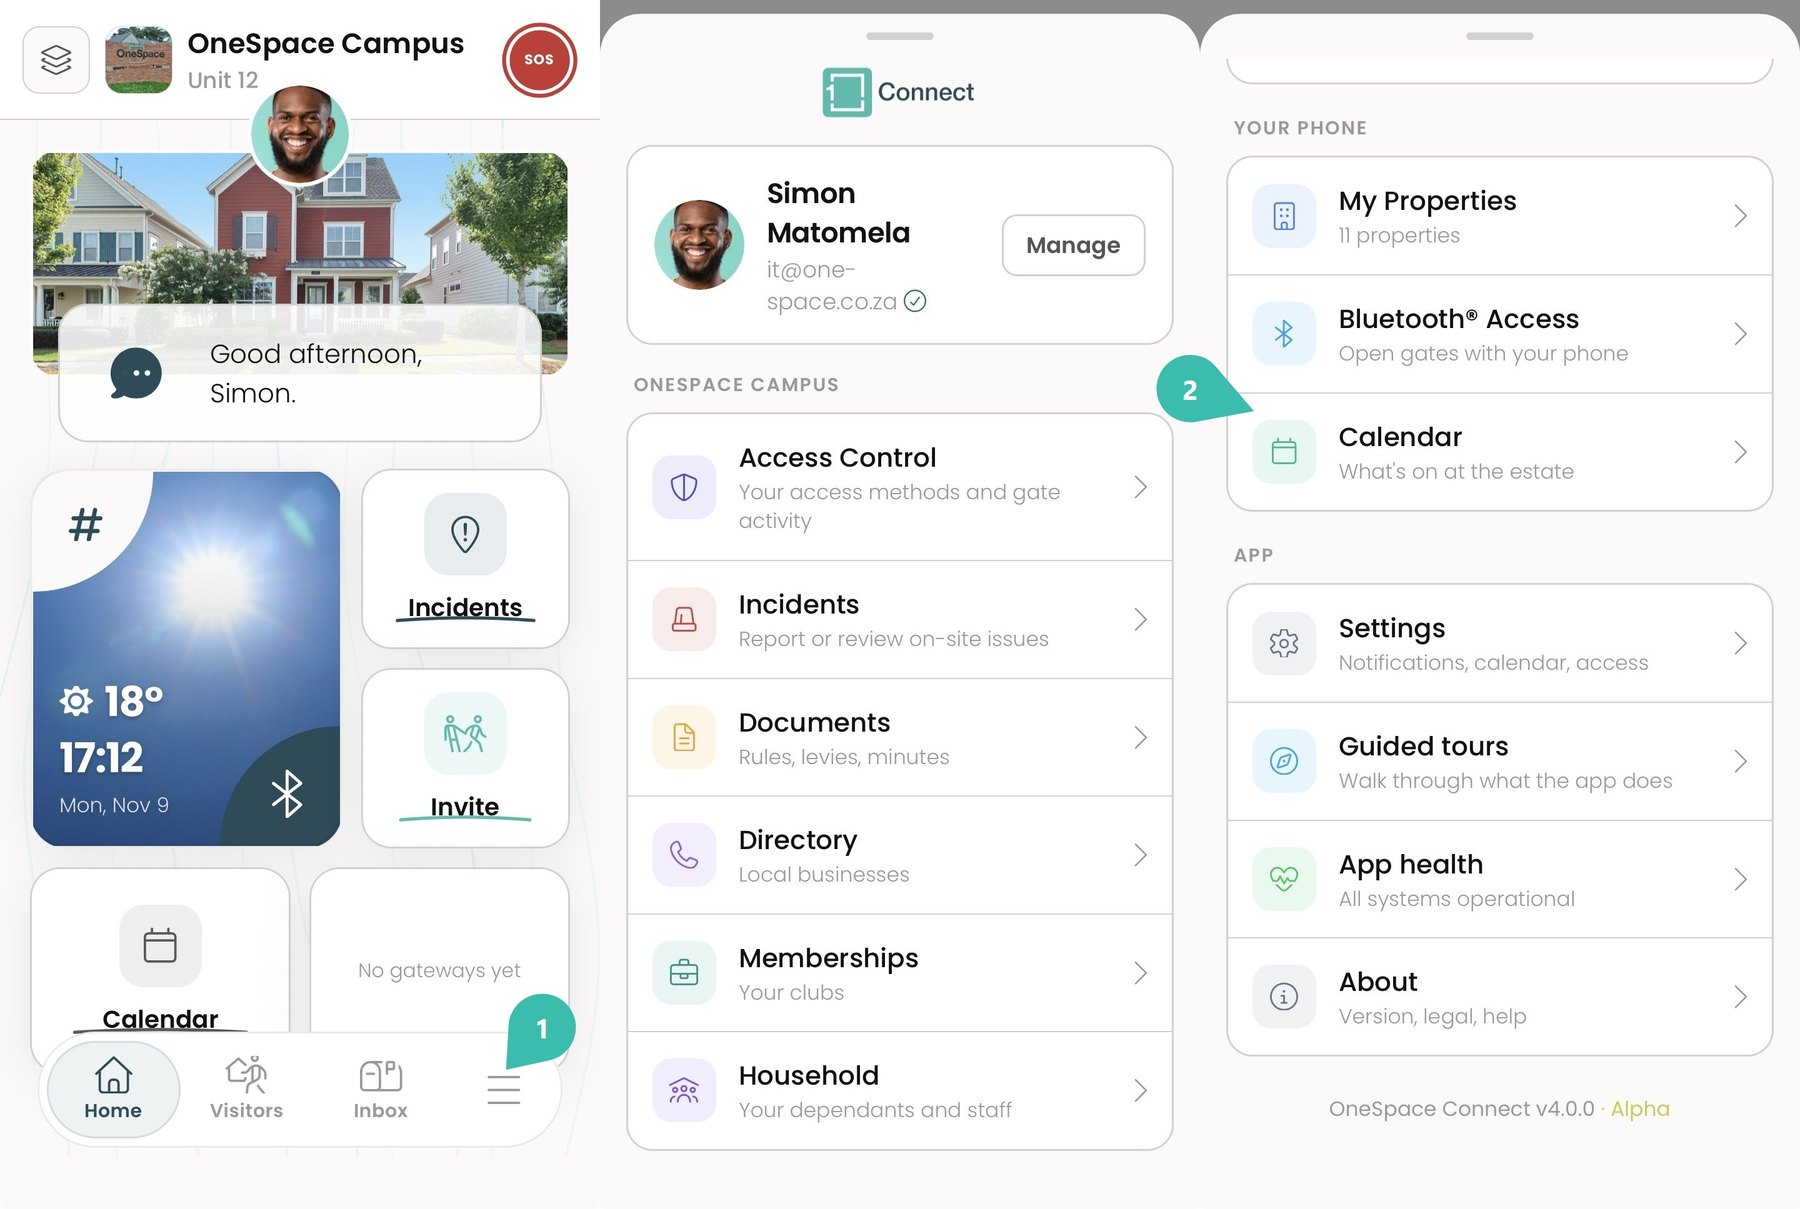
On the Home screen, tap the menu (☰) on the bottom bar.
Under Your phone, tap Calendar (what's on at the estate). You can also tap the Calendar tile on the Home screen.
Open the Calendar
Filter and search the Calendar
Good to know: Switch between Week, Month and Year at the top, and use the arrows to move to the previous or next month. Today is highlighted.
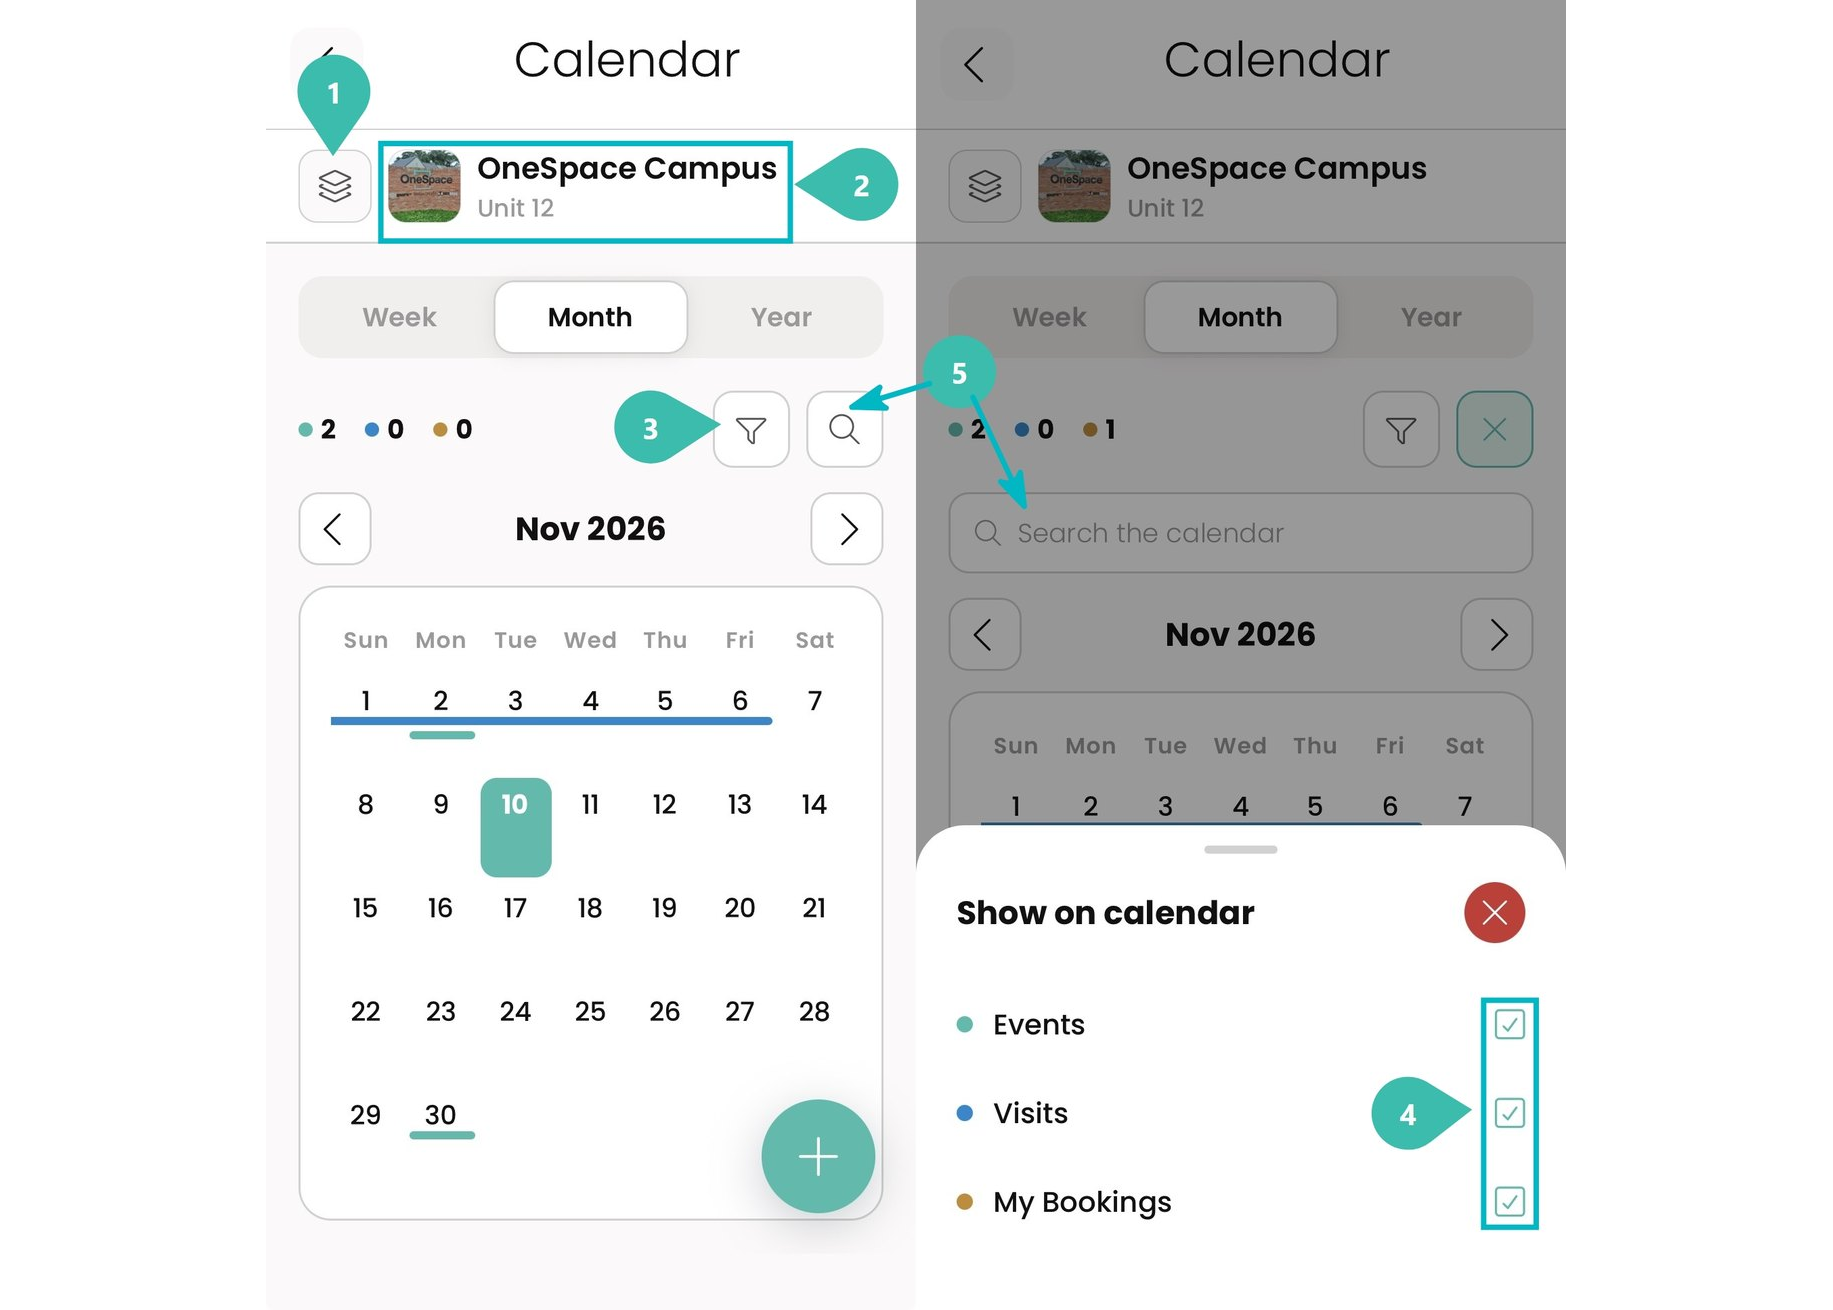
Site Layers filter: tap the layers button to see the calendar for all the sites you are enrolled at. Tap it again to go back to your current site.
Current site: the site whose calendar you are looking at. Tap the site name to choose another site.
Tap the filter icon to choose what shows on the calendar.
Show on calendar: tick Events, Visits and My Bookings to show them, or untick them to hide them. The coloured dots above the calendar count each one.
Tap the search icon and type in Search the calendar to find something quickly.
View events
Good to know: Events are published by your site manager.
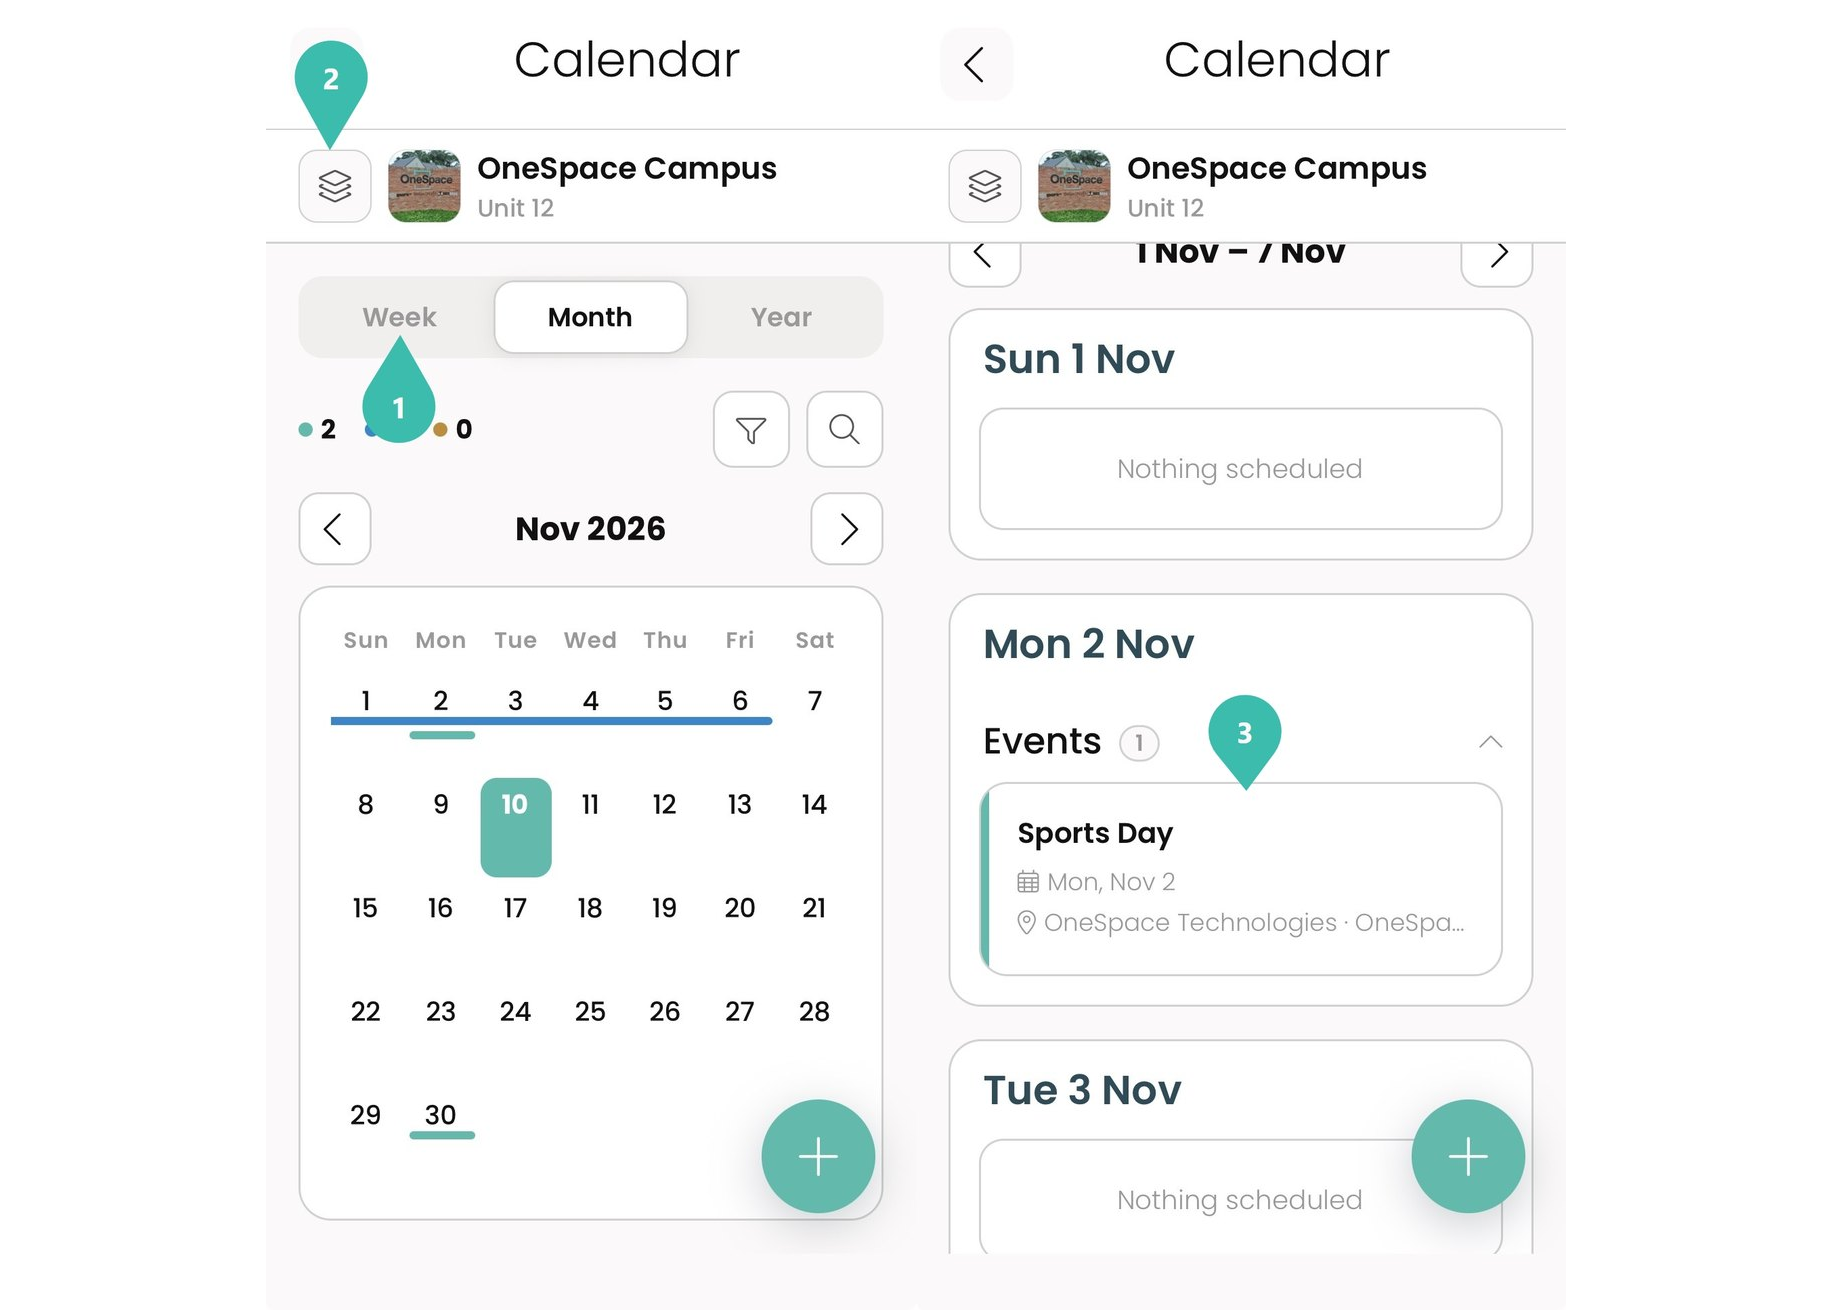
Tap Week to see each day of the week listed, or stay on Month to see the whole month. Days with something on are underlined in that item's colour.
Tap the layers button to see events from all your sites.
Events: each event shows its name, date and place. Days with nothing on show Nothing scheduled.
Book a facility
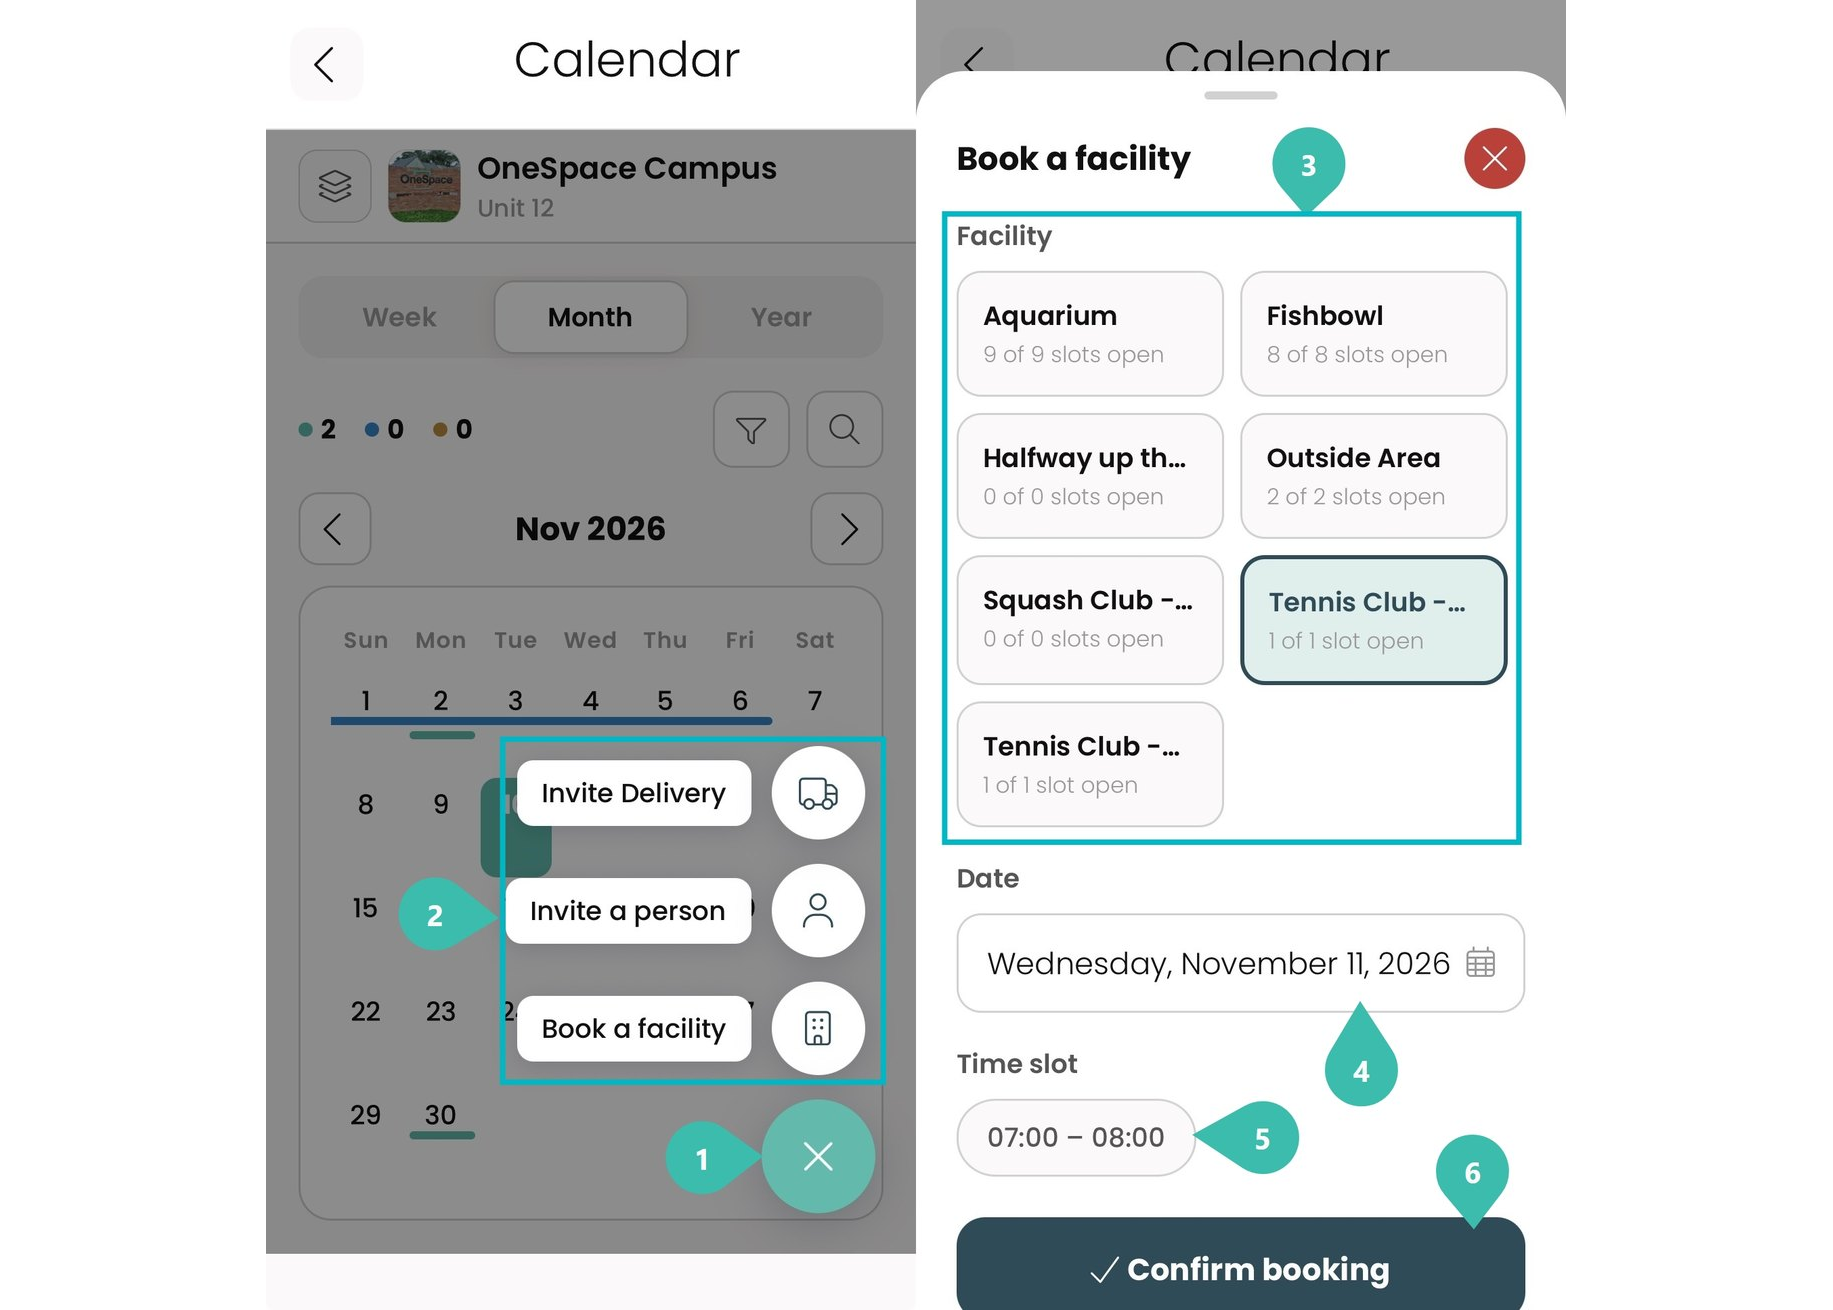
On the Calendar, tap the + button.
Tap Book a facility. (The same button also lets you Invite a person or Invite Delivery.)
Facility: tap the facility you want. Each one shows how many slots are open, for example 9 of 9 slots open.
Date: choose the day you want to book.
Time slot: tap an available time slot.
Tap Confirm booking.
Good to know: Your bookings show on the calendar as My Bookings. Facilities and their available slots are set by your site manager. Ask them if you need different times.
Memberships
Good to know: Renewal dates and fees are set by your site manager.
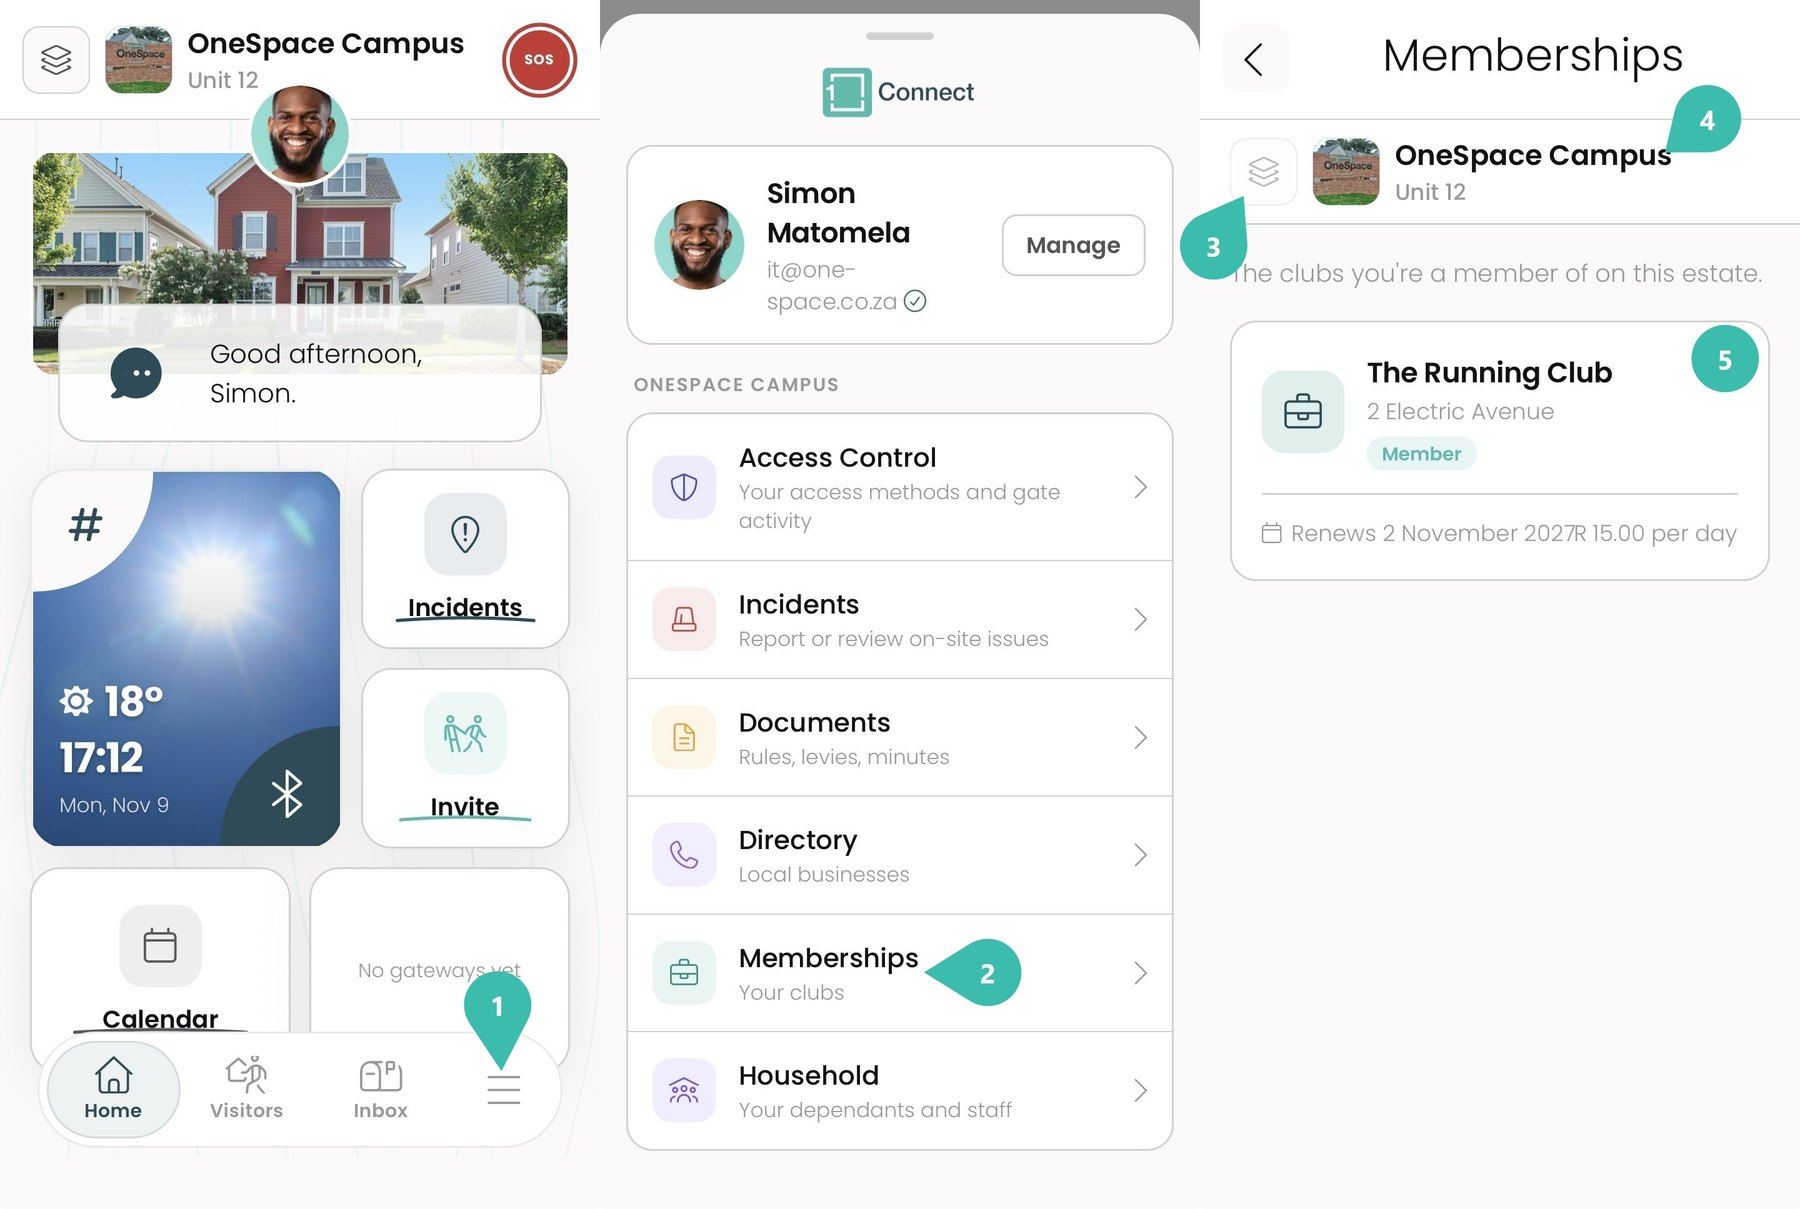
On the Home screen, tap the menu (☰) on the bottom bar.
Under your site, tap Memberships (your clubs).
Your site only: Memberships shows the clubs for your current site. The Site Layers filter isn't available on this page.
Current site: the site whose clubs are listed. Tap the site name to choose another site.
Your clubs: each membership shows the club's name, where it meets, your status (for example, Member), and when it renews and what it costs.
Site Documents
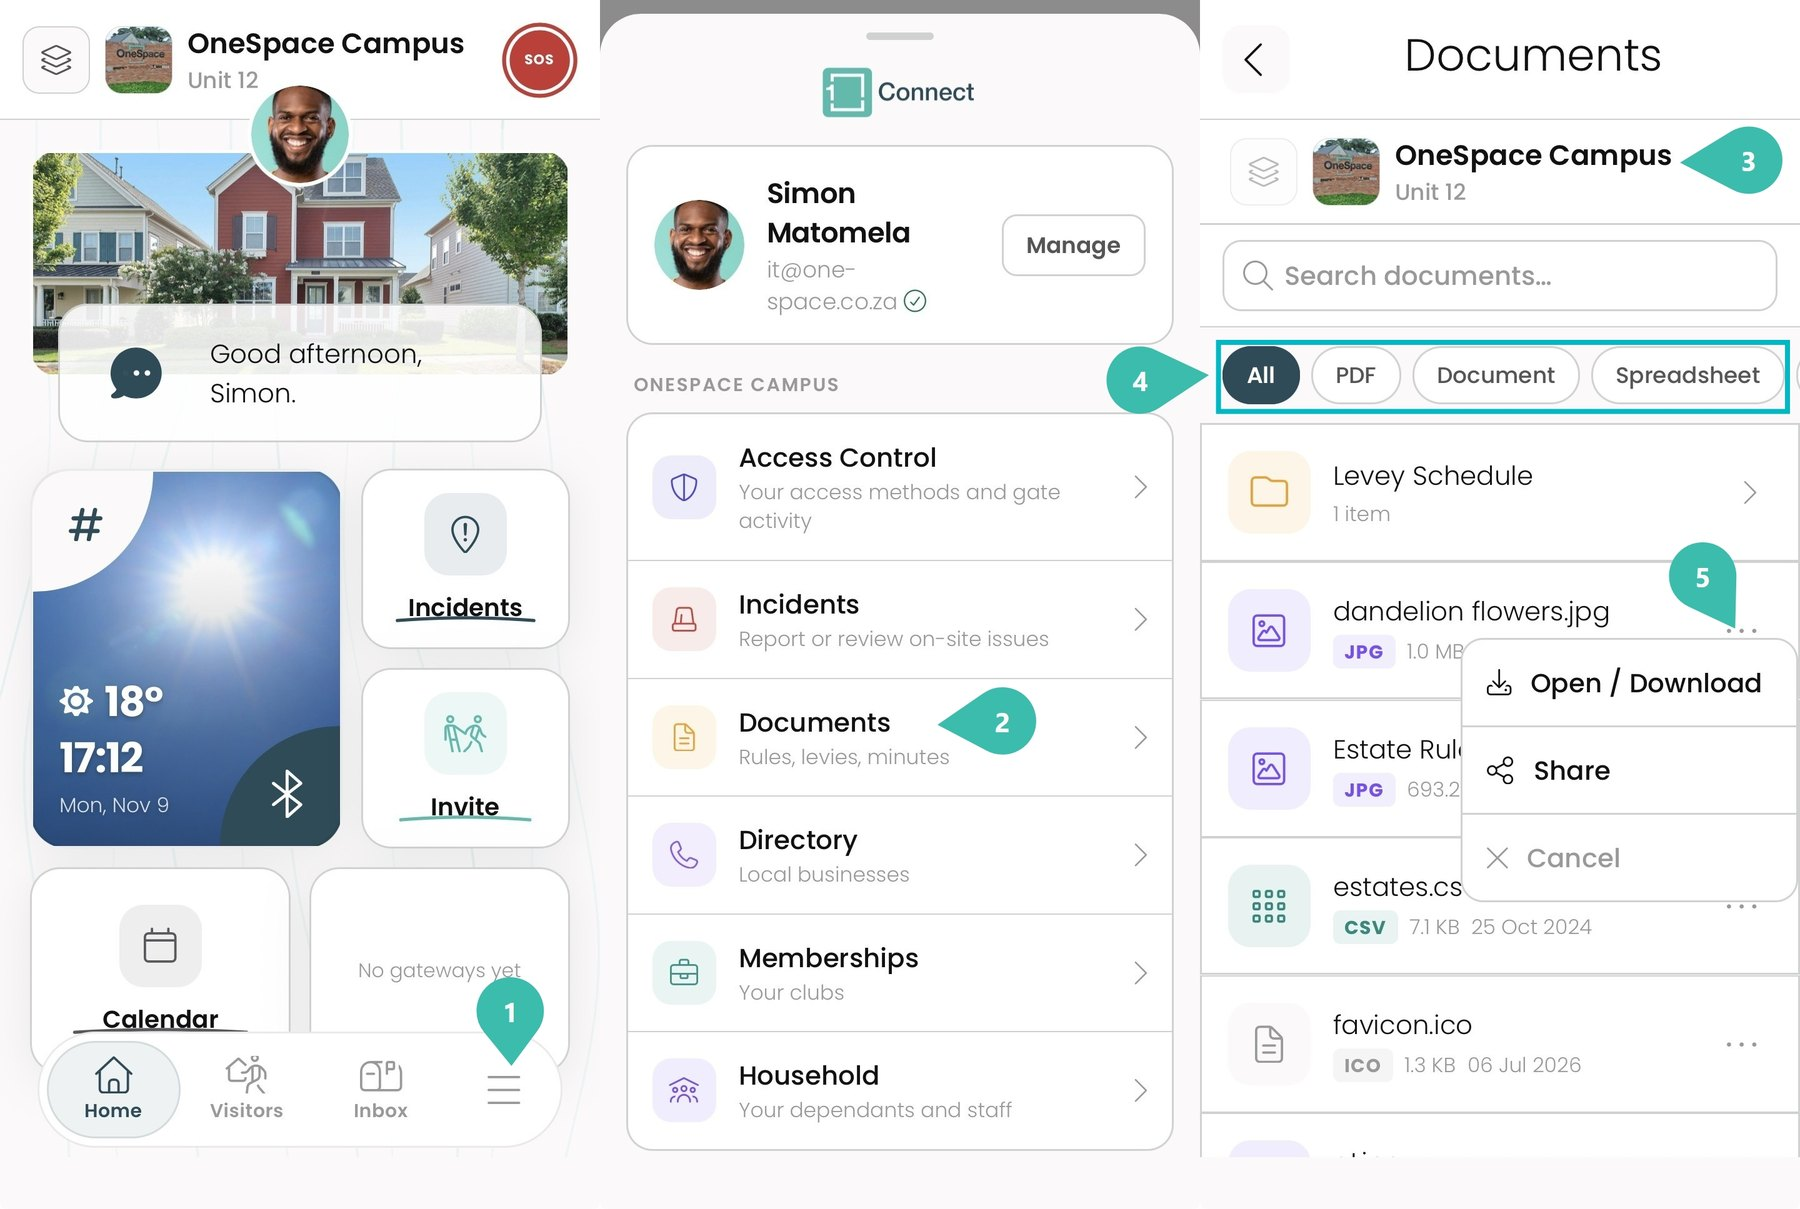
On the Home screen, tap the menu (☰) on the bottom bar.
Under your site, tap Documents (rules, levies, minutes).
Current site: the site whose documents are listed. Tap the site name to choose another site. The Site Layers filter isn't available on this page.
Type a file name in Search documents, or tap a type to filter the list: All, PDF, Document or Spreadsheet.
Tap the ... next to a file, then tap Open / Download or Share. Tap Cancel to close the menu.
Good to know: Folders (for example, Levy Schedule) show how many items they hold. Tap a folder to open it. Documents are files your site manager has shared with everyone on your site.
App Settings
Previous version: View the previous Connect App User Guide (this section is new)
The menu (☰) is where you manage your account, open your site's services and choose how the app works on your phone. Features that used to be in the User Portal are now in this menu.
The menu
Good to know: Documents, Memberships, the estate Calendar and My Properties used to be in the User Portal. Broadcasts now arrive as messages in your Inbox. Pets are added to your own profile, not under Household. The Your site section is headed with the name of your current site.
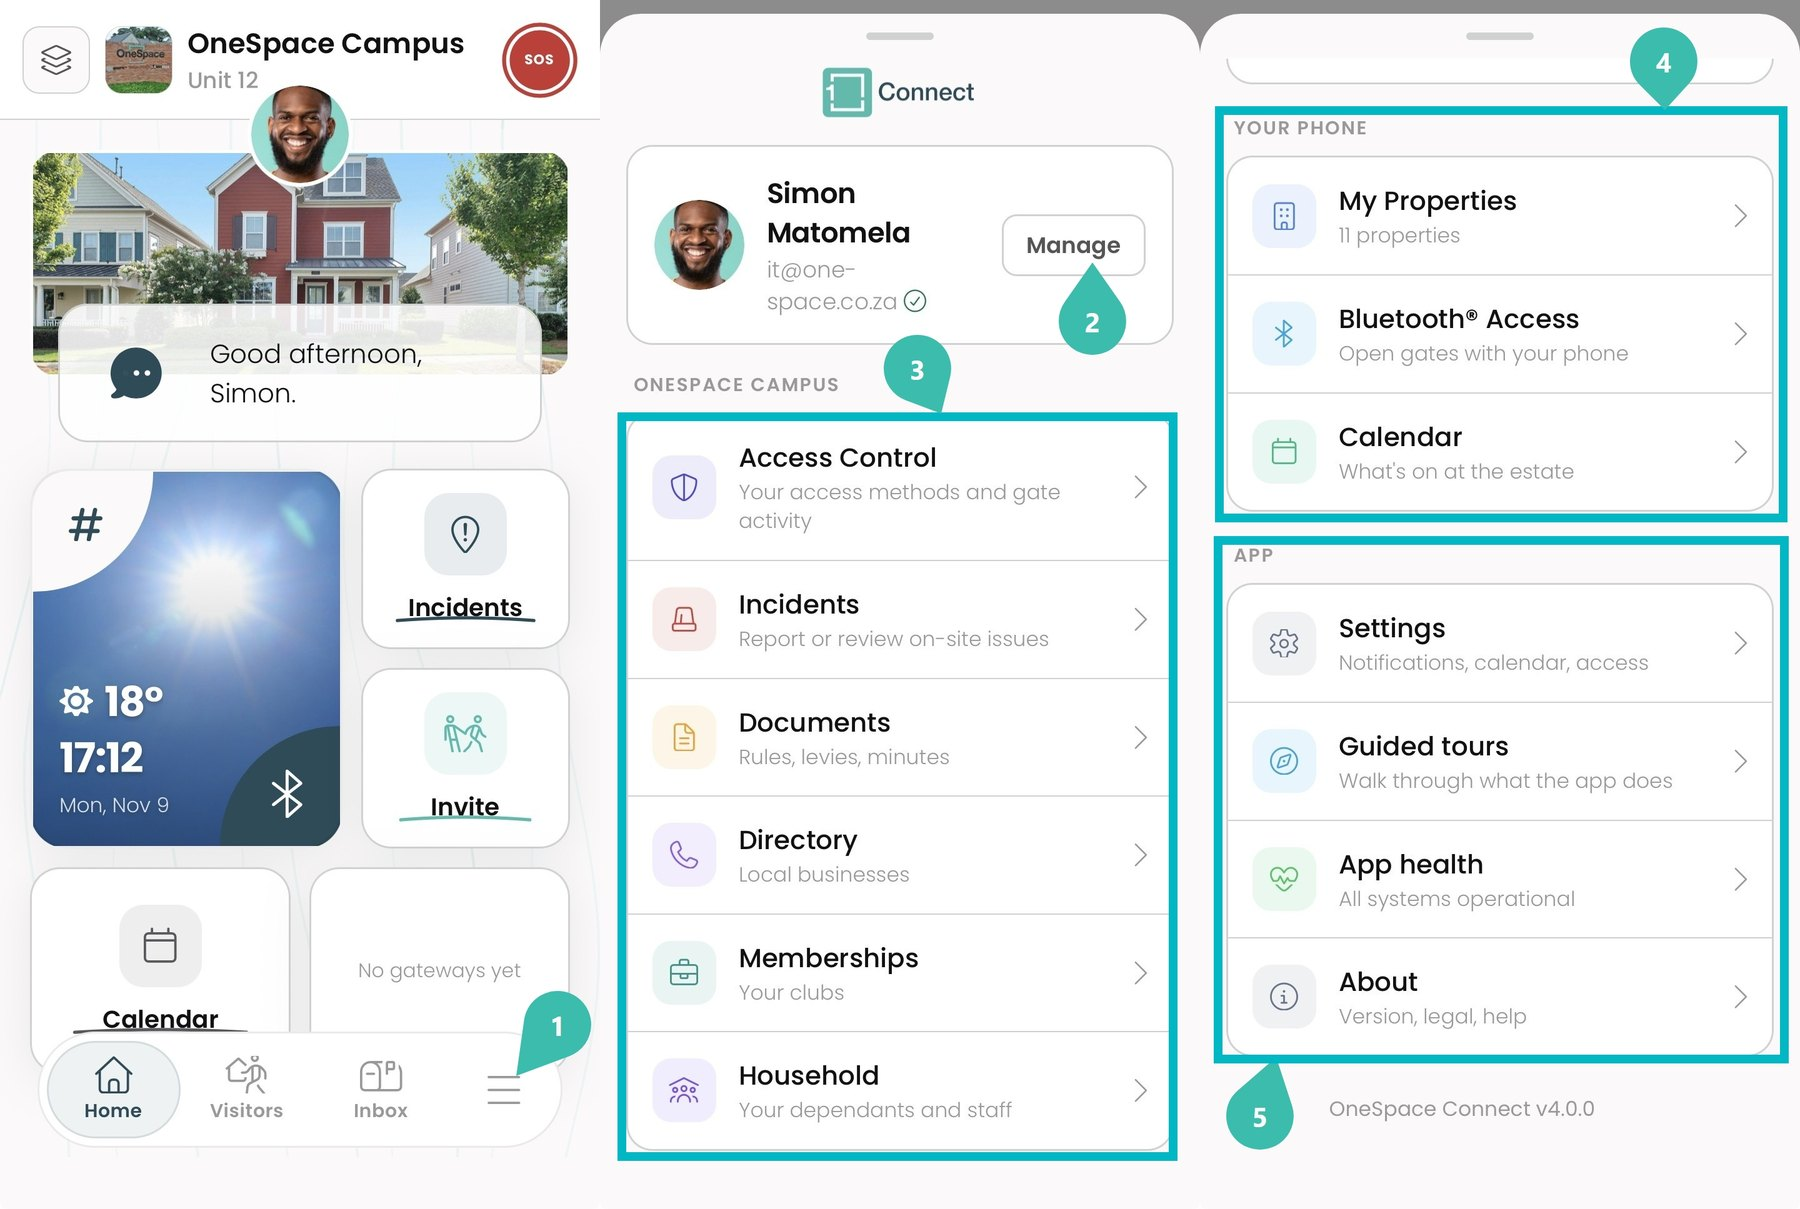
On the Home screen, tap the menu (☰) on the bottom bar.
Manage: opens your Account.
Your site: services for the site shown in the heading: Access Control (your access methods and gate activity), Incidents, Documents (rules, levies, minutes), Directory (local businesses), Memberships (your clubs) and Household (your dependants and staff).
Your phone: My Properties (the properties you are linked to), Bluetooth® Access (open gates with your phone) and Calendar (what's on at the estate).
App: Settings (notifications, calendar and access), Guided tours (a walk-through of what the app does), App health (whether all systems are operational) and About (version, legal and help). The app version is shown at the bottom of the menu.
Settings: Calendar and Gatewayss
Good to know: Lots of gates near you? Set Home screen gates to Strong so your Home screen only lists the gates with the best signal. Shake to open: when it is on, shake your phone twice to open the nearest gate while the app is open.
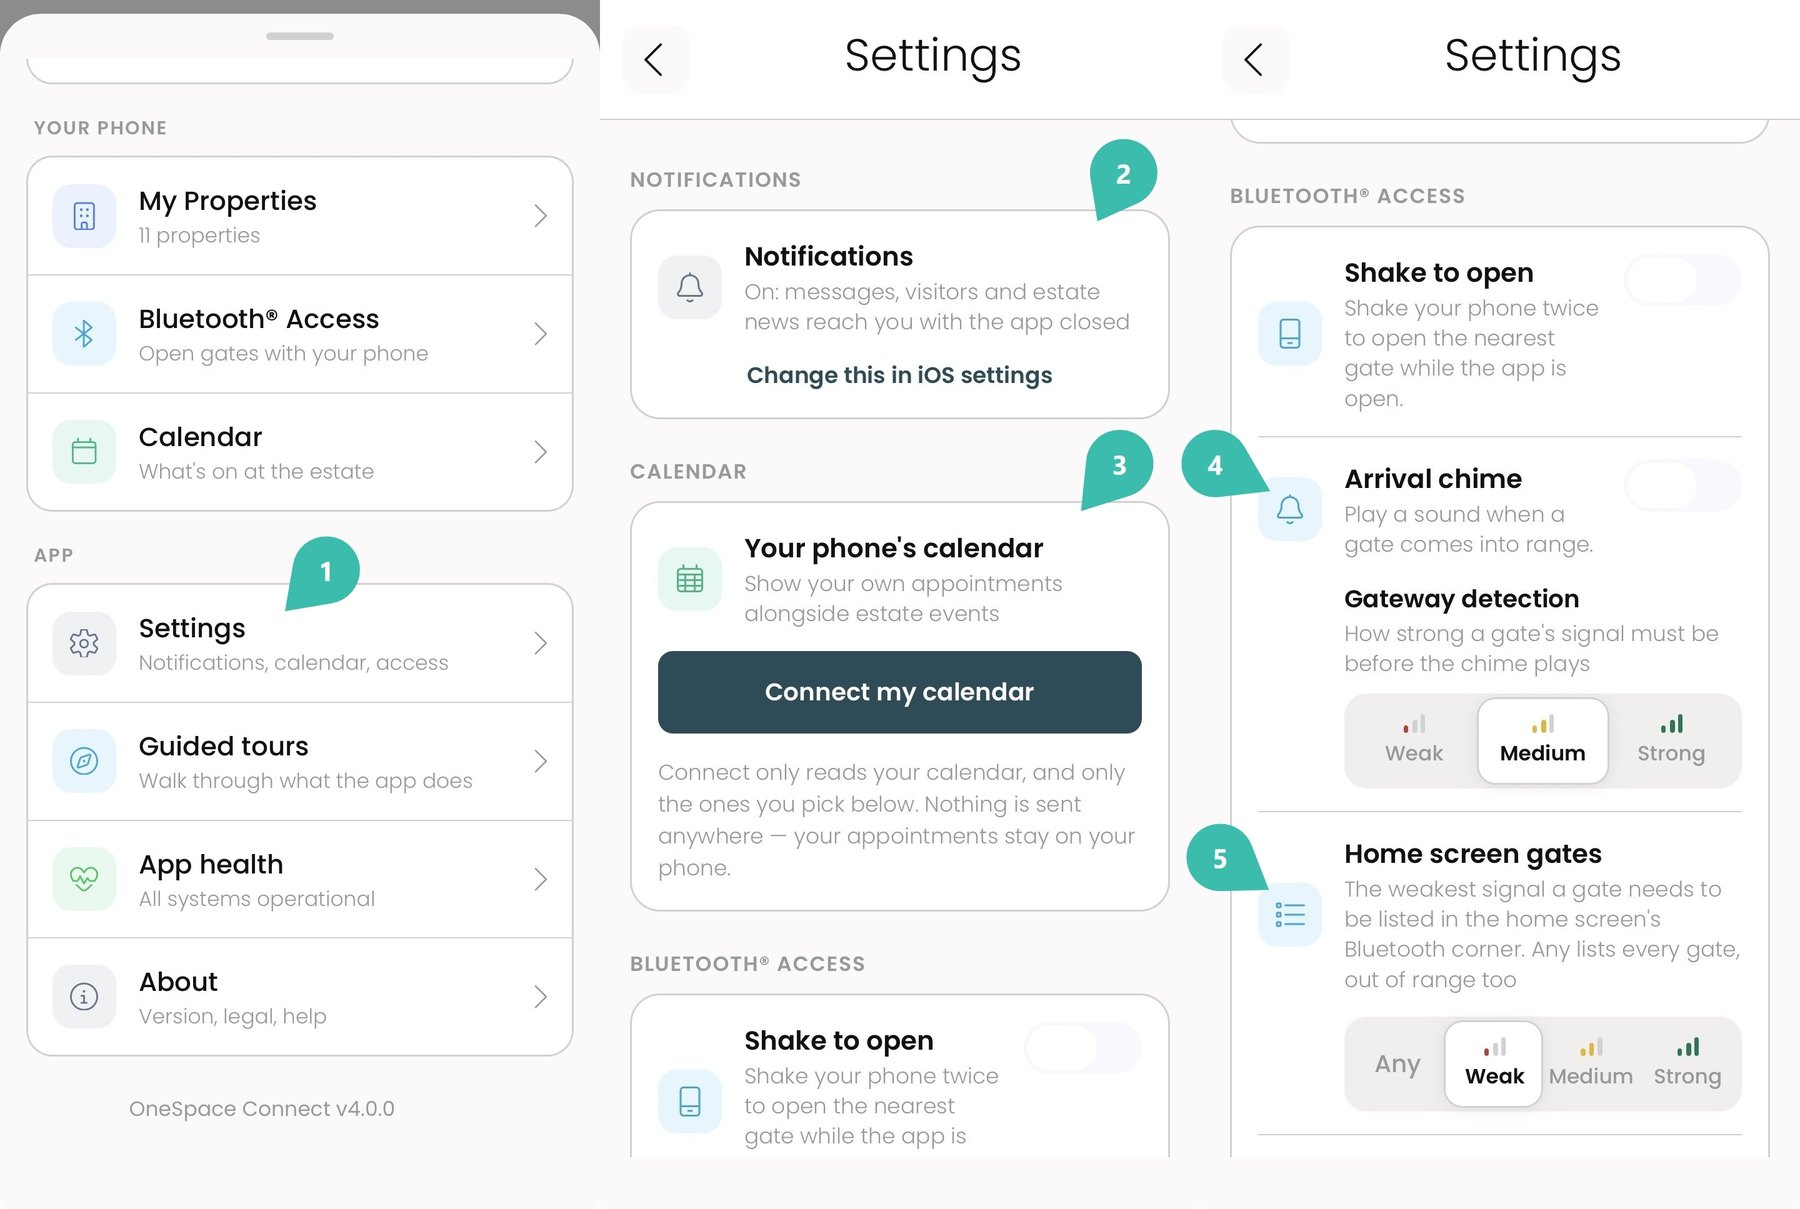
In the menu, under App, tap Settings.
Notifications: shows whether notifications are on. When they are on, messages, visitors and estate news reach you even when the app is closed. To change this, use your phone's settings.
Your phone's calendar: tap Connect my calendar to show your own appointments alongside estate events in the Connect calendar. Connect only reads the calendars you pick. Nothing is sent anywhere, and your appointments stay on your phone.
Arrival chime: turn it on to play a sound when a gate comes into range. Use Gateway detection (Weak, Medium or Strong) to set how strong a gate's signal must be before the chime plays.
Home screen gates: choose the weakest signal a gate needs to be listed on the Home screen: Any, Weak, Medium or Strong. Any lists every gate, even ones out of range.
Settings: Bluetooth Access
Good to know: Pinned gates stay on your Home screen list whatever their signal strength. Other gates follow your Home screen gates setting. If a gate you should have access to is listed under No access, contact your site manager.
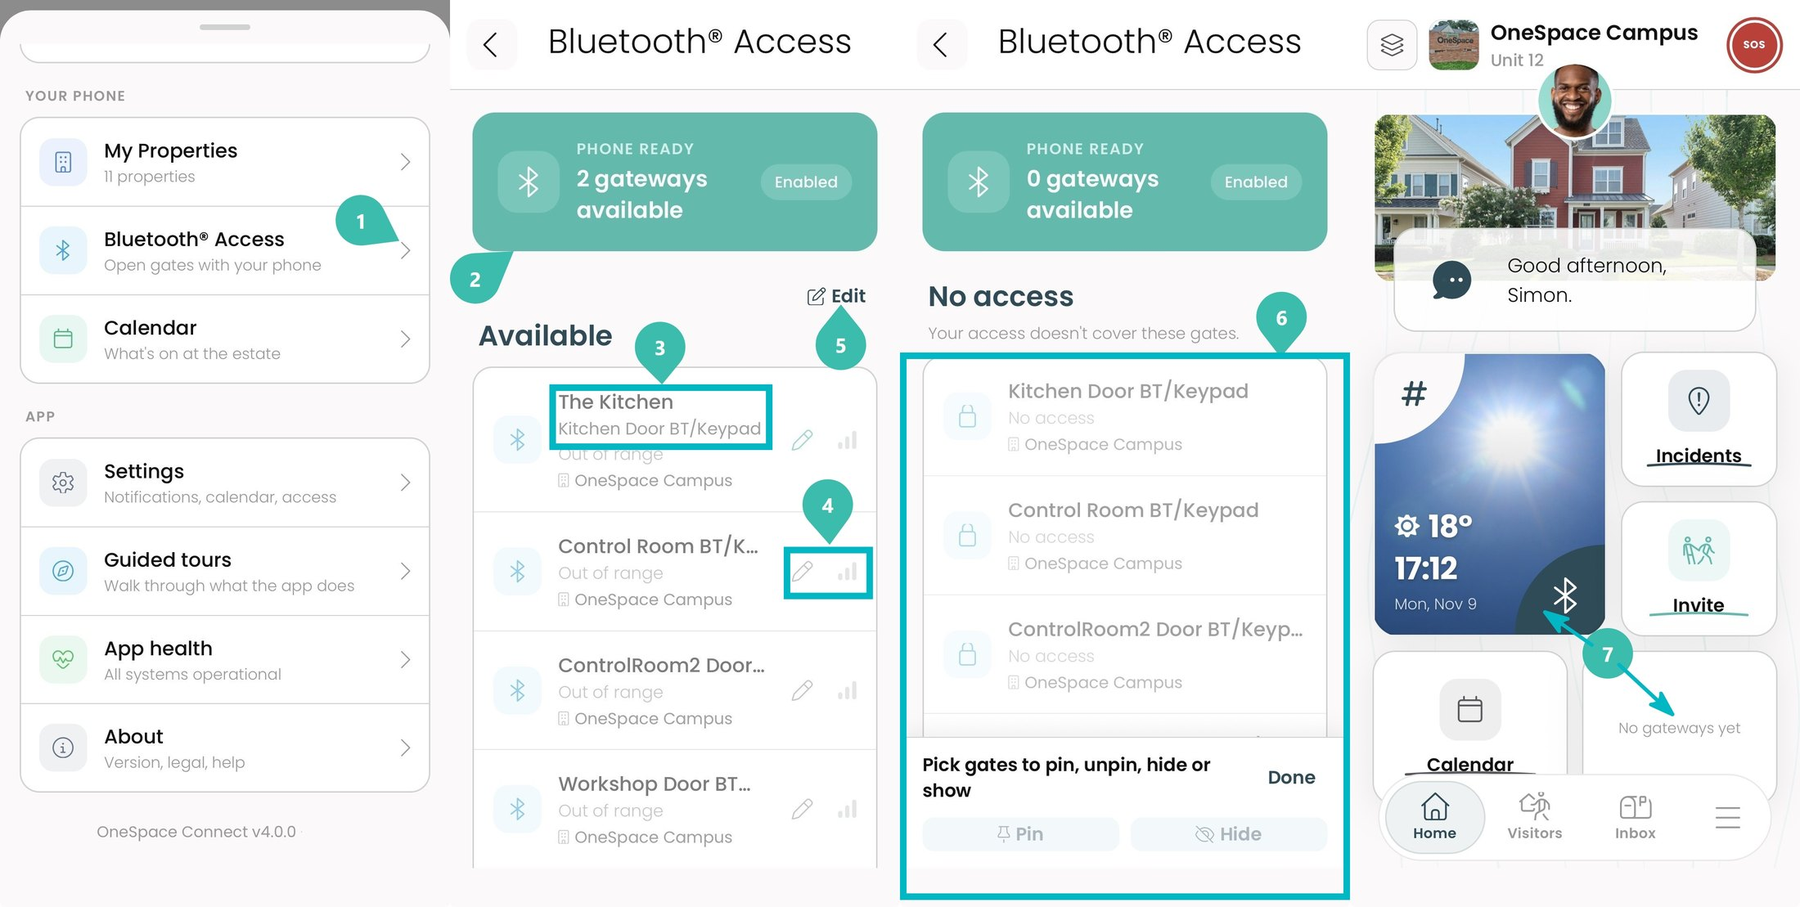
In the menu, under Your phone, tap Bluetooth® Access.
Phone ready: shows whether your phone is ready to use Bluetooth access, and how many gateways are available to you.
Available: the gates you have access to. If you have renamed a gate, your name is shown above the name your site manager chose.
Tap the pencil to give a gate your own name. The signal bars show how strong the gate's signal is relative to your phone.
Tap Edit to choose which gates show on your Home screen.
No access: the gates your access doesn't cover. In Edit, pick gates, then tap Pin to keep them on your Home screen list whatever their signal strength, or Hide to remove gates you don't want to see. Tap Done when you're finished.
The gates you pin or show appear in the gateway tile on the Home screen.